80 gal shallow reef (sps…..I think)

Cycleguy0623

Active Member
View Badges
Joined
Dec 18, 2015
Messages
198
Reaction score
173
Rating - 0%
0   0   0
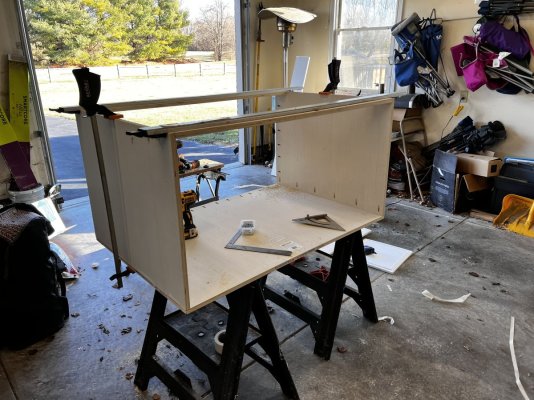
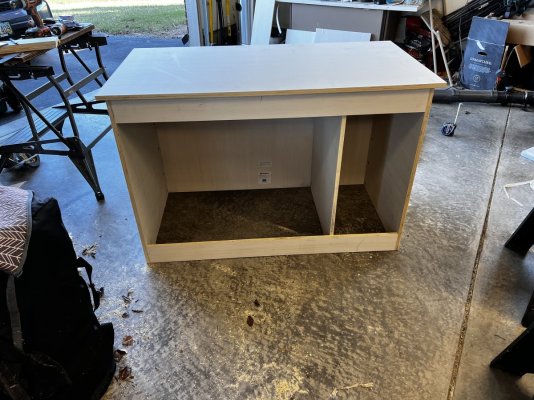
Well I have been playing around with a 32gal AIO since we moved houses and I had to take down my Reefer 550. I have always loved the shallow reef look and I love the space it gives for the scape. This week I picked up a Sephora 80gal shallow (48x24x16). Starting a stand build tomorrow out of 3/4 plywood with some 2x4 and 2x6 bracing for strength.

We will move over 30lbs of rock from the AIO to seed the new tank and add new real reef rock to fill in.

Equipment list:
Core 20 return pump (back up core 20 on mixing station)
Apex pro
2 xr15 g5 pro (moving up to 4 as I can)
Two Finix 200 watt heaters with ink bird controler
One MP10
Two MP40
One maxspec gyre 350 cloud or AI variant (need)
Some kind of UV (need)
Reef Octo Elite 150
Trigger systems Platinum 26 sump
Apex AKT auto top off
Plank auto feeder
Apex DOS for auto water changes
Apex Trident
Reef factory KH Keeper
Reef factory dosing pump x3
Kalk Stirer
Kamore continue duty pump
Pax Bellum n18


I will be running a Refugium and some additional bio bricks in the sump. I will be ordering some Tampabay live rock as well as live sand to help drive diversity in the Biome. The rock will be just splashed in but I think the full sanded will be from them.

Stock list Fish: (in progress)
2 clowns
1 Tomni Tang
1 Aiptasia eating file fish
2 scarlet cleaner shrimp
1 orchid dottyback
Some kind of wrasse
Maybe a small school of chromas

IMG_5430.jpeg
 
Last edited:

DIYreefer

Well-Known Member
View Badges
Joined
Oct 27, 2020
Messages
717
Reaction score
1,040
Location
Tx
Rating - 100%
10   0   0
Sounds like it's going to be awesome!

FYI, if you're relatively experienced eith woodworking (or the person you have to build your stand is) then 3/4" plywood alone is plenty strong enough to support your tank if built properly. My 125g system sits on a stand made solely out of 3/4" plywood.

Granted, there is nothing wrong with adding additional support. I just figured I would mention it, might save you some valuable real estate inside the stand.

Edit: I forgot to say, I've been using those cheap jebao uv sterilizer from Amazon and they've been great. I've got two running currently, and will have another once my newest system is up and running. You really can't beat them for what they cost. They're almost disposable.
 
OP
OP
Cycleguy0623

Cycleguy0623

Active Member
View Badges
Joined
Dec 18, 2015
Messages
198
Reaction score
173
Rating - 0%
0   0   0
Sounds like it's going to be awesome!

FYI, if you're relatively experienced eith woodworking (or the person you have to build your stand is) then 3/4" plywood alone is plenty strong enough to support your tank if built properly. My 125g system sits on a stand made solely out of 3/4" plywood.

Granted, there is nothing wrong with adding additional support. I just figured I would mention it, might save you some valuable real estate inside the stand.

Edit: I forgot to say, I've been using those cheap jebao uv sterilizer from Amazon and they've been great. I've got two running currently, and will have another once my newest system is up and running. You really can't beat them for what they cost. They're almost disposable.
Thanks! I am pretty experienced with woodwork but I also tend to overbuild things lol.
I have the main box all cut up so I may just join the plywood and see how it feel with some bracing. Most of the commercially available stands are honestly worse than 3/4 plywood and they hold up so 3/4 white wood plywood should be plenty.

I have not looked at the jebao UV at all. Honestly just knowing myself I’m better off going with higher end gear or I’ll just upgrade to it anyway.
 
OP
OP
Cycleguy0623

Cycleguy0623

Active Member
View Badges
Joined
Dec 18, 2015
Messages
198
Reaction score
173
Rating - 0%
0   0   0
Spent some time today working on the stand! It’s coming along nicely. I have a sump area and an electronics area with a small wire chase in the back on the divider. Just need to drill some wire holes and overflow holes. Going to add a bottom shelf and some braces to the top just to be safe. The door is going to be two pieces that attach by magnets so I can remove the whole front panel.
 

Attachments

  • IMG_5461.jpeg
    IMG_5461.jpeg
    251.2 KB · Views: 54
  • IMG_5463.jpeg
    IMG_5463.jpeg
    254.2 KB · Views: 47

kevgib67

7500 Club Member
View Badges
Joined
Apr 16, 2022
Messages
9,375
Reaction score
43,743
Location
Canfield, Ohio
Rating - 0%
0   0   0
Spent some time today working on the stand! It’s coming along nicely. I have a sump area and an electronics area with a small wire chase in the back on the divider. Just need to drill some wire holes and overflow holes. Going to add a bottom shelf and some braces to the top just to be safe. The door is going to be two pieces that attach by magnets so I can remove the whole front panel.
I saved a lot of money building my stand using balsa wood. Going to be a great build, following.
 

Coalminer

Community Member
View Badges
Joined
Aug 11, 2023
Messages
30
Reaction score
18
Location
NOVA
Rating - 0%
0   0   0
I love this style of tank. It’s basically what I was trying to do before I switched based on what was available locally. I love the look of a wide shallow tank.
 
OP
OP
Cycleguy0623

Cycleguy0623

Active Member
View Badges
Joined
Dec 18, 2015
Messages
198
Reaction score
173
Rating - 0%
0   0   0
I love this style of tank. It’s basically what I was trying to do before I switched based on what was available locally. I love the look of a wide shallow tank.
I have alwayse loved this kind of tank as well! Just could never go this wide before front to back. I’m excited to scape it! Next up though is finishing the stand, building the door and I think we are going to build a hood to control light spill and pretty up the gear that will be on top.
 
OP
OP
Cycleguy0623

Cycleguy0623

Active Member
View Badges
Joined
Dec 18, 2015
Messages
198
Reaction score
173
Rating - 0%
0   0   0
image.jpg
Finally for the stand built minus doors. The plumbing is temporary as I need to get a few components to convert the durso to a herbi. I’m also waiting on two new ends for the used UV I picked up so I can plumb that in correctly.

Moved over about 35-40 lbs of live rock from our previous all in one and added another 20 lbs of real reef rock with a bottle of Turbo start 900. I don’t really expect to see much of a cycle with the light bio load.

Tomorrow as long as things are still stable we will move the two clowns out of QT into the display and then give it a few weeks for things to settle in. While we wait I will order pods and macro along with a refugium light.

IMG_5528.jpeg

IMG_5533.jpeg
 
OP
OP
Cycleguy0623

Cycleguy0623

Active Member
View Badges
Joined
Dec 18, 2015
Messages
198
Reaction score
173
Rating - 0%
0   0   0
Our first three critters into this tank are loving the extra space. So far it looks like the insta cycle worked well. Still working on polishing up cord management and gear configuration. The trouble with this shallow tank is getting the flow right without distorting my sand bed over and over lol.


IMG_5544.jpeg
 

XLReefer525

Active Member
View Badges
Joined
Jan 27, 2021
Messages
175
Reaction score
31
Location
Naples
Rating - 0%
0   0   0
Looking good! I'm following your progress on this. I just purchased 2 of these same tanks, and will be running both off of one large sump.
 
OP
OP
Cycleguy0623

Cycleguy0623

Active Member
View Badges
Joined
Dec 18, 2015
Messages
198
Reaction score
173
Rating - 0%
0   0   0
Looking good! I'm following your progress on this. I just purchased 2 of these same tanks, and will be running both off of one large sump.
So far I love it. Working today to convert the factory Durso to a Herbie.

The larger plan for this is to run plumbing down to the basement and connect this with a 280-350 gallon that will be going in down there. Along with a sump and frag system in the fish room. Just going slow to not give the wife a heart attack.
 
OP
OP
Cycleguy0623

Cycleguy0623

Active Member
View Badges
Joined
Dec 18, 2015
Messages
198
Reaction score
173
Rating - 0%
0   0   0
There are a couple reasons, I was able to get it mostly quiet but I still get some noise from the air in the sump. Two I can’t get the flow rate quite high enough to 10x the sump and I like to run the full triton method. Three I really like the idea of the emergency drain as we have flooded a house from a clogged durso before. It’s unlikely with a strainer on the pipe but it can still happen.
 

XLReefer525

Active Member
View Badges
Joined
Jan 27, 2021
Messages
175
Reaction score
31
Location
Naples
Rating - 0%
0   0   0
There are a couple reasons, I was able to get it mostly quiet but I still get some noise from the air in the sump. Two I can’t get the flow rate quite high enough to 10x the sump and I like to run the full triton method. Three I really like the idea of the emergency drain as we have flooded a house from a clogged durso before. It’s unlikely with a strainer on the pipe but it can still happen.
Understood and makes sense. I'm a little worried with no emergency drain. I'd love to see how you convert it when you are done.
 
OP
OP
Cycleguy0623

Cycleguy0623

Active Member
View Badges
Joined
Dec 18, 2015
Messages
198
Reaction score
173
Rating - 0%
0   0   0
Just a quick update, the tank is mostly up and running well. Got the UV added on yesterday and a local member @dangles happened to over order Tampa’s bay live sand so I added 40lbs of that. This was my first go with UV and my water is basically not there anymore. I am shocked how much it cleared up. Should finish the new drain plumbing get the skimmer on and doors on this weekend.

Also got a new addition coming. A beautiful white tail tang is going through QT right now and will be the next addition.

IMG_5573.jpeg IMG_5574.jpeg IMG_5575.jpeg
 

Attachments

  • IMG_5555.mov
    19.4 MB

Cool Ethan

Active Member
View Badges
Joined
May 19, 2022
Messages
132
Reaction score
115
Location
Colorado
Rating - 0%
0   0   0
Looking great! What made you choose the 80 shallow instead of the standard 120 with the same footprint? Just prefer the look of a shallow tank?
 

Cool Ethan

Active Member
View Badges
Joined
May 19, 2022
Messages
132
Reaction score
115
Location
Colorado
Rating - 0%
0   0   0
Cool, I'll be following this. I'm contemplating exact same tank (or the 120) so have been checking out aquascapes for the shallow builds.
 

Reefing threads: Do you wear gear from reef brands?

  • I wear reef gear everywhere.

    Votes: 20 13.4%
  • I wear reef gear primarily at fish events and my LFS.

    Votes: 10 6.7%
  • I wear reef gear primarily for water changes and tank maintenance.

    Votes: 1 0.7%
  • I wear reef gear primarily to relax where I live.

    Votes: 23 15.4%
  • I don’t wear gear from reef brands.

    Votes: 84 56.4%
  • Other.

    Votes: 11 7.4%
Back
Top