Any 80/20 T slot guru willing to help an newb out?

Reefer Reboot

F.V.P.!
View Badges
Joined
Jan 31, 2018
Messages
2,647
Reaction score
3,813
Location
Irvine, Ca.
Rating - 0%
0   0   0
It was pretty darn bad. Bad enough the ER decided I needed to stay overnight to correct some problems. One of the doctors even suggested a lawsuit for negligence (yes, a DOCTOR suggested that) but I don't play that sort game. Now I'm home with a catheter the size of a large ballpoint pen in a place that you really don't want one :D
Now that just makes me cringe!:confounded-face: Wishing you good luck and a speedy recovery.
I've got exnisstech's finished up (I hope) so now I'll resume yours which should be easy.
Stay tuned.
 

Reefer Reboot

F.V.P.!
View Badges
Joined
Jan 31, 2018
Messages
2,647
Reaction score
3,813
Location
Irvine, Ca.
Rating - 0%
0   0   0
If anyone ever says you'll be bored when you retire, don't believe them! Busier than ever but I found some time to finish this up for @kdx7214 . But please, go over this and verify everything as I had so many interruptions that I may have messed up somewhere.
Shown in normal position and swung out of the way.
kdx7214 light fixture front Rev 2.jpg

Close up swung position,
Rev 2 close up.jpg

Invisible wall to show needed fire blocks for mounting.
Rev 2 invisible wall fire break placement.jpg

color coded to Xcel build list.
Rev 2 color coded.jpg

Build list
kdx7214 Build List.jpg

kdx7214 build notes
Tap one end of the 12.5686” (yellow) 1515 profile with a 5/16x18 thread for mounting the inside corner bracket (4302).
Tap both ends of the 11.5” (purple) 1515 profile with 5/16x18 thread to mount the inside corner brackets (4302 green).
Use lag bolts for mounting the inside corner brackets to the newly installed fire blocks.
Mounting lights to bracket can be done as discussed earlier in thread.
And if you had any concerns about the weight, the deflection calculator shows it may deflect (sag) a whole .0004":rolling-on-the-floor-laughing:
All I ask is to see some pictures once it is all done.
Enjoy & Ready, Set, GO!:smiling-face-with-sunglasses:
 

kdx7214

Well-Known Member
View Badges
Joined
Jan 5, 2020
Messages
724
Reaction score
660
Location
Columbia, MO, US
Rating - 0%
0   0   0
If anyone ever says you'll be bored when you retire, don't believe them! Busier than ever but I found some time to finish this up for @kdx7214 . But please, go over this and verify everything as I had so many interruptions that I may have messed up somewhere.
Shown in normal position and swung out of the way.
kdx7214 light fixture front Rev 2.jpg

Close up swung position,
Rev 2 close up.jpg

Invisible wall to show needed fire blocks for mounting.
Rev 2 invisible wall fire break placement.jpg

color coded to Xcel build list.
Rev 2 color coded.jpg

Build list
kdx7214 Build List.jpg

kdx7214 build notes
Tap one end of the 12.5686” (yellow) 1515 profile with a 5/16x18 thread for mounting the inside corner bracket (4302).
Tap both ends of the 11.5” (purple) 1515 profile with 5/16x18 thread to mount the inside corner brackets (4302 green).
Use lag bolts for mounting the inside corner brackets to the newly installed fire blocks.
Mounting lights to bracket can be done as discussed earlier in thread.
And if you had any concerns about the weight, the deflection calculator shows it may deflect (sag) a whole .0004":rolling-on-the-floor-laughing:
All I ask is to see some pictures once it is all done.
Enjoy & Ready, Set, GO!:smiling-face-with-sunglasses:

Holy cow! Now that's amazing detail! I just managed to order the lights and when I can find the spare $$$ I'll order the parts and get started building! Any place you'd recommend ordering from? I've had problems in the past with extruded aluminum not being cut square on the ends and that sort of thing. Thanks again!!
 

magallonbuckinbulls

Beers, Bulls, and Reefer
View Badges
Joined
Feb 1, 2024
Messages
170
Reaction score
136
Location
SFV
Rating - 100%
1   0   0
Disclaimer: I have never worked with t slot. In fact I saw it and touched it for the first time when my new stand arrived a few days ago.
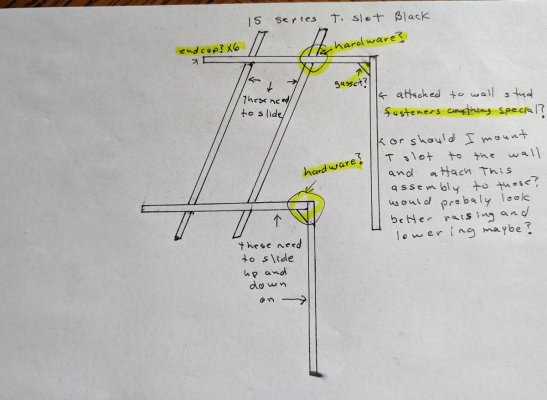
I'm designing a light mount to go over a new build. I'm thinking 15 series T slot but am open to suggestions. I want to attach 2 vertical pieces to wall studs behind the tank. I think I should be able to drill the T slot to attach it? Then I want 2 horizontal pieces to extend over the tank. I want to be able to raise and lower the horizontal pieces to adjust the height as needed. Then I want 2 horizontal pieces under the first 2 to support the lights. I want these pieces to be able slide for and aft as needed. What I need help with is what fasteners I need to assemble all of this. I struggled with legos so all the different fasters and terminology at 80/20dot net has me lost. I've attached a crude drawing with some notes and would greatly appreciate anyone who can tell me what hardware I need to assemble this.
light mount.jpg
Lmk if you still need help. I can model it for yah with hardware
 

magallonbuckinbulls

Beers, Bulls, and Reefer
View Badges
Joined
Feb 1, 2024
Messages
170
Reaction score
136
Location
SFV
Rating - 100%
1   0   0
If anyone ever says you'll be bored when you retire, don't believe them! Busier than ever but I found some time to finish this up for @kdx7214 . But please, go over this and verify everything as I had so many interruptions that I may have messed up somewhere.
Shown in normal position and swung out of the way.
kdx7214 light fixture front Rev 2.jpg

Close up swung position,
Rev 2 close up.jpg

Invisible wall to show needed fire blocks for mounting.
Rev 2 invisible wall fire break placement.jpg

color coded to Xcel build list.
Rev 2 color coded.jpg

Build list
kdx7214 Build List.jpg

kdx7214 build notes
Tap one end of the 12.5686” (yellow) 1515 profile with a 5/16x18 thread for mounting the inside corner bracket (4302).
Tap both ends of the 11.5” (purple) 1515 profile with 5/16x18 thread to mount the inside corner brackets (4302 green).
Use lag bolts for mounting the inside corner brackets to the newly installed fire blocks.
Mounting lights to bracket can be done as discussed earlier in thread.
And if you had any concerns about the weight, the deflection calculator shows it may deflect (sag) a whole .0004":rolling-on-the-floor-laughing:
All I ask is to see some pictures once it is all done.
Enjoy & Ready, Set, GO!:smiling-face-with-sunglasses:
Nice brother:)
 

Reefer Reboot

F.V.P.!
View Badges
Joined
Jan 31, 2018
Messages
2,647
Reaction score
3,813
Location
Irvine, Ca.
Rating - 0%
0   0   0
Holy cow! Now that's amazing detail! I just managed to order the lights and when I can find the spare $$$ I'll order the parts and get started building! Any place you'd recommend ordering from? I've had problems in the past with extruded aluminum not being cut square on the ends and that sort of thing. Thanks again!!
Sorry but that's something you'll have to figure on your own. I only use 80/20 website just because it is easy to work with and I already have my modeling based on their products, so I feel kind of bad steering people to other sites, but that's life. I'm sure if you were to google extruded aluminum T-slot manufacturers you will find plenty to choose from:winking-face:. Especially when it comes to the nuts and bolts. (Cough cough Amazon) One note about the nuts, with this being a rather small project, the slide in nuts should suffice and be cheaper, but on bigger projects, the roll in type can be a sanity saver. So, time to start shopping around if you wish. Don't hesitate to ask if you have questions. Good luck.
 

kdx7214

Well-Known Member
View Badges
Joined
Jan 5, 2020
Messages
724
Reaction score
660
Location
Columbia, MO, US
Rating - 0%
0   0   0
Sorry but that's something you'll have to figure on your own. I only use 80/20 website just because it is easy to work with and I already have my modeling based on their products, so I feel kind of bad steering people to other sites, but that's life. I'm sure if you were to google extruded aluminum T-slot manufacturers you will find plenty to choose from:winking-face:. Especially when it comes to the nuts and bolts. (Cough cough Amazon) One note about the nuts, with this being a rather small project, the slide in nuts should suffice and be cheaper, but on bigger projects, the roll in type can be a sanity saver. So, time to start shopping around if you wish. Don't hesitate to ask if you have questions. Good luck.

Oh! So 80/20 is a website. I didn't know that. Now I know where to look. Thanks :)
 

Reefer Reboot

F.V.P.!
View Badges
Joined
Jan 31, 2018
Messages
2,647
Reaction score
3,813
Location
Irvine, Ca.
Rating - 0%
0   0   0
Oh! So 80/20 is a website. I didn't know that. Now I know where to look. Thanks :)
I guess I could have specified that a little better. One last helpful tip for those that are unfamiliar with T-slot. There is a little tutorial video that will explain how to use the parts in the specific part numbers page which can make things easier.
 

BR260354

Active Member
View Badges
Joined
Aug 12, 2022
Messages
108
Reaction score
41
Location
The Woodlands, TX
Rating - 0%
0   0   0
@Reefer Reboot , here's one for you. I like the floating light mount from ReefDudes that was done years ago. Instead of mounting to the stand, I could mount to the wall but mount 8020 to the wall and then attach to that. Make it adjustable somehow. I put this crude drawing on TinkerCAD as an idea. This will go on a 4 ft tank.
1711075404877.png


The tubes on the "wall" would be used to attach the main mount to that. Would something like that work? I'm very much a newbie on this as well. Thanks!
Well, I think I found what I had in mind....just need to make it a single. I'm going to have it on a peninsula 500.

DIY Aluminum Light Mount For The Red Sea S-1000 | Modern And Sleek
 

Reefer Reboot

F.V.P.!
View Badges
Joined
Jan 31, 2018
Messages
2,647
Reaction score
3,813
Location
Irvine, Ca.
Rating - 0%
0   0   0
@BR260354
The video is much different than what you have in mind due to how far you will have to reach out with the lights coming from the short side end of the tank. (Lots of leverage) But it just so happens that I have designed something for your application already. Take a look at @Isaac Alves build thread, https://www.reef2reef.com/threads/isaacs-cade-1500s2-peninsula-reef-build.919947/page-3 , post #49. This light fixture allows the light to be raised/lowered and/or swung side to side for easy access. He was planning to hang some heavier lights and a wooden canopy off of it so I tried to design it to be strong. Maybe he can join in and critique it, what he likes, what he doesn't, I won't be offended, just curious.
 

BR260354

Active Member
View Badges
Joined
Aug 12, 2022
Messages
108
Reaction score
41
Location
The Woodlands, TX
Rating - 0%
0   0   0
That is quite the build. For the Cade 1500, that's a 5 footer (I believe) and he's going with 4 T5's also. Mine will be a 4 footer and I'm only driving either 2 XR30's or 2 Reefi Uno 2 Pro's with maybe a Kessil A360x just because. My profile coming over the tank might be 4ft at the most (not sure how far to come out actually). Think I would need all of that support like the build you mentioned?

Also, I'm thinking of attaching to the stand rather the wall. Would that work?

Thanks again for you time!
 

Reefer Reboot

F.V.P.!
View Badges
Joined
Jan 31, 2018
Messages
2,647
Reaction score
3,813
Location
Irvine, Ca.
Rating - 0%
0   0   0
Depending on total weight, how much movement and directions of movement it could be done differently. What is your stand made of?
 

BR260354

Active Member
View Badges
Joined
Aug 12, 2022
Messages
108
Reaction score
41
Location
The Woodlands, TX
Rating - 0%
0   0   0
Well, Reefi Uno 2 Pro is 2.2lbs. XR30 is 4.5lbs. Kessil around 1lbs....so max would be 10lbs for equipment. Weight of the profiles, not sure. Material of the cabinet, not sure on the Red Sea Reefer Peninsula 500G2+. Cabinet back panel:
1711161430694.png
 

BR260354

Active Member
View Badges
Joined
Aug 12, 2022
Messages
108
Reaction score
41
Location
The Woodlands, TX
Rating - 0%
0   0   0
After reviewing the link for Issac's build, I changed it up a bit.
1711212866026.png

I don't really need to pivot it out, but I do like to adjust the height. Do I really need to do a 1530 for riser or can I get away with a 1515-ULS? The length of that should be around 72". For the length over the tank, no more than 48". For the length for the profile against the wall, figure I need enough for whatever adjustable height. With the total system height of 63", and the minimum height of lights above the water being 10" (the mount itself) and a max height of 16-18" above water, I think I could get away of wall profile being 50-60" (yellow in drawing and set to 50" roughly starting a foot above the ground). Thoughts?

Since no pivot, I may add a 45degree for support.
 

Reefer Reboot

F.V.P.!
View Badges
Joined
Jan 31, 2018
Messages
2,647
Reaction score
3,813
Location
Irvine, Ca.
Rating - 0%
0   0   0
According to Red Sea's websites info on the Red Sea Reefer Peninsula 500G2+, "The marine-spec laminated cabinets follow the contour of the glass, and are now all fortified and made of plywood.". Yeah, I think the wall mount is a much better option. If there was any deflection with the vertical piece that was mounted flush with the stand it would create a pressure point at the top of the tank since the tank is the same dimension as the stand.:eek: If you'd like, I can mock you up an idea to consider, but it might take me a couple few days to find the time to complete it. If so I'll need to know the following,
1) How far from the wall are you planning on have the tank/stand located?
2) How high is the ceiling?
3) Do you want the lifting mechanism motorized?
4) Let me know which light goes where. (IE, is one centered with tank and how far away are the others.)
5) Are there any other room constraints? (IE nearby side walls.)
 

BR260354

Active Member
View Badges
Joined
Aug 12, 2022
Messages
108
Reaction score
41
Location
The Woodlands, TX
Rating - 0%
0   0   0
I'm in the planning stages of an aquarium upgrade, so I have plenty of time. Not going to really start until after our master bathroom remodel (that's another joy ;-)). I appreciate your time on this. I took a look at Sketchup, but didn't want to pay $120 for something I wouldn't use that often.

Your questions:
1) How far from the wall are you planning on have the tank/stand located?
Currently, the existing aquarium is 4.5" from the back wall and just under 5.5" from the side wall. The wall that the aquarium backs to is 30 3/4" wide - it's like a little nook. I'll provide a picture.

2) How high is the ceiling?
10ft - however it backs to a stairway.

3) Do you want the lifting mechanism motorized?
Hmmm....that's an interesting option. Don't need, but I would put that in the nice to have.

4) Let me know which light goes where. (IE, is one centered with tank and how far away are the others.)
if I do a Kessil A360x, that would be in the middle. The Reefi Uno 2 Pro OR XR30 would be on either side evenly distributed over the aquarium.

5) Are there any other room constraints? (IE nearby side walls.)
Stairs. A 4 footer would fit there....had to do some selling on it!

The current aquarium is a Red Sea 200xl 23.5" W x 22.5" D x 56" H total system. So the Peninsula 500 would be higher (63" per site), 25" D and longer (49.7"), of course.

1711237479765.png


Thanks again!
 

Reefing threads: Do you wear gear from reef brands?

  • I wear reef gear everywhere.

    Votes: 32 16.2%
  • I wear reef gear primarily at fish events and my LFS.

    Votes: 11 5.6%
  • I wear reef gear primarily for water changes and tank maintenance.

    Votes: 1 0.5%
  • I wear reef gear primarily to relax where I live.

    Votes: 25 12.6%
  • I don’t wear gear from reef brands.

    Votes: 116 58.6%
  • Other.

    Votes: 13 6.6%
Back
Top