DIY Alkalinity Monitor

OP
OP
Borat

Borat

Valuable Member
View Badges
Joined
Apr 4, 2021
Messages
1,499
Reaction score
1,744
Location
United Kingdom
Rating - 0%
0   0   0
The complete build thread is here:


Ranjib

7500 Club Member
View Badges
Joined
Apr 16, 2016
Messages
9,843
Reaction score
17,058
Location
Pleasant Hill, Concord
Rating - 0%
0   0   0
Welcome to reef2reef.
very nice :).
I briefly browsed through that thread. I'll need some time to digest it :) . It will be awesome if you can summarize the build process (BOM and build guide), it will help anyone interested in building it
 

KonradTO

Valuable Member
View Badges
Joined
Aug 11, 2021
Messages
1,221
Reaction score
667
Location
Germany
Rating - 0%
0   0   0
Scientist ingegnous man from Kazakistan made a very niice project.
Following up closely both threads!
I will add my version next year. My plan was to build an all-testing device using both pH probe and color recognition with everything rotating around a central circular column.
We'll see, time is hard to find
 
OP
OP
Borat

Borat

Valuable Member
View Badges
Joined
Apr 4, 2021
Messages
1,499
Reaction score
1,744
Location
United Kingdom
Rating - 0%
0   0   0
I am pretty much following @Randy Holmes-Farley DIY Alkalinity test recipe and the device simply automates the process. All commercially made alkalinity monitors are made in the same way:

- a set of motors that act as dosing pumps and are able to measure the amount dosed. Typically there are 3 motors: (#1) for adding tank water (#2) for removing tank water and (#3) for adding titration acid. These motors need to be stepper motors - in order to exactly measure the amounts of liquid added (although the motor for removing tank water can be a non-stepper motor).
- a reaction chamber with a PH probe
- a magnetic stirrer situated underneath the reaction chamber
- electronics componens: monitor controller (Arduino Nano), a PH board (DF Robot SEN0161 kit), 5v relay (for switching the stirrer), stepper motor drivers (TMC2209/one per motor)
- additional cooling fan as stepper motor drivers and stepper motors themselves generate significant heat

For every test the monitor performs the following steps:

- remove existing water (100ml) from reaction chamber (it’s kept there in order for PH probe to be continuously submerged)
- add small amount of tank water (20ml) – this is in order to purge water in tubing connecting the tank to the reaction chamber
- remove added small amount of tank water (20ml)
- add tank water to be used for test (100ml)
- start magnetic stirrer
- start adding 0.1N acid (hydrochloric acid 10% strength) in small amounts (10% diluted hydrochloric acid) and measure PH at each step
- when PH reaches an endpoint (just below PH 4.4) stop adding acid
- based on the total amount of acid used to reach the end point, alkalinity (DKH) can be calculated as acid_vol_ml*sample_water_ml/280
- remove sample water (it will have 0 DKH)
- add 100ml of tank water (again, in order for PH probe to be continuously submerged)

Used water is discharged back into tank - this has miniscule impact on tank DKH and is completely safe.
 
OP
OP
Borat

Borat

Valuable Member
View Badges
Joined
Apr 4, 2021
Messages
1,499
Reaction score
1,744
Location
United Kingdom
Rating - 0%
0   0   0
Some extra details are:
- all parts are made by hand, no laser cutting/pre-ordering of parts (i.e. by cutting the acrylic using simple tools such as handsaw)
- 5mm acrylic used throughout (Perspex), where 20mm acrylic was required for dosing head components - this was made by gluing 4 pieces of 5mm acrylic together
 
OP
OP
Borat

Borat

Valuable Member
View Badges
Joined
Apr 4, 2021
Messages
1,499
Reaction score
1,744
Location
United Kingdom
Rating - 0%
0   0   0
The greatest challenge for me was to build a monitor without having any prior knowledge about it or ever seeing the commercially made alternative..

So the thread should be a useful guide for others to follow.. Should you have any specific questons - feel free to reach out!
 

KonradTO

Valuable Member
View Badges
Joined
Aug 11, 2021
Messages
1,221
Reaction score
667
Location
Germany
Rating - 0%
0   0   0
It's incredible you hand-cut all the parts! I had a look in the original forum thread and they look very accurately cut. May I ask what range of accuracy the peristaltic pumps need to have for the tank water intake and acidic solution dosing? What's the final KH accuracy of the device compared to color shifting solution-based tests?
 
OP
OP
Borat

Borat

Valuable Member
View Badges
Joined
Apr 4, 2021
Messages
1,499
Reaction score
1,744
Location
United Kingdom
Rating - 0%
0   0   0
It's incredible you hand-cut all the parts! I had a look in the original forum thread and they look very accurately cut. May I ask what range of accuracy the peristaltic pumps need to have for the tank water intake and acidic solution dosing? What's the final KH accuracy of the device compared to color shifting solution-based tests?

Some fellow reefers here in the UK made their own versions of these devices (I think there are only 2, me being the 3rd - in the whole of UK!). Unlike me they either bought dosing heads or 3D printed them.

As my dosing heads are hand-made, they can be made to squeeze santoprene tubing hard enough - so that once the pump is calibrated, it's 100% accurate (seriously - you can make it as accurate is you want to). Think of pump accuracy as within 1% max - so DKH 9.1 could be DKH 9.11 or DKH 9.09 (that's nothing really!).

The main weakness to accuracy (in my opinion) comes via PH probe and PH board. For the PH development board - I use a relatively cheat DF Robot v1 PH board (this is not as cheap as some Chinese unbranded imitations), for higher accuracy I would recommend Atlas Scientific PH board instead (I have heard about them but never used before). For the PH probe itself I use Extech Instriuments PH probe - it's a decent quality probe that's probably adequate for this task.

But even with my relatively cheap PH board - I would (probably in 4 out of 5 tests) get exactly the same DKH (to 1 decimal place) if I rerun the test... So the overall accuracy is better than 0.1 DKH..

As compared to other test kits - I am still digesting it.. My monitor is giving the (broadly) same (+/- 0.2DKH) DKH as Salifert test (I always used Salifert), but I still have my open questions after I read an excellent article on this site:
 
Last edited:
OP
OP
Borat

Borat

Valuable Member
View Badges
Joined
Apr 4, 2021
Messages
1,499
Reaction score
1,744
Location
United Kingdom
Rating - 0%
0   0   0
Prior to building this monitor I built a DIY calcium reactor (and DIY peristalstic pump for it)..


This is where I mastered the technique of building dosing pumps. My main source of knowledge/aspiration (although with limited amount of details) for building my first peristaltic pump was actually here:
 

KonradTO

Valuable Member
View Badges
Joined
Aug 11, 2021
Messages
1,221
Reaction score
667
Location
Germany
Rating - 0%
0   0   0
Prior to building this monitor I built a DIY calcium reactor (and DIY peristalstic pump for it)..


This is where I mastered the technique of building dosing pumps. My main source of knowledge/aspiration (although with limited amount of details) for building my first peristaltic pump was actually here:
Thanks for the link! I think I will get some (a lot) of ideas for my personal version of this device. I never thought of building my own pump! Basically the tighter you make the bearings around the tubes the more you get precise dosing (less liquid per each step pass through them) right?
 

Daniel@R2R

Living the Reef Life
View Badges
Joined
Nov 18, 2012
Messages
37,517
Reaction score
63,980
Location
Fontana, California
Rating - 100%
1   0   0
Very very cool!! Thanks for sharing with us!!
 

Ranjib

7500 Club Member
View Badges
Joined
Apr 16, 2016
Messages
9,843
Reaction score
17,058
Location
Pleasant Hill, Concord
Rating - 0%
0   0   0
I am pretty much following @Randy Holmes-Farley DIY Alkalinity test recipe and the device simply automates the process. All commercially made alkalinity monitors are made in the same way:

- a set of motors that act as dosing pumps and are able to measure the amount dosed. Typically there are 3 motors: (#1) for adding tank water (#2) for removing tank water and (#3) for adding titration acid. These motors need to be stepper motors - in order to exactly measure the amounts of liquid added (although the motor for removing tank water can be a non-stepper motor).
- a reaction chamber with a PH probe
- a magnetic stirrer situated underneath the reaction chamber
- electronics componens: monitor controller (Arduino Nano), a PH board (DF Robot SEN0161 kit), 5v relay (for switching the stirrer), stepper motor drivers (TMC2209/one per motor)
- additional cooling fan as stepper motor drivers and stepper motors themselves generate significant heat

For every test the monitor performs the following steps:

- remove existing water (100ml) from reaction chamber (it’s kept there in order for PH probe to be continuously submerged)
- add small amount of tank water (20ml) – this is in order to purge water in tubing connecting the tank to the reaction chamber
- remove added small amount of tank water (20ml)
- add tank water to be used for test (100ml)
- start magnetic stirrer
- start adding 0.1N acid (hydrochloric acid 10% strength) in small amounts (10% diluted hydrochloric acid) and measure PH at each step
- when PH reaches an endpoint (just below PH 4.4) stop adding acid
- based on the total amount of acid used to reach the end point, alkalinity (DKH) can be calculated as acid_vol_ml*sample_water_ml/280
- remove sample water (it will have 0 DKH)
- add 100ml of tank water (again, in order for PH probe to be continuously submerged)

Used water is discharged back into tank - this has miniscule impact on tank DKH and is completely safe.
Awesome. Thank you so much
 
OP
OP
Borat

Borat

Valuable Member
View Badges
Joined
Apr 4, 2021
Messages
1,499
Reaction score
1,744
Location
United Kingdom
Rating - 0%
0   0   0
Thanks for the link! I think I will get some (a lot) of ideas for my personal version of this device. I never thought of building my own pump! Basically the tighter you make the bearings around the tubes the more you get precise dosing (less liquid per each step pass through them) right?
Not quite. The accuracy of positioning of ball bearings (and their number) will determine how quiet your pump will be:
- if the ball bearings are slightly non-central, you will get the oscilating noise from the pivot going up and down
- if there is not enought rows of ball bearings (e.g. if you make the roller with only 4 rows of ball bearings), you will also end up with pivot assembly wobbling a bit
- larger number of rows of ball bearings obviously means less liquid pumped for each turn (which may be a problem if the pump is for calcium reactor and needs to pump, say 200ml / min) but higher volumetric precision

Think of a dosing head.. it needs to be built (to the last 0.25mm) precisely in such a way that it squeezes santoprene by precisely the required amount:
- If santoprene tubing is not squeezed enough, water may back-flow (caused by differential in water levels) or, if some air gets in the tubing, the pump may fail to work at all
- If santoprene tubing is squeezed too hard, the motor may not have enough power to turn the roller (squeezing it harder than required does NOT really change the amount of liquid pumped)..

Therefore ideally santoprene tubing needs to be squeezed by (exactly) a certain amount (and not greater than that).

With the pivot assembly (as I use, it's similar to Kamoer FX-STP pump) pivot manufacturing accuracy is much less important. Pivot arch just needs to have a slightly larger diameter than the roller (as measured to protruding ball bearings edges) - but it does not matter whether it will be 2mm larger or 4mm larger.. You can adjust the force with which pivot will squeeze the tubing using the adjustment screw.

20210728_161515.jpg
 
Last edited:
OP
OP
Borat

Borat

Valuable Member
View Badges
Joined
Apr 4, 2021
Messages
1,499
Reaction score
1,744
Location
United Kingdom
Rating - 0%
0   0   0
The precision to dose small volumes (acid ) is achieved by using santoprene tubing with smaller diameter:
- for tank water addition/removal pump, it's 3.2 ID tubing (1ml ~ 1.5 turns of roller)
- for acid addition it's 1.6mm ID tubing (1ml ~ 4.5 turns of roller)

Obviously with Nema 17 stepper motor and TMC2209 driver I can turn the roller by 1/256 turn at a time, so 1ml is can split into 1152 increments (in reality the minimum acid increment I use is much larger and corresponds to 0.1DKH change. That's roughtly 0.035ml or 1/7 roller turn)..
 
Last edited:

KonradTO

Valuable Member
View Badges
Joined
Aug 11, 2021
Messages
1,221
Reaction score
667
Location
Germany
Rating - 0%
0   0   0
The precision to dose small volumes (acid ) is achieved by using santoprene tubing with smaller diameter:
- for tank water addition/removal pump, it's 3.2 ID tubing (1ml ~ 1.5 turns of roller)
- for acid addition it's 1.6mm ID tubing (1ml ~ 4.5 turns of roller)

Obviously with Nema 17 stepper motor and TMC2209 driver I can turn the roller by 1/256 turn at a time, so 1ml is can split into 1152 increments (in reality the minimum acid increment I use is much larger and corresponds to 0.1DKH change. That's roughtly 0.035ml or 1/7 roller turn)..
OK now I got it. Thanks for the explanation!
 
OP
OP
Borat

Borat

Valuable Member
View Badges
Joined
Apr 4, 2021
Messages
1,499
Reaction score
1,744
Location
United Kingdom
Rating - 0%
0   0   0
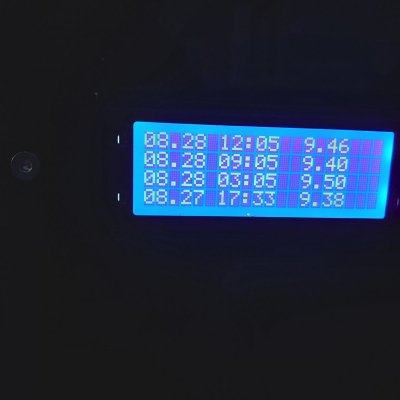
Now the monitor is a complete hands-off device, I have scheduled 4 tests to be run daily:
- 9am (morning)
-12pm (noon)
-3pm (afternoon)
-3am (nighttime)

I am running a DIY calcium reactor (2 chambers, total media volume = 7L) with a DIY PH controller (2 PH probes) and a DIY peristaltic pump, this seem to achieve quite an impressive DKH stabillity (it's an SPS tank, although I would describe it as "SPS beginner").

Considering I am a complete newbie to the concept (calcium reactor) - it's not bad at all!

20210828_125232.jpg
 

Appoloreefer

Active Member
View Badges
Joined
May 26, 2021
Messages
167
Reaction score
139
Location
Spring Hill, FL
Rating - 0%
0   0   0
Hello folks from US&A. Warm hello from a friendly nation of Kazakistan!

Please check out my video for a DIY Alkalinity monitor that I built myself!


Cheers,

Borat.

There is no words so how do we know you built it? Welcome to the forum
 

Reefing threads: Do you wear gear from reef brands?

  • I wear reef gear everywhere.

    Votes: 17 15.3%
  • I wear reef gear primarily at fish events and my LFS.

    Votes: 6 5.4%
  • I wear reef gear primarily for water changes and tank maintenance.

    Votes: 0 0.0%
  • I wear reef gear primarily to relax where I live.

    Votes: 18 16.2%
  • I don’t wear gear from reef brands.

    Votes: 62 55.9%
  • Other.

    Votes: 8 7.2%
Back
Top