"DIY" skimmer bubble trap and bio filtration 2:1

chaostactics

Valuable Member
View Badges
Joined
Jul 5, 2010
Messages
1,155
Reaction score
706
Location
Maryland
Rating - 0%
0   0   0
Actually 3:1 A skimmer riser, bubble trap, and bio filtration all in one!

I got a new redsea RSK 300 skimmer and I hate it! Well actually there are a number of things I love about it but it's a microbubble factory! And since it's bottom discharge there's no easy way, like a traditional PVC pipe output, to redirect effluent to a different chamber or bubble trap device... Until now.

I had some bioblock that I got in trade a while ago and it's fairly close to the size of the footprint of the skimmer.

This is what I came up with.
IMG_20201101_122353.jpg


Not e: I strongly recommend cycling the piece of bio block in a bucket of your tank water with a power head for a few days to 1. soften up a block a little bit to make it a little less brittle and easier to carve without cracking the block. 2. Impregnate the block with bacteria from your tank. 3. Make the block less likely to cause a cycle as you have a sudden bacterial bloom spurred on by the extra surface area from the block.

Another tip is after everything's all carved out in your fitment is good. Give the block a good rinse with tank water from the bucket or from a water change to get all of the dust and crumbles out of the block so you don't end up with a bunch of extra junk in your sump.

Last tip. As you're cutting out the little divots for the screws and feet and the spindle on the output be very careful not to cut too deep as you'll get a lot of rub from the bio block against the output adjustment plate and it will be more difficult to turn the valve to adjust the skimmer
 
Last edited:
OP
OP
C

chaostactics

Valuable Member
View Badges
Joined
Jul 5, 2010
Messages
1,155
Reaction score
706
Location
Maryland
Rating - 0%
0   0   0
So this functions as a skimmer riser giving me about 2/3" lift, a bubble trap, and biofiltration with forced flow since the effluent of the skimmer pushes out through the block.

Warning if you do a modification like this bioblock is a very very fragile material. Good news is it's very easy to carve with something like a toothpick skewer or even a fairly dull scalpel.

step one was to cut the bio block to match the footprint or as close as I could get to it since I didn't have a 10-in piece of block.
IMG_20201101_120144.jpg
IMG_20201101_120151.jpg
 
OP
OP
C

chaostactics

Valuable Member
View Badges
Joined
Jul 5, 2010
Messages
1,155
Reaction score
706
Location
Maryland
Rating - 0%
0   0   0
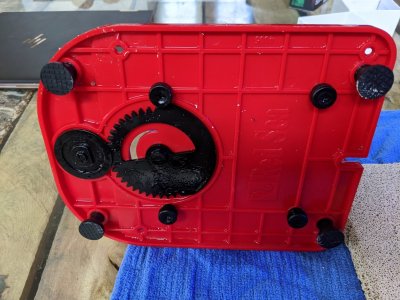
Ultimately you'll have to carve out a space for the four screws on the bottom that hold the motor plate in place, plus the feet (although this steps is optional since the skimmer will now be sitting on top of the bio block), a tiny little divot for the pivot point on the adjustable bubble plate output, and a little notch for the power cord.

After cutting the block down to size step two is to strip the base plate of all of its screws and feet lay it on top of the bio block and use something sharp such as a disposable bamboo skewer to poke holes in the plate where you're going to carve out spaces for each of the screws and everything else protruding from the bottom of the plate.
IMG_20201101_120232.jpg
IMG_20201101_120257.jpg
IMG_20201101_120453.jpg
IMG_20201101_120151.jpg
 
OP
OP
C

chaostactics

Valuable Member
View Badges
Joined
Jul 5, 2010
Messages
1,155
Reaction score
706
Location
Maryland
Rating - 0%
0   0   0
After you've marked off the spots where the screws, feet, and plate pivot point are going to protrude into the block. You can now use the screws as well as the feet as a guide for how big around and how deep to cut each hole to accommodate them.
IMG_20201101_120559.jpg
IMG_20201101_120616.jpg
IMG_20201101_120715.jpg
 
OP
OP
C

chaostactics

Valuable Member
View Badges
Joined
Jul 5, 2010
Messages
1,155
Reaction score
706
Location
Maryland
Rating - 0%
0   0   0
Again be super careful when you're doing the carving as it's a double-edged sword how fragile material is. It carved super easily but it also breaks super easily.

I cut out a divot the height of each of the heads of the thumb screws that hold on the motor plate. And cut out a divot for each foot on the bottom of the skimmer base plate to the depth of just where the flare on the foot ends.
IMG_20201101_120757.jpg
IMG_20201101_121639.jpg
 
OP
OP
C

chaostactics

Valuable Member
View Badges
Joined
Jul 5, 2010
Messages
1,155
Reaction score
706
Location
Maryland
Rating - 0%
0   0   0
If you do happen to crack or chip the block a little bit don't panic (and don't throw it across the room because it'll explode in a thousand little tiny pieces) It is fixable as long as you haven't completely crumbled whatever you've broken.

I dropped the block on the corner when I was picking up to dry fit the bottom of the skimmer. because it's so porous you're going to need a heaping amount of super glue but it also bonds really well because of the irregular edges. Glue it up and then soak it in tank water from your bucket for about 15 seconds and the glue will set.

IMG_20201101_122022.jpg
IMG_20201101_122030.jpg
 
OP
OP
C

chaostactics

Valuable Member
View Badges
Joined
Jul 5, 2010
Messages
1,155
Reaction score
706
Location
Maryland
Rating - 0%
0   0   0
Here's the finished product with a block nice and snugged up against the bottom of the skimmer. The corner that was glued after chipping is showing in this attached picture.
IMG_20201101_122353.jpg
 
OP
OP
C

chaostactics

Valuable Member
View Badges
Joined
Jul 5, 2010
Messages
1,155
Reaction score
706
Location
Maryland
Rating - 0%
0   0   0
Reassemble the whole skimmer and carefully set it in your sump while holding the bio block to the bottom of the skimmer so it doesn't fall off and chip or break as you're putting the skimmer in the tank. You will have to return the skimmer based on the new depth of the water relative to the skimmer because you've added half an inch or more of rise.

There's also still potential for some bacterial bloom so you might find yourself having to tune the skimmer a little bit until everything settles back out.

Part of the other issue why I didn't like the skimmer was I could never quite get it to foam dry enough. I was either getting no skimmate or very wet skimmate. It took me a little while to realize that the skimmer was about a third of an inch to half an inch deeper and then the maximum recommended depth per the instructions so that one's on me.

IMG_20201101_135724.jpg
 

Being sticky and staying connected: Have you used any reef-safe glue?

  • I have used reef safe glue.

    Votes: 135 88.2%
  • I haven’t used reef safe glue, but plan to in the future.

    Votes: 9 5.9%
  • I have no interest in using reef safe glue.

    Votes: 6 3.9%
  • Other.

    Votes: 3 2.0%
Back
Top