Equipment Review: Aquarium Engineering ACR (Automatic Calcium Reactor)

PSU4ME

Active Member
View Badges
Joined
Feb 11, 2013
Messages
446
Reaction score
308
Location
Boston
Rating - 0%
0   0   0
I just got off the phone with Bill and it was refreshing to hear him talk through what’s happened and how they’ve fixed things as they go on. I too am one who hates chasing ph probes.

Placing my order for an 8” stacked reactor tmw.
 

Mark Gray

2500 Club Member
View Badges
Joined
Jul 13, 2015
Messages
2,960
Reaction score
2,832
Location
Athens GA
Rating - 0%
0   0   0
I am curious for those that have used this thing for a while whether you’re a net thumbs up or down? Would you recommend it if asked? A reefing friend of mine (who does not do social media .... hard to argue he’s wrong LOL) inquired of me.
I give it thumbs up. I have heard and I have a friend that hates Bill. I have not had a single problem with Bill. Stuff is well built, only thing I wish is they would keep controllers available for immediate switch out. It may be coming not sure.
 

PSU4ME

Active Member
View Badges
Joined
Feb 11, 2013
Messages
446
Reaction score
308
Location
Boston
Rating - 0%
0   0   0
I just bought mine and I feel like I want to ask Bill what the cost would be to have a second on hand. Love redundancy but I’ve got a bunch of 2 part here.

When asked the question of “what happens if the controller dies?” He said I’ll just send you another. I like that. Trying to get Geo to respond or Jeff to agree that anything is wrong with his reactor would be harder!
 

Kyl

And how does it feel like, to wake up in the sun
View Badges
Joined
May 11, 2016
Messages
2,474
Reaction score
3,140
Location
humble.fish/community
Rating - 0%
0   0   0
So the general consensus is if you have a fish room / remote sump, great. If this unit is in the same room as the display tank, and you at all care about noise, even housed in a cabinet, not great.

That about right?
 

Manny Tavan

Active Member
View Badges
Joined
Oct 30, 2017
Messages
174
Reaction score
287
Rating - 0%
0   0   0
Took mine down cause it’s too loud
 

Attachments

  • BABB8E8C-04E0-4BF4-96B2-C311A60010F1.jpeg
    BABB8E8C-04E0-4BF4-96B2-C311A60010F1.jpeg
    136.1 KB · Views: 98
  • A9288FB7-BE0E-44BA-A3F7-FD4D68F25A32.jpeg
    A9288FB7-BE0E-44BA-A3F7-FD4D68F25A32.jpeg
    131.5 KB · Views: 89

Manny Tavan

Active Member
View Badges
Joined
Oct 30, 2017
Messages
174
Reaction score
287
Rating - 0%
0   0   0
I just bought mine and I feel like I want to ask Bill what the cost would be to have a second on hand. Love redundancy but I’ve got a bunch of 2 part here.

When asked the question of “what happens if the controller dies?” He said I’ll just send you another. I like that. Trying to get Geo to respond or Jeff to agree that anything is wrong with his reactor would be harder!
It’ll be interesting to see how long it takes you to get it. A lot of people are waiting 1+ year. Got mine in 3 months cause I submitted a payback process via PayPal. Join the Facebook group and you’ll see how many people are still waiting for theirs
 

PSU4ME

Active Member
View Badges
Joined
Feb 11, 2013
Messages
446
Reaction score
308
Location
Boston
Rating - 0%
0   0   0
It’ll be interesting to see how long it takes you to get it. A lot of people are waiting 1+ year. Got mine in 3 months cause I submitted a payback process via PayPal. Join the Facebook group and you’ll see how many people are still waiting for theirs
Already have it. He shipped the day after I paid him for it. It was in stock though so it wasn’t a build.

Still in the box, haven’t opened it yet!
 

ca1ore

10K Club member
View Badges
Joined
Oct 28, 2014
Messages
13,890
Reaction score
19,743
Location
Stamford, CT
Rating - 0%
0   0   0
I give it thumbs up. I have heard and I have a friend that hates Bill. I have not had a single problem with Bill. Stuff is well built, only thing I wish is they would keep controllers available for immediate switch out. It may be coming not sure.

Thanks! I also have a fully formed opinion of Bill .... it was the actual reactor I was curious about. Moot point since I offered to build my friend one (which I will probably regret LOL).
 

ca1ore

10K Club member
View Badges
Joined
Oct 28, 2014
Messages
13,890
Reaction score
19,743
Location
Stamford, CT
Rating - 0%
0   0   0
It’ll be interesting to see how long it takes you to get it. A lot of people are waiting 1+ year. Got mine in 3 months cause I submitted a payback process via PayPal. Join the Facebook group and you’ll see how many people are still waiting for theirs

In retrospect, I wish I had done that. It's close to two years since I originally ordered a custom item .... now he doesn't respond to emails. Live and learn.
 

Mark Gray

2500 Club Member
View Badges
Joined
Jul 13, 2015
Messages
2,960
Reaction score
2,832
Location
Athens GA
Rating - 0%
0   0   0
Thanks! I also have a fully formed opinion of Bill .... it was the actual reactor I was curious about. Moot point since I offered to build my friend one (which I will probably regret LOL).
I really like the reactor, it took me a little while to get it figured out, but it's very simple to use.
 

mattgsa

Valuable Member
View Badges
Joined
Nov 16, 2017
Messages
1,464
Reaction score
2,400
Location
San Antonio
Rating - 0%
0   0   0
I have one, I have not set it up yet, (a new tank with no corals ;Shamefullyembarrased) However, I ordered in June of 2020, and in February of 2021, I called him and asked to cancel the order. He talked me out of it and must have shipped the next day. However, when it showed up it was missing the second regulator that I ordered along with the secondary CO2 controller. He said they were on backorder. I will call him again in a couple of months to cancel that too. LOL. I'm still waiting on my request to join the Facebook group.

That being said, overall the reactor looks very well made. I'm a little concerned about all the comments on noise. I may have to get a new pump and do away with the solenoid. Would anyone be will to post a picture of their setup with a dosing pump, no solenoid.

Thanks
 

Dennis Cartier

Valuable Member
View Badges
Joined
Aug 25, 2016
Messages
1,950
Reaction score
2,388
Location
Brampton, Ontario
Rating - 0%
0   0   0
Sorry, I don't have any photos to help show the style of operation, but I can give you a run down as it is a pretty easy conversion. I have not finished removing my controller yet, but once I do, I will try and post a photo.

The controller contains 2 sets of valves. A pinch valve that meters the effluent and a solenoid that meters the CO2. They both are audible during operation, but the solenoid is quite a loud snap when it energizes. Using the peristaltic pump removes the need for the pinch valve, and in my opinion work so much better. Not hooking up the controller means that you have 3 lines going or coming from the reactor.
  • Feed line in (located on the pump intake)
  • Effluent line out (located on the reactor lid)
  • CO2 line in (located on the reactor lid)
The peristaltic pump can be installed in a push or pull setup. For pushing, you would install it on the feed line in and the effluent line out would run back directly to the tank. This would run the reactor at atmospheric pressure as the CO2 bubble would push against an open line. For a pull setup, you install the peristaltic pump on the effluent line and hook a feed pump up to the feed line in. Using this style, the CO2 bubble is pushing against the head pressure of the feed pump. This results in slightly higher DKH effluent as it runs above atmospheric pressure. This is the way I have mine running currently, but I plan to switch to a push setup when I finish removing the controller. Mine currently runs at 2 PSI, and the DKH of the effluent is super high, so the reduction in DKH should be minimal.

The CO2 line needs to connect to a solenoid valve of some kind in order for the reactor to function properly. The toggling of the solenoid by the float valve in the lid of the reactor is what makes it automated. So running without one is not really an option. However, the solenoid included in the factory controller is quite noisy. That is because it is not 1 solenoid, but 2 solenoids in series with a check valve in between. So you do need to use a solenoid, however, you don't have to use the ones included in the controller. My plans are to replace the solenoid function, and remove the controller entirely, by using a Clippard EV valve in place of the stacked solenoids. These are small, high quality, pneumatic valves that are designed for high reliability, fast operation and are very quiet. It is the same valve that powers the Carbon Doser CO2 controller people often use on their CalRx. They come in both 12v and 24v with a couple of different mounting styles and valve styles. I have purchased a 24v inline EV valve, well 10 of them actually, but I have a bunch of projects I am working on. Including an auto CO2 tank switcher.

So to replace the solenoid function in the controller, you need simply to wire a Clippard EV valve inline with the float switch on the ACR. The existing controller runs at 24v, so I purchased 24v valves to simplify the conversion. The connectors on the float valve on the ACR are a bit sloppy on mine, but I don't want to redo them just yet, so I plan to open the valve box of the controller and disconnect the float lead inside the valve box to preserve the existing connectors and keep as much length of cable. Then you simply wire the EV valve and float switch inline with the power supply salvaged from the controller and you now have a virtually silent automated ACR. You can get the Clippard valves off Ebay or buy them new. I suggest the valves with 24V, inline, with spade connectors, and FKM seals (ET-2-24-V). Again you can get the connecting cables that plug into these off Ebay or directly from Clippard. I will try to post a photo when I get my ACR running without any part of the controller being used (other than the power supply).

There is also a site selling Clippard valves with all the bits needed for a clean installation (www.diyco2regulator.com). Unfortunately I have not been able to order from them as they don't seem to ship to Canada, and they have not responded to any attempt to contact them. Hopefully they are still in business, but YMMV. If you do reach them, suggest they add Canadian ordering to their site!

Here is an example of the EV valves and connectors I purchased recently. I am still waiting for cables to arrive.
ACtC-3deF71nRcEXt9JM2YD5LBpAYrwh-EzBF4HgAdqr92gfPlpxA61KEpCRYNQpuECpmHtGKqAsqjmQ4GMRtX3MYbCfhnmSFz6qDbcLuGEvuliGatuFI9T6KH6HGuJcobVi5obrn-5fslonmqKsQ9HAvPlFeA=w717-h956-no


I agree on the build quality. These reactors are awesome and built like tanks.

Dennis
 
Last edited:

mattgsa

Valuable Member
View Badges
Joined
Nov 16, 2017
Messages
1,464
Reaction score
2,400
Location
San Antonio
Rating - 0%
0   0   0
Sorry, I don't have any photos to help show the style of operation, but I can give you a run down as it is a pretty easy conversion. I have not finished removing my controller yet, but once I do, I will try and post a photo.

The controller contains 2 sets of valves. A pinch valve that meters the effluent and a solenoid that meters the CO2. They both are audible during operation, but the solenoid is quite a loud snap when it energizes. Using the peristaltic pump removes the need for the pinch valve, and in my opinion work so much better. Not hooking up the controller means that you have 3 lines going or coming from the reactor.
  • Feed line in (located on the pump intake)
  • Effluent line out (located on the reactor lid)
  • CO2 line in (located on the reactor lid)
The peristaltic pump can be installed in a push or pull setup. For pushing, you would install it on the feed line in and the effluent line out would run back directly to the tank. This would run the reactor at atmospheric pressure as the CO2 bubble would push against an open line. For a pull setup, you install the peristaltic pump on the effluent line and hook a feed pump up to the feed line in. Using this style, the CO2 bubble is pushing against the head pressure of the feed pump. This results in slightly higher DKH effluent as it runs above atmospheric pressure. This is the way I have mine running currently, but I plan to switch to a push setup when I finish removing the controller. Mine currently runs at 2 PSI, and the DKH of the effluent is super high, so the reduction in DKH should be minimal.

The CO2 line needs to connect to a solenoid valve of some kind in order for the reactor to function properly. The toggling of the solenoid by the float valve in the lid of the reactor is what makes it automated. So running without one is not really an option. However, the solenoid included in the factory controller is quite noisy. That is because it is not 1 solenoid, but 2 solenoids in series with a check valve in between. So you do need to use a solenoid, however, you don't have to use the ones included in the controller. My plans are to replace the solenoid function, and remove the controller entirely, by using a Clippard EV valve in place of the stacked solenoids. These are small, high quality, pneumatic valves that are designed for high reliability, fast operation and are very quiet. It is the same valve that powers the Carbon Doser CO2 controller people often use on their CalRx. They come in both 12v and 24v with a couple of different mounting styles and valve styles. I have purchased a 24v inline EV valve, well 10 of them actually, but I have a bunch of projects I am working on. Including an auto CO2 tank switcher.

So to replace the solenoid function in the controller, you need simply to wire a Clippard EV valve inline with the float switch on the ACR. The existing controller runs at 24v, so I purchased 24v valves to simplify the conversion. The connectors on the float valve on the ACR are a bit sloppy on mine, but I don't want to redo them just yet, so I plan to open the valve box of the controller and disconnect the float lead inside the valve box to preserve the existing connectors and keep a much length of cable. Then you simply wire the EV valve and float switch inline with the power supply salvaged from the controller and you now have a virtually silent automated ACR. You can get the Clippard valves off Ebay or buy them new. I suggest the valves with 24V, inline, with spade connectors, and FKM seals (ET-2-24-V). Again you can get the connecting cables that plug into these off Ebay or directly from Clippard. I will try to post a photo when I get my ACR running without any part of the controller being used (other than the power supply).

There is also a site selling Clippard valves with all the bits needed for a clean installation (www.diyco2regulator.com). Unfortunately I have not been able to order from them as they don't seem to ship to Canada, and they have not responded to any attempt to contact them. Hopefully they are still in business, but YMMV. If you do reach them, suggest they add Canadian ordering to their site!

Here is an example of the EV valves and connectors I purchased recently. I am still waiting for cables to arrive.
ACtC-3deF71nRcEXt9JM2YD5LBpAYrwh-EzBF4HgAdqr92gfPlpxA61KEpCRYNQpuECpmHtGKqAsqjmQ4GMRtX3MYbCfhnmSFz6qDbcLuGEvuliGatuFI9T6KH6HGuJcobVi5obrn-5fslonmqKsQ9HAvPlFeA=w717-h956-no


I agree on the build quality. These reactors are awesome and built like tanks.

Dennis
Wow, Thank you so much for this great write-up. I was not expecting such a great response. I will certainly save this for when I set up my reactor. Again, Thank you so much.
 

Chueco

Community Member
View Badges
Joined
Dec 2, 2019
Messages
31
Reaction score
28
Rating - 0%
0   0   0
Disclaimer: This thread is intended to be an objective review of the features, performance, vulnerabilities, and experience of owning an Automatic Calcium Reactor by Aquarium Engineering. It is not a thread about the company, the owner, war stories, or what have you. Please join the conversation if you have comments, questions, or interest, and lets discuss this piece of reefing gear!

Ok, lets get started!

Aquarium Engineering ACR - Review and Walkthrough
Model Reviewed: June 2020 Stacked 8" ACR

IMG_4067.jpg
IMG_4307.jpg


I bought the unit because I like "different" reef gear, solid engineering concepts, and I dislike how my pH probe was always wandering out of calibration and getting fouled in my old Calcium Reactor. This unit seemed worth the money, whereas I must say some of the other saturation reactors are just insanely priced.

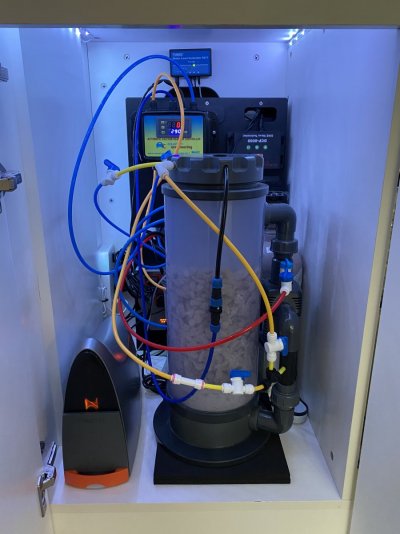
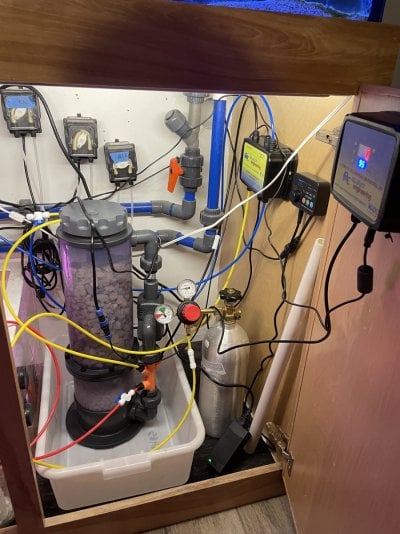
Here are pictures of it disassembled and one of it running. As you can see, it is a saturation reactor, which means, it maintains a bubble of CO2 at the top of the reactor, and recirculates this through the volume of the reactor, maintaining a low pH in the water, dissolving the media until a state of saturation is reached upon which time the CO2 stops being absorbed by the water. The alkalinity, calcium, magnesium, and trace element rich water is then dosed into the aquarium by the controller. That same controller also feeds more CO2 into the unit when the float valve in the lid says the CO2 bubble has been depleted.

In this fashion, the reactor runs with no pH probe to wander out of calibration or foul. It pushes water up through the two chambers, and then recirculates it with a sicce pump.

The reactor must be fed with a pump, and ideally from an area devoid of microbubbles.

IMG_3869.jpg
IMG_3868.jpg
IMG_4312.jpg


Here's a shot of the lid with the: Effluent out (left, clear), Purge line (middle, yellow), and CO2 recirc line (right, yellow). Also you can see the float switch cable (black).
IMG_4311.jpg


Here is a pic of the regulator that comes with the unit, you can see that it is feeding the reactor at about 8 or 9psi.
IMG_4310.jpg


Performance Review:

Construction is solid, parts are machined from PVC, the large tubes are clear PVC, and a lot of thought went into the design. Perhaps too much thought, because the units are constantly changing and being updated and improved.

The reactor is quiet during operation. In fact, the solenoids in the control module are the loudest part. Based on feedback in the facebook group, the control module is also the most failure prone portion in previous variants, though mine has been problem free.

Setup was straightforward using the instructions from AE, the unit does not come with instructions, or any assembly guidance at all, but the owner recently released a set of instructions online.

I am pleased to say that my unit was leak-free from the vendor, setup went exactly as planned, and it has been reliably churning out effluent for weeks now. Tomorrow when I get a chance I will test the reactor effluent alkalinity again, but it is very high as you would expect (30-40+dKh).

Media/Maintenance:

The suggested Magnesium media to go in the bottom chamber is remag (dolomite) and then reborn (coral skeletons) go in the top, larger, chamber. Although the new reborn (after the shutdown) is much smaller particles and seems more likely to clog and less prone to efficient water flow.

Basically, the unit then runs itself. Maintenance includes:

  • Topping off media when it runs low
  • Checking effluent potency from time to time to ensure proper operation
  • Maybe changing effluent tubing in the control box? (unknown how long it lasts getting pinched)
  • Recirculation and Feed Pump maintenance

The Control Module and valve module:

Effluent delivery is controlled by a super simple “time on, time off” control box. The top button is the “time on” that the solenoid will open for, then the bottom button is the “time off” that the solenoid will close the effluent line for. Want more alkalinity? Increase time on, or reduce time off. Want less? Reduce time on, or increase time off.

IMG_4309.jpg


The CO2 bubble float switch is a simple conductivity switch, so your Apex could just as easily read it via a break-out box and control a Carbon Doser regulator to maintain the CO2 bubble in the unit, and the effluent could just as easily be metered with a Kamoer, Versa, or Masterflex peristaltic pump, but the stock system is working well so I have not had to enact “Plan B”.

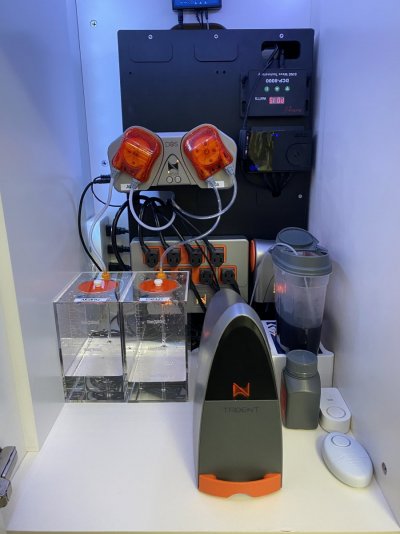
Here is the inside of the valve module. On the left you can see the CO2 control portion, a check valve and a solenoid. Then on the right, the effluent control portion, a big old solenoid to pinch the effluent tube.

IMG_3866.jpg


Final Thoughts:

So in summary, thus far, I'd give the unit an 8.5 out of 10. Only docking it 1 point for not coming with any instructions (people shouldn't have to join a facebook group to get instructions), and 0.5 point for the loud effluent control box. My unit is in a fishroom, and I can still hear the "CLUNK" of the solenoid opening and closing as it causes a water hammer. I may try a less forceful feed pump and see if that helps the situation (currently using a dedicated small magdrive). That being said, if the unit is in your living room, you may not love the bubble noises and solenoid noises. However, the unit is very solid construction, and other than the pinch-hose in the effluent control, I don't see many wear items if any, so I would expect the unit to last ages. AE uses high quality O-rings, excellent attention to detail of all machined parts, and everything fits together very well. When one buys a boutique piece of equipment, created by a largely one-man show, there are certain issues that are worth mentioning. For example if you have problems, shipping issues, need parts, etc, you need to find the owner, which can be easy or hard depending on the day, but I will say, based on the ownership experience thus far, I would buy this unit again.
Your sicce pump doesn’t leak from o ring? As soon as I open water feed valve and it builds back pressure the pump starts leaking along with the effluent to tank tubing. Maybe I’m doing something wrong! Any chance you can help me out?
 

Dennis Cartier

Valuable Member
View Badges
Joined
Aug 25, 2016
Messages
1,950
Reaction score
2,388
Location
Brampton, Ontario
Rating - 0%
0   0   0
Your sicce pump doesn’t leak from o ring? As soon as I open water feed valve and it builds back pressure the pump starts leaking along with the effluent to tank tubing. Maybe I’m doing something wrong! Any chance you can help me out?
You may have cracked the volute on the Sicce. These pumps have a ridiculously thin tubing thickness and tightening the fitting with the o-ring just a tad too much will crack the output. I speak from experience as I cracked 2 of mine in succession. I eventually made a collar for the output that reinforced it to prevent cracking when the fitting is tightened. If yours is cracked, you will need to replace it with a volute from another pump, or you can make a collar similar to what I did and glue it into place with PVC/ABS transition cement.

Dennis
 

Chueco

Community Member
View Badges
Joined
Dec 2, 2019
Messages
31
Reaction score
28
Rating - 0%
0   0   0
You may have cracked the volute on the Sicce. These pumps have a ridiculously thin tubing thickness and tightening the fitting with the o-ring just a tad too much will crack the output. I speak from experience as I cracked 2 of mine in succession. I eventually made a collar for the output that reinforced it to prevent cracking when the fitting is tightened. If yours is cracked, you will need to replace it with a volute from another pump, or you can make a collar similar to what I did and glue it into place with PVC/ABS transition cement.

Dennis
Thanks! My pump did not crack. It was user error. That pump cannot handle the pressure coming out of RODI FILTER, which I used to leak test reactor, but when I teed off from return pump in my aquarium, per instructions from Bill, it didn’t leak anymore it reached pressure balance on its own. Now it’s running smoothly. Thanks again for taking time to reply!
 

Attachments

  • B81B7A41-E044-4590-A1B9-D31416C23873.jpeg
    B81B7A41-E044-4590-A1B9-D31416C23873.jpeg
    210.9 KB · Views: 64

Chueco

Community Member
View Badges
Joined
Dec 2, 2019
Messages
31
Reaction score
28
Rating - 0%
0   0   0
The pump is the worst part of this reactor, it should be designed to be as bullet proof as the rest of the unit.
It’s actually no to shabby. It’s very quiet and easy to take off. I had an issue at first but it was my fault, because I didn’t understand that there is a balance between pump and input water pressure. This pump was not designed to take a lot of back pressure, that’s why the O ring fits just tightly enough.
 

Reefing threads: Do you wear gear from reef brands?

  • I wear reef gear everywhere.

    Votes: 44 16.2%
  • I wear reef gear primarily at fish events and my LFS.

    Votes: 17 6.3%
  • I wear reef gear primarily for water changes and tank maintenance.

    Votes: 1 0.4%
  • I wear reef gear primarily to relax where I live.

    Votes: 33 12.2%
  • I don’t wear gear from reef brands.

    Votes: 157 57.9%
  • Other.

    Votes: 19 7.0%
Back
Top