External refugium for AIO tank

Llorgon

Well-Known Member
View Badges
Joined
Dec 10, 2018
Messages
757
Reaction score
302
Location
Kelowna, BC
Rating - 0%
0   0   0
Hello everyone, new guy to the DIY forum here. My DIY skills are pretty low. Generally if it's not on a computer or electronic I can't fix it. So this will be fun!

I have a IM 25 AIO tank that is having some nutrient export issues. My plan is to have a small refugium above the tank where I can add a little upflow algae scrubber and have a place for pods and such to reproduce. Looking to do a similar concept as seen here.


My questions are:
1. How should I plumb this thing? So far I am thinking having water pumped up from the main tank with a gravity fed drain and then have a standpipe of some sort as an emergency drain.
2. Should the main drain go into the main part of the tank or the back? Does it even matter?
3. If I go with a 10 gal tank( I already have one in the garage) the tank would end up being about a foot above the main tank. What is the best way to pump the water up? Second return pump or upgrade my current return pump(sicce 1.5) to something bigger and then have it tee off some water goes up while the rest just goes back into the tank.
 

R.Weller

Active Member
View Badges
Joined
Aug 5, 2019
Messages
346
Reaction score
453
Location
Lees Summit
Rating - 0%
0   0   0
For plumbing, I would drill two holes for 1” bulkheads in the side of the glass horizontally for the gravity drains about 1/2 way up the tank. Use an elbow & create a standpipe inside the tank for both drains allowing one of the drains to be 1/4” higher than the other. This will give you an emergency drain should something clog the main. While you probably won’t need it, you can add a flat screen to the drains if you prefer. If you use the screen, adjust the emergency drain to be higher to account for the screen height. Algae will grow on the top of the screen so you will eventually see the emergency drain in action.

A refugium uses low flow. So I would tee off the return pump you already have to see if it is sufficient. I like to hard plumb my pipe work because I’ve had algae grow inside braided & clear plastic tubing. I’ve also used black plastic tubing for returns on another build & I don’t care for how that material bends...perhaps I was just doing it wrong. Regardless, cutting & glueing PVC is enjoyable, so I would use hard pipe, 45 deg joints at the bends & lock line for the input to the refugium.

I would position the drains near the back of the display but in the main tank itself. The clean water & refugium goodness (Pods) will be fed directly to the fish & corals w/o needing any other kind of filtration. To help reduce noise, you can submerge the main drain 1” below the water line. I would not submerge the emergency drain but keep it 1/2” above the water line so you can here is splashing anytime it is in use. This will provide an audio queue that the system needs maintenance.

If you find the noise from the main drain on the refugium to be unacceptable, you have already built most of what you need for a Herbie overflow which uses a syphon & it’s virtually silent. To eliminate the noise, add a gate valve & lower the stand pipe on the main drain to create the syphon.

This is going to be a great project...
 
OP
OP
L

Llorgon

Well-Known Member
View Badges
Joined
Dec 10, 2018
Messages
757
Reaction score
302
Location
Kelowna, BC
Rating - 0%
0   0   0
For plumbing, I would drill two holes for 1” bulkheads in the side of the glass horizontally for the gravity drains about 1/2 way up the tank. Use an elbow & create a standpipe inside the tank for both drains allowing one of the drains to be 1/4” higher than the other. This will give you an emergency drain should something clog the main. While you probably won’t need it, you can add a flat screen to the drains if you prefer. If you use the screen, adjust the emergency drain to be higher to account for the screen height. Algae will grow on the top of the screen so you will eventually see the emergency drain in action.

A refugium uses low flow. So I would tee off the return pump you already have to see if it is sufficient. I like to hard plumb my pipe work because I’ve had algae grow inside braided & clear plastic tubing. I’ve also used black plastic tubing for returns on another build & I don’t care for how that material bends...perhaps I was just doing it wrong. Regardless, cutting & glueing PVC is enjoyable, so I would use hard pipe, 45 deg joints at the bends & lock line for the input to the refugium.

I would position the drains near the back of the display but in the main tank itself. The clean water & refugium goodness (Pods) will be fed directly to the fish & corals w/o needing any other kind of filtration. To help reduce noise, you can submerge the main drain 1” below the water line. I would not submerge the emergency drain but keep it 1/2” above the water line so you can here is splashing anytime it is in use. This will provide an audio queue that the system needs maintenance.

If you find the noise from the main drain on the refugium to be unacceptable, you have already built most of what you need for a Herbie overflow which uses a syphon & it’s virtually silent. To eliminate the noise, add a gate valve & lower the stand pipe on the main drain to create the syphon.

This is going to be a great project...
Would I not need 3 holes in the tank? 1 for the water coming in, main drain and then emergency drain?

For the plumbing, would it be a good idea to have a little ball valve so I can control the flow of the water? I'm guessing the best place for plumbing supplies would be home depot.

One big thing I am going to have to figure out is how to drill glass without breaking it... It looks so easy online, but I don't trust myself.
 

Steven Garland

Valuable Member
View Badges
Joined
Sep 10, 2016
Messages
2,032
Reaction score
1,418
Location
Sanford,Florida
Rating - 0%
0   0   0
Not even,you wouldn't have to drill. Make everything hang on back. It would be very easy. Just install check valves,which Coralvue sells so if anything ever happened like power outtage or pump failure you wouldn't have extra water back siphoning into your display.
 

burnetb1

Active Member
View Badges
Joined
Mar 4, 2019
Messages
127
Reaction score
209
Location
Southwestern Michigan
Rating - 0%
0   0   0
@R.Weller has got you on the right track I think.
I have drilled 10 and 5 gal tanks, but it is not easy. The glass is very thin and breaks easily. Drilling 2 holes in the same panel on a 5 gal will be even worse, unless you do it on the back of the tank.
I drilled the bottom of a 5 gal, broke it, then cut it out and replaced it with a 1/4 in piece of glass and drilled that with much better success.
I drilled the short sides of a couple 10 gal, but I always "laminated" another piece of glass onto it with silicone. It wasn't pretty, but it worked and I didn't have to worry about the panel breaking in the future.

You only NEED one hole in the tank. A second for an emergency overflow is highly recommended. I would never build another tank without an emergency drain.
The input to the fuge from your return pump can go over the top and doesn't require drilling.

You could do the siphon route and not drill at all. I used a siphon overflow on my 50 gal reef. I can personally say that I will never, ever use a siphon overflow again. They are temperamental and prone to failure.

And when it fails, your tank overflows and destroys your brand new reef angel and LED power supplies....or maybe thats just me...
 

Steven Garland

Valuable Member
View Badges
Joined
Sep 10, 2016
Messages
2,032
Reaction score
1,418
Location
Sanford,Florida
Rating - 0%
0   0   0
@R.Weller has got you on the right track I think.
I have drilled 10 and 5 gal tanks, but it is not easy. The glass is very thin and breaks easily. Drilling 2 holes in the same panel on a 5 gal will be even worse, unless you do it on the back of the tank.
I drilled the bottom of a 5 gal, broke it, then cut it out and replaced it with a 1/4 in piece of glass and drilled that with much better success.
I drilled the short sides of a couple 10 gal, but I always "laminated" another piece of glass onto it with silicone. It wasn't pretty, but it worked and I didn't have to worry about the panel breaking in the future.

You only NEED one hole in the tank. A second for an emergency overflow is highly recommended. I would never build another tank without an emergency drain.
The input to the fuge from your return pump can go over the top and doesn't require drilling.

You could do the siphon route and not drill at all. I used a siphon overflow on my 50 gal reef. I can personally say that I will never, ever use a siphon overflow again. They are temperamental and prone to failure.

And when it fails, your tank overflows and destroys your brand new reef angel and LED power supplies....or maybe thats just me...
I feel like check valves would cause that from happening though. Would it not ? Especially if a siphon break was used,I don't see with the use of those 2 things a "hob" diy overflow would destroy everything.

20200714_195854.jpg 20200712_171700.jpg
 
Last edited:

burnetb1

Active Member
View Badges
Joined
Mar 4, 2019
Messages
127
Reaction score
209
Location
Southwestern Michigan
Rating - 0%
0   0   0
Check valves? I am referring to the overflow, not the return lines.
Check valves on the return help keep the sump from filling up when the return is off.
I am talking about a siphon overflow kit, like this:
1598290641335.png
 
OP
OP
L

Llorgon

Well-Known Member
View Badges
Joined
Dec 10, 2018
Messages
757
Reaction score
302
Location
Kelowna, BC
Rating - 0%
0   0   0
Not even,you wouldn't have to drill. Make everything hang on back. It would be very easy. Just install check valves,which Coralvue sells so if anything ever happened like power outtage or pump failure you wouldn't have extra water back siphoning into your display.

Interesting. I will have to look into the hang on back way. It does sound easier than attempting to drill the tank.

@R.Weller has got you on the right track I think.
I have drilled 10 and 5 gal tanks, but it is not easy. The glass is very thin and breaks easily. Drilling 2 holes in the same panel on a 5 gal will be even worse, unless you do it on the back of the tank.
I drilled the bottom of a 5 gal, broke it, then cut it out and replaced it with a 1/4 in piece of glass and drilled that with much better success.
I drilled the short sides of a couple 10 gal, but I always "laminated" another piece of glass onto it with silicone. It wasn't pretty, but it worked and I didn't have to worry about the panel breaking in the future.

You only NEED one hole in the tank. A second for an emergency overflow is highly recommended. I would never build another tank without an emergency drain.
The input to the fuge from your return pump can go over the top and doesn't require drilling.

You could do the siphon route and not drill at all. I used a siphon overflow on my 50 gal reef. I can personally say that I will never, ever use a siphon overflow again. They are temperamental and prone to failure.

And when it fails, your tank overflows and destroys your brand new reef angel and LED power supplies....or maybe thats just me...
Really not instilling confidence in me being able to drill the tank...

I would want to have an emergency drain. I don't need to flood the carpet in my office. My wife wouldn't be happy if I did that.

I feel like check valves would cause that from happening though. Would it not ? Especially if a siphon break was used,I don't see with the use of those 2 things a "hob" diy overflow would destroy everything.

20200714_195854.jpg 20200712_171700.jpg

Is this the HOB you are talking about in your first post or are you referring to the hang on back overflow box?

I'm open to the HOB style like in your pictures. Don't really want to go the HOB overflow route. I am limited on how far I want the tank to stick out from the wall.
 
OP
OP
L

Llorgon

Well-Known Member
View Badges
Joined
Dec 10, 2018
Messages
757
Reaction score
302
Location
Kelowna, BC
Rating - 0%
0   0   0
So went to Petsmart yesterday to pick up a 5 gal tank.... and they were sold out...

On the plus side, my neighbour said he would help me install a shelf above the main tank for the little refugium tank to sit on.
 

R.Weller

Active Member
View Badges
Joined
Aug 5, 2019
Messages
346
Reaction score
453
Location
Lees Summit
Rating - 0%
0   0   0
So went to Petsmart yesterday to pick up a 5 gal tank.... and they were sold out...

On the plus side, my neighbour said he would help me install a shelf above the main tank for the little refugium tank to sit on.

I have not yet tried drilling glass. I’ve seen plenty of videos & while it looks simple, I don’t trust it. Although the next expansion to our system will involve a 40b drilled peninsula style & I’ve already made arrangements with our favorite LFS to drill those holes. I bought the tank during the last $1 / gallon sale at Petco.

What I have drilled several times is plastic. If you end up going that route, check a local farm supply store for food grade storage containers. It won’t look as good as glass, but it will serve the same purpose & you won’t have to worry about a seam failing. I’m using two now. One 18gal bucket for our surge device & a 50gal Rubbermaid stock tank for our remote refugium.

You have several options.
 
OP
OP
L

Llorgon

Well-Known Member
View Badges
Joined
Dec 10, 2018
Messages
757
Reaction score
302
Location
Kelowna, BC
Rating - 0%
0   0   0
I have not yet tried drilling glass. I’ve seen plenty of videos & while it looks simple, I don’t trust it. Although the next expansion to our system will involve a 40b drilled peninsula style & I’ve already made arrangements with our favorite LFS to drill those holes. I bought the tank during the last $1 / gallon sale at Petco.

What I have drilled several times is plastic. If you end up going that route, check a local farm supply store for food grade storage containers. It won’t look as good as glass, but it will serve the same purpose & you won’t have to worry about a seam failing. I’m using two now. One 18gal bucket for our surge device & a 50gal Rubbermaid stock tank for our remote refugium.

You have several options.
I'm jealous of these $1/gallon sales. 10 gallon tank here is $20 year round.

I thought about plastic, but I am planning to put the DIY algae scrubber on the refugium so it would need to be clear plastic or acrylic.

It shouldn't be too hard to find a 5 gallon tank here... I hope. And I might go the route of having the plumping hang on the side like in @Steven Garland pictures. That way I wouldn't have to drill anything.
 

R.Weller

Active Member
View Badges
Joined
Aug 5, 2019
Messages
346
Reaction score
453
Location
Lees Summit
Rating - 0%
0   0   0
Right! I recall you're including the uplift ATS on the side. You could always put that on the side of your DT if you have trouble drilling the glass. Alternatively, you could use another style of ATS or you might find that different types of macro algae (e.g. sea lettuce &/or cheato) can outcompete the ATS anyway which moves your light-source to the top like the one in the video from your first post. The good news is that you have lots of options if one doesn't work out.

I tried a few versions of the gravity syphon overflow on our non-drilled 60gal, & while it was always easy to get started, it routinely failed over time. We even tried adding the aqualifter pump at the top of the elbow to pull air out to make sure the syphon doesn't break. It still broke (the pump clogged).

When, not IF, the syphon breaks, you lose flow. The source chamber will pump all it can into the destination, & if water isn't coming out, you'll quickly overflow the smaller refugium. It was one of the reasons we could not wait to get a drilled tank.
 
OP
OP
L

Llorgon

Well-Known Member
View Badges
Joined
Dec 10, 2018
Messages
757
Reaction score
302
Location
Kelowna, BC
Rating - 0%
0   0   0
Right! I recall you're including the uplift ATS on the side. You could always put that on the side of your DT if you have trouble drilling the glass. Alternatively, you could use another style of ATS or you might find that different types of macro algae (e.g. sea lettuce &/or cheato) can outcompete the ATS anyway which moves your light-source to the top like the one in the video from your first post. The good news is that you have lots of options if one doesn't work out.

I tried a few versions of the gravity syphon overflow on our non-drilled 60gal, & while it was always easy to get started, it routinely failed over time. We even tried adding the aqualifter pump at the top of the elbow to pull air out to make sure the syphon doesn't break. It still broke (the pump clogged).

When, not IF, the syphon breaks, you lose flow. The source chamber will pump all it can into the destination, & if water isn't coming out, you'll quickly overflow the smaller refugium. It was one of the reasons we could not wait to get a drilled tank.

Yep it will probably go on the side of the display at first, but it will take up a good chunk of viewing room so I would rather move it to the refugium if possible. I assume the algae scrubber will change at some point. I have seen pictures of display refugium and they look awesome. I'm not sure my skills are there yet.

Good to know about the siphon. What I really want is something reliable and won't flood the tank.

I'm going to ask around the local reef group here to see if anyone there could help me drill a small tank.
 
OP
OP
L

Llorgon

Well-Known Member
View Badges
Joined
Dec 10, 2018
Messages
757
Reaction score
302
Location
Kelowna, BC
Rating - 0%
0   0   0
So I found, what I think is a pretty good example of what I would like to do. https://www.nano-reef.com/forums/topic/198809-home-made-glass-above-tank-display-fuge/

Hopefully you can see the pictures. The person has a small tank above the main one, drilled two holes in the back. One for a drain and the other the return. They are using a second pump on the outside of the tank to bring water up to the rufugium. What are the pros and cons of a external pump?

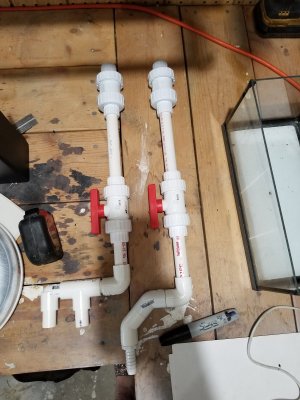
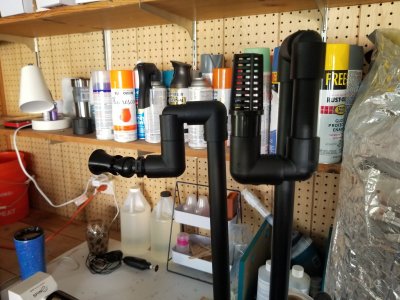
What I am thinking is get the 5 gallon tank drilled for 2 holes for 1” bulkheads along the back of the tank. One for drain and the other for the return. Then I can do something similar to @Steven Garland pictures where I have the emergency drain that hangs on the back of the refugium. I can add a valve to the return so I can control the flow up to the refugium.

Is it worth it to use the external pump or get another pump a bit more powerful than the sicce 1.5 and tee off it. Maybe get a bump with speed control.
 

R.Weller

Active Member
View Badges
Joined
Aug 5, 2019
Messages
346
Reaction score
453
Location
Lees Summit
Rating - 0%
0   0   0
The example is excellent. Thanks for sharing. I have no doubt this will give you the benefits that you are looking for with your AIO. It's both biological (natural) nutrient export & a live food factory. While it takes some time to build the population, the first time that you witness the corals consuming zooplankton that you grew is very rewarding.

The flow to the refugium should be slow. We have a 50gal remote refugium that is being fed by a 600gal / hr pump running at 66%. I'm not sure what your Sicce runs, but you probably don't want more than 20 - 30gal / hr if not slower. The ball valve should help you dial it in but a gate valve would make it easier. I paid $9 at the hardware store for a 1/2" pvc gate valve (x3 the cost of the ball valve but much easier).

A second pump is always a good idea. Everything breaks eventually & a design that provides redundancy is great risk reduction.
 
OP
OP
L

Llorgon

Well-Known Member
View Badges
Joined
Dec 10, 2018
Messages
757
Reaction score
302
Location
Kelowna, BC
Rating - 0%
0   0   0
The sicce 1.5 is rated at 357 GPH and maximum head hight of 6 ft. Currently, that pump is teed off to go into both return outlets the tank has built in. What I was thinking I could do is tee it off so one goes into the tank and the other up to the refugium. Then plumb the drain of the refugium into that second return outlet the tank has.

There is quite a size difference between pvc pipe and the connections of the pump/return outlet of the tank. Am I better off to use flexible tubing for that portion or will I be able to get the pvc down that small?

The specs of the sicce say
  • Inlet: 1/2" Female NPT or 3/8"-9/16" Hose
  • Outlet: 1/2" Female NPT or 3/8"-9/16" Hose
 
OP
OP
L

Llorgon

Well-Known Member
View Badges
Joined
Dec 10, 2018
Messages
757
Reaction score
302
Location
Kelowna, BC
Rating - 0%
0   0   0
So hit a snag. The guy I found to drill the tank couldn't do it without the glass cracking. Tried it on 2 different 5 gallons. Looks like if I do this refugium it will have have to not be drilled. Or I will need to see if I can fit a 10 gallon tank above the current tank.
 

Looking back to your reefing roots: Did you start with Instant Ocean salt?

  • I started with Instant Ocean salt.

    Votes: 102 77.3%
  • I did not start with Instant Ocean salt, but I have used it at some point.

    Votes: 11 8.3%
  • I did not start with Instant Ocean salt and have not used it.

    Votes: 17 12.9%
  • Other.

    Votes: 2 1.5%
Back
Top