Japanese style reef tank

Takaki1980

Active Member
View Badges
Joined
Apr 3, 2020
Messages
188
Reaction score
1,398
Rating - 0%
0   0   0
I built a reef tank in my loft at home.The preparations started in the summer of 2019 and the seawater was added on January 18, 2020. I'm going to show you the record to date. There is already an aquatic plant tank on the right side.I decided to make a tank full of coral on the left side of this one.

6C49E780-2712-4C0D-BD7D-83CB6902C828.jpeg

FE8FD70C-7EAA-4B9D-AE01-2873B95608C8.jpeg


And it was recently filled with coral.
3A82AB3A-84BF-4EEA-80FB-4EB6D2550BBB.jpeg

E86E0DF4-D4B3-4302-A02D-A1DC9BCFDC01.jpeg

4D9AFDA7-15FD-4D51-B1E0-73068616C03B.jpeg

This is my tank build thread.

…and now. March 2023
4B6D59BB-DE92-42CC-A136-BC2009614C41.jpeg
 
Last edited:
OP
OP
Takaki1980

Takaki1980

Active Member
View Badges
Joined
Apr 3, 2020
Messages
188
Reaction score
1,398
Rating - 0%
0   0   0
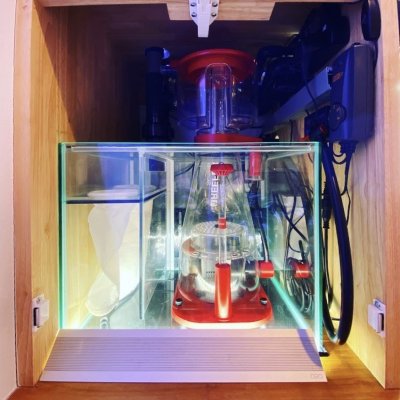
The sump was made by myself by modifying a commercial tank.But I just used a partition with acrylic. It was the first time for me to make it, so I made some mistakes, but I am satisfied with it.
068B84DB-F100-4A05-B544-18BD2635A983.jpeg


Seawater entering (1) passes through the filter in (2), passes through the protein skimmer in (3), and returns to the tank from (5).(4) is to adjust the water level.
C09D5958-6FC1-464B-AE4B-9EB343CD7734.jpeg


I also made a lid to prevent evaporation.
17F01E53-682F-46CC-BB1C-C5259E37E7F1.jpeg
 
OP
OP
Takaki1980

Takaki1980

Active Member
View Badges
Joined
Apr 3, 2020
Messages
188
Reaction score
1,398
Rating - 0%
0   0   0
It was very difficult to come up with the plumbing and actually build it.It was my first overflow tank, so it took a long time.It was like I didn't even want to look at the pipes for a while. I had to tentatively assemble it many times and check the dimensions as I went along.
31385A12-D950-4334-ADDA-0DF0D2C12935.jpeg

60F90547-CCB0-4FB2-B871-5396A66FEC03.jpeg


I was so happy when I installed the pipe in the tank that I looked at it for a while.
FAA61399-8CE1-404C-A3A0-1333E75124F2.jpeg


A sump was installed.
AF889ADE-CFA7-4074-9DF7-AC29C8DA87B6.jpeg
 
OP
OP
Takaki1980

Takaki1980

Active Member
View Badges
Joined
Apr 3, 2020
Messages
188
Reaction score
1,398
Rating - 0%
0   0   0
I went through hell in making the pipe, but the ordeal wasn't over.Wiring the electrical system. I have to admit, though, I really enjoyed both!

There is a power supply in the back left corner. I'm a little worried about leakage, but I don't have the skills to change the position, so I'm patient with putting the lid on.
1846CAEC-CBBE-4CFA-8C88-539F3A2C5ECB.jpeg


The electrical system on the left.
30FA2152-DF6C-4CA2-B5D5-788D6F4F9F84.jpeg


The electrical system on the right.
1DCC7D47-D88A-47FF-B9A1-3FE997899157.jpeg
D7A0A711-F5F2-420D-A0A7-95E58B3E1D36.jpeg
 
OP
OP
Takaki1980

Takaki1980

Active Member
View Badges
Joined
Apr 3, 2020
Messages
188
Reaction score
1,398
Rating - 0%
0   0   0
Whereas the pipes and the electrical system were hell, this is heaven!Layout!
I was a beginner and didn't know better, so I made the layout out of a dead coral skeleton.I read on the web that live rock is a coral skeleton.
I didn't use live rock because I knew it would contain things I didn't want, such as sharks and bugs.


First of all, I assembled it temporarily outside of the tank.
E04DD2AE-8038-4D94-B306-58CC3E54A909.jpeg

88BBA17D-AF24-435A-97E4-8FE442F0FC13.jpeg


Once the temporary assembly is decided, it is fixed with cement and glue.The legs of the layout are held in place with pipes and acrylic.(Did they come off afterwards...)
0CFB7E72-6E5D-4EC8-9ABC-8101E07270A0.jpeg


The completed layout was finally placed in the tank, and the placement of each module was decided while looking at the balance.Finally, I added well-washed sand to complete the layout.(Washing the sand was so hard I thought I was going to die.)
1FFB485D-1B96-459F-BADE-1A19EA20636D.jpeg

DB1729EC-728A-4470-85E3-599B3F06DC8E.jpeg

90C0F364-A3CE-4122-B9CF-AE73912CE1C9.jpeg


13D4C97E-B293-4F0B-B17C-7DD9D0E2EC3F.jpeg
E8CEA539-E898-4B4E-8AA7-4EAD660992A0.jpeg
 
OP
OP
Takaki1980

Takaki1980

Active Member
View Badges
Joined
Apr 3, 2020
Messages
188
Reaction score
1,398
Rating - 0%
0   0   0
I read the first post, scrolled up and clicked “watch”. Then finished the thread. It was obvious that this will be an interesting build. Beautiful start! Your aesthetic and attention to detail are abundantly clear.
Thank you. I'm a newbie, so I don't know what to expect, but I'll do my best!
 
OP
OP
Takaki1980

Takaki1980

Active Member
View Badges
Joined
Apr 3, 2020
Messages
188
Reaction score
1,398
Rating - 0%
0   0   0
Definitely jealous of the colonies for sale overseas instead of the tiny frags we have here in the US.

Have you run into any issues mounting the colonies on the dead skeleton?
Flags seem to be common in the US.
I haven't had any problems gluing the colonies together.It's the same as gluing to live rock with coral glue.
Just leave it there and it will come alive naturally.
 

More than just hot air: Is there a Pufferfish in your aquarium?

  • There is currently a pufferfish in my aquarium.

    Votes: 32 17.8%
  • There is not currently a pufferfish in my aquarium, but I have kept one in the past.

    Votes: 31 17.2%
  • There has never been a pufferfish in my aquarium, but I plan to keep one in the future.

    Votes: 33 18.3%
  • I have no plans to keep a pufferfish in my aquarium.

    Votes: 76 42.2%
  • Other.

    Votes: 8 4.4%
Back
Top