Peninsula 650 build with lessons for anyone planning to py

Jacksmedula

New Member
View Badges
Joined
Mar 8, 2019
Messages
19
Reaction score
14
Rating - 0%
0   0   0
So.. after jerking around with cubes and nano tanks for years because of career, moves, Etc. I have finally been able to cross off a bucket list item: first class 120+ gallon reef tank!

So, before I get into my thoughts so far, here is the equipment list for this build.

Tank
Red Sea Peninsula 650

Equipment
Apex 2016
Reef Octopus Elite 150int
Apex Cor 20 return
Simplicity dc1000 (Algae Scrubber)
Clear Water cw100
Finnex heater
Apex Dos
Tunze ATO
(2) Maxspect 350 gyre
Nyos Torque 1.0

Lights
(3) Radion xr30 g4 pro

Water station
(2) Norwesco 65g upright
Pan world 50px pump with 3/4” Penducter on salt side.
Spectrapure max 90 5 stage plumbed into house main
Misc schedule 80

I am going to try to not go into too much minutiae about packing, unpacking, unboxing, basic assembly etc.. and try to stay focused on my challenges and lessons learned. Hopefully, it will save someone some headache at worst and avoid disaster at best.

Unpacking and Assembly

First, let me say that the quality of the tank and cabinet is top notch. I’ve been running an Elos midi for the last year or so and I can honestly say that the 650 tank itself is on par if not better in some regards than the Elos and the the Red Sea cabinet blows Elos completely out of the water. (No pun intended). All of the Red Sea components are good quality. The tank seams are perfect. The glass has only a very, very minor tint of green when looking down the glass from the top. Everything fits together as perfect as CNC mass produced furniture can and the finish is top notch.

That said...

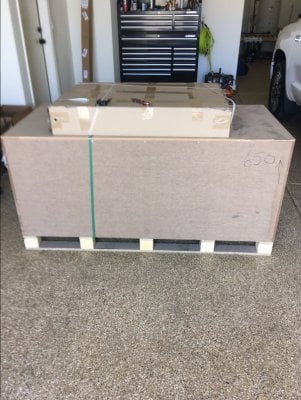
- Save all of the stainless screws that you need to remove to unpack the tank. There are 3 different sizes and all high quality. I used quite a few of them to mount assorted equipment inside the cabinet and other odds and ends.
AB36AA57-E1B3-4712-8C91-3F3D4B46C9A0.jpeg
- It’s not in any documentation but... key pieces to the cabinet are UNDER the 500lb tank. So you CANNOT build the stand and then move the tank. Do yourself a favor and pick up 4 glass suction handles. Can’t remember what they’re called but I think I paid 40 dollars for 4 from amazon. Hands down, best 40 bucks I have spent in this hobby.
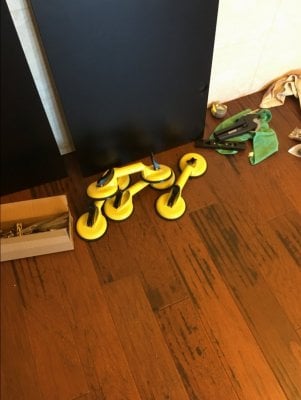
416C22AA-A8B3-456B-8FCA-B73577C8354C.jpeg

- IMPORTANT. The tank has plastic bulkheads that are pre installed and hang below the bottom of the tank about 1/4 inch. So... when you are moving the tank to get to the cabinet pieces DO NOT drag the tank or put it on the garage floor or house flooring. Tempered glass is strong but brittle. My solution was to have my wife and I basically pick the bulkhead side up with the suction handles and slide it over so the bulkhead fittings we’re hanging over the side of the shipping pallet.

- The instructions are a big ambiguous about how to assemble the stand based on choosing left side or right side doors. I screwed up the base rails and had to backtrack to get it right. Only advice here is to make sure you can see the pre drilled holes on the top rail and bottom rail as you’re looking through the “doors”. These holes are where you attach the panels that make up the “front” of the tank.

- The lock nuts on the leveling feet should be removed before screwing them in. They really
aren’t necessary, lowers the tank a little to get rid of that nasty gap and makes leveling a whole lot easier. Also, screw the feet all the way in. Again, no reason to leave room for adjustment “up”. You will most certainly introduce “pilot induced oscillation “ if you leave more than one axis for adjusting 50 dang screw levelers.

-The doors, oh, the doors. The instructions say “slide and click the doors into place.” Lol. Not sure about the other reefer series but for the 650, the geometry on the door hinges is weird. It kind of lifts forward and out. Not sure how to explain it but long story short.... I could not for the life of me get the doors to slide and click. My solution was to attach the hinges to the cabinet and leave the door off. I put the hinge in the closed position, lined up the door and seated the hinge inside the door hole and then screw the door side in. Lol. I’m probably a dum dum and missing something stupid. IDK. Would love to hear if anyone cracked the code on these.

That’s it for now but I will follow up with my rockscape challenges and solutions along with some more pics. Didn’t think anyone would be interested in seeing a big black box so not too many of the cabinet without the tank.

I would be happy to answer any questions anyone has about the build, dimensions or whatever related to the peninsula 650.
 

UCF Alum

Stick addict
View Badges
Joined
Oct 7, 2017
Messages
935
Reaction score
2,808
Location
Central Florida
Rating - 0%
0   0   0
I have this same tank. Mines been up a year now.
We love ours. I suggest adding a loc line splitter for the return. If you don’t, it will suck air and blow bubbles into the display. ( my original post was about leveling the feet, but I see that you got that already )
Good luck
 
OP
OP
J

Jacksmedula

New Member
View Badges
Joined
Mar 8, 2019
Messages
19
Reaction score
14
Rating - 0%
0   0   0
I have this same tank. Mines been up a year now.
We love ours. I suggest adding a loc line splitter for the return. If you don’t, it will suck air and blow bubbles into the display. ( my original post was about leveling the feet, but I see that you got that already )
Good luck

Hmm.. does you original return have a swivel output or was it a straight pipe coming out of the weir? Not sure if it’s an update but mine is about 4 inches long on a ball so flow can be directed.

Thanks for the heads up... definitely something I’ll keep my eye on.
 

UCF Alum

Stick addict
View Badges
Joined
Oct 7, 2017
Messages
935
Reaction score
2,808
Location
Central Florida
Rating - 0%
0   0   0
Hmm.. does you original return have a swivel output or was it a straight pipe coming out of the weir? Not sure if it’s an update but mine is about 4 inches long on a ball so flow can be directed.

Thanks for the heads up... definitely something I’ll keep my eye on.

No. Its the same as yours. When your wave makers start churning water, the tip will suck air and blow bubbles in the display.
This is of course how many GPH your return pump is. If its on the lower end, you might not have this problem.
 
OP
OP
J

Jacksmedula

New Member
View Badges
Joined
Mar 8, 2019
Messages
19
Reaction score
14
Rating - 0%
0   0   0
Aquascape and Rockwork

Let me preface by saying I am in no way a subject matter expert or trying to preach best practices. My intention is to only share my particular build and the tools I used to accomplish the mission.

I have always ran tanks that are flat against the wall with only about a 100 degree viewing angle. This makes designing rockscape pretty straightforward. With a peninsula, you have pretty close to 360 viewing so the aquascape has to be appealing from 3 sides. This turned out to be much harder than I realized.

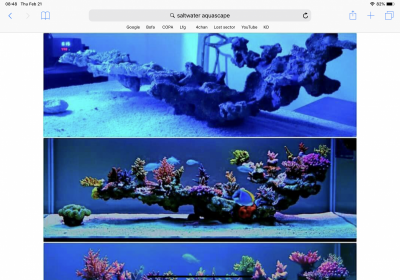
I started the project off with a grandiose design in my head of a single, long, sweeping shelf with one base that ran the length of the tank similar to pic below.
7B812EB7-60EB-461E-B730-6C0DFEC079D8.png
Lol.. I never really sat back and thought of the actual mechanics involved with making this work with 120lbs of Marco rock. Needless to say reality met expectations in short order. My hat is off to the creator of this piece.

Back to square one.

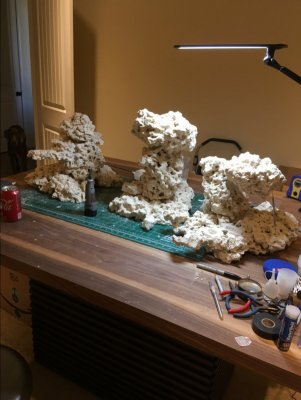
One key lesson I learned through this was to have a space dedicated to creating the aquascape. I am lucky enough to have a man cave that has a work table in it. Having a workspace that mimicked the actual dimensions of the tank and being able to walk around to see from all angles was key for me.

So after a a few years of moving and dry fitting pieces, I was was finally ready to create the final build. I had a couple of shelves I wanted and an overhang, pillar and some other kooky things. Ok.. now how do I do this without it falling over the minute I touch it.

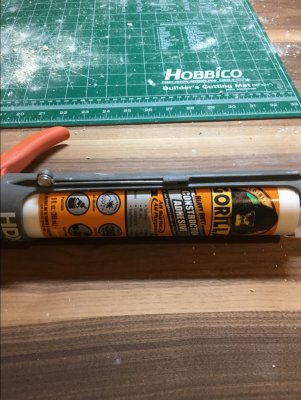
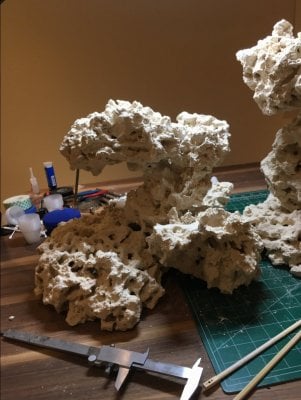
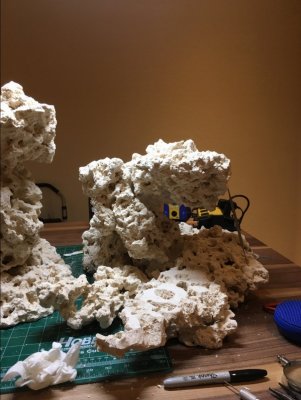
I looked online and found the usual suspects... reef cement, coral gel, epoxy, acrylic rods and drill. Nothing worked. Either set too fast, not fast enough, broke the rock, wouldn’t bond to the rock, came apart, flimsy etc.. I finally came upon some random post somewhere that suggested using construction adhesive. I looked at everything Home Depot had for construction adhesive and found one that is 100% waterproof, bonds to EVERYTHING and dries the same color as Marco.

1886F544-AADE-4BF5-8485-84B4DCDFDA0D.jpeg

This stuff worked great for me. It has a learning curve to use and takes about 12 hours to cure but when it does... It’s like cement. What I like about it is it gets into the pores of the rock and really bonds. It’s a little slow to set so I had to use supports for the curing process. Couldn’t find any information about leaching so my plan is keep the tank fallow for awhile and watch the bonds for any type of degradation or emulsification.

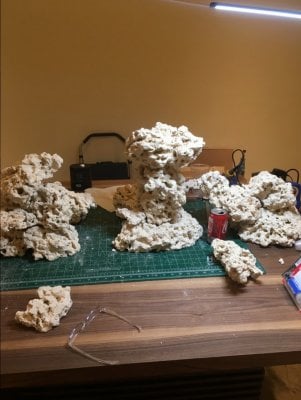
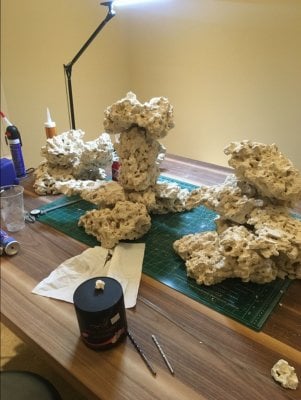
The process that worked best for me was to build from the base up and create support for the overhangs and shelves, let it cure, use a little reef epoxy putty to use as support where needed then start building again. With 12 hours between sessions it took a lot of time but was completely worth the hassle. Nothing good happens fast in reefing.. amirite?

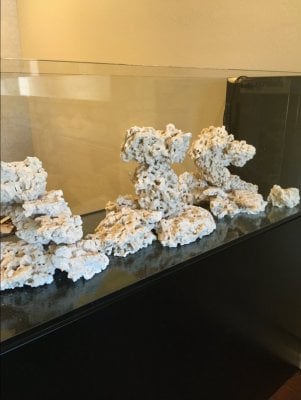
Here are a few pics of the work in progress...

F9681FD1-E33B-42C6-8F84-C1BCCD130C01.jpeg
60BD9943-21DB-4C13-9DB9-8EEB8A234FC0.jpeg
687F0C98-7D61-45A8-80B9-C0D3FCE43657.jpeg
46F9B80A-C859-473A-BE9A-91196C0E194E.jpeg
B75CC87F-E98C-472C-A586-9D1D3DD447E2.jpeg

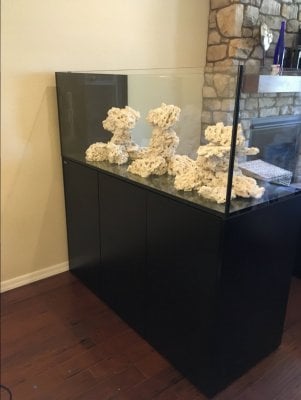
Moving the rock to the tank was done with 2 people and a step stool. I’m 6’3 and can barely reach the bottom of the tank on tippy toes. This thing is very tall.

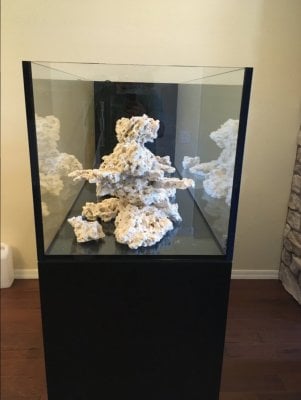
Here is the final product. Not exactly what I wanted but the best I could do with my skill set lol

8369B2BF-C1BF-45C6-8B74-F8BFF08FE5BB.jpeg
F95FCDC2-ACA3-4A53-88DB-9331C77DFE0B.jpeg
34563050-996C-4D00-9CBF-F6A417F34205.jpeg

I’ll try to cover the electronics mounting and equipment placement next...
 
Last edited:
OP
OP
J

Jacksmedula

New Member
View Badges
Joined
Mar 8, 2019
Messages
19
Reaction score
14
Rating - 0%
0   0   0
No. Its the same as yours. When your wave makers start churning water, the tip will suck air and blow bubbles in the display.
This is of course how many GPH your return pump is. If its on the lower end, you might not have this problem.

Ahhh.. that makes sense. With the return so close to the surface I can see how that happens. Planning a trip to the LFS today for salt anyway so I’ll pick up some loc-line. Thanks for the tip.
 

Mike.P

Well-Known Member
View Badges
Joined
Apr 1, 2019
Messages
686
Reaction score
1,848
Location
Centennial, Colorado
Rating - 0%
0   0   0
So.. after jerking around with cubes and nano tanks for years because of career, moves, Etc. I have finally been able to cross off a bucket list item: first class 120+ gallon reef tank!

So, before I get into my thoughts so far, here is the equipment list for this build.

Tank
Red Sea Peninsula 650

Equipment
Apex 2016
Reef Octopus Elite 150int
Apex Cor 20 return
Simplicity dc1000 (Algae Scrubber)
Clear Water cw100
Finnex heater
Apex Dos
Tunze ATO
(2) Maxspect 350 gyre
Nyos Torque 1.0

Lights
(3) Radion xr30 g4 pro

Water station
(2) Norwesco 65g upright
Pan world 50px pump with 3/4” Penducter on salt side.
Spectrapure max 90 5 stage plumbed into house main
Misc schedule 80

I am going to try to not go into too much minutiae about packing, unpacking, unboxing, basic assembly etc.. and try to stay focused on my challenges and lessons learned. Hopefully, it will save someone some headache at worst and avoid disaster at best.

Unpacking and Assembly

First, let me say that the quality of the tank and cabinet is top notch. I’ve been running an Elos midi for the last year or so and I can honestly say that the 650 tank itself is on par if not better in some regards than the Elos and the the Red Sea cabinet blows Elos completely out of the water. (No pun intended). All of the Red Sea components are good quality. The tank seams are perfect. The glass has only a very, very minor tint of green when looking down the glass from the top. Everything fits together as perfect as CNC mass produced furniture can and the finish is top notch.

That said...

- Save all of the stainless screws that you need to remove to unpack the tank. There are 3 different sizes and all high quality. I used quite a few of them to mount assorted equipment inside the cabinet and other odds and ends.
AB36AA57-E1B3-4712-8C91-3F3D4B46C9A0.jpeg
- It’s not in any documentation but... key pieces to the cabinet are UNDER the 500lb tank. So you CANNOT build the stand and then move the tank. Do yourself a favor and pick up 4 glass suction handles. Can’t remember what they’re called but I think I paid 40 dollars for 4 from amazon. Hands down, best 40 bucks I have spent in this hobby.
416C22AA-A8B3-456B-8FCA-B73577C8354C.jpeg

- IMPORTANT. The tank has plastic bulkheads that are pre installed and hang below the bottom of the tank about 1/4 inch. So... when you are moving the tank to get to the cabinet pieces DO NOT drag the tank or put it on the garage floor or house flooring. Tempered glass is strong but brittle. My solution was to have my wife and I basically pick the bulkhead side up with the suction handles and slide it over so the bulkhead fittings we’re hanging over the side of the shipping pallet.

- The instructions are a big ambiguous about how to assemble the stand based on choosing left side or right side doors. I screwed up the base rails and had to backtrack to get it right. Only advice here is to make sure you can see the pre drilled holes on the top rail and bottom rail as you’re looking through the “doors”. These holes are where you attach the panels that make up the “front” of the tank.

- The lock nuts on the leveling feet should be removed before screwing them in. They really
aren’t necessary, lowers the tank a little to get rid of that nasty gap and makes leveling a whole lot easier. Also, screw the feet all the way in. Again, no reason to leave room for adjustment “up”. You will most certainly introduce “pilot induced oscillation “ if you leave more than one axis for adjusting 50 dang screw levelers.

-The doors, oh, the doors. The instructions say “slide and click the doors into place.” Lol. Not sure about the other reefer series but for the 650, the geometry on the door hinges is weird. It kind of lifts forward and out. Not sure how to explain it but long story short.... I could not for the life of me get the doors to slide and click. My solution was to attach the hinges to the cabinet and leave the door off. I put the hinge in the closed position, lined up the door and seated the hinge inside the door hole and then screw the door side in. Lol. I’m probably a dum dum and missing something stupid. IDK. Would love to hear if anyone cracked the code on these.

That’s it for now but I will follow up with my rockscape challenges and solutions along with some more pics. Didn’t think anyone would be interested in seeing a big black box so not too many of the cabinet without the tank.

I would be happy to answer any questions anyone has about the build, dimensions or whatever related to the peninsula 650.

Great advice, thank you. I'm building my XXL625, as we speak... So this is probably a silly thought, but do you really think it's okay to take the locking nuts off the feet? I want to do that too, but do they also serve in creating more surface area to distribute the load?

Once the feet are leveled, the nuts should be moved up, until they contact the wood. So once the tank is filled, and the wood is pressing down on them, do they take some of that weight, or is the weight still just on the screwed in studs of the feet themselves?

I don't know if that wording makes any sense. lol. Maybe you'll understand what I mean.
 
Last edited:
OP
OP
J

Jacksmedula

New Member
View Badges
Joined
Mar 8, 2019
Messages
19
Reaction score
14
Rating - 0%
0   0   0
Nice tank.. I think you’re going to love the Red Sea. Did you do deluxe? Or putting in your own lights?

I see what your line of thinking here is but the nuts serve no structural purpose. The load is being held by the screwed in studs and distributed through the rubber feet...

Definitely take the lock nuts off with the feet screwed all way up to the stop before you get the stand upright and tank on. Reason for this is to only have 1 direction to adjust for in the initial leveling. If you leave room, you will end up chasing level all day and all night... 3 guesses how I know lol
 
OP
OP
J

Jacksmedula

New Member
View Badges
Joined
Mar 8, 2019
Messages
19
Reaction score
14
Rating - 0%
0   0   0
Equipment and Mounting

So... after a few setbacks it’s finally complete . I am going to cover the Electronics and equipment installation. Not going to be a long post because everything was pretty straightforward.

Mounting

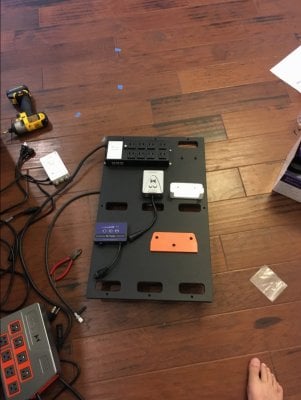
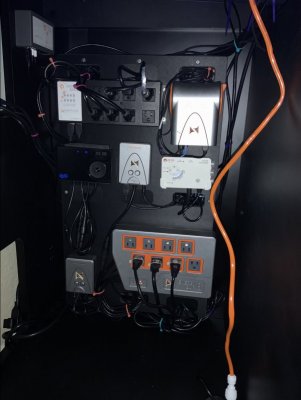
I decided to pickup the Marine Depot basic mounting board for the electronics. The dimensions are perfect for the cabinet and the material is like a particle board but lighter. Very impressed with the overall quality for the price.

It comes in 2 pieces so you can mount the base to the cabinet and then mount the equipment to the face without and gymnastics.

BBA856D4-443F-440E-A358-68B2373EBE0B.jpeg

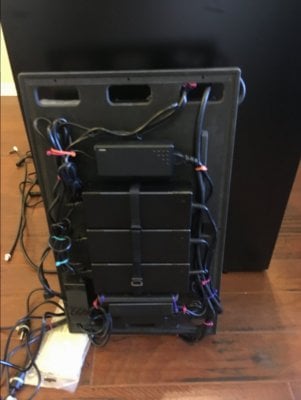
The unit is on the smallish side so getting the power bricks and wires ran tucked behind the board was probably the toughest part. Once that code was cracked, pretty straightforward. Thank god for zip ties and Velcro. Hoping heat won’t be an issue but I plan to monitor it closely for a few weeks. We’ll see.

DB2A3CEA-C1B3-40EA-B437-49B789D0D815.jpeg

Like I said, everything was pretty straightforward other than some unforeseen/unplanned issues.

Maxspect gyre 350’s

- I found that you can actually mount 2 350’s horizontal on opposite ends of the tank. The return side is just large enough to
Hold the magnet.
- if the plan is to have a gyre on the viewing side, any tank longer than probably 55” is going to need the extension. Unfortunately, it looks like the only place to buy one for the 350 is from coral view. I think it was 18 bucks so not too bad other than the wait for shipping.
- the flow with the 2 facing each other is phenomenal. I am running LTC at 60/40. Anything higher blows m medium grain sand. Very powerful.

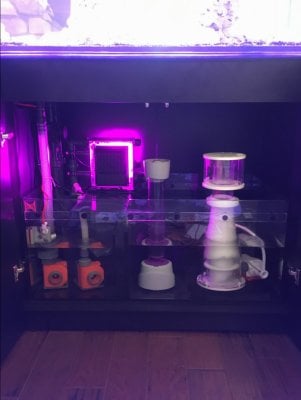
Reef Octopus Elite 150

- it’s a protein skimmer.
- the minimum water level for the peninsula 650 is 9in. The RO elite needs 7-7.8 inches. More delays waiting for egg crate. Ended up getting some snap lock eggcrate from Amazon. It was cheap and and a lot easier than the typical LFS stuff. It comes with feet that snap in. No zip ties and PVC for me this time.

Clear Water scrubber CW-100

- very nice unit and well made. Some things I don’t like but manageable.
- the simplicity pump I originally bought for this is utter garbage. Decided to just bite the bullet and buy a cor 15 so I could really get down and adjust the flow and save myself some hassle and an outlet because of 1 link.
- After hours of trying to get it right (flow vs sound level) I finally just broke down and picked up an inline flow valve. Now everything is dead silent and the flow is just right. Great combo for the Clearwater.

Notes and final thoughts.

- the Tunze ATO **** the bed and didn’t want to pump anymore so I picked an Apex ATK. With a little program magic, I was able to save another slot and power brick by just hooking up the pmup to the EB832 24v supply. The FMM gets power by the aquabus so... easy peezee.
- I had one Radion xr30 dead out of the box so off to ecotech for repair. Had to pick up another one to finish the build. Looks like a 4 xr30 setup when it comes back. PAR shouldn’t be a problem Lol. I have an apogee mq210 so I think I might do a full PAR thread once it gets up if anyone is interested.

Overall, everything went pretty smooth. Only real problem was waiting for shipments and dead equipment.

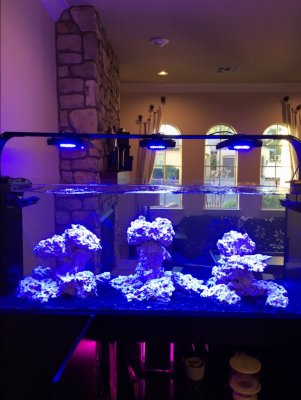
Here is the final product....

F349DA42-BD32-4FA5-BEB7-2B3A39A5F4F5.jpeg
A461BEC2-0F98-4930-8E8A-7F777CAED436.jpeg
DD22ECC1-63EF-427B-A773-3A3E3C6B8AD3.jpeg

 
Last edited:

Bubbles, bubbles, and more bubbles: Do you keep bubble-like corals in your reef?

  • I currently have bubble-like corals in my reef.

    Votes: 50 40.3%
  • I don’t currently have bubble-like corals in my reef, but I have in the past.

    Votes: 15 12.1%
  • I don’t currently have bubble-like corals in my reef, but I plan to in the future.

    Votes: 34 27.4%
  • I don’t currently have bubble-like corals in my reef and have no plans to in the future.

    Votes: 23 18.5%
  • Other.

    Votes: 2 1.6%
Back
Top