Programmable Logic Tips & Examples

Users Who Are Viewing This Thread (Total: 1, Members: 0, Guests: 1)

Kyle Sicard

Active Member
View Badges
Joined
Sep 24, 2015
Messages
169
Reaction score
94
Location
Atlanta Georgia
Rating - 0%
0   0   0
Profilux Programming Logic Tips, Tricks, and Examples

Intro:

The aim of this post is to help give people some perspective on how to use programming logic for your Profilux controllers. I have not had any sort of controller before and when I received my Profilux 4 Ultimate Package last week I was a bit star struck on the amount of settings the controller had to offer. At first glance I thought my P4 was limited, that is until I realized how the programming logic works. I have only owned a Profilux for about a week now, but I tend to be tech savvy and have a good understanding of how to implement programming logic. Lastly, let me go ahead and warn you that the programming logic that will be in this post is a bit limited since I only have the P4 ultimate package and nothing else, and to top it off since I have never owned a controller before I already have a lot of devices that have some sort of built in controller so unfortunately I do not have examples of more than just a few devices that I have set-up on the power bar.

Downloads and Info:

Before we go any further you will need to know what all the different settings do in the GCC software, without knowing how the settings work or what they mean you will be limiting the scope of your programming logic. Go to: https://www.aquariumcomputer.com/downloads/

You will need to first make sure your running the latest version of GCC and that your Profilux has up to date firmware. You will want to download several of the guides: Power bar 5.1 Manual, Profilux 4 Manual, Profilux 4 Programming Guide, and Programmable Logic Instructions. You will need to read these manuals and understand what all the different settings mean. It will take some time to read all of this. Make sure to keep the Programmable Logic Instructions Manual handy as you will need this to do your PL (Programming Logic).


My Tank & Equipment:

To understand my use of programming logic you will need to know how my tank is set-up and what equipment I have. My aquarium consists of two tanks, a 120g 48x24 and a 35g 38x18 frag tank plumbed to the same sump. The tank is a mixed reef and I have 20 fish with most of them being wrasses.

Lighting: Both tanks have DIY T5/LED hybrids

Water Flow: In my DT I have 2x mp40w QD’s and a Tunze 9410 in the frag tank

ATO: Tunze Osmolator 3155

Heaters: x2 Jager Eheim Heaters

Dosing Pump: Bubble Magus TM-01

Protein Skimmer: Eshopps Axium x-160

Return Pump: Jebao DCT 12000

Auto Feeder: Intellifeed Fish Feeder from Lifegard Aquatics

Controller: Profilux 4 Ultimate Package and no other accessories just yet.

Media Reactors: 1 carbon and 1 GFO reactor plumbed off a manifold from the return pump

Sensor Settings:

Before we can dive into the programming logic you will need to change some settings in the Probe/Sensor Controls. Here are how my temperature probe settings are configured in GCC.

You will notice that my alarm is active and deactivate control is turned off. It is crucial that you have deactivate control turned off. In theory deactivate control sounds like a good setting to turn on since it will cut the power to any device configured to your probe if an alarm is triggered. Let’s use the heaters as an example, let’s pretend that your tank loses power for several hours. In that time your tank temperature has dropped from 78 to 75. When the tank regains power and the Profilux temp probe says the tank is 75 it will trigger an alarm and thus will cut the power to the heaters. And if you are not home to witness this mistake your tank will run without heaters until you manually change a setting or turn the power back on. Instead of using this setting we will leave it off and configure your heater to not do what was mentioned above with programming logic. It’s entirely up to you, but I would repeat this setting for the other sensors unless your positive it will do no harm. Also for the temp probe you will want to change the default cooling difference from 0 to any number you desire as we will be using it in the PL for your heaters. I have no chiller, but the cooling difference will need to be turned on. And here are my salinity probe settings:

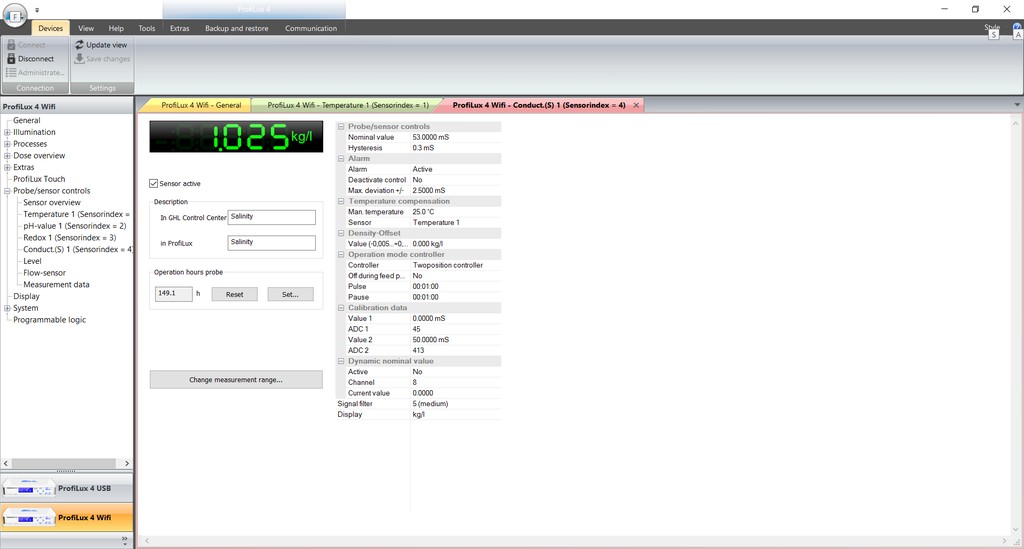
Currently I have no use for my PH and ORP reading since I don’t have any devices that use these probes and their settings, so as of for right now they are just for monitoring. The setting on deactivate control for my salinity probe is also off.

Switch Channels and Outlets:

Here is a picture of my Switch Channel and Outlet settings:

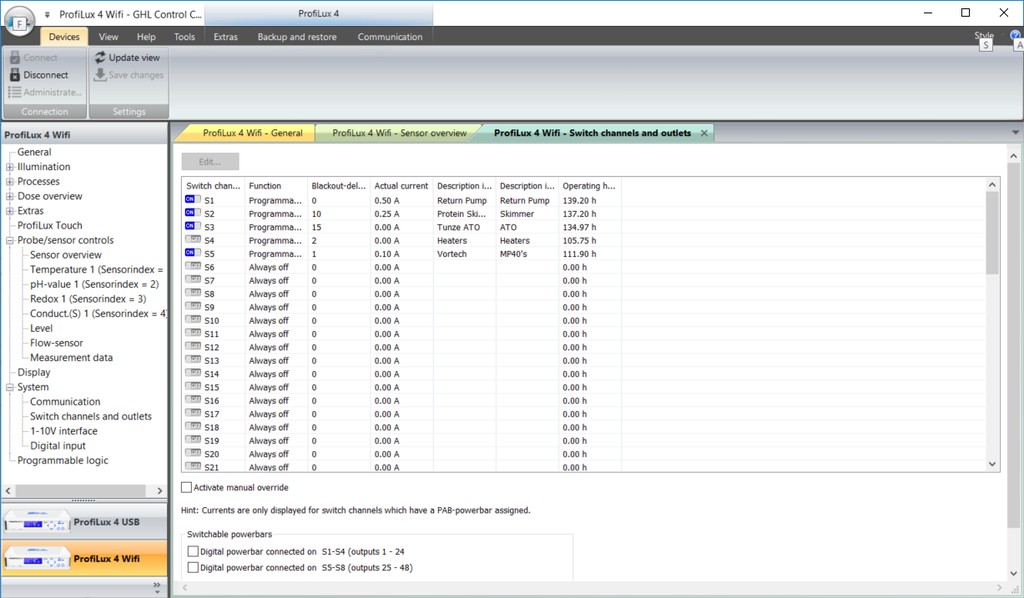
It is important to note that every single socket has the function set to programming logic. If you set your function to anything else, you are limiting the power of your Profilux. So far I have not found a single instance where using a different function setting for a socket gives you more scope of what you can control. Bare in mind I only have the base package, so I haven’t fully explored all the configurations due to the lack of various sensors/devices/equipment.

There are probably several different ways to achieve the same thing through the GCC settings but for my way of using PL you will want every socket set to the correct programming logic. And do not worry I will show you how to use PL so that your feed modes still work correctly, just because a pump is not set to the filter function does not mean that you cannot use feed mode to turn that device off, PL will still let you do that if you set it up correctly.

Programmable Logic:

I’m not claiming this is the best way to program your Profilux controller, and unfortunately these examples cannot be used as a cookie cutter for everyone. Since everyone’s controller and tank equipment are different you are more than likely not going to be able to use my exact PL configuration due to differing equipment or additional Profilux items like sensors and what not. It will be important that you document your PL statements very well so you can go back and edit them when you want to make a change. Also, I have tested all of my PL statements and I believe they are all working as intended, but I do make mistakes so please correct anything you see wrong.

The idea here is to basically build an infrastructure of programmable logic, I have set mine up in a way that lets me accomplish tasks that would not be possible without the use of PL. At this point you are going to need your Programmable Logic Instructions manual handy. We will start with my return pump settings.

(PL 8)

Since I do not have any level sensors I configured my return pump to turn off if both my salinity probe alarm and salinity probe decrease are to activate. The NAND function allows my return pump to stay on as long as the 2 input parameters are not both on at the same time. In other words, I want my return pump to turn off if my salinity reaches too high of a level, meaning that the water level has dropped inside my sump. Implementing a level sensor would accomplish this task much better but since I do not have one this is the best I could do for preventing the return pump to run dry.

(PL 9)

This PL statement is also for my return pump. This one isn’t necessary but I just wanted to ensure that if I ever activate maintenance 4 my pump will turn off. As long as both inputs are off then my return pump will be on, it will only shut off if maintenance 4 is activated.

(PL 7)

And this is my final PL for my return pump, this PL statement ties together the 2 previous statements and is ultimately the PL that I set to function in the sockets and switch menu. What it is saying is that as long as the 2 previous PL statements are ON then the return pump is ON, if either previous PL turns Off then the controller will switch the socket to the return pump OFF.

Now for my heaters, here is the first PL statement

(PL 3)

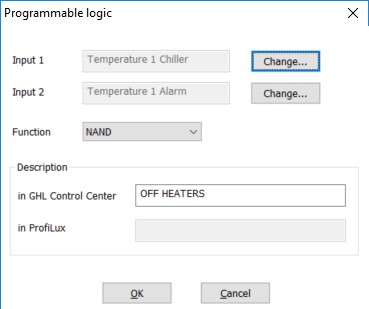
This PL turns OFF my heaters when both the chiller activates (remember the cooling difference setting in the probe menu) and the temperature probe sounds an alarm. This way the heater will only be turned off if the tank temperature is above the nominal temperature and will still function if the alarm is on but the tank temperature is below instead of above the nominal temperature.

(PL 17)

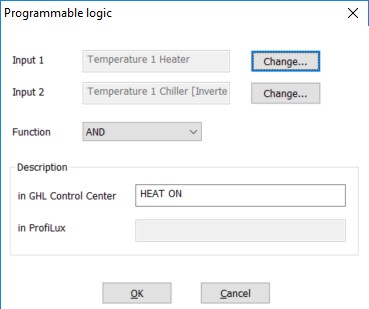
This PL statement only allows the heater to be on if the temp probe sets the heater to be on and if the cooling difference is not activated. This way my heater won’t ever be turned on if the chiller is activated, meaning the tank temperature is high enough to where the cooling difference turns on. I inverted the chiller setting to accomplish this, otherwise the heater would never turn on. This is mainly just for unforeseen glitches. It locks the heaters into their intended functionality, but this step isn’t really necessary.

(PL 16)

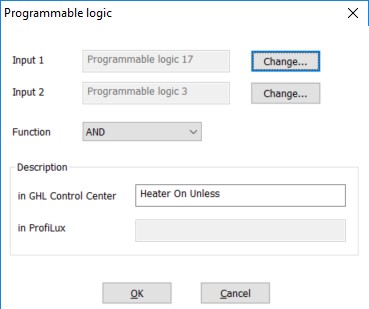
This statement ties together the 2 previous statements so that they must both be on for the heaters to turn on. If either statement switches to off, then it switches the heaters to off.

(PL 14)

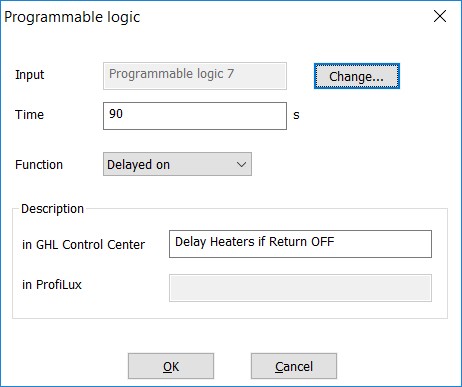
This PL delays my heaters from turning back on for 90 seconds if the return pump is ever turned off. This gives my return pump some time to get started and circulating water throughout tank before the heaters kick on. This will also prevent my heaters from being delayed if they are turned off for any other reason. I only wanted the delay feature to be turned on if the return pump is turned off for any reason.

(PL 15)

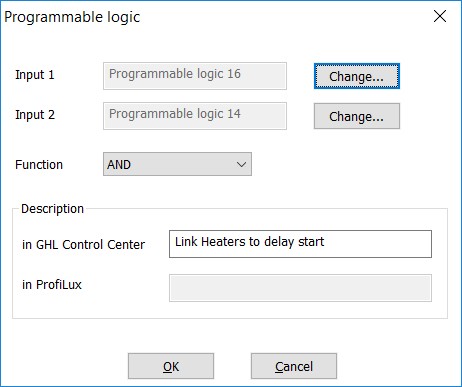
This PL links my heaters to the return pump via the delay start (PL 14) This way if my return pump is ever turned off then my heaters will also be turned off and delayed upon restart. I wouldn’t want my heaters activated if there is no water circulation. It also ties together PL 16 so if at any time my return pump is turned off or PL 3 or PL 17 is switched to off then it will cut the power to my heater socket. This is ultimately what I set my function to in the switch menu for my heaters.

Here are my vortech settings with the feed mode included into the PL.

(PL 10)


(PL 11)


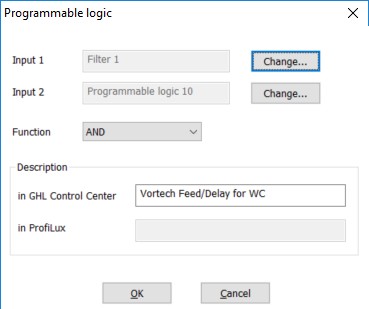
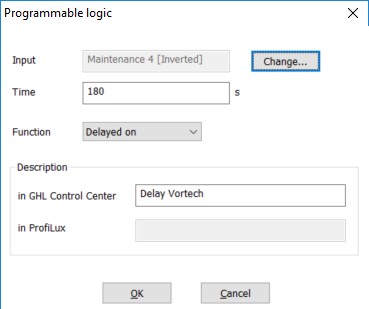
This way my vortech pumps are always ON unless I activate filter 1 (meaning feed mode 1) or the return pump is switched off for a water change via maintenance 4. I set it up this way so if my return pump gets shut off for any reason other than a water change the vortechs will continue to stay on in hopes that it will save the tank by continuing to circulate the water in the DT.

Lastly, I added a delay feature for when I activate maintenance 4 for a water change. Sometimes I fill the sump up and turn the return on while I pump water to the sump and the delay will only activate if I press the maintenance 4 button so in case I don’t have water back in the display they will not turn on immediately and run dry. I didn’t want my vortechs to delay start when I push feed modes so I set-up a way that it will only delay during a water change via PL 10. In order to achieve the results I wanted with the delay feature you have to invert the maintenance input so that it will function as intended for how I configured it. PL 11 is what I set my function to in the switch menu for my vortech socket.

For my ATO, since I’m using a Tunze Osmolator I already have a controller that has 2 sensors to control the top off pump so all I did was configure some PL statements to provide fault prevention and ease of maintenance when servicing the tank.


(PL 1)

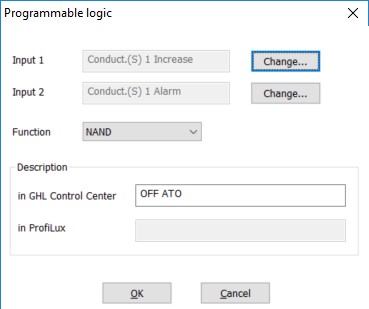
PL 1 switches the socket off if the alarm is on and if my controller says the salinity needs to be increased. Meaning the only time the power will be switched off for the ATO is if the salinity reaches a low level, AKA the top off failed to turn off and dropped my salinity really low from diluting the tank with freshwater.

(PL 4)

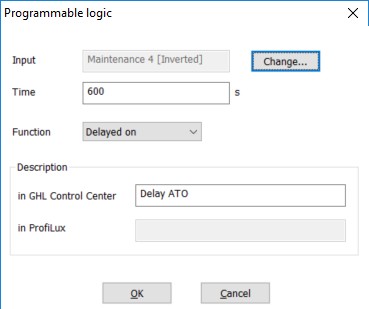
PL 4 is used as a delay timer if I activate maintenance 4 (my water change button), I don’t want the top off being delayed unless this action were to occur.

(PL 6)

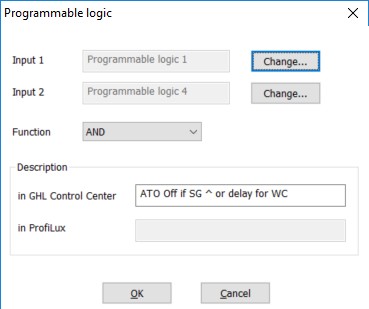
Lastly, PL6 ties together PL 1 and 4 so that if either one is to switch to off then my socket for my ATO will be turned off. I plan to expand more on my functionality whenever I get my hands on some level sensors. PL 6 is what I set my function to in the socket/switch menu for my ATO.

For my skimmer:

(PL 2)

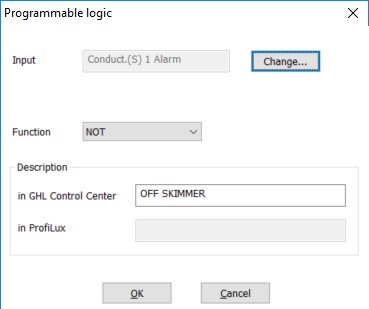
PL 2 cuts the switch off to my skimmer if my salinity gets too high or low. Without float/optical sensors for my P4 this is my best attempt at shutting down the skimmer if the water level gets too high or low in my sump.

(PL 5)

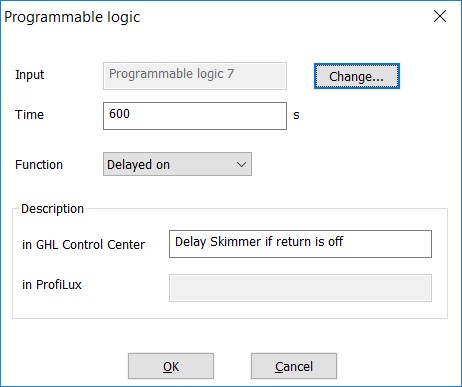
PL 5 shuts my skimmer off and delays its start-up if my return pump is ever to shut off for any reason. This way my skimmer wont overflow if the return is shut down. This way my skimmer wont delay start if I turn it off for any other reason like when I clean the cup and change filter socks. Maintenance 1 and 2 on my controller are for the skimmer and ATO, I don't want either equipment to delay start when I push those buttons.

(PL 18)

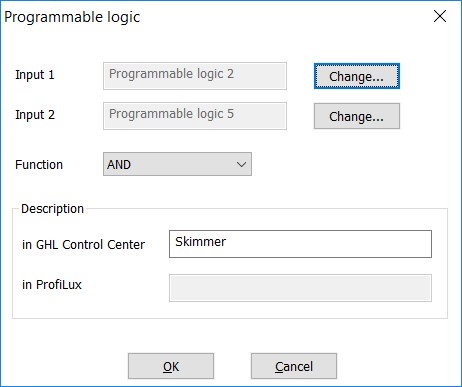
PL 18 is what ties together PL 5 and PL 2 and is ultimately what I set my skimmer’s function to in the sockets and switch menu.


Conclusion
Currently I only have the 4 standard probes that came with my unit so a lot of the configurations I did were all based off readings from the sensors. It will be much more effective to use float/optical sensors for some of the PL statements I made. So, keep that in mind that I set this up the way it is because I just don’t have the level sensors yet. Hopefully this will give you a decent idea as to how to work with PL in order to achieve the functionality you desire for your controller. I would recommend making a list of your equipment and beneath that equipment list all the functions you want your PL to control, this will give you a good idea of what you want to accomplish. From there pull up your programmable logic manual and think things through carefully and attempt to setup the PL that you desire. It is imperative that you test all of your PL, I like to change the nominal settings on my probes to test the functionality of the PL I created. You can crank the nominal value really high or really low then watch the sockets through GCC to see if they are responding the way they should be.
 
Last edited:

BCSreef

Well-Known Member
View Badges
Joined
Jan 22, 2016
Messages
599
Reaction score
482
Location
Maineville, OH
Rating - 0%
0   0   0
Very helpful! Thanks for taking the time to write all that up. You have given me some nice ideas that will work on my system.

I too am waiting on level sensors. When they arrive, I'll post the PL used to ATO with kalk at night with an upper pH limit.

Bob
 

d2mini

5000 Club Member
View Badges
Joined
Sep 2, 2013
Messages
5,070
Reaction score
8,580
Location
Houston, TX
Rating - 0%
0   0   0
Thank you, KYLE!!!

This is terrific.

Just to let everyone know, I'm going to eventually combine the information in this thread with the other one we already started, so it's all concise and in one spot.
So if you see one of them disappear at some point, you'll know everything still exists, just look for the other thread. Which we'll sticky. :)
 

Robthorn

Well-Known Member
View Badges
Joined
May 16, 2009
Messages
528
Reaction score
305
Location
Largo, FL
Rating - 0%
0   0   0
Good job and please don't take this wrong. I only know how to be direct so here goes. lol

You have done a good job of faking safeties but this is only if the Profilux glitches which may in turn glitch enough to not make your safeties work. Sorry but I can't think of a better word than faking. I do not mean to offend.

For instance turning your skimmer off. This is my main issue with the profilux. I have a bad memory so I may get a bit mixed up here but. I wanted to shut my skimmer off if I have an actual issue. Say if my circulation pump actually goes bad. The Profilux will still have the outlet set to on so your skimmer will not shut off. You are left with a bad pump and possibly a mess from overflowing. What I did on a competitors controller was a simple float switch. If the High Sump level opens then I shut down multiple things like the ato and my skimmer and whatever else I come up with.
On the Profilux you can easily go in and set a hand pushed maintenance but you can't just trigger multiple items with a simple input/ float switch. I can't believe they haven't thought of this let alone implemented it. Seems like a very simple task that should have been included in version 1.
So I guess I have to ask what you plan to do if you have an actual component failure?
Not you of course but some are thinking and telling others you don't need safeties with a Profilux like you do other manufacturers. Its not so much the controller I worry about with safeties. Its everything else that can go wrong outside of the controller I worry about. If it was the controller I wouldn't really need one. I would surely sleep better without one. :)
 

Robthorn

Well-Known Member
View Badges
Joined
May 16, 2009
Messages
528
Reaction score
305
Location
Largo, FL
Rating - 0%
0   0   0
In your conclusion you said it will be good to use floats in your PL. Sorry for the bad news but if you have the same software version as me you can't. Level sensors in my software are not an option. Sorry to ruin your great idea.
Please let me know if you see them in there.
 

Gaël

Well-Known Member
View Badges
Joined
Sep 27, 2014
Messages
612
Reaction score
355
Location
France
Rating - 0%
0   0   0
I have a 400l tank + 100l refugium + 250l extension and a sump.
level.png
levelbis.png
PL.png
switch.png


I use 12 level sensor input:
level input 6->switch level sensor on my micron bag (for alarm and notify)
level input 13->leaks detect sensors (for alarm and notify)
level input 14->low battery sensor on my battery setup (for alarm, notify and shutdown none critical stuff )
levels inputs 3 and 4->2 optical level sensor for ATO and rain
level input 8->optical level sensor for too low water level detection (for alarm, notify and shutdown sump pumps, uv, chiller)
level input 9->level-sensor contactless for too hight water level detection (for alarm, notify and power on emergency drain pump)
level input 10->level-sensor contactless for detect water in tank emergency overflow pipe (for alarm and notify)
level input 11->level-sensor contactless for detect water in refugium emergency overflow (for alarm and notify)
level input 12->level-sensor contactless pl-0627 on my skimmer cup (for alarm, notify and shutdown skimmer)
level input 5->level-sensor contactless pl-0627 for detect too high water level on extension overflow (only one one pipe return to sump) (for alarm, notify and shutdown extension pump (+ chiller and uv because they are on the same pipe)
level input 7->level-sensor contactless pl-0627 for detect empty osmosis water reserve (for alarm and notify and protect osmosis pump)
 

d2mini

5000 Club Member
View Badges
Joined
Sep 2, 2013
Messages
5,070
Reaction score
8,580
Location
Houston, TX
Rating - 0%
0   0   0
You will notice that my alarm is active and deactivate control is turned off. It is crucial that you have deactivate control turned off. In theory deactivate control sounds like a good setting to turn on since it will cut the power to any device configured to your probe if an alarm is triggered. Let’s use the heaters as an example, let’s pretend that your tank loses power for several hours. In that time your tank temperature has dropped from 78 to 75. When the tank regains power and the Profilux temp probe says the tank is 75 it will trigger an alarm and thus will cut the power to the heaters. And if you are not home to witness this mistake your tank will run without heaters until you manually change a setting or turn the power back on. Instead of using this setting we will leave it off and configure your heater to not do what was mentioned above with programming logic.

I've never used "deactivate control" before.
My temp regularly goes well above what I have the heater set for (i dont run a chiller on this tank), and the socket turns off when the water temp is above my temp setting.
Why would I want to deactivate control?
 
OP
OP
Kyle Sicard

Kyle Sicard

Active Member
View Badges
Joined
Sep 24, 2015
Messages
169
Reaction score
94
Location
Atlanta Georgia
Rating - 0%
0   0   0
I've never used "deactivate control" before.
My temp regularly goes well above what I have the heater set for (i dont run a chiller on this tank), and the socket turns off when the water temp is above my temp setting.
Why would I want to deactivate control?
If I'm reading your question correctly, I think what your asking is why would you want deactivate control off? I posted a example of how it could potentially cause harm if you turned it on. It cuts power to the socket regardless of whether your tank is below or above the nominal temperature if an alarm is triggered. I personally wouldn't want my heater socket turned off if the temperature was low enough to trigger an alarm. I used PL to only turn off the heaters if the temperature was above the nominal temperature.
 

Robthorn

Well-Known Member
View Badges
Joined
May 16, 2009
Messages
528
Reaction score
305
Location
Largo, FL
Rating - 0%
0   0   0
Ga I see that you said you are doing what I wanted to do. Use a level sensor to trigger off outlets to protect those devices.
I do not see how to do that in the controller nor in the pictures you posted. Do you mind explaining how you were able to accomplish this?
I want to shut off my main circulation pump and my skimmer and my heater and sump circulation pump if the low level sump float opens.
I also run a high sump level switch as well to trigger other items as well as my skimmer.

Thank you in advance,

Robert
 

d2mini

5000 Club Member
View Badges
Joined
Sep 2, 2013
Messages
5,070
Reaction score
8,580
Location
Houston, TX
Rating - 0%
0   0   0
If I'm reading your question correctly, I think what your asking is why would you want deactivate control off? I posted a example of how it could potentially cause harm if you turned it on. It cuts power to the socket regardless of whether your tank is below or above the nominal temperature if an alarm is triggered. I personally wouldn't want my heater socket turned off if the temperature was low enough to trigger an alarm. I used PL to only turn off the heaters if the temperature was above the nominal temperature.
No, i'm wondering why anyone would turn it on. I've never had it on and its off by default.
I never even realized it was there until you mentioned it. :)
 
OP
OP
Kyle Sicard

Kyle Sicard

Active Member
View Badges
Joined
Sep 24, 2015
Messages
169
Reaction score
94
Location
Atlanta Georgia
Rating - 0%
0   0   0
In your conclusion you said it will be good to use floats in your PL. Sorry for the bad news but if you have the same software version as me you can't. Level sensors in my software are not an option. Sorry to ruin your great idea.
Please let me know if you see them in there.

Ga I see that you said you are doing what I wanted to do. Use a level sensor to trigger off outlets to protect those devices.
I do not see how to do that in the controller nor in the pictures you posted. Do you mind explaining how you were able to accomplish this?
I want to shut off my main circulation pump and my skimmer and my heater and sump circulation pump if the low level sump float opens.
I also run a high sump level switch as well to trigger other items as well as my skimmer.

Thank you in advance,

Robert

When I get my level sensors I'll post back with how to configure them. I plan to use 3 level sensors in my setup. 2 in the sump for when water gets to low and the other for when the water level gets to high in the sump. The third sensor will be for my ATO reservoir, so I get alerted when the water level gets low in the reservoir.
 

Robthorn

Well-Known Member
View Badges
Joined
May 16, 2009
Messages
528
Reaction score
305
Location
Largo, FL
Rating - 0%
0   0   0
If you had a 4th you could keep your sump level constant controlling an ato pump. :)
 

BCSreef

Well-Known Member
View Badges
Joined
Jan 22, 2016
Messages
599
Reaction score
482
Location
Maineville, OH
Rating - 0%
0   0   0
If you had a 4th you could keep your sump level constant controlling an ato pump. :)

I'm in the same boat as Kyle - waiting for 2 floats to use PL for ATO wich sill be controlled by a number of inputs. I do have 2 floats that are on each of 2 thanks. They shut off the return pumps to protect not the pumps but the floors and my marriage. No PL needed. But, i'll likely use PL for alarms, e-mail when available.

First I set Float #3 as shown below.
upload_2017-3-17_11-24-12.png


Socket (outlet) 6 controls my 180 return pump. See below.

upload_2017-3-17_11-28-6.png


If water level in the 180 tank gets too high it shut off the return pump. When the level drops, the pump goes back on since I checked the "reset error" box in the 1st screen shot.

You could do the same but for a low level float in your sump, click the invert box in the 2nd screen shot. That should shut whatever is on that socket off on low water. Or try the "drain water" function. That may work without the invert option.

There are a few different ways to handle what you are after.

Hope that helps.

Bob

upload_2017-3-17_11-23-41.png
 

Gaël

Well-Known Member
View Badges
Joined
Sep 27, 2014
Messages
612
Reaction score
355
Location
France
Rating - 0%
0   0   0
Ga I see that you said you are doing what I wanted to do. Use a level sensor to trigger off outlets to protect those devices.
I do not see how to do that in the controller nor in the pictures you posted. Do you mind explaining how you were able to accomplish this?
I want to shut off my main circulation pump and my skimmer and my heater and sump circulation pump if the low level sump float opens.
I also run a high sump level switch as well to trigger other items as well as my skimmer.

Thank you in advance,

Robert
"fill water" with the number of the control circuit is the solution. :)
 

chefjpaul

2500 Club Member
View Badges
Joined
May 21, 2014
Messages
3,278
Reaction score
4,667
Location
South Florida
Rating - 0%
0   0   0
Hey.
Great write ups, I appreciate them.

I have a couple questions programming PL & ATO / Heater.

I have my regular ato set, but I have 2 floats in my tank resivor to be filled from a large main resivor. In PL, I cant seem to get the right function to operate high / low floats.
Thanks
 

BCSreef

Well-Known Member
View Badges
Joined
Jan 22, 2016
Messages
599
Reaction score
482
Location
Maineville, OH
Rating - 0%
0   0   0
I don't think you need to use PL for 2 floats. On Page 64 of the programming guide, one of the following functions can be assigned to a socket without PL.

Min/Max-control
Two sensors work together to control a water level. Sensor 1 works as a maximum-switch, sensor 2 as a minimum-switch. As soon as sensor 2 registers a too low level, the switchable socket with function Fill water is switched on. When the water level reaches then sensor 1, the switchable socket is switched off again.

ATO 2 sensors
Like ATO, but 2 sensors are used to register the same level. Only if both sensors register at the same time a too low level, the switchable socket with function Fill water is activated. So this function offers an additional safety.

Is one of the above what you are after?

Bob
 

chefjpaul

2500 Club Member
View Badges
Joined
May 21, 2014
Messages
3,278
Reaction score
4,667
Location
South Florida
Rating - 0%
0   0   0
I don't think you need to use PL for 2 floats. On Page 64 of the programming guide, one of the following functions can be assigned to a socket without PL.

Min/Max-control
Two sensors work together to control a water level. Sensor 1 works as a maximum-switch, sensor 2 as a minimum-switch. As soon as sensor 2 registers a too low level, the switchable socket with function Fill water is switched on. When the water level reaches then sensor 1, the switchable socket is switched off again.

ATO 2 sensors
Like ATO, but 2 sensors are used to register the same level. Only if both sensors register at the same time a too low level, the switchable socket with function Fill water is activated. So this function offers an additional safety.

Is one of the above what you are after?

Bob
Thanks, I found away. I actually changed things up a bit.

Thank you.
 

Bubbles, bubbles, and more bubbles: Do you keep bubble-like corals in your reef?

  • I currently have bubble-like corals in my reef.

    Votes: 46 41.1%
  • I don’t currently have bubble-like corals in my reef, but I have in the past.

    Votes: 12 10.7%
  • I don’t currently have bubble-like corals in my reef, but I plan to in the future.

    Votes: 32 28.6%
  • I don’t currently have bubble-like corals in my reef and have no plans to in the future.

    Votes: 20 17.9%
  • Other.

    Votes: 2 1.8%
Back
Top