I want to build my own saltwater mixing station. Are there any good diy plans or blueprints out there? I know I’ve saw plenty of nice ones from several different reefers. Where should I start?

Navigation
Install the app
How to install the app on iOS
Follow along with the video below to see how to install our site as a web app on your home screen.
Note: This feature may not be available in some browsers.
More options
You are using an out of date browser. It may not display this or other websites correctly.
You should upgrade or use an alternative browser.
You should upgrade or use an alternative browser.
Saltwater Mixing Station
- Thread starter Chiefmaster30
- Start date
- Tagged users None


143MPCo
ASSIST PROTECT DEFEND
View Badges
Excellence Award
Photo of the Month
Article Contributor
Moderator Emeritus
Reef Squad Emeritus
- Joined
- May 14, 2012
- Messages
- 6,696
- Reaction score
- 8,295
Nope, not a one.Are there any good diy plans or blueprints out there?
")
https://www.reef2reef.com/threads/let’s-mix-it-up-designing-and-using-a-water-mixing-station.270585/
Let’s Mix it Up!
Designing and Using a Water Mixing Station
Let’s Mix it Up!
There is one undeniable fact in this hobby – WE ALL NEED WATER! In fact, two types of water. Clean fresh water (FW) run through a quality RODI system and the obvious saltwater (SW). Secondly, we all know what a water change is. This is not an article on whether or not water changes are required or necessary, nor is it an article to discuss frequency. Your research and ultimate reefing philosophy will determine those answers for you.
Water changes can be done using something as simple as a 5-gallon bucket. If that is how you currently do it, and you’re okay with that, you can stop reading and move on. But if you’re looking for something a little more formal, and might I add potentially easier, you may want to continue reading. I’ll try not to bore you too much!
My personal goal was to never lift another bucket again…simple as that. So I started searching the internet for ideas. Between Google, forums, Youtube and Mytube, I quickly realized I didn’t need to recreate the wheel. There are a plethora of designs out there to choose from…pick one. Remember, imitation is the highest form a flattery!
The most critical component of making water is obviously the RODI unit. All I will say is if you don’t have one yet, get one! I am of the opinion that having control of your water is vital. Making your own (nothing against LFS’s, I love mine) is about the only way to ensure you know the exact quality of your water.
The Equipment
Subject to the design you choose, here’s a simple breakdown of what you will and/or may need:
- RODI unit you already have or will be buying (hint-hint)
- A shut-off valve and float switch – no flooding necessary!
- Water storage containers with lids – two of them preferably
- One for FW, and one for new SW
- These should be food-grade quality containers, preferably they will be NSF Approved
- Size determined by your needs/system capacity
- The grey Brute trash cans are very common and often used
- Although more costly, the water storage containers found online and in farm supply stores work nicely as well
- Plumbing
- I like to use good old PVC (we usually have some laying around anyway right)
- Ball valves, T’s, Elbows and Unions
- Connections – Plumbing into container walls and/or tops
- Bulkheads for flat surfaces
- Uniseals for curved surfaces
- Pump for mixing
- If designed properly, you can use one pump for mixing and distribution
- Powerhead and Heater – resides in the SW container
- A switched Power strip for easy control (optional)
- Hose long enough to reach your display/sump/top-off reservoir
- Or if you have the ability to hard plumb to your display, even better.
Obviously, this will be unique to your environment. My biggest suggestion is in a controlled environment, meaning it’s heated and/or cooled depending on your climate. If you’re lucky enough to have a fish room, then it’s pretty obvious! If not, then maybe it’s a spare closet, the laundry room, the garage or basement may work if temperatures are at least somewhat stable. Note: Garages and basements, particularly non-insulated ones, can cause issues with RODI unit production during extreme temperatures, so choose your space wisely.
You may have to get creative. In my case, my wife wanted me to redo the foyer. Through intense negotiations (which I rarely win) I was able to commandeer the coat closet that had become the dumping grounds for all things junk. I took that space, which happened to back to our laundry room. So she got a new foyer and I got the perfect spot for a mixing station. Use your creativity and you’ll be surprised what you can come up with.
One thing you do have to keep in mind is access to water supply and drainage. That RODI unit you already had or will be getting soon (hint-hint) doesn’t come with its own water! That’s why a laundry room works great. You’ll have both the supply and drain for the washing machine right there at your disposal.
The Assembly
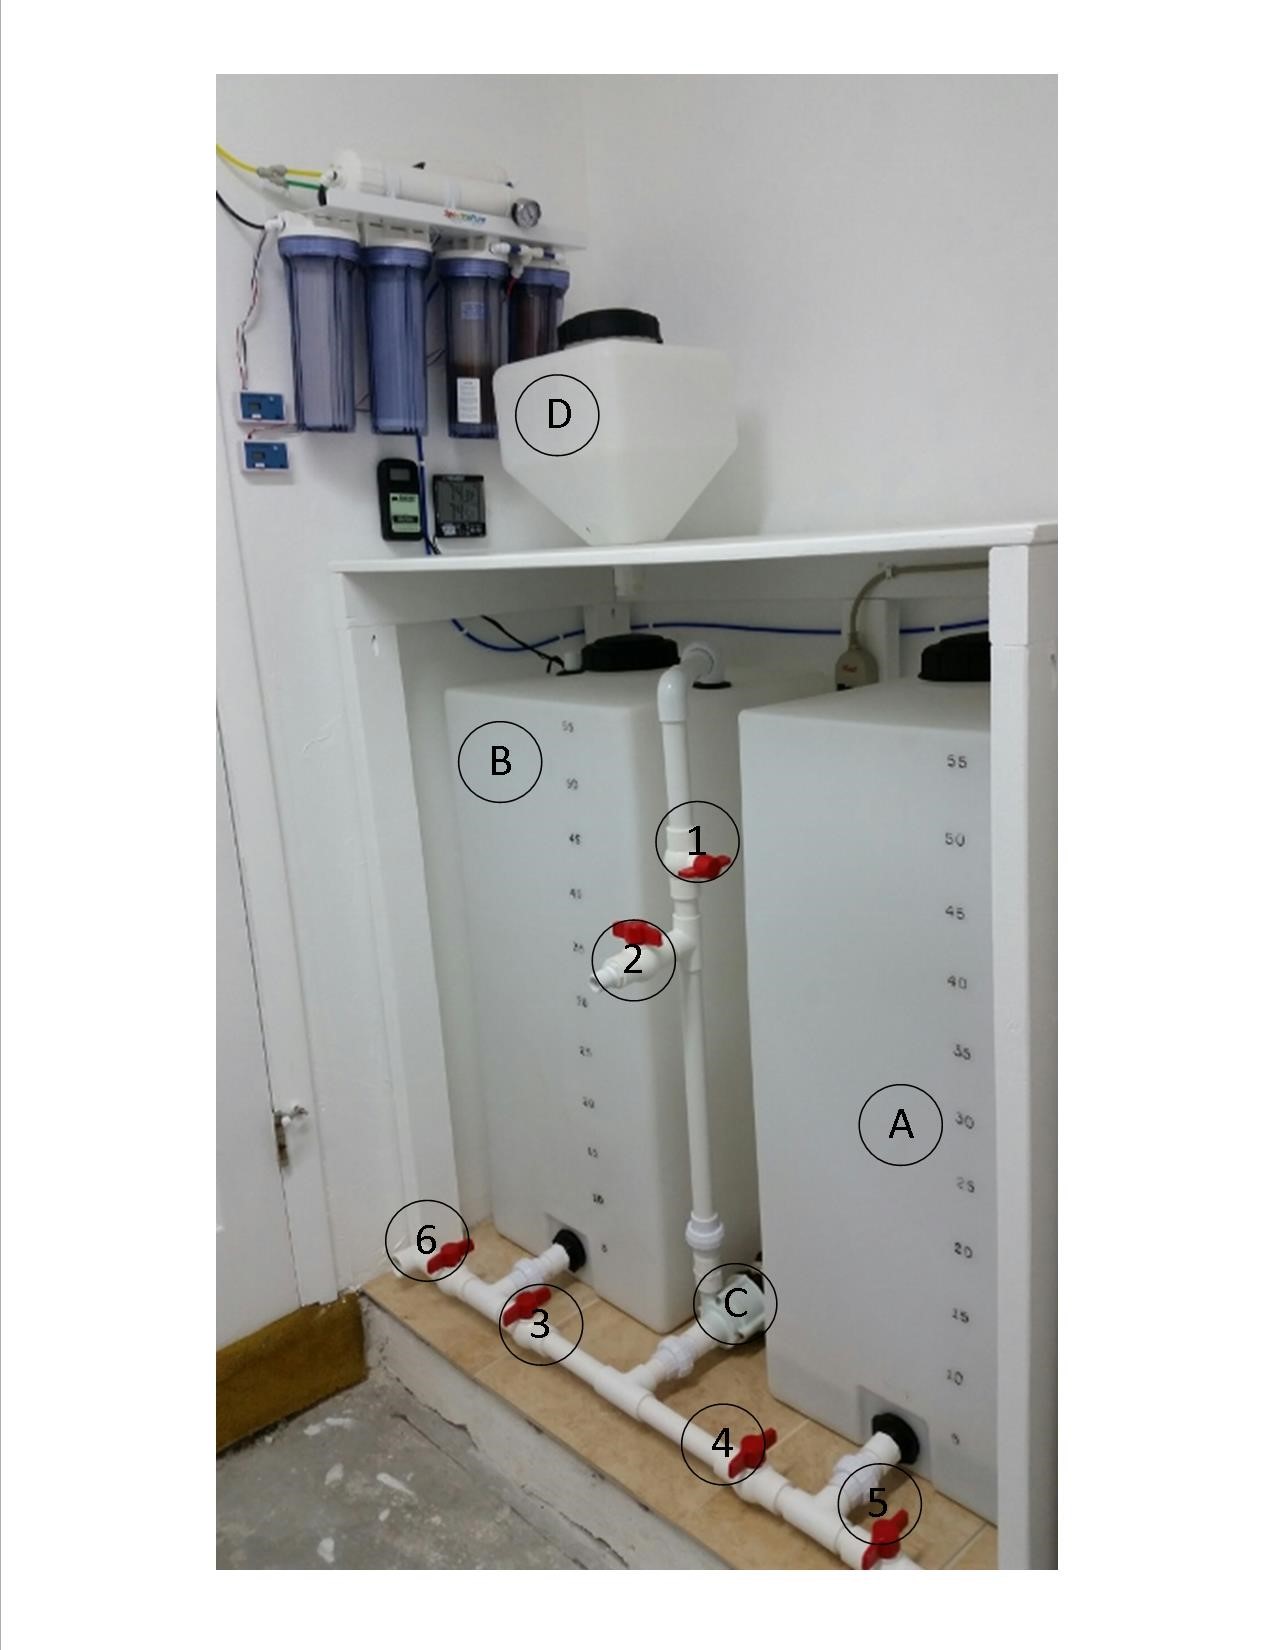
By now, you should have already flattered someone by using their design, but here is a breakdown of the basics. To try to make this easier, the image below is a picture of mine just after setting it up. I’ve labeled things and will refer to this image moving forward.
You can see my RODI unit mounted above. The lettered items are “equipment” and the numbered items are “valves”. This is merely for reference and by no means the only (or best for that matter) way of putting together a mixing station.
The main idea of doing all this is to mix and move water, so at a minimum, your new mixing station should be able to:
- Transfer water between containers
- Pump/circulate water within the SW mixing container for well, mixing!
- Pump both FW and SW to the display and/or top-off reservoir.
- You will want to be able to empty the containers in case of prolonged power outage or a visit from Mr. Murphy - the inevitable pump failure.
The Operations – (Using the picture above for reference)
Your RODI system will produce FW and be stored in the first container A. You will use this FW for top-offs, as well as supply your second container B with water that will become your new SW after mixing. With this design and the turning of a few valves, pump C does all the work. Said differently, no more buckets!!! So let’s move some water:
For discussion purposes, assume all valves are closed (like pictured) at the beginning of each task – represented by numbered items below. I would recommend closing all valves at the end of any task to lessen the chances of cross-contaminating the FW and SW. You will also need a hose with a ball valve on the output end. Again, if you can hard plumb to your display/sump/ATO reservoir, all the better.
- Move FW to top-off reservoir in the stand under display (in my case)
- Attach the hose to the outlet of valve 2 (there is a hose bib converter on the end of that valve)
- Open valves 2 and 4, turn on pump C to fill reservoir via the hose
- Move FW to the SW container B for mixing
- o Open valve 1 and valve 4, turn on pump C to pump over to container B.
- Mixing new SW
- o Put salt into container B
- o Open valve 1 and valve 3, turn on pump C and begin mixing salt via circulation
- Editor Note: In my case, I built a shelf over my mixing station, so I purchased the hopper D to add salt. Totally unnecessary if you have access to the top of your container.
- Move SW to Display for Water Change
- Open valves 2 and valve 3, turn on pump C to pump SW to display via the hose
- Empty Containers without pump due to power outage or visit from Mr. Murphy
- Attached hose to end of either valve 5 or 6, and open the valve. Gravity will do its thing
I have a heater inside container B. I only heat just prior to using the SW. Some will argue this is not necessary dependent on the quantity of your water change, which may very well be true. But since I have the heater already, I just try to match the display.
Water Storage and Continued Mixing:
This is another area of debate among hobbyists. We’ve all seen the threads asking “How long can I keep mixed saltwater?” And “Should I keep it mixed”. There are far too many choices/options to discuss here. Me personally, I mix up about 50 gallons at a time. I mix and heat just prior to performing a water change.
When it comes to storing your RODI water, the important factor is to keep it sealed as tightly as possible. Very simply put, RODI water has been stripped of all things bad, and if allowed, it will try to grab those bad things back! So an airtight lid is best and no stirring necessary.
Over time your containers interior may build up some nasty’s and need to be cleaned. An annual cleaning (or more often if necessary) is recommended – let vinegar be your friend.
Extras
You may have noticed on my station a couple things under the RODI unit. In addition to a powerhead and heater, I also have a salinity monitor and thermometer inside the SW container. I didn’t want to drill a hole in the lid, so I came up with this.
Are there fancier ways of doing this, sure? Did I have this stuff already lying amongst my fish stuff, heck yes! It works great and is essentially airtight once the uniseal is capped with the PVC. Lastly, although I do not have a picture, all the interior items in my SW container are zipped tied to a long piece of PVC that rests inside the container. So if need be, I can pull that one piece of PVC out and bring all the equipment with it. That is the one thing I thought of myself!!!
Let your imagination run wild with one goal in mind…what you can do to make things easier on yourself. This hobby can be difficult enough on its own. Something as simple as a well-designed mixing station can make your weekly/bi-weekly/monthly/whenever water changes a little easier.
I hope this has helped at least give you an idea of the what’s and how’s of a mixing station. Don’t be afraid to put yours together. Having control of the water quality will be something you will never regret. Never lifting another bucket isn’t bad either.
Happy Reefing!
- Joined
- Oct 25, 2018
- Messages
- 62
- Reaction score
- 77
I want to build my own saltwater mixing station. Are there any good diy plans or blueprints out there? I know I’ve saw plenty of nice ones from several different reefers. Where should I start?
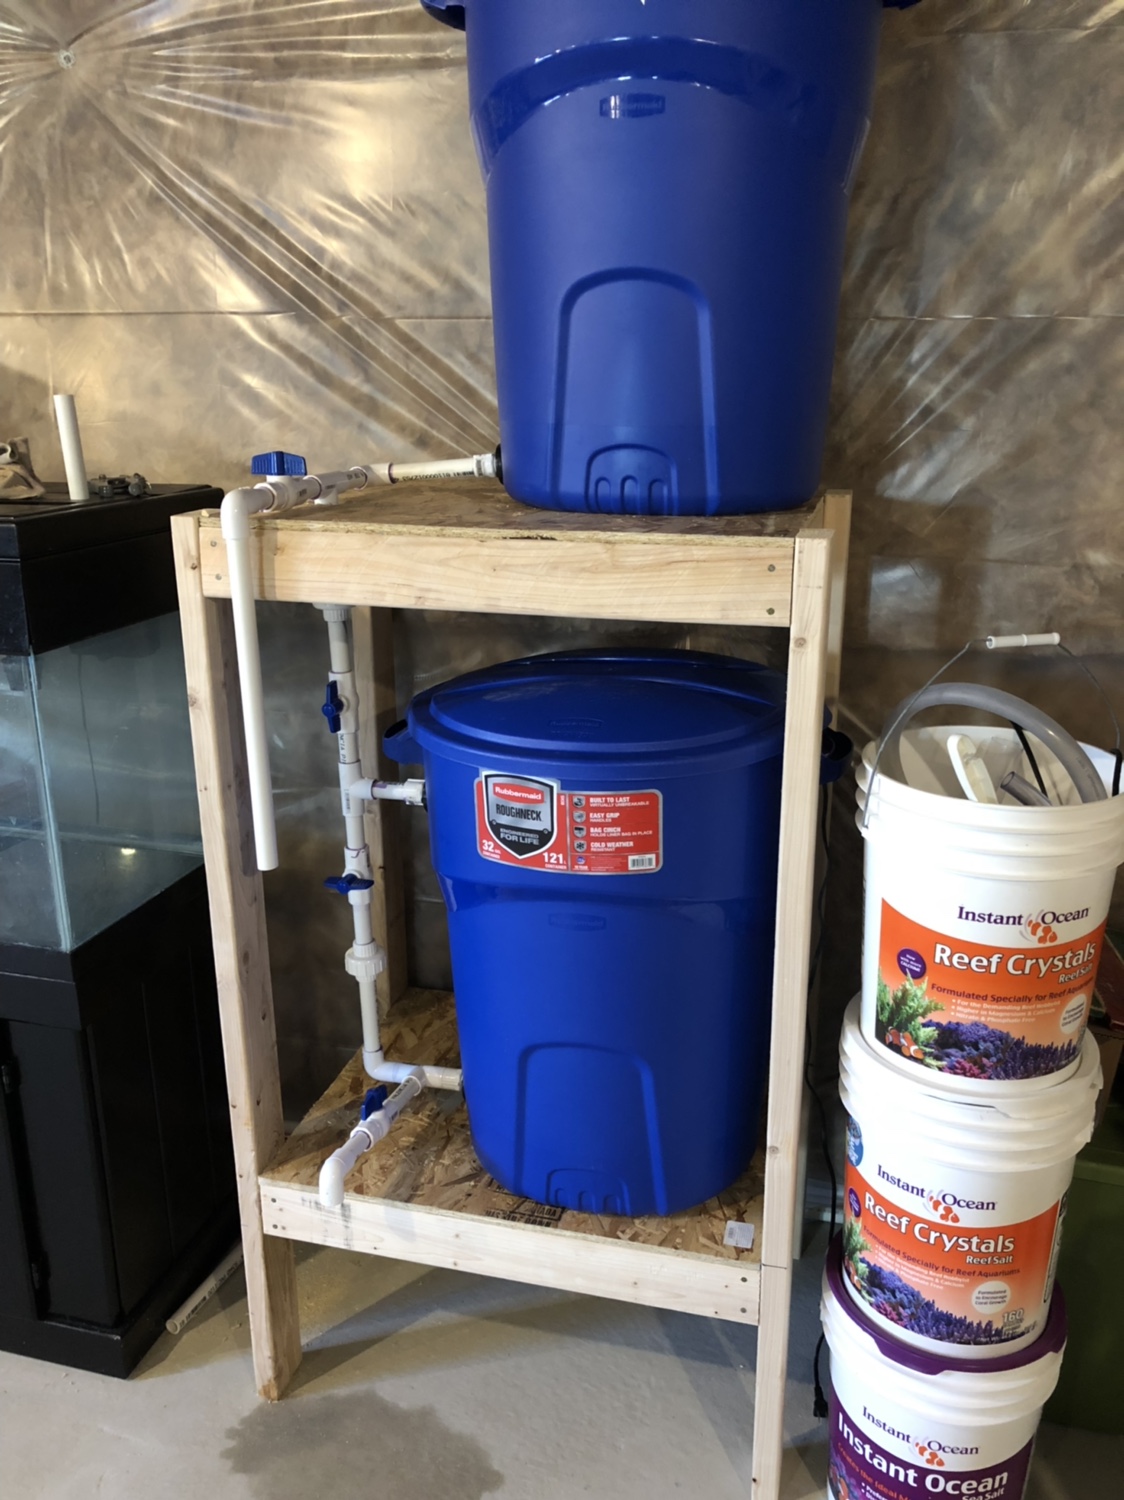
Mine costed me only $75ish. I can mix up batches of up to 32 gallons or I can transfer water into the upper tank and mix another batch below for up to 64 gallons. That is more than I will need with my current tank. But yeah minus the RODI system, the submersible pump, and the heater I already owned, it was very cheap and easy to build! I only do 10 gallons every 2 weeks so I don’t mind carrying that upstairs. But someday my DT will be downstairs and this pump will do just fine pumping it right into the tank. Let me know if you’re interested and I can take some more pictures for you

U
User1
Guest
View BadgesJust wanted to say this - very helpful. Not my thread, but, well, just wanted to let you know it helped another reefer. I always had an idea of how I was going to set it up but this is a lot more helpful than what I had going through my mind. It is like following a recipe when cooking a new meal. So thanks a million.Nope, not a one.
https://www.reef2reef.com/threads/let’s-mix-it-up-designing-and-using-a-water-mixing-station.270585/
Let’s Mix it Up!
Designing and Using a Water Mixing Station
Let’s Mix it Up!
There is one undeniable fact in this hobby – WE ALL NEED WATER! In fact, two types of water. Clean fresh water (FW) run through a quality RODI system and the obvious saltwater (SW). Secondly, we all know what a water change is. This is not an article on whether or not water changes are required or necessary, nor is it an article to discuss frequency. Your research and ultimate reefing philosophy will determine those answers for you.
Water changes can be done using something as simple as a 5-gallon bucket. If that is how you currently do it, and you’re okay with that, you can stop reading and move on. But if you’re looking for something a little more formal, and might I add potentially easier, you may want to continue reading. I’ll try not to bore you too much!
My personal goal was to never lift another bucket again…simple as that. So I started searching the internet for ideas. Between Google, forums, Youtube and Mytube, I quickly realized I didn’t need to recreate the wheel. There are a plethora of designs out there to choose from…pick one. Remember, imitation is the highest form a flattery!
The most critical component of making water is obviously the RODI unit. All I will say is if you don’t have one yet, get one! I am of the opinion that having control of your water is vital. Making your own (nothing against LFS’s, I love mine) is about the only way to ensure you know the exact quality of your water.
The Equipment
Subject to the design you choose, here’s a simple breakdown of what you will and/or may need:
The Location
- RODI unit you already have or will be buying (hint-hint)
- A shut-off valve and float switch – no flooding necessary!
- Water storage containers with lids – two of them preferably
- One for FW, and one for new SW
- These should be food-grade quality containers, preferably they will be NSF Approved
- Size determined by your needs/system capacity
- The grey Brute trash cans are very common and often used
- Although more costly, the water storage containers found online and in farm supply stores work nicely as well
- Plumbing
- I like to use good old PVC (we usually have some laying around anyway right)
- Ball valves, T’s, Elbows and Unions
- Connections – Plumbing into container walls and/or tops
- Bulkheads for flat surfaces
- Uniseals for curved surfaces
- Pump for mixing
- If designed properly, you can use one pump for mixing and distribution
- Powerhead and Heater – resides in the SW container
- A switched Power strip for easy control (optional)
- Hose long enough to reach your display/sump/top-off reservoir
- Or if you have the ability to hard plumb to your display, even better.
Obviously, this will be unique to your environment. My biggest suggestion is in a controlled environment, meaning it’s heated and/or cooled depending on your climate. If you’re lucky enough to have a fish room, then it’s pretty obvious! If not, then maybe it’s a spare closet, the laundry room, the garage or basement may work if temperatures are at least somewhat stable. Note: Garages and basements, particularly non-insulated ones, can cause issues with RODI unit production during extreme temperatures, so choose your space wisely.
You may have to get creative. In my case, my wife wanted me to redo the foyer. Through intense negotiations (which I rarely win) I was able to commandeer the coat closet that had become the dumping grounds for all things junk. I took that space, which happened to back to our laundry room. So she got a new foyer and I got the perfect spot for a mixing station. Use your creativity and you’ll be surprised what you can come up with.
One thing you do have to keep in mind is access to water supply and drainage. That RODI unit you already had or will be getting soon (hint-hint) doesn’t come with its own water! That’s why a laundry room works great. You’ll have both the supply and drain for the washing machine right there at your disposal.
The Assembly
By now, you should have already flattered someone by using their design, but here is a breakdown of the basics. To try to make this easier, the image below is a picture of mine just after setting it up. I’ve labeled things and will refer to this image moving forward.
You can see my RODI unit mounted above. The lettered items are “equipment” and the numbered items are “valves”. This is merely for reference and by no means the only (or best for that matter) way of putting together a mixing station.
The main idea of doing all this is to mix and move water, so at a minimum, your new mixing station should be able to:
In both containers, you’ll need a connection towards the bottom. In the SW container, you’ll also want one towards the top of the container. This will allow circulation within the container for mixing. Your containers will determine how this accomplished – uniseal or bulkhead.
- Transfer water between containers
- Pump/circulate water within the SW mixing container for well, mixing!
- Pump both FW and SW to the display and/or top-off reservoir.
- You will want to be able to empty the containers in case of prolonged power outage or a visit from Mr. Murphy - the inevitable pump failure.
The Operations – (Using the picture above for reference)
Your RODI system will produce FW and be stored in the first container A. You will use this FW for top-offs, as well as supply your second container B with water that will become your new SW after mixing. With this design and the turning of a few valves, pump C does all the work. Said differently, no more buckets!!! So let’s move some water:
For discussion purposes, assume all valves are closed (like pictured) at the beginning of each task – represented by numbered items below. I would recommend closing all valves at the end of any task to lessen the chances of cross-contaminating the FW and SW. You will also need a hose with a ball valve on the output end. Again, if you can hard plumb to your display/sump/ATO reservoir, all the better.
Heating:
- Move FW to top-off reservoir in the stand under display (in my case)
- Attach the hose to the outlet of valve 2 (there is a hose bib converter on the end of that valve)
- Open valves 2 and 4, turn on pump C to fill reservoir via the hose
- Move FW to the SW container B for mixing
- o Open valve 1 and valve 4, turn on pump C to pump over to container B.
- Mixing new SW
- o Put salt into container B
- o Open valve 1 and valve 3, turn on pump C and begin mixing salt via circulation
- Editor Note: In my case, I built a shelf over my mixing station, so I purchased the hopper D to add salt. Totally unnecessary if you have access to the top of your container.
- Move SW to Display for Water Change
- Open valves 2 and valve 3, turn on pump C to pump SW to display via the hose
- Empty Containers without pump due to power outage or visit from Mr. Murphy
- Attached hose to end of either valve 5 or 6, and open the valve. Gravity will do its thing
I have a heater inside container B. I only heat just prior to using the SW. Some will argue this is not necessary dependent on the quantity of your water change, which may very well be true. But since I have the heater already, I just try to match the display.
Water Storage and Continued Mixing:
This is another area of debate among hobbyists. We’ve all seen the threads asking “How long can I keep mixed saltwater?” And “Should I keep it mixed”. There are far too many choices/options to discuss here. Me personally, I mix up about 50 gallons at a time. I mix and heat just prior to performing a water change.
When it comes to storing your RODI water, the important factor is to keep it sealed as tightly as possible. Very simply put, RODI water has been stripped of all things bad, and if allowed, it will try to grab those bad things back! So an airtight lid is best and no stirring necessary.
Over time your containers interior may build up some nasty’s and need to be cleaned. An annual cleaning (or more often if necessary) is recommended – let vinegar be your friend.
Extras
You may have noticed on my station a couple things under the RODI unit. In addition to a powerhead and heater, I also have a salinity monitor and thermometer inside the SW container. I didn’t want to drill a hole in the lid, so I came up with this.
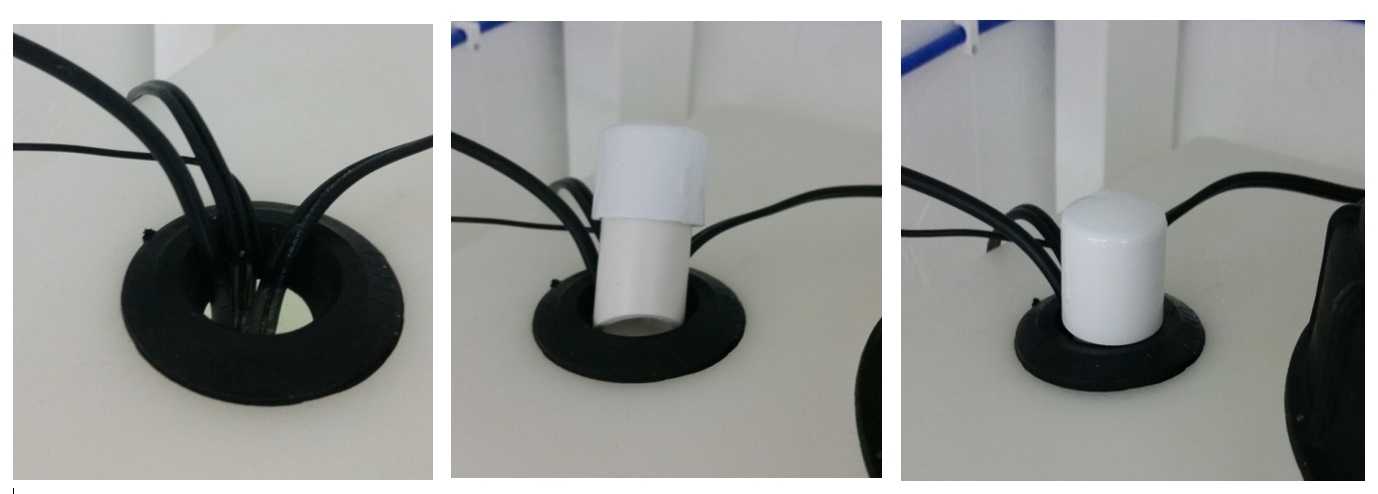
Are there fancier ways of doing this, sure? Did I have this stuff already lying amongst my fish stuff, heck yes! It works great and is essentially airtight once the uniseal is capped with the PVC. Lastly, although I do not have a picture, all the interior items in my SW container are zipped tied to a long piece of PVC that rests inside the container. So if need be, I can pull that one piece of PVC out and bring all the equipment with it. That is the one thing I thought of myself!!!
Let your imagination run wild with one goal in mind…what you can do to make things easier on yourself. This hobby can be difficult enough on its own. Something as simple as a well-designed mixing station can make your weekly/bi-weekly/monthly/whenever water changes a little easier.
I hope this has helped at least give you an idea of the what’s and how’s of a mixing station. Don’t be afraid to put yours together. Having control of the water quality will be something you will never regret. Never lifting another bucket isn’t bad either.
Happy Reefing!
Similar threads
- Replies
- 14
- Views
- 402
- Replies
- 2
- Views
- 138
- Replies
- 1
- Views
- 215
- Replies
- 14
- Views
- 634


