Sump/overflow

BC1906

Active Member
View Badges
Joined
Jan 25, 2016
Messages
260
Reaction score
137
Rating - 0%
0   0   0
So I have a 55 gallon column tank that I set up a couple of months ago and I currently have a tunze 3162 filter and an aquamaxx hob 1 skimmer. I hate the tunze filter. Since my only other options I think would be since my tank isn't drilled is a hob filter, canister filter(which neither I want) or a sump/refugium.

What all would I need to set up the sump/refugium on a tank that isn't drilled? What size return pump?

Any suggestions would be greatly appreciated!

20161206_185031.jpg
 

Brew12

Electrical Gru
View Badges
Joined
Aug 14, 2016
Messages
22,488
Reaction score
61,035
Location
Decatur, AL
Rating - 0%
0   0   0
So I have a 55 gallon column tank that I set up a couple of months ago and I currently have a tunze 3162 filter and an aquamaxx hob 1 skimmer. I hate the tunze filter. Since my only other options I think would be since my tank isn't drilled is a hob filter, canister filter(which neither I want) or a sump/refugium.

What all would I need to set up the sump/refugium on a tank that isn't drilled? What size return pump?

Any suggestions would be greatly appreciated!

20161206_185031.jpg
Why not just stop using the tunze filter? You will need to be more careful to control your nutrients. You could always pull it out and run it if you wanted to clarify your water or if you needed to run gfo or activated carbon. Otherwise, I don't know why you don't just turn it off and put it away.
 

morpheas

Well-Known Member
View Badges
Joined
Apr 3, 2016
Messages
532
Reaction score
450
Rating - 0%
0   0   0
I personally purchased a cpr external overflow with an aqualifter pump, a 20 gallon tank for a sump, cutting boards for baffles (which i ironically cut to size), a jebao dc return pump and a return nozzle and presto i was done! Ditched the hob and had a sump!
 

Be102

Valuable Member
View Badges
Joined
Nov 29, 2016
Messages
1,884
Reaction score
1,059
Rating - 0%
0   0   0
I personally purchased a cpr external overflow with an aqualifter pump, a 20 gallon tank for a sump, cutting boards for baffles (which i ironically cut to size), a jebao dc return pump and a return nozzle and presto i was done! Ditched the hob and had a sump!

How difficult was it to do it yourself? Did you have any problems with the plumbing? I also am looking to add a sump but am unsure if I should do it myself or order one from a company like triggersystems
 

Luna

Active Member
View Badges
Joined
May 8, 2015
Messages
367
Reaction score
125
Rating - 0%
0   0   0
I too would like to know more on this topic. I have a 40b not drilled & am curious on a hob overflow, but don't want any leaks.
 

Brew12

Electrical Gru
View Badges
Joined
Aug 14, 2016
Messages
22,488
Reaction score
61,035
Location
Decatur, AL
Rating - 0%
0   0   0
So I have a 55 gallon column tank that I set up a couple of months ago and I currently have a tunze 3162 filter and an aquamaxx hob 1 skimmer. I hate the tunze filter. Since my only other options I think would be since my tank isn't drilled is a hob filter, canister filter(which neither I want) or a sump/refugium.

What all would I need to set up the sump/refugium on a tank that isn't drilled? What size return pump?

Any suggestions would be greatly appreciated!

20161206_185031.jpg
Take a look at this thread for a 55g system. No sump, no HOB filter. Just a few powerheads and an HOB skimmer.
https://www.reef2reef.com/threads/mallettes-sumpless-55g.277378/#post-3357126
 

MaiReef

Valuable Member
View Badges
Joined
Oct 27, 2016
Messages
1,198
Reaction score
1,153
Location
Albany, NY
Rating - 0%
0   0   0
Eshopps overflows work well. Follow this link to make it quiet though.
A pump that handles slightly more than the drain
Drain plumbing could just be a flex drain that you can get at your lfs and then just a little work with pvc with a valve union on the return so you can dial it in for equal flow. As far as a sump goes, you can buy one or make one. PVC is easier than messing with silicone, but a local glass repair store can cut you some baffles for a glass tank and you can make the sections whatever size you would like. I resiliconed a 30 gallon tank, but buying a cheap one at the $1 per gallon sale at petco works even better.
 

Joey waid

Well-Known Member
View Badges
Joined
Aug 18, 2016
Messages
883
Reaction score
499
Location
Warner Robins Ga..
Rating - 0%
0   0   0
I use a cpr overflow into a sump. I put filter floss in the overflow to cut down on noise and to get the first wave of nasties, it then goes into a sock. I also run a skimmer. I have meat eating beast that make a mess. It's real easy to set up. I did add a extra drain in mine for when the floss clogs.
 

morpheas

Well-Known Member
View Badges
Joined
Apr 3, 2016
Messages
532
Reaction score
450
Rating - 0%
0   0   0
Well I was on the same boat you are so I definitely understand your hesitation. I will try to put a little detailed description of my experience and decisions.

First off, let me say that I'm a gear junkie so most of the design here was over engineered and designed. I have a 30 gallon system so a sump was an overkill and the way I did it was an overkill of the overkill. But I am happy with what I designed and have.

The initial considerations

First off you need to decide whether you need a sump or not. As suggested, you might want to go with HOB equipment and make your life easier. Also, if you do want to have a sump, you need to see if you have the space for it, either under the tank, near the tank, in the garage, the basement etc. Measure and see how much space you have. This will determine what kind of container you can get. In my case I had space under my tank. I could fit a 20 gallon tall and that's what I went for (I went with a tall for one more reason that I will explain a little later). One thing you need to consider is how much space you have under your tank if you decide to go with that. My stand is relatively short and to this day I cuss every time I have to put or remove equipment for cleaning.

Next you start getting a little specific about what type of sump you want. Just a place for a skimmer and reactors? Do you want a refugium? Any other compartments? How much flow through the sump?

The overflow

Early on, on the design you're going to have to pick which type of external overflow you want. There are two basic kinds: the eshopps kind with the U-tubes and the CPR kind. The main difference of the two, physically speaking, is the velocity at which the water moves in them. The eshopps relies on a high velocity movement through the tube(s) to keep it's priming for the siphon. The CPR has a low velocity but relies on a pump to prime it and keep it primed. I personally went with the CPR one, I like the pump idea and it seemed more robust to me personally (although I know people with eshopps designs are equally as happy). There are pros and cons for both designs, a quick search and read will help you decide which one is appropriate for you and how you feel about your design.

Next you need to size your overflow according to the flow rate you have set as your goal. Let's say for your 55 gallon tank you expect a total water volume of 60 gallons. Let's say you want 5 times the total system water volume as flow through your sump (a common guideline in design) then you need an overflow that can handle 300 gallons per hour. In that case I would go with a 600 gallon one (the single 1" drain will do).

Another thing to consider is the type of drain you want. Although you can certainly implement a herbie drain, a more common implementation with external overflows are the stockman standpipes (as suggested earlier).

Now, I personally favor very high flow rates through my sump. As I said earlier I over-overdesigned. I have dual 1" line drains (I have a CPR CS202) which allows for a lot of water (designed for 1500 GPH). With this I have the option of running a herbie if I like but I simply run a dual stockman standpipe.

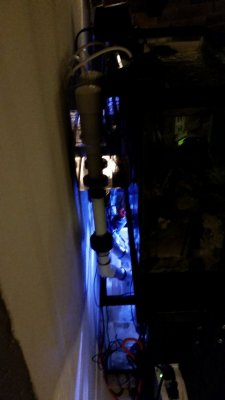
IMG_20161207_063935.jpg

Above is a picture of my setup. As you can see hard PVC is plumbed with unions on the overflow box and through 2 45° angles drops water in my sump. This is not dead quiet (as no stockman is) but moves a lot of water, promotes gas exchange and oxygenation. Again, this is my personal preference and definitely not the norm.

The sump

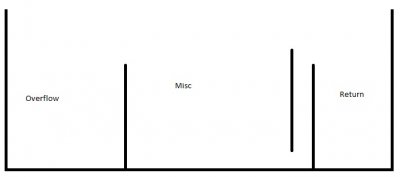
Now, as I mentioned I went with a 20 gallon tall standard tank for my sump. Since all the glass shops around my area were asking over $60 to cut three darn baffles I decided to go and buy three cutting boards from Walmart for $20 total. I also got some aquarium safe silicone from Home Depot and I was off to the races. I measured and cut the baffles with a jigsaw and siliconed them in.

sump.jpg

Above you can see my approximate design. The size and number of your compartments will vary with the different goals you set. Here's a couple of points on the decisions I made:

- The height of my baffles is 11". This accommodates most (if not all) skimmers and allows for 5" clearance on the top. This is my cushion for taking in water when the power goes out. This again is over engineered by design trying to give me comfort on feeling safe with water floods.
- The return pump compartment is designed pretty small (fits the pump and has a little clearance). The main reason is because I don't want it to hold too much water. I estimate it holds approximately 3 gallons or so. If something goes wrong with my overflow and the water is not returning to the sump for some reason there's only 3 gallons to "flood" out before my pump runs dry.
- I decided to go with a DC pump and specifically a Jebao one. Again, on the high flow motif, I decided for the DC 6000 which gives 1100 GPH at it's lowest setting. Now, this pump has an extra feature. It has an auto shutoff protecting it from running dry.

I personally liked the approach of the cutting boards for a few more reasons. One, they're opaque which means there is no light going from my center compartment (if I do run one) in the other ones, keeping algae at lower levels. Also, these are not fragile like glass is so breaking them is much harder. The only negative is that they bow a little on the center but I am not too worried about it at this point.

The return

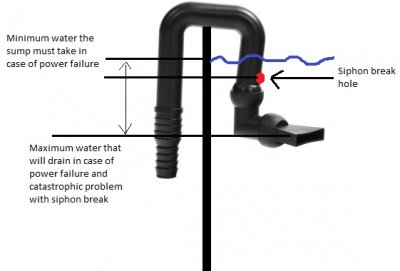
As I mentioned for the return I selected the Jebao DC 6000 pump for the reasons I stated, mainly controllability, low consumption, noise and the extra protection of low water shutoff. I used 1" vinyl tubing to return water to the tank and a nozzle as pictured.

203300-CPR-Aquatics-Aquarium-Return-Jet-a_1.jpg

First consideration is that you have to drill a hole right under where the water line is (as pictured) so the siphon will break in case of a power failure. While you're at it drill a redundant one.

Also, at this point, my tall sump comes into play. With that design, I can technically sustain the siphon not breaking until the water level reaches the end tip of the nozzle and I still have a few inches to spare. That's not a requirement but it gives me an extra piece of mind.

Notes

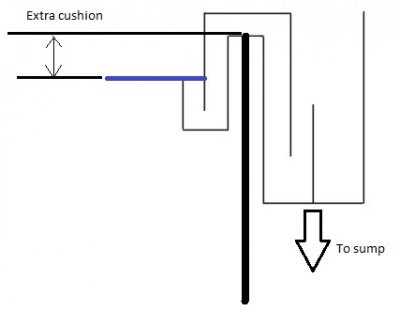
- The level you will have in your display tank will depend on where is the overflow box sitting. If you leave a couple of inches between the top of the tank and the water level, this is space that you can use as a cushion in case your overflow stops and the return pump keeps on bringing water up. This ties up with my comment about the small return compartment volume. In my case, I have a 2 inches or so which allows for pretty much the hole return compartment to be pumped up. That's another level of protection. Of course, you might like the aesthetics of it but I go for peace of mind with this one.

CSMEASUREMENTS1.jpg

- One downside to the small return compartment is the fact that you have to be on top of your topping off (no pun intended). You don't have a lot of slack volume wise so you have to take that into consideration during design. I personally find it more than enough volume to have a days (even two) of operation without top off. Another solution is an auto top off system.

- You do not have to over design and engineer it like me. I just show how I did it. You can get away with it with a much simpler and cheaper system (smaller overflow and pump) equally well.

- Another factor for the water level in the tank is the flow rate. As described here, the level will be set by the flow rate and the length of the weir. In my case it didn't make a big difference since the overflow box is pretty long.

- One downside to the CPR is that it's really hard to clean the inside of the overflow. I clean it every 3-6 months by removing it and submersing it in vinegar for a couple of hours. I leave my power heads running in the tank to make sure gas exchange is not stopped. The eshopps ones are much easier to clean.

- To summarize on the most crucial question posed, floods. My design has:
- If the overflow stops, a small return pump compartment paired with extra cushion on the display tank allows for water to be moved from the sump to the display until the pump runs dry without overflowing. Extra bonus is the run dry protection on the pump (which might or might not work as advertised).
- If the return pump stops (power failure, maintenance etc), the sump is large enough to take the water volume not only to the siphon relief hole (which might or might not work) but down to the end of the nozzle.
Does this system guarantee no flooding? Nothing will, but it minimizes it to a manageable point.

This is how I designed my sump system. I feel it has a lot of redundancies built in to give me some comfort. I could add a couple more (a float valve on the display to stop the return pump, leak detectors) but I haven't done anything so far.

I hope this helps someone design a successful sump system on a non drilled tank.
 

Brew12

Electrical Gru
View Badges
Joined
Aug 14, 2016
Messages
22,488
Reaction score
61,035
Location
Decatur, AL
Rating - 0%
0   0   0
Well I was on the same boat you are so I definitely understand your hesitation. I will try to put a little detailed description of my experience and decisions.

First off, let me say that I'm a gear junkie so most of the design here was over engineered and designed. I have a 30 gallon system so a sump was an overkill and the way I did it was an overkill of the overkill. But I am happy with what I designed and have.

The initial considerations

First off you need to decide whether you need a sump or not. As suggested, you might want to go with HOB equipment and make your life easier. Also, if you do want to have a sump, you need to see if you have the space for it, either under the tank, near the tank, in the garage, the basement etc. Measure and see how much space you have. This will determine what kind of container you can get. In my case I had space under my tank. I could fit a 20 gallon tall and that's what I went for (I went with a tall for one more reason that I will explain a little later). One thing you need to consider is how much space you have under your tank if you decide to go with that. My stand is relatively short and to this day I cuss every time I have to put or remove equipment for cleaning.

Next you start getting a little specific about what type of sump you want. Just a place for a skimmer and reactors? Do you want a refugium? Any other compartments? How much flow through the sump?

The overflow

Early on, on the design you're going to have to pick which type of external overflow you want. There are two basic kinds: the eshopps kind with the U-tubes and the CPR kind. The main difference of the two, physically speaking, is the velocity at which the water moves in them. The eshopps relies on a high velocity movement through the tube(s) to keep it's priming for the siphon. The CPR has a low velocity but relies on a pump to prime it and keep it primed. I personally went with the CPR one, I like the pump idea and it seemed more robust to me personally (although I know people with eshopps designs are equally as happy). There are pros and cons for both designs, a quick search and read will help you decide which one is appropriate for you and how you feel about your design.

Next you need to size your overflow according to the flow rate you have set as your goal. Let's say for your 55 gallon tank you expect a total water volume of 60 gallons. Let's say you want 5 times the total system water volume as flow through your sump (a common guideline in design) then you need an overflow that can handle 300 gallons per hour. In that case I would go with a 600 gallon one (the single 1" drain will do).

Another thing to consider is the type of drain you want. Although you can certainly implement a herbie drain, a more common implementation with external overflows are the stockman standpipes (as suggested earlier).

Now, I personally favor very high flow rates through my sump. As I said earlier I over-overdesigned. I have dual 1" line drains (I have a CPR CS202) which allows for a lot of water (designed for 1500 GPH). With this I have the option of running a herbie if I like but I simply run a dual stockman standpipe.

IMG_20161207_063935.jpg

Above is a picture of my setup. As you can see hard PVC is plumbed with unions on the overflow box and through 2 45° angles drops water in my sump. This is not dead quiet (as no stockman is) but moves a lot of water, promotes gas exchange and oxygenation. Again, this is my personal preference and definitely not the norm.

The sump

Now, as I mentioned I went with a 20 gallon tall standard tank for my sump. Since all the glass shops around my area were asking over $60 to cut three darn baffles I decided to go and buy three cutting boards from Walmart for $20 total. I also got some aquarium safe silicone from Home Depot and I was off to the races. I measured and cut the baffles with a jigsaw and siliconed them in.

sump.jpg

Above you can see my approximate design. The size and number of your compartments will vary with the different goals you set. Here's a couple of points on the decisions I made:

- The height of my baffles is 11". This accommodates most (if not all) skimmers and allows for 5" clearance on the top. This is my cushion for taking in water when the power goes out. This again is over engineered by design trying to give me comfort on feeling safe with water floods.
- The return pump compartment is designed pretty small (fits the pump and has a little clearance). The main reason is because I don't want it to hold too much water. I estimate it holds approximately 3 gallons or so. If something goes wrong with my overflow and the water is not returning to the sump for some reason there's only 3 gallons to "flood" out before my pump runs dry.
- I decided to go with a DC pump and specifically a Jebao one. Again, on the high flow motif, I decided for the DC 6000 which gives 1100 GPH at it's lowest setting. Now, this pump has an extra feature. It has an auto shutoff protecting it from running dry.

I personally liked the approach of the cutting boards for a few more reasons. One, they're opaque which means there is no light going from my center compartment (if I do run one) in the other ones, keeping algae at lower levels. Also, these are not fragile like glass is so breaking them is much harder. The only negative is that they bow a little on the center but I am not too worried about it at this point.

The return

As I mentioned for the return I selected the Jebao DC 6000 pump for the reasons I stated, mainly controllability, low consumption, noise and the extra protection of low water shutoff. I used 1" vinyl tubing to return water to the tank and a nozzle as pictured.

203300-CPR-Aquatics-Aquarium-Return-Jet-a_1.jpg

First consideration is that you have to drill a hole right under where the water line is (as pictured) so the siphon will break in case of a power failure. While you're at it drill a redundant one.

Also, at this point, my tall sump comes into play. With that design, I can technically sustain the siphon not breaking until the water level reaches the end tip of the nozzle and I still have a few inches to spare. That's not a requirement but it gives me an extra piece of mind.

Notes

- The level you will have in your display tank will depend on where is the overflow box sitting. If you leave a couple of inches between the top of the tank and the water level, this is space that you can use as a cushion in case your overflow stops and the return pump keeps on bringing water up. This ties up with my comment about the small return compartment volume. In my case, I have a 2 inches or so which allows for pretty much the hole return compartment to be pumped up. That's another level of protection. Of course, you might like the aesthetics of it but I go for peace of mind with this one.

CSMEASUREMENTS1.jpg

- One downside to the small return compartment is the fact that you have to be on top of your topping off (no pun intended). You don't have a lot of slack volume wise so you have to take that into consideration during design. I personally find it more than enough volume to have a days (even two) of operation without top off. Another solution is an auto top off system.

- You do not have to over design and engineer it like me. I just show how I did it. You can get away with it with a much simpler and cheaper system (smaller overflow and pump) equally well.

- Another factor for the water level in the tank is the flow rate. As described here, the level will be set by the flow rate and the length of the weir. In my case it didn't make a big difference since the overflow box is pretty long.

- One downside to the CPR is that it's really hard to clean the inside of the overflow. I clean it every 3-6 months by removing it and submersing it in vinegar for a couple of hours. I leave my power heads running in the tank to make sure gas exchange is not stopped. The eshopps ones are much easier to clean.

- To summarize on the most crucial question posed, floods. My design has:
- If the overflow stops, a small return pump compartment paired with extra cushion on the display tank allows for water to be moved from the sump to the display until the pump runs dry without overflowing. Extra bonus is the run dry protection on the pump (which might or might not work as advertised).
- If the return pump stops (power failure, maintenance etc), the sump is large enough to take the water volume not only to the siphon relief hole (which might or might not work) but down to the end of the nozzle.
Does this system guarantee no flooding? Nothing will, but it minimizes it to a manageable point.

This is how I designed my sump system. I feel it has a lot of redundancies built in to give me some comfort. I could add a couple more (a float valve on the display to stop the return pump, leak detectors) but I haven't done anything so far.

I hope this helps someone design a successful sump system on a non drilled tank.
Excellent post!
 

beaslbob

2500 Club Member
View Badges
Joined
May 11, 2009
Messages
4,086
Reaction score
961
Location
huntsville, al
Rating - 0%
0   0   0
You can make an hob overflow with about $20 worth of pcv pipe.

Whatever you so be sure to adjust the sump so:

1) no floods power out
2) normal operation returns power returns
3) (and the one I forgot) is the overflow(drain) fails (siphon break, or blockage) the pump runs out of water before the display floods.

Get creative. 10-30g plastic storage containers are very inexpensive and work just fine. I would suggest a larger container for macro algae then a smaller container for the actual sump. You can even put the sump inside the larger container to form the same functions a baffles.

my .02
 

morpheas

Well-Known Member
View Badges
Joined
Apr 3, 2016
Messages
532
Reaction score
450
Rating - 0%
0   0   0
You definitely can go as DIY as you want but I would advice against a DIY external overflow since it's the most crucial part of the whole thing especially for someone that hasn't worked with something like that before (which is my impression on what the OP is asking). The sump on the other hand, can definitely be Rubbermaid containers as @beaslbob suggested. Actually, I have seen @Mike Paletta and his sunlit tank, if I'm not mistaken, running a sump with no baffles really, just an aquarium and some Tupperware...
 

beaslbob

2500 Club Member
View Badges
Joined
May 11, 2009
Messages
4,086
Reaction score
961
Location
huntsville, al
Rating - 0%
0   0   0
You can make an hob overflow with about $20 worth of pcv pipe.

Whatever you so be sure to adjust the sump so:

1) no floods power out
2) normal operation returns power returns
3) (and the one I forgot) is the overflow(drain) fails (siphon break, or blockage) the pump runs out of water before the display floods.

Get creative. 10-30g plastic storage containers are very inexpensive and work just fine. I would suggest a larger container for macro algae then a smaller container for the actual sump. You can even put the sump inside the larger container to form the same functions a baffles.

my .02

These adjustments and tests are still required with any sump system including pre drilled tanks.

my .02
 

Reefing threads: Do you wear gear from reef brands?

  • I wear reef gear everywhere.

    Votes: 31 16.0%
  • I wear reef gear primarily at fish events and my LFS.

    Votes: 11 5.7%
  • I wear reef gear primarily for water changes and tank maintenance.

    Votes: 1 0.5%
  • I wear reef gear primarily to relax where I live.

    Votes: 25 12.9%
  • I don’t wear gear from reef brands.

    Votes: 114 58.8%
  • Other.

    Votes: 12 6.2%
Back
Top