Taking the Plunge

rhduggan

Community Member
View Badges
Joined
Dec 4, 2023
Messages
39
Reaction score
78
Location
Newark
Rating - 0%
0   0   0
Hello All,

I've been lurking in R2R for a while learning from you all, but this is my (our, actually) first post. Hopefully we'll be adding to this thread for a long time. I kept freshwater tanks when I was a teenager more than 40 years ago, but this will be my first experience with saltwater fish and corals.

My daughter is a junior in college majoring in marine biology. She's a full-time student, but she lives at home when she is not off teaching SCUBA diving somewhere. Since she has been studying corals I suggested to my wife that we get her a reef tank for Christmas. "How much will it cost?", she asked. "Well," I said, "this website I found www.bulkreefsupply.com/content/post/5-minute-saltwater-aquarium-guide-ep2-is-it-expensive says 'Most people will probably spend $500 to $1000 for a brand new saltwater tank and all of the necessary supplies within the first year. Over the next 12 months, you can double that start-up cost to budget for fish, corals and new equipment. More precisely, you are looking at $1K - $2K within the first two years for a reasonably sized tank (less than 120 gallons).'" "That's not bad," she said. Green light!

So, I started delving in reading everything I could here and on the Red Sea page on Facebook and, you know, I just want us to have every chance of success. Here's what we've bought so far:

Red Sea Reefer MAX 200 G2+ - Black
200 Watt (Dual Element) Helio PTC Smart Heater
Kraken Lid
BRS 5 Stage RODI System
Plumbing for RODI System
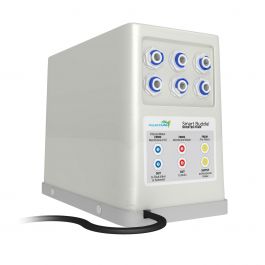
Power Strip for RODI System / water mixing station
Rubbermaid Brute Water Barrel, Lid, Spigot
CaribSea LifeRock Nano Arches
MarcoRocks Dry Rock 40 lbs
MarcoRocks Aquascaping Mortar
BRS Super Glue
Aragonite Substrate
Milwaukee Digital Refractometer
Hanna 9 Parameter Photometer Kit
Scuba 100W Heater for Salt Bucket
BRS Salt Mixing Setup with bucket, pump, prism refractometer, etc.
Red Sea Coral Pro Salt
Sicce Water Change Pump
BRS Water Change Bucket
BRS Water Change Tube
BRS Gravel Wash Siphon
Red Sea Reef Mature
Red Sea Reef Spec Carbon
Algae Free Hammerhead Float Plus Glass Cleaner

Total expenditure so far: $5,596.76

The person who wrote that BRS article might want to do a little updating LOL.

Anyway, we are looking forward to everyone's suggestions and constructive criticism as we proceed. First photos to follow in the next post.
 
Last edited:
OP
OP
rhduggan

rhduggan

Community Member
View Badges
Joined
Dec 4, 2023
Messages
39
Reaction score
78
Location
Newark
Rating - 0%
0   0   0
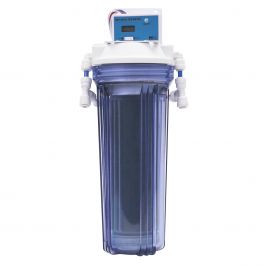
So here's our water supply. We have a well and septic system here. Our well is in a sandstone aquifer with a moderate iron content. The water comes out of the well at a pH of 5.5, and will chew through copper plumbing like crazy, so we have a neutralizer column filled with calcium carbonate, followed by a sediment filter, and then a cation exchange column (water softener) to remove most of the calcium we put in to neutralize the acid.
IMG_8449.jpg
 
OP
OP
rhduggan

rhduggan

Community Member
View Badges
Joined
Dec 4, 2023
Messages
39
Reaction score
78
Location
Newark
Rating - 0%
0   0   0
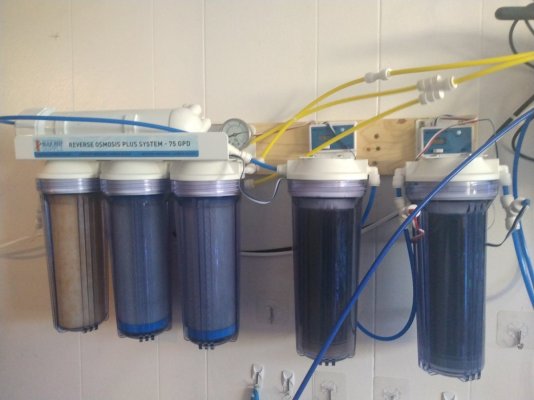
Reading on here I learned the first thing we need to worry about is getting the water right. So here is our RODI setup, which we plumbed into an unused closet where the septic line runs out of the house. Conveniently, the backwash lines from the main water treatment system run right through that closet and out to a sump we have to dispose of the brine from the water softener (saltwater is NOT good for your septic system). So I tapped into the line to run the waste water from the RODI to the same sump. Our first 30 gallons of DI is already made and waiting for us to get the tank set up. You can see the DI resin is being depleted rather quickly because of the CO2 in the well water. Since the tank/sump volume is only 52 gal total I think we can live with that rate of depletion rather than getting more complicated.
IMG_8448.jpg
 
OP
OP
rhduggan

rhduggan

Community Member
View Badges
Joined
Dec 4, 2023
Messages
39
Reaction score
78
Location
Newark
Rating - 0%
0   0   0
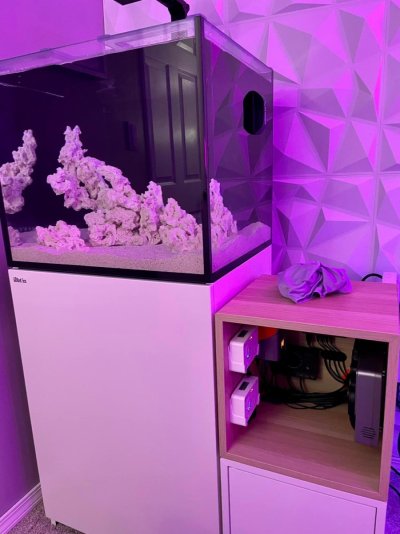
Next, we moved on to building our aquascape. This is where I expect some of you may have comments/suggestions. We tried to make it have many levels and interesting places for fish to swim through. That's all for now. Everything is here, but we're going to wait until after a holiday party to unpack the Reefer and start building the cabinet.
IMG_8454.jpg
IMG_8455.jpg
IMG_8458.jpg
 

Daenero

New Member
View Badges
Joined
Dec 22, 2023
Messages
2
Reaction score
3
Location
uk
Rating - 0%
0   0   0
Looks amazing, love the arches youve created. The only thing I’d say is that is it high enough for some sps on the top nearest the lights?

Have you used Caribsea live rock to create all of it? As you mentioned Marco earlier and don’t look like that.

Can’t wait to see your progress, I’m hoping to pick a reefer 200 and get back into the hobby. Have you got any stocking ideas yet?
 
OP
OP
rhduggan

rhduggan

Community Member
View Badges
Joined
Dec 4, 2023
Messages
39
Reaction score
78
Location
Newark
Rating - 0%
0   0   0
Looks amazing, love the arches youve created. The only thing I’d say is that is it high enough for some sps on the top nearest the lights?
Hi Daenero! I posted the aquascape build on the Red Sea Reefers group on Facebook and we've received some conflicting feedback on that topic. the highest point on the structure is a little over 14" and the tank height on the 200 is 20.9". Most info I've read seems to agree on 2/3 the height of the tank as the maximum height, so we're right there, but obviously the strength of the light(s) is a factor. One response on FB said make it higher if we want acros, but another said the new lights are so powerful that we shouldn't make it higher. In the end we decided to just add a couple of small pieces to make a larger platform at pretty much the highest level.
Have you used Caribsea live rock to create all of it? As you mentioned Marco earlier and don’t look like that.
The arches are CaribSea Nano Arches, which come in a set of four. All of the base rock is Marco. The Marco has lots of deep crevices/holes, a few of which go all the way through the pieces here and there. The CaribSea is smoother because it's clearly made by mortaring together smaller pieces to make the arch before spraying it with whatever that is that looks like coraline. All of the arches are in the main structure, with one standing on end on the right side.
Can’t wait to see your progress, I’m hoping to pick a reefer 200 and get back into the hobby. Have you got any stocking ideas yet?
Another area of much conflict! I wish the Red Sea group admins weren't opposed to people adding a link to outside groups since it's hard to make a build thread in a FB group but, clearly, they're trying to keep people's attention inside their group. Bottom line is we really haven't arrived at a consensus on the best way to start up the tank. Full "let it be" 8 week(ish) cycle, then CUC first followed by fish? Red Sea Reef Mature, then CUC, then fish? Fish first? Lights on? Lights off? One very well respected LFS guy told us the CUC will die because there's nothing for them to eat, so take a piece of his live rock and a couple clowns and only add CUC after. I've even read a guy who starts with corals first (not doing that)!
 
Last edited:
OP
OP
rhduggan

rhduggan

Community Member
View Badges
Joined
Dec 4, 2023
Messages
39
Reaction score
78
Location
Newark
Rating - 0%
0   0   0
IMG_8460.jpg

We added a couple more pieces to the top to make a bigger platform at the highest level.

Today is the day we unwrap the big package and start building the cabinet. Neither of us can wait to see this in the glass, but holiday socializing is taking precedence. Can't be chasing people out of the house saying, "Really nice to see you, but I have an aquarium to build . . ."!
 

CasperOe

In it to win it!
View Badges
Joined
Feb 14, 2022
Messages
3,261
Reaction score
5,714
Location
Glasgow, United Kingdom
Rating - 0%
0   0   0
Scape looks fantastic, can't wait to see it wet!! Make sure you leave enough room around the edges to get a glass cleaner around :cool:
 

kevgib67

7500 Club Member
View Badges
Joined
Apr 16, 2022
Messages
9,375
Reaction score
43,717
Location
Canfield, Ohio
Rating - 0%
0   0   0
I would take the guy up for sure that offered you the live rock to seed your tank. Not knowing the size and what the biological load it could handle I can’t advise for or against putting the clowns in with it. If it seems like it could handle it I would I would put an ammonia alert in and have fresh salt water handy. Looking forward to updates after the holidays.
 

Cichlid Dad

2500 Club Member
View Badges
Joined
Jul 20, 2022
Messages
3,007
Reaction score
10,415
Location
Auburn
Rating - 0%
0   0   0
It is very obvious you did a lot of homework and made great decisions. It will take you far. Unless I missed it no light listed. If I could add one thing to add, it would be a second DI unit to your rodi system. Reason, it will Make sure nothing gets past the unit when the resin is almost gone. The add on is cheap on brs. When the first resin Is exhausted, you replace it with the second unit and put the new resin in the second position.


IMG_20231223_125705836.jpg
IMG_20231223_125659763.jpg
IMG_20231223_125643875.jpg


The booster pump is an additional piece that will make it just that much easier and faster. I get 80 psi and don't worry about anyone else using water that would lower my water pressure.
 

Attachments

  • IMG_20231223_125638223.jpg
    IMG_20231223_125638223.jpg
    120.1 KB · Views: 22
OP
OP
rhduggan

rhduggan

Community Member
View Badges
Joined
Dec 4, 2023
Messages
39
Reaction score
78
Location
Newark
Rating - 0%
0   0   0
It is very obvious you did a lot of homework and made great decisions. It will take you far. Unless I missed it no light listed. If I could add one thing to add, it would be a second DI unit to your rodi system. Reason, it will Make sure nothing gets past the unit when the resin is almost gone. The add on is cheap on brs. When the first resin Is exhausted, you replace it with the second unit and put the new resin in the second position.


IMG_20231223_125705836.jpg
IMG_20231223_125659763.jpg
IMG_20231223_125643875.jpg


The booster pump is an additional piece that will make it just that much easier and faster. I get 80 psi and don't worry about anyone else using water that would lower my water pressure.
I didn't list a breakdown of the equipment that comes with the Red Sea Reefer MAX 200 package. Sort of assumed it was known in this group. But it is:
ReefLED 90
ReefWave 25 gyre pump
ReefRun 5500 return pump
RSK DC 300 protein skimmer
ReefMat 500

Very nice suggestion on the RODI; thanks!
 

Daniel92481

Valuable Member
View Badges
Joined
Apr 28, 2018
Messages
1,610
Reaction score
5,769
Location
Houston, TX
Rating - 0%
0   0   0
This is awesome! What a great gift for your daughter as well as learning experience for all of you. My best advice would be to just go ahead and forget about the costs while you’re ahead. :grinning-face-with-big-eyes: :zipper-mouth-face:
 
OP
OP
rhduggan

rhduggan

Community Member
View Badges
Joined
Dec 4, 2023
Messages
39
Reaction score
78
Location
Newark
Rating - 0%
0   0   0
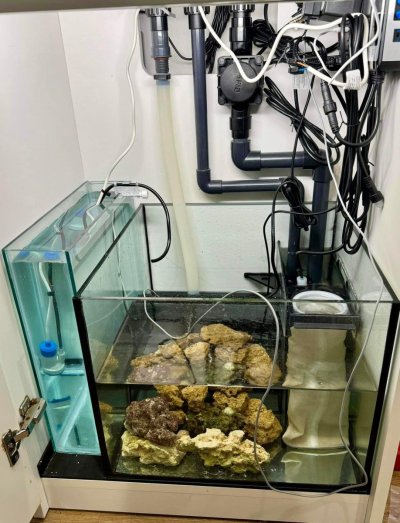
Since Red Sea sells the Reefer Max 200 G2+ as a complete system, you’d think they’d provide complete instructions as to how to put it all together, no? It is completely unclear to me how the ATO reservoir, ReefMat 500, and DC Skimmer 300 are all supposed to fit together in the sump and I can’t find a video or written instructions anywhere! I also didn’t understand that it didn’t come with the ATO+ but was just “compatible”. We just ordered that. Do we cut the bottom of the divider between the downflow side of the filter sock box so the ReefMat hose can come through under the ATO reservoir? The divider is necessary to support the reservoir, but there’s not enough clearance for the hose to go through the filter sock hole. And it looks like there's no way to fit the ReefMat, Skimmer, and ATO reservoir in the space even if we do cut that plastic panel. I think we're going to have to use an external ATO reservoir. Hoping we can find something that fits beside, or above, the sump. The existing one will fit beside it, but then it would be below the water level and I'm not sure if the ATO+ has a backflow preventer? Also, we'd have to cut the little outlet off and seal it with silicone seal. I'm not sure I'm comfortable with that, either!

If we don't put the plastic divider in there at all (our current thinking) we could put something else like a refugium in there eventually, I guess.

IMG_0827.jpg
 
OP
OP
rhduggan

rhduggan

Community Member
View Badges
Joined
Dec 4, 2023
Messages
39
Reaction score
78
Location
Newark
Rating - 0%
0   0   0
2023-12-25 Well we've hit some hiccups but made a lot of progress in the last two days. On Christmas day we put the cabinet together, did the basics of the plumbing, and wet-tested the setup. It did turn out to have a slight leak in the return line bayonet connector. The bayonet comes threaded together to the part that slips into and threads onto the return line. It came assembled and has a single O ring, but also had Teflon tape. That, to me, is always a signal that something isn't right. If a fitting is properly built with an O ring seal it should never need thread sealant. Anyway, this does, and more than was on there. We took it apart, sealed it, and let everything run overnight.
 
OP
OP
rhduggan

rhduggan

Community Member
View Badges
Joined
Dec 4, 2023
Messages
39
Reaction score
78
Location
Newark
Rating - 0%
0   0   0
2023-12-26
Red Sea Reef Mature process Day 1
No surprises in the morning, so we drained everything and started mixing saltwater and washing sand. Meanwhile, I took accurate measurements of the weir box and the internal dimensions of the glass and translated them onto the base of our aquascape template. It was clear that the rockwork would fit, but it would be crammed too far forward and not look like we planned. Fortunately, that could easily be solved with a right-angle grinder and a diamond wheel. I just sliced off an inch or so of the rock in the back and it looks just like we planned. You can't see the back, anyway, and no horizontal surface area was compromised.

We figured out (after considerable struggling) how to fit the ReefMat and the skimmer next to one another, and started carting buckets of artificial seawater up from the basement. We had friends over for dinner and to play games, but that didn't stop my daughter from running off for a bucket every hour or so. Guests went home at 2AM. We finished filling and playing around with it at 3:00!
 
Last edited:
OP
OP
rhduggan

rhduggan

Community Member
View Badges
Joined
Dec 4, 2023
Messages
39
Reaction score
78
Location
Newark
Rating - 0%
0   0   0
2023-12-27
Red Sea Reef Mature process Day 2
I mentioned hiccups earlier. The first hiccup we ran into was that the ReefWave 25 gyre pump had no power supply in the box. The box was sealed; somebody goofed. And that turned out not to be the only Red Sea goof. I mentioned earlier that the package didn't include the ATO+ setup. Well, that turns out to be wrong. It is supposed to come with it and that also was not on the pallet. My daughter already ordered one from BRS, so now we have to figure out how to straighten it out with Red Sea and BRS. Joy.

We finished up a lot of things today. We repositioned the venturi inlet on the skimmer so it isn't isolated in what is supposed to be the filter box and it all fits together much more neatly. We adjusted the water level and flow rate (like, oh I dunno, 25 times?) and I think we've got that set pretty good. We've got our salinity at 1.025 and our temperature at 79 (I see so many conflicting numbers for this I'm really not sure what to go with. Most heaters seem to come set to 77, but the Red Sea Reef Mature instructions say 26-28 C. Well, 26 C is 78.8 F, so we set ours to 79 F.

The instructions say to "prepare your salt water to 1.023-1.025 at 25 C. Then they tell you to maintain the tank at 26-28 C. So what should the salinity measure at that temperature? Is there a detectable difference? By the time we draw water and put it on the refractometer that little bit is going to equilibrate to the surface temperature anyway, right?

Our return pump is running at 25% and our skimmer pump is running at 50%. The Reef Mature instructions say the skimmer should turn over at least 3x system volume per hour with a water:air ratio of at least 3:1. I don't know how one could possibly measure this.

Anyway, we started dosing our Reef Mature supplements tonight around 10PM. Our starting numbers:
Temp: 79
Salinity: 1.025
pH: 7.8
KH/Alkalinity: 10
Added: Nitro Bac = 35 ml, BactoStart = 17.5 ml, NoPox = 4.5 ml
IMG_8498.jpg

IMG_8499.jpg
 
Last edited:

Daenero

New Member
View Badges
Joined
Dec 22, 2023
Messages
2
Reaction score
3
Location
uk
Rating - 0%
0   0   0
It’s looking very good, can’t wait to see what you do with it! You’re right with the plumbing I always put tap on as an added extra precaution but when it comes with it in already you can’t but wonder.

You won’t know as you said that the back of the scape it flat and now that it’s in place you can see the high is great for sps on the top right. The arches will make it for fun swimming around my old six line wrasse loved to do that and it’s a stunning little fish. I’m currently thinking about a pair of naked clowns, orchid dottyback, striped Blenny and maybe a fairy wrasse.

Glad you managed to fit the Reefmat 500 and the skimmer in that tight space shame you’ll not have much room left for a refugium, or much rock medium for extra live rock. Did you manage to also fit your ATO? As I can’t quite see. I may self will be getting the 250 to help with space which will allow me to put a ITC ALR 1 reactor in fingers crossed.

On the FB page I saw a couple of pictures regarding having the space next to the sump for an external ATO reservoir and another one with a cabinet next to the cabinet for a bigger one. I’ll see if I can add the pictures (not mine). As I might do that myself even if I put the food and cleaning stuff and test kits in the top half of the cabinet.

Can’t wait to see your next update and see how you get along with cycling the tank
 

Attachments

  • IMG_7161.jpeg
    IMG_7161.jpeg
    227.4 KB · Views: 31
  • IMG_7162.jpeg
    IMG_7162.jpeg
    135.2 KB · Views: 31

Reefing threads: Do you wear gear from reef brands?

  • I wear reef gear everywhere.

    Votes: 20 13.7%
  • I wear reef gear primarily at fish events and my LFS.

    Votes: 10 6.8%
  • I wear reef gear primarily for water changes and tank maintenance.

    Votes: 1 0.7%
  • I wear reef gear primarily to relax where I live.

    Votes: 22 15.1%
  • I don’t wear gear from reef brands.

    Votes: 83 56.8%
  • Other.

    Votes: 10 6.8%
Back
Top