I have an INT50 and previously an IM20. I found the IM 20 cabinet made a nice looking place for all my electronics. Not saying I would buy one for this purpose, but if you have an extra.... just a thought.
Navigation
Install the app
How to install the app on iOS
Follow along with the video below to see how to install our site as a web app on your home screen.
Note: This feature may not be available in some browsers.
More options
You are using an out of date browser. It may not display this or other websites correctly.
You should upgrade or use an alternative browser.
You should upgrade or use an alternative browser.
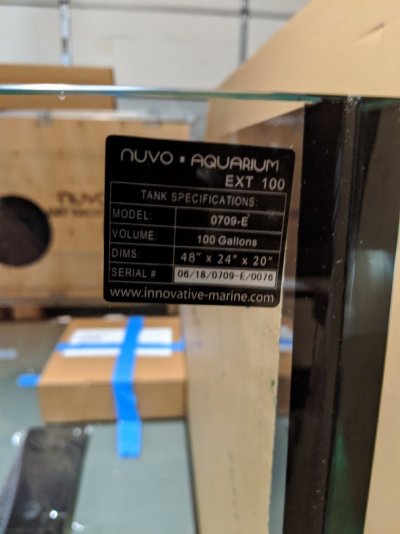
Tank Build - 100Gal EXT - Innovative Marine
- Build Thread
- Thread starter LukasEragon
- Start date
-
- Tags
- #lukasreef
- Tagged users None


OP
OP
Tank Update:
Wow, lots of time has passed. I have a lot of things to share. Sorry for not posting sooner, so many things going on in life.
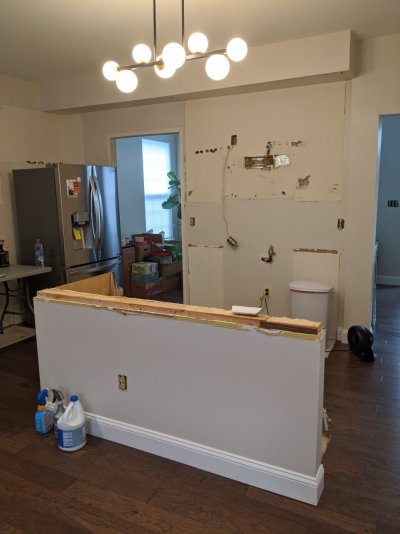
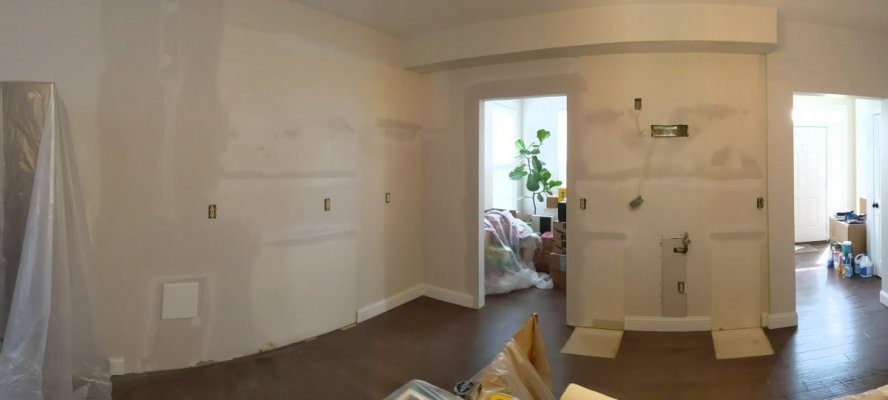
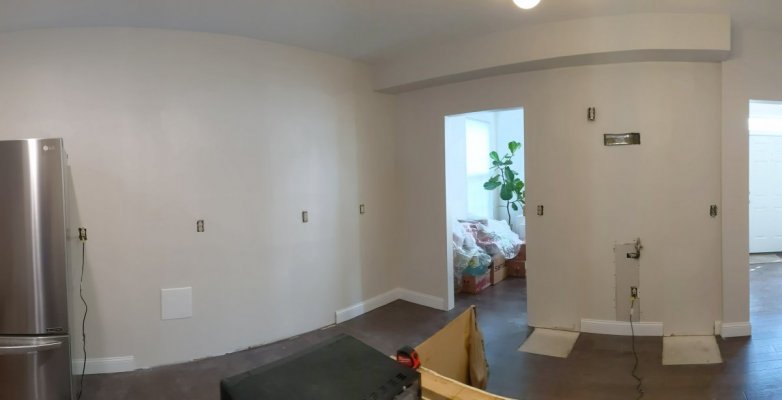
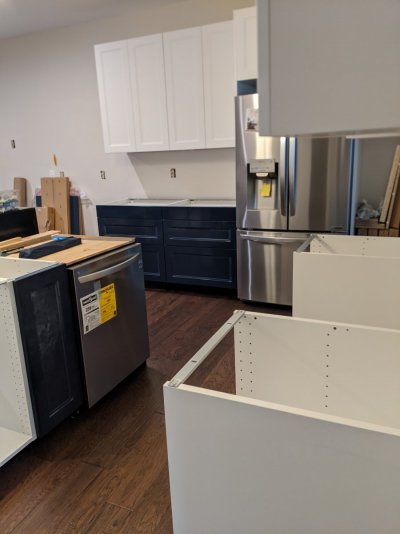
Although, not directly tank related, I would like to begin with the renovations to the room in which the tank is going to live. As you may remember, where was a space of wall between the Kitchen and the Fireplace which was a perfect fit for the spacing of the 100gal EXT Innovative Marine tank. I have now completed(mostly) BOTH the fireplace and the Kitchen renovations which I decided to do before putting the tank into place. Photo's of the updated room can be seen in the following posts.
Wow, lots of time has passed. I have a lot of things to share. Sorry for not posting sooner, so many things going on in life.
Although, not directly tank related, I would like to begin with the renovations to the room in which the tank is going to live. As you may remember, where was a space of wall between the Kitchen and the Fireplace which was a perfect fit for the spacing of the 100gal EXT Innovative Marine tank. I have now completed(mostly) BOTH the fireplace and the Kitchen renovations which I decided to do before putting the tank into place. Photo's of the updated room can be seen in the following posts.
OP
OP
Fireplace Re-Do-
Removed fake bricks, Smoothed out Drywall, Added ledge stone to around fireplace, built and made mantel.


Removed fake bricks, Smoothed out Drywall, Added ledge stone to around fireplace, built and made mantel.

OP
OP
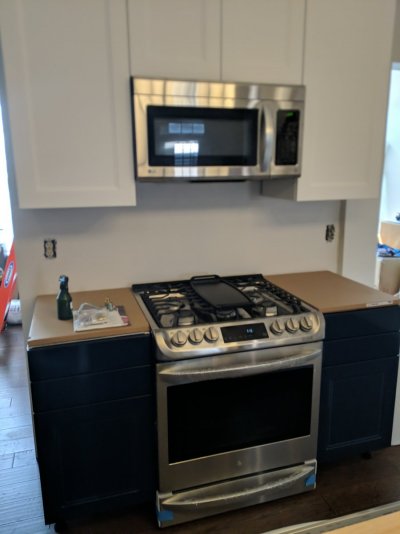
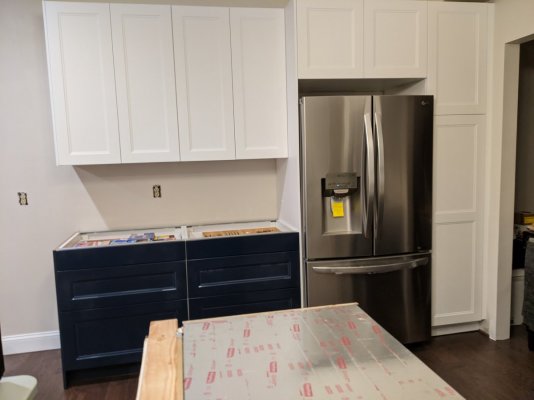
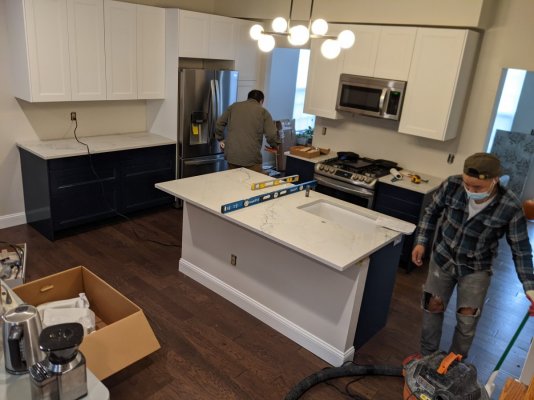
Kitchen Re-Do-
Removed all old cabinets and appliances. Patched Drywall issues, Installed new Cabinets, Installed new appliances, (new countertops Installed by pros)
Removed all old cabinets and appliances. Patched Drywall issues, Installed new Cabinets, Installed new appliances, (new countertops Installed by pros)
Attachments
-
 IMG_20200816_165544.jpg110.3 KB · Views: 50
 -
 IMG_20200816_165556.jpg105.6 KB · Views: 48
 -
 PANO_20200821_150559.vr.jpg54.5 KB · Views: 42
 -
 PANO_20200823_162259.vr.jpg52.6 KB · Views: 39
 -
 PXL_20200912_220341306.jpg98 KB · Views: 38
 -
 IMG_20200913_131509_01.jpg89.8 KB · Views: 40
 -
 PXL_20201027_013318968.jpg90.8 KB · Views: 41
 -
 PXL_20201030_141852967.jpg145 KB · Views: 48
OP
OP
OK! Enough with the related house updates. Back to the tank build.
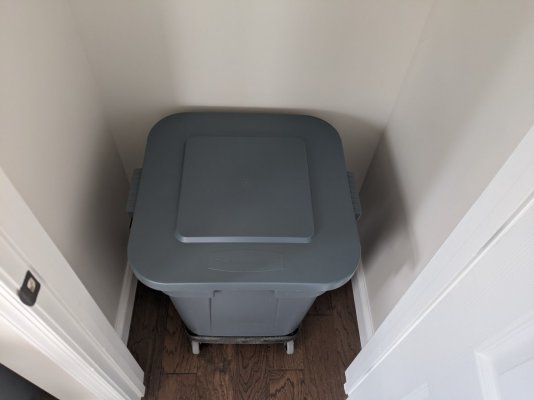
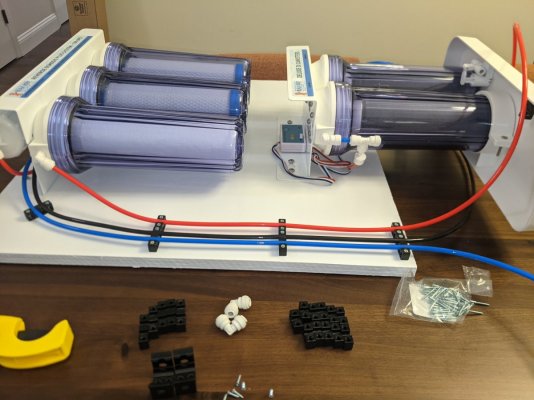
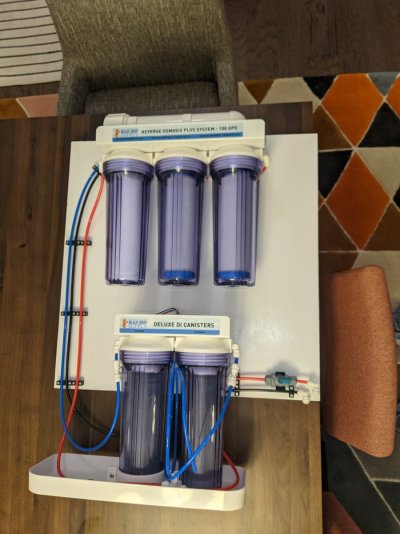
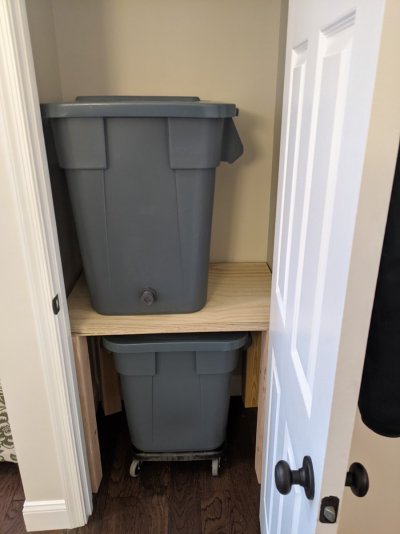
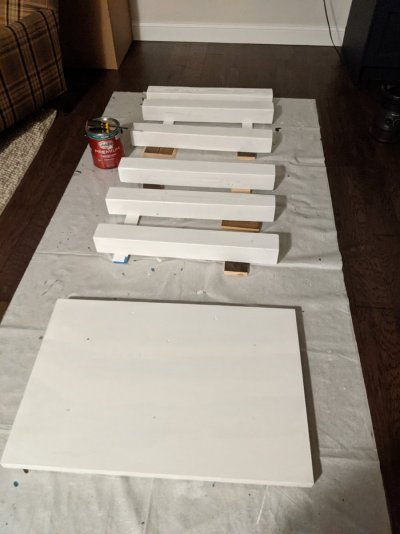
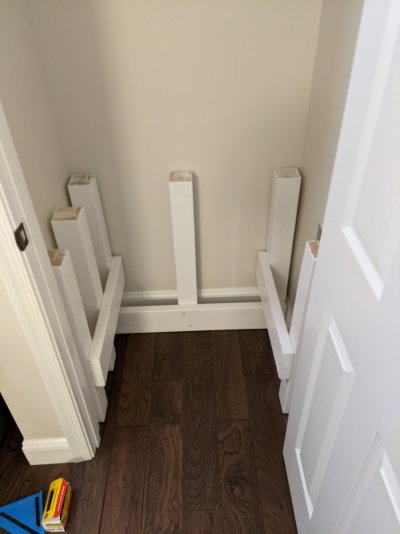
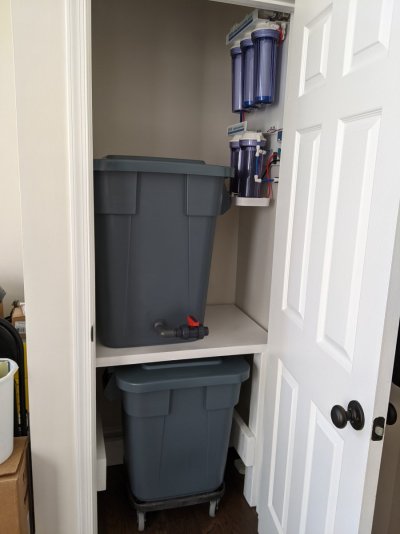
First "change of plans" happened when doing the Kitchen Cabinets. I originally planned to have the RO-DI System connected to drains under the kitchen sink, But when we actually re-did the kitchen, it was pretty clear the RO was way to big for the under sink cabinet and I needed to modify my plans. I decided to take over a coat closet (which shares a wall with a 1/2 bath for plumbing hookups) in order to make myself a full RO-DI Storage and Salt Water Mixing area.
Used 2 Brute Square trash cans for the 2 bins. One is 40Gal (RO Storage) and is plumed directly to the RO-DI output with a float value installed in the top lip of the Brute tub. Additionally, I added a 3/4in bulkhead to the bottom of the tub which has a ball valve connected to it so I can use gravity feed to fill the mixing tub which lives below. I am also going to get a longer hose which can run across the kitchen so I can easily top off my ATO container inside the Tank Stand.
The smaller 28gallon Brute is going to be used for salt mixing and is set on top of the Brute rolling base to easily move around from it's storage spot inside the closet to the tank when I do water changes.
I used 4x4 and 2x4 wood from hardware store to create my own stand at the right height spacing for the two tubs. Top 40Gal sits on the wooden frame, and bottom 28Gal rolls underneath it. It's top is 3/4in Plywood doublestacked and the whole thing got 4x coats of white paint.
The RO-DO I mounted to another piece of white painted Plywood and then did my RO cable management on that board. Once organized, I secured the entire unit to the inside wall of the cabinet with plumbing connections though the wall to the half-bath on the other side.
Attachments
-
 PXL_20210124_195133660.jpg117.4 KB · Views: 49
 -
 PXL_20210127_154854719.jpg71.3 KB · Views: 48
 -
 PXL_20210124_015244041.jpg158.9 KB · Views: 47
 -
 PXL_20210124_023050521.jpg153.1 KB · Views: 49
 -
 PXL_20210127_221012930.jpg94.9 KB · Views: 52
 -
 PXL_20210127_213058755.jpg100.1 KB · Views: 50
 -
 PXL_20210129_015018212.jpg120.3 KB · Views: 46
 -
 PXL_20210201_002748153.jpg81.9 KB · Views: 53
 -
 PXL_20210329_204651969.jpg101.5 KB · Views: 67
OP
OP
Tank Stand Update
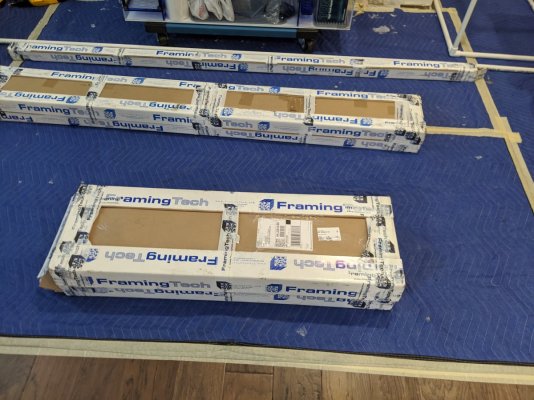
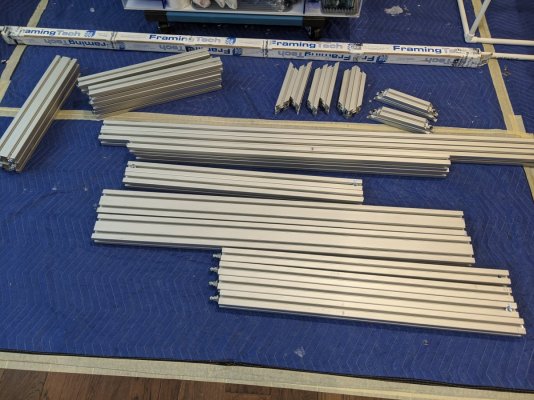
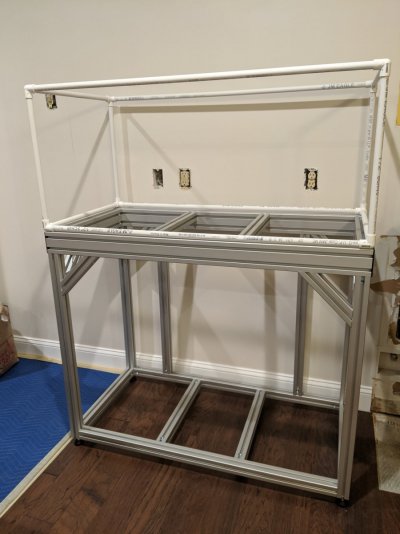
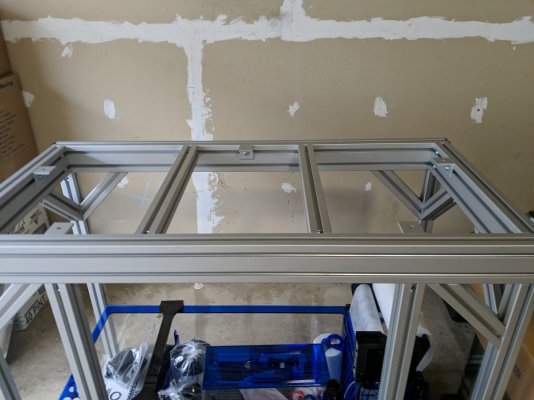
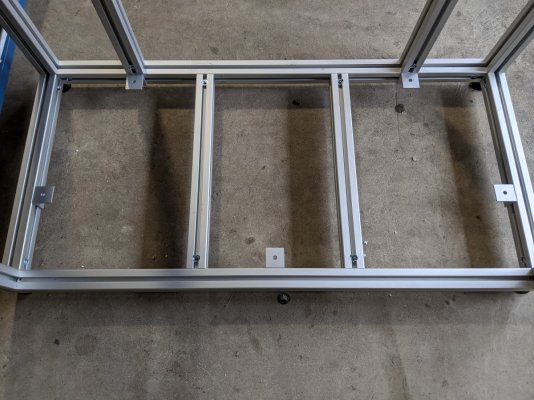
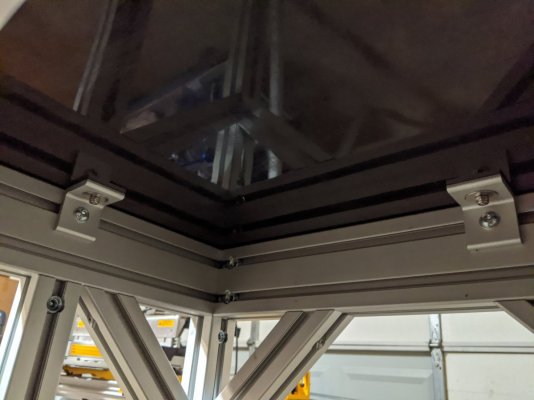
Ok, Framing Tech is AWESOME. This stand absolutely came out perfect. I'm so happy with this decision to not use the stand which came provided by Innovative Marine with the tank itself. It's not a bad factory stand by any means, but this extruded aluminum frame is really something awesome. I see that IM will now sell their EXT Tanks as "tank only" options! This would have been nice months back when I bought mine, but oh well! That said, I was able to sell my unused IM stand to another local reefer who was needed a replacement.
So I've already described the design and plans for the stand. But seeing it in person and how precision it is, has been awesome. I love that the front has no center brace so access to the sump area is very open. Once fully assembled it feels bomb proof.
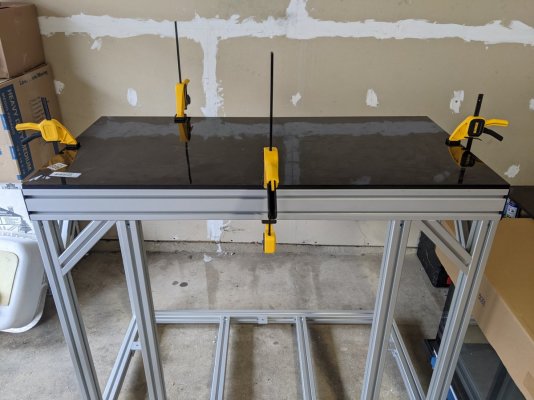
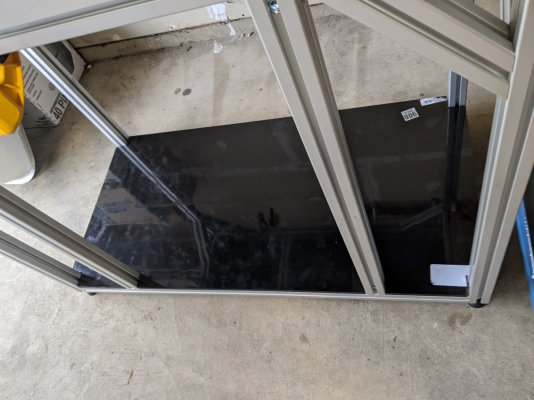
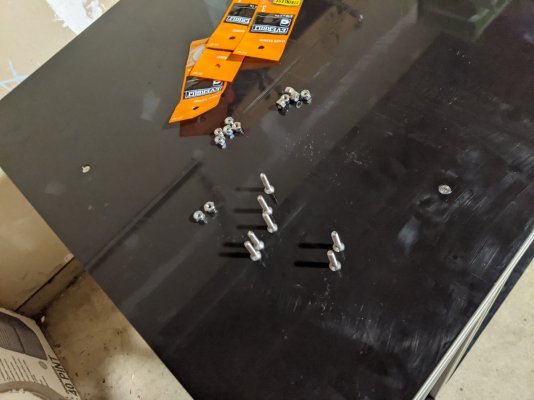
One thing I would have done differently is to get the top and inside floor from Framing Tech as well. I ended up going with some thick plastic sheets that I found at Grainger, but needed to trim the bottom one around the aluminum bars and setup my own mounting setup for it. I used stainless hardware and counter sunk the bolt heads so they are under the face of the plastic material. They do look nice now that they are Installed, but they may easily scratch and I'll need to be careful with them over time.
Photo's of the frame build attached.
Note: One thing these photo's don't show is the 2 vertical bars up the back which will be light mounting arms. But you'll see that in my Plumbing photos, up next!
Ok, Framing Tech is AWESOME. This stand absolutely came out perfect. I'm so happy with this decision to not use the stand which came provided by Innovative Marine with the tank itself. It's not a bad factory stand by any means, but this extruded aluminum frame is really something awesome. I see that IM will now sell their EXT Tanks as "tank only" options! This would have been nice months back when I bought mine, but oh well! That said, I was able to sell my unused IM stand to another local reefer who was needed a replacement.
So I've already described the design and plans for the stand. But seeing it in person and how precision it is, has been awesome. I love that the front has no center brace so access to the sump area is very open. Once fully assembled it feels bomb proof.
One thing I would have done differently is to get the top and inside floor from Framing Tech as well. I ended up going with some thick plastic sheets that I found at Grainger, but needed to trim the bottom one around the aluminum bars and setup my own mounting setup for it. I used stainless hardware and counter sunk the bolt heads so they are under the face of the plastic material. They do look nice now that they are Installed, but they may easily scratch and I'll need to be careful with them over time.
Photo's of the frame build attached.
Note: One thing these photo's don't show is the 2 vertical bars up the back which will be light mounting arms. But you'll see that in my Plumbing photos, up next!
Attachments
-
 IMG_20200816_172848.jpg216.4 KB · Views: 67
 -
 IMG_20200816_174327.jpg249.2 KB · Views: 71
 -
 IMG_20200816_203001.jpg132.8 KB · Views: 73
 -
 IMG_20201012_151028_01.jpg142.6 KB · Views: 72
 -
 PXL_20201012_195743663.jpg249.3 KB · Views: 61
 -
 PXL_20201012_195817158.jpg173.4 KB · Views: 57
 -
 PXL_20201012_195743663.jpg249.3 KB · Views: 58
 -
 PXL_20201012_203204689.jpg186.2 KB · Views: 61
 -
 PXL_20201012_211128861.jpg162.2 KB · Views: 63
 -
 PXL_20201012_235114133.jpg128.7 KB · Views: 62
 -
 PXL_20201013_004618261.jpg123.1 KB · Views: 67
 -
 PXL_20201012_211239386.jpg137.5 KB · Views: 80

OP
OP
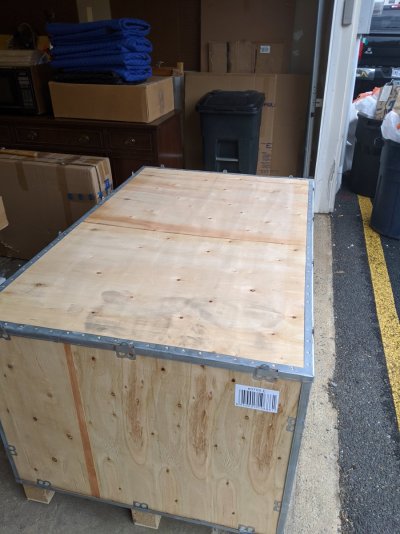
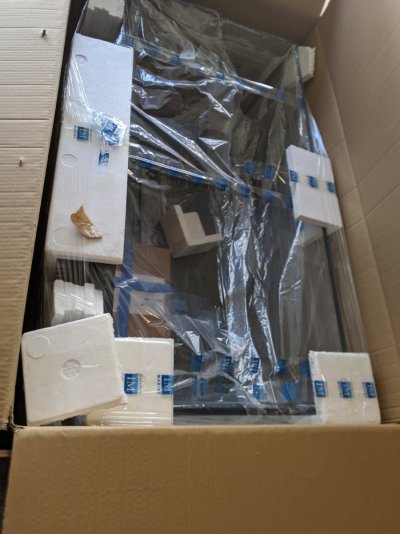
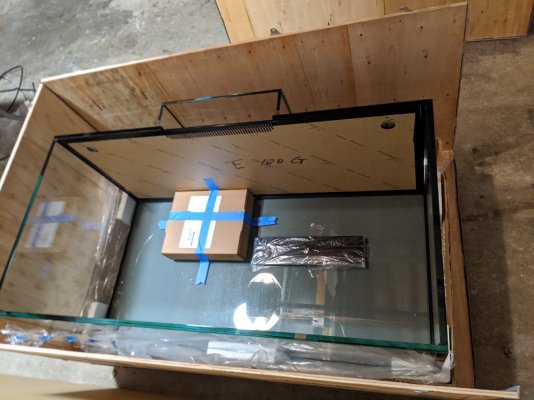
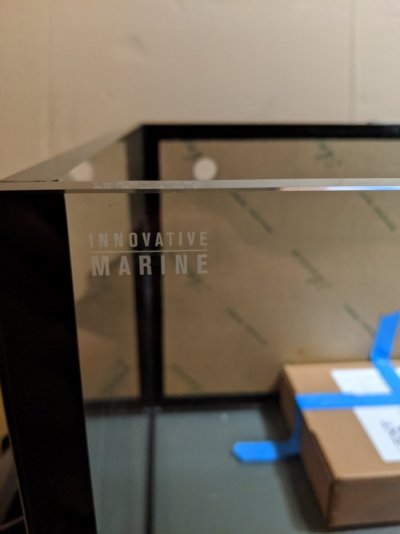
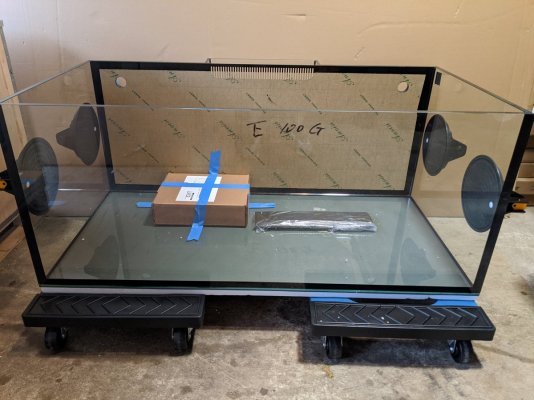
Tank Arrived!
I guess I actually have never shown any photo's of the tank. People probably think I'm crazy building all this stuff with no glass box to put water in! But...Yes, I do have the Tank!
Shipping from IM was pretty quick (for truck freight) and it was well packaged. Came on a crate which the delivery guy allowed me to inspect before signing for.
Tank looks great and it's a fantastic size, not too big, not too small. (don't let me regret saying this in the future, lol)
Silicon work looks spot on, only a few minor imperfections. Bugs me that the serial number sticker is not straight, but oh well, that's a minor thing. Overflow box is slick. I do wish they could design the overflow weir's to be removable for cleaning as they are simply cut into the back acrylic panel which is attached permanently overlay of the back glass. Maybe this is a detail IM can develop into future models. But overall I am very happy with this tank!
Attachments
- Joined
- Aug 12, 2018
- Messages
- 5,806
- Reaction score
- 8,227
That’s a sweet tank; I have a little IM 20-gallon to fool around with— I bet the 100 is spectacular!
OP
OP
Remaining Gear Update
So as previously mentioned. I have a load of EcoTech gear as the core of my flow and lighting.
2x: EcoTech Radion XR30 Gen5 Blue
2x: EcoTech Vectra S2 Pump (picked up another one due to the design of plumbing/+ redundancy)
2x: EcoTech MP40QD Powerhead
But, that still left me with some major components I needed to source.
I really want to do "Heavy In-Heavy Out" philosophy with this tank, so I decided to go with a bit larger gear than most people might typically choose for only 100gal display. I also want to TRY *(to what extent possible)* eliminate some of the tedious maintenance tasks which are usually associated with Reef Tanks. I understand it's not a maintenance free hobby, but I figured at least I can oversize some bits and avoid filter socks to at least move the needle a bit in the less maintenance required direction. So, below are the additional component selections that I decided on.
SUMP: Trigger Systems : Platinum 39 - Filter roller Sump
(got a matching Trigger Systems 5gal ATO Container on scratch/dent from Trigger Systems directly)
(also, no more filter socks! YAY!)
Protein Skimmer: Reef Octopus Regal : 200EXT 8" Recirculating Protein Skimmer
(it needs a secondary pump so I picked up a matching second Varios4 pump from Reef Octopus)
UV: Pentair Aquatics: Smart UV 40 Watt:
(This was also an "open box" option from BRS, in hindsight it's way too big for my space, but I figured it out )
)
T5s: Aquatic Life: 48" DX18 Hybrid Dimmable T5 HO Light Fixture (to which the Radion's will mount within)
Media Reactors: I got 3x, one of which is the XL model and I filled it with Brightwell Aquatics Denitrification media and then covered with a light blocking film. The XL one will run a low amount of water though all the time off the return pump manifold. The other 2 are Standard size, one I'll use for Carbon and the last will be for "whatever" as needed.
links to everything below
 reefoctopus.com
 pentairaes.com
 aquaticlife.com
 www.marinedepot.com
 www.marinedepot.com


So as previously mentioned. I have a load of EcoTech gear as the core of my flow and lighting.
2x: EcoTech Radion XR30 Gen5 Blue
2x: EcoTech Vectra S2 Pump (picked up another one due to the design of plumbing/+ redundancy)
2x: EcoTech MP40QD Powerhead
But, that still left me with some major components I needed to source.
I really want to do "Heavy In-Heavy Out" philosophy with this tank, so I decided to go with a bit larger gear than most people might typically choose for only 100gal display. I also want to TRY *(to what extent possible)* eliminate some of the tedious maintenance tasks which are usually associated with Reef Tanks. I understand it's not a maintenance free hobby, but I figured at least I can oversize some bits and avoid filter socks to at least move the needle a bit in the less maintenance required direction. So, below are the additional component selections that I decided on.
SUMP: Trigger Systems : Platinum 39 - Filter roller Sump
(got a matching Trigger Systems 5gal ATO Container on scratch/dent from Trigger Systems directly)
(also, no more filter socks! YAY!)
Protein Skimmer: Reef Octopus Regal : 200EXT 8" Recirculating Protein Skimmer
(it needs a secondary pump so I picked up a matching second Varios4 pump from Reef Octopus)
UV: Pentair Aquatics: Smart UV 40 Watt:
(This was also an "open box" option from BRS, in hindsight it's way too big for my space, but I figured it out
)T5s: Aquatic Life: 48" DX18 Hybrid Dimmable T5 HO Light Fixture (to which the Radion's will mount within)
Media Reactors: I got 3x, one of which is the XL model and I filled it with Brightwell Aquatics Denitrification media and then covered with a light blocking film. The XL one will run a low amount of water though all the time off the return pump manifold. The other 2 are Standard size, one I'll use for Carbon and the last will be for "whatever" as needed.
links to everything below
Regal Protein Skimmer EXT (3 models available) – Reef Octopus
reefoctopus.com
SMART UV Sterilizers | UV Sterilizers | Pentair Aquatic Eco-Systems
The SMART UV line of high-quality ultraviolet sterilizers features a watertight design and can be used safely both indoors and out. Buy yours from Pentair AES.
pentairaes.com
Aquatic Life DX18 T5 HO Dimmable 4-Lamp Hybrid Mounting System Fixture, 48-Inch
Description DX18 Hybrid T5HO Dimmable Fixtures (lamps not included). The ultimate way to have both T5HO and LED lighting over your aquarium, the Aquatic Life DX18 Hybrid Fixture provides the platform for you to create the ideal lighting for corals and plants. With decades of experience growing...
aquaticlife.com
AquaMaxx Fluidized GFO and Carbon Filter Media Reactor - XL - Marine Depot
AquaMaxx Fluidized Media Reactors are multi-purpose aquarium water filters specially designed for use in marine and reef aquaria. Insert your media of choice to help eliminate organic pollutants, odors, discolorations and algae fuels. Fluidized reactors, also commonly referred to as phosphate or med
Fluidized GFO and Carbon Filter Media Reactor - Standard
AquaMaxx Fluidized Media Reactors are multi-purpose aquarium water filters specially designed for use in marine and reef aquaria. Insert your media of choice to help eliminate organic pollutants, odors, discolorations and algae fuels. Fluidized reactors, also commonly referred to as phosphate or...
www.marinedepot.com

OP
OP
Thanks! It's been a really fun project to work on so far. I'm happy with the 100 gal size. It's big, but still small enough to easily work within the tank. I think it will be great!That’s a sweet tank; I have a little IM 20-gallon to fool around with— I bet the 100 is spectacular!
OP
OP
Plumbing Update
Now that I had a Sump, I could begin to design my plumbing. The 3x drain lines are all 1inch bulkheads and the sump has 3x drain connection points. One of the sump drain connection points is in the skimmer section and made sense to me to be used as the emergency drain. The 2x return lines are 3.4inch bulkheads and this matches the fittings for the return pumps, but the sump only had 1 return line connection. I got in touch with Trigger Systems Support who sold me directly an extra fitting which I then modified the sump in order to attach it. You'll see in the photos, the front return pump connection mount is not a factory placement from Trigger Systems, that is the one I added as extra.
At this point I bought a bunch of Schedule80 fittings and began to design the plumbing. I keep running into issues with how large the body of the UV is. I ended up needing to run it horizontally in fount of the sump which isn't ideal but it is still pretty much out of the way. Additionally, the return manifold was tricky to design because it's just so intricate with 3 different ball values to control flow to the 3 media reactors. This was my first time working with a large scale hard plumbing setup, I made a few mistakes and had to remake a few of the pipe sections but overall it came out great! I added some basic white LED's for light inside the stand and it's all done now, Photo's attached!


.jpg")
Now that I had a Sump, I could begin to design my plumbing. The 3x drain lines are all 1inch bulkheads and the sump has 3x drain connection points. One of the sump drain connection points is in the skimmer section and made sense to me to be used as the emergency drain. The 2x return lines are 3.4inch bulkheads and this matches the fittings for the return pumps, but the sump only had 1 return line connection. I got in touch with Trigger Systems Support who sold me directly an extra fitting which I then modified the sump in order to attach it. You'll see in the photos, the front return pump connection mount is not a factory placement from Trigger Systems, that is the one I added as extra.
At this point I bought a bunch of Schedule80 fittings and began to design the plumbing. I keep running into issues with how large the body of the UV is. I ended up needing to run it horizontally in fount of the sump which isn't ideal but it is still pretty much out of the way. Additionally, the return manifold was tricky to design because it's just so intricate with 3 different ball values to control flow to the 3 media reactors. This was my first time working with a large scale hard plumbing setup, I made a few mistakes and had to remake a few of the pipe sections but overall it came out great! I added some basic white LED's for light inside the stand and it's all done now, Photo's attached!
OP
OP
Aquascape Update
I have never been called someone with an "artistic" touch. Art and me usually just don't get along. So making this Rockwork was a big question mark to me. I wanted something interesting and substantial, but I did NOT want a big pile or wall of rocks. I got myself a bunch of Marco rocks including some flat "stax" and "foundation" rocks. One of the rocks is a "Pedestal" rock but placed upside down(cut flat side as the foot). It took me some trial and error but eventually I came to a shape that I think is not too imposing, offers lots of coral placement options and isn't really shadowing itself currently. I had completed the rockwork and then thought to myself that the sand might cover up a lot of what I had built, so to avoid this, I ordered a few more "stax" rocks (cut flat on top and bottom) and used them like spacers underneath the existing rockwork. This raised the whole structure about the depth I assumed my sand would end up being which has worked out great! I needed to mount the far right rock on an acrylic plate in order to keep it stable as it's very much a cantilevered design.
The overall design is a 3 way "cave" with overhangs and 3 "feet" for coral placements on the left, and a shorter "ying/yang" type setup on the right (Where the two rocks are separate but sort of slot around each other)
Note on Marco rocks: I love that they are so porous, they are quite light per rock and have minimal density, water can basically pass though most of these rocks. They are pretty easy to break up as needed with a hammer and chisel. (wear eye protection) The Marco mortar works well to hold things together. Their "stax" and "base" rocks are a bit $$ but make for VERY Stable bases to the rock scape. Also...ordered WAY too much rock. I think you can get away with less than you assume and still have enough to work with for building a cool structure.

Photo's show the progression of the rock scape, including the small "raise" at the end. Tell me what you think how this came out?! Thoughts on what corals should be placed where on the rockwork?

OP
OP
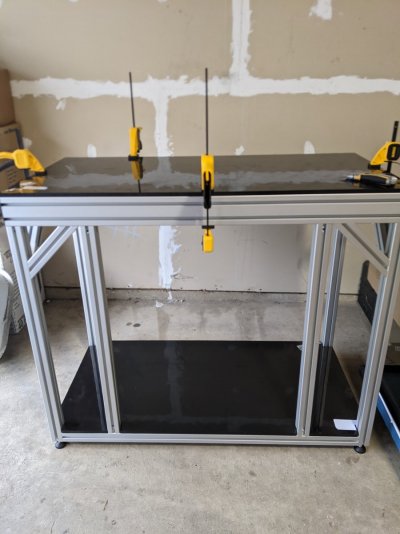
Wire management and first water fill.
Although tempting as it was to shove it against the wall and smack water in it. I figured I should take my time and wire manage the tank while I still had access to the back of everything before sliding it into place. I used the "T-Slot Cover" from Framing tech to help hide the wires within the slots on the stand. I mounted the T5 Light at this point as well and secured the Radions into it. I used cable tracks along the wall to organize the cables and power cords. I also picked up a Heater holder from Melev's Reef. I mounted the heater controller and the ATO controller inside the tank stand as their cords are simply not long enough to live in the cabinet to the left where everything is intended to live long term. Eventually I got everything nicely organized and bundled into similar connections. IE: Lights cords together, pump cords together, etc.
With this all completed, I was able to finally move it into final position and fill the tank with the rocks, sand and fresh RO-DI Saltwater, Whoot! After all this work, it's awesome to have the tank finally filled and cycling. (I'm using DrTims)
Last edited:
OP
OP
Short Video of the tank as it cycles: (sorry, still a bit cloudy from sand/bacteria in the bottle)
OP
OP
Added a bunch of updates today! TYFollowing! Any updates? I'm considering this very tank. Also I'm digging your eve online avatar even though I retired from the game a couple years ago
OP
OP
Did you end up using FT?I took a very long look at Framing Tech myself and if I ever go with an extruded aluminum stand (other than the ones Innovative Marine sells for their own tanks), I would go with them. Looks like your positive experience confirms that.
OP
OP
I was convinced...the Aquatic Life light ended up being perfect for me too!Awesome! I am also leaning towards using a T5 Hybrid Fixture. I figure I won't have much PAR needs for quite a few months, so no real reason to source the fixture quite yet, but the Stand design has this in mind! The vertical bars could easily be used to mount the Aquatic Life Wall Mount. I think down the road I will seriously consider this!
OP
OP
Yeah I am in love with the stand. It's height really changes the way the tank itself is presented. I'm very happy with FT.Nice stand. Those extra few inches in stand height can make a big difference.

Great build! Your under tank set up is very clean
OP
OP
Thanks I appreciate that! I'm trying to keep it clean and organized.Great build! Your under tank set up is very clean
Similar threads
- Replies
- 6
- Views
- 315
- Replies
- 1
- Views
- 109
- Replies
- 5
- Views
- 208


