I am still waiting for mine. 10 months in. I worry about the shipping. Seeing this was at least a bit reassuring, since I see that the tank survived a damaged crate. Glad your tank arrived undamaged and looking forward to following along.

Navigation
Install the app
How to install the app on iOS
Follow along with the video below to see how to install our site as a web app on your home screen.
Note: This feature may not be available in some browsers.
More options
You are using an out of date browser. It may not display this or other websites correctly.
You should upgrade or use an alternative browser.
You should upgrade or use an alternative browser.
The Journey Continues - Mike & Terry's 280g Reef Savvy
- Large Build
- Thread starter Mike&Terry
- Start date
- Tagged users None


OP
OP
Mike&Terry
Wrasses, Angels, & Tangs, Oh My!
View BadgesPartner Member 2024
Excellence Award
Reef Of The Month
Photo of the Month
Article Contributor
Moderator Emeritus
Definitely was a close call for sure.Wow that was a close one glad it was packaged nicely.
Crazy, scary for sure, Rev!That's crazy!
Very scary! The delivery man would have had to pick me up and deliver me to the hospital! Glad all was well.
My Goodness, I would have done it in my pants right there especially after such a long wait and anticipation and the last trama you had to endure just would have been too much for me. Thankfully all is well and Reef savvy Builds an excellent crate. Wait till you examine the rest of the tank, thats art in that box
I still have a bit of PTSD from the first failed seal debacle in 2010 and I really did not want to be here by myself when the Reef Savvy was delivered - but we can't always have our way. Then to see that hole, well, it took every bit of self-control I had, not to flip out. Thankfully, the delivery guy helped keep me calm. Otherwise, it would not have been pretty, LOL.Oh man, I would have literally pooped my pants if I saw that hole in the crate. Glad it's ok!
Geez! What a scare!! So glad it was ok! Can't wait to see this one get wet!
So glad it was OK!
Just reading it made me nervous! Glad its all good!
Scary shipping accident, at least the tank wasn't damaged!
Thanks so much guys!Shipping is one of my worst nightmare. congratulation on the new beautiful tank.
Thank You and Congrats on your new Reef Savvy! Have you started a build thread yet?I just received my tank as well and although there were no holes in the crate I was still nervous. Felix was concerned enough about the shipping to wyoming so he nailed on 3/4" plywood on the exterior just to make sure there were no forklift mishaps. Talk about a tank for a crate. Relieved to see there was no damage to your tank!
Couldn't agree more and often wonder the same thing.Why cant packages be handled a little bit more gently, especially when it had "Fragile" stickers all over the crate? Is that code to handler it rougher?
Thanks Gary! We hope your tank is ready SOON!I am still waiting for mine. 10 months in. I worry about the shipping. Seeing this was at least a bit reassuring, since I see that the tank survived a damaged crate. Glad your tank arrived undamaged and looking forward to following along.
It was a bit longer, but definitely worth the wait.People are telling me it takes 6 to 8 months for reef savvy to build a aquarium how long did it take for you?
OP
OP
Mike&Terry
Wrasses, Angels, & Tangs, Oh My!
View BadgesPartner Member 2024
Excellence Award
Reef Of The Month
Photo of the Month
Article Contributor
Moderator Emeritus
Thanks You Bronc!Following! Great read so far!
Thank You so much Marc!Loving this thread so far. I haven't seen any updates from you in a long time, so this was a nice thread to find.
-------------------------------------------------------------------------------------------
And the tank is on the stand! We'll post up some pics tomorrow...

OP
OP
Mike&Terry
Wrasses, Angels, & Tangs, Oh My!
View BadgesPartner Member 2024
Excellence Award
Reef Of The Month
Photo of the Month
Article Contributor
Moderator Emeritus
It's time to bring the tank inside the house and place it on the stand, but it won't fit through the front door. After discussing it with Felix, we decide our best option would be to remove the 36" entry door and one sidelight to allow enough clearance to bring the tank in without having to turn it on it's side.
Our son, Chris, came down from New York to help us prepare and move the tank. Here's a pic after he removed the door and sidelight:

Here are a couple of shots of the moving team after we un-crated the tank and were developing our move strategy. The tank weighs ~850 lbs, so it was important to carefully choreograph the steps we were going to take as we manuevered the tank from the garage, up the stairs and into the house.


As we mentioned earlier, we added a 3/4" sheet of hardwood maple plywood to the top of the stand. This was protected with several coats of poly, and holes cut for the closed loop bulkheads. We then placed a sheet of 3/8" neoprene (source) onto the plywood. This certainly made putting the tank onto the stand a bit more tricky. We needed to lift the tank over to its "landing position" and carefully lower it down to avoid bunching or tearing the neoprene. The suction cups were essential in making that possible. Once the tank was on the stand, it took quite a while to fine-tune the position so that it sat precisely where intended. This also was challenging and difficult, and we can't say enough about the patience and care that our friends gave us to get everything just right.
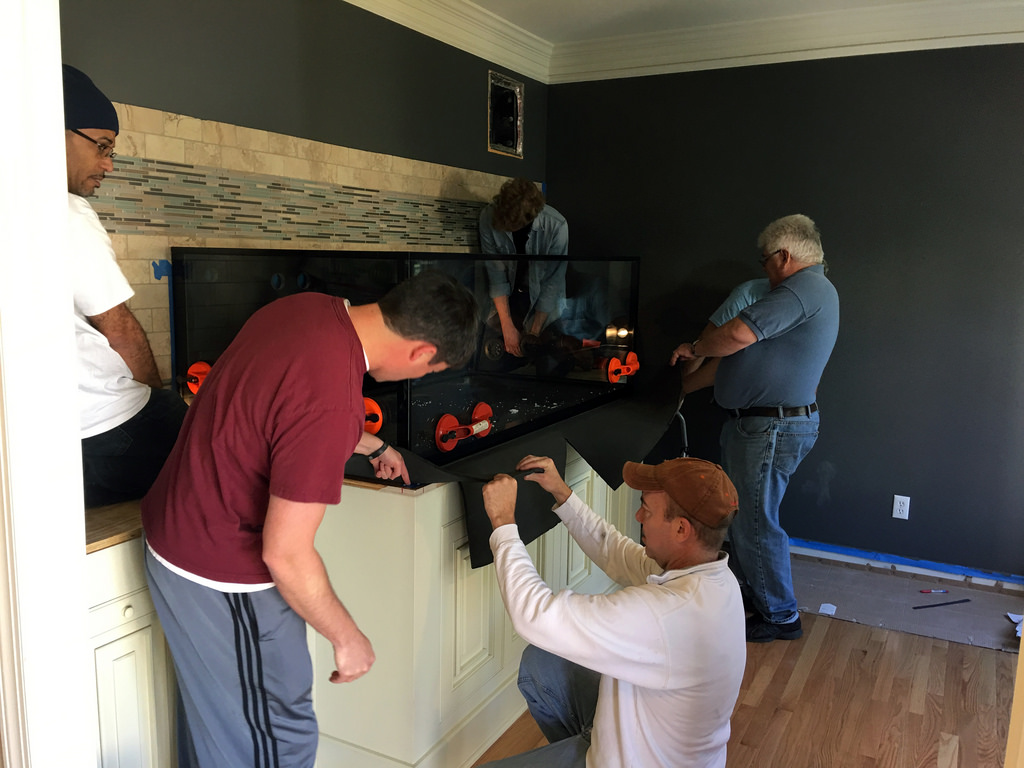
We owe a HUGE Thank You to our neighbor (Chuck), our reef keeping friends (Angel, Dave and Paul) and to our son Chris for helping us make this happen! We could NOT have done it without them! Mike said it "was the heaviest thing he's ever lifted", and there was plenty of Advil for the next couple of days!

Several other tasks are underway, including design and construction of the new suspended light fixture, plumbing of the display, installation of the closed loop, and of course aquascaping!! Stay tuned and thanks for watching...
Our son, Chris, came down from New York to help us prepare and move the tank. Here's a pic after he removed the door and sidelight:
Here are a couple of shots of the moving team after we un-crated the tank and were developing our move strategy. The tank weighs ~850 lbs, so it was important to carefully choreograph the steps we were going to take as we manuevered the tank from the garage, up the stairs and into the house.
As we mentioned earlier, we added a 3/4" sheet of hardwood maple plywood to the top of the stand. This was protected with several coats of poly, and holes cut for the closed loop bulkheads. We then placed a sheet of 3/8" neoprene (source) onto the plywood. This certainly made putting the tank onto the stand a bit more tricky. We needed to lift the tank over to its "landing position" and carefully lower it down to avoid bunching or tearing the neoprene. The suction cups were essential in making that possible. Once the tank was on the stand, it took quite a while to fine-tune the position so that it sat precisely where intended. This also was challenging and difficult, and we can't say enough about the patience and care that our friends gave us to get everything just right.
We owe a HUGE Thank You to our neighbor (Chuck), our reef keeping friends (Angel, Dave and Paul) and to our son Chris for helping us make this happen! We could NOT have done it without them! Mike said it "was the heaviest thing he's ever lifted", and there was plenty of Advil for the next couple of days!
Several other tasks are underway, including design and construction of the new suspended light fixture, plumbing of the display, installation of the closed loop, and of course aquascaping!! Stay tuned and thanks for watching...
I have started my build thread. https://www.reef2reef.com/threads/new-in-wall-110-tank-build.231455/Thank You and Congrats on your new Reef Savvy! Have you started a build thread ?

OP
OP
Mike&Terry
Wrasses, Angels, & Tangs, Oh My!
View BadgesPartner Member 2024
Excellence Award
Reef Of The Month
Photo of the Month
Article Contributor
Moderator Emeritus
Thanks, Marc! We used DOW Styrofoam Residential sheathing under both of our acrylic tanks. The first time we saw the Neoprene being used was on the BRS 160g Reef Savvy tank. Felix prefers and recommended the 3/8" Neoprene sheeting over the foam board, so that's what we went with.Awesome. And that's the first time I've heard anyone has used Neoprene under their tank.
Thank You lefkonj! And LOL on the "depends"!Really like the Reef Savvy tanks. That hole in the crate would of required a new "depends" for me, glad it all worked out.
Here is a question no one ever ask, what did you do with all that styrofoam and the crate. mine is disassembled and against the garage wall, it will take two trash pick ups to dispose of all that packing. trying to decide what to do withe the crate other than sell it, but that's always an option
I have the same question. I may just put some castors and some hinges and use it as a 200# storage box[emoji15]Here is a question no one ever ask, what did you do with all that styrofoam and the crate. mine is disassembled and against the garage wall, it will take two trash pick ups to dispose of all that packing. trying to decide what to do withe the crate other than sell it, but that's always an option
OP
OP
Mike&Terry
Wrasses, Angels, & Tangs, Oh My!
View BadgesPartner Member 2024
Excellence Award
Reef Of The Month
Photo of the Month
Article Contributor
Moderator Emeritus
Here is a question no one ever ask, what did you do with all that styrofoam and the crate. mine is disassembled and against the garage wall, it will take two trash pick ups to dispose of all that packing. trying to decide what to do withe the crate other than sell it, but that's always an option
Yes, we've given that some thought. We may offer it up to the local reef club. The lumber in the crate is extensive and could be used for numerous projects, e.g. a stand or...
Do you have any pictures of the back areas where the access to the over flows are located?
Funny you should ask. Here's an update on some of the "infrastructure".
You will recall that with the ghost overflows, we needed to accommodate the external overflow boxes that will be mounted to the back of the tank. We went through a lot of thoughtful discussions (aka arguments) about how best to do this. It really came down to 2 options for us. Move the entire stand and side cabinets forward away from the wall to provide the extra space needed, or cut holes into the walls to allow for the overflow boxes to "hide" in the wall cavity. The front room where the tank resides is fairly narrow, and besides being a lot of work to move the stand and cabinets, it would eat into the already narrow space we have in front of the tank to observe and enjoy it. The other downside there is that we couldn't re-use the quartz countertops and surround, and that would be very expensive to replace. So we decided to leave the stand in place and cut the wall.
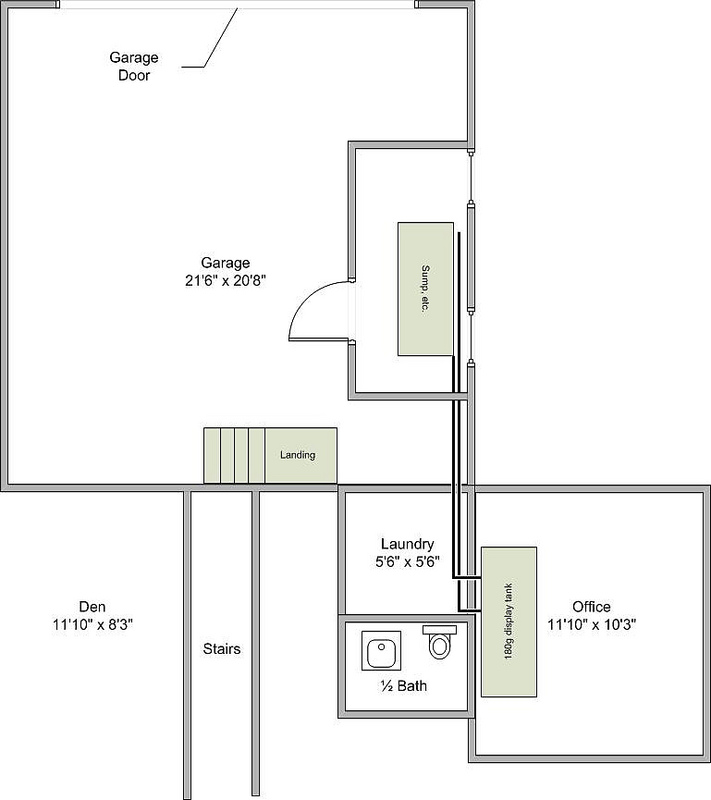
Here is a shot of how the original design for the wall cutouts was done. We left enough room for the overflow boxes, the return line bulkheads, and some surrounding space to be able to maintain the overflows. Still, the space was pretty small, relatively speaking:

The wall behind the tank stretches across two rooms behind; a half-bathroom, and the laundry room. This drawing is a little dated (referencing our first 180g tank here), but the structure is the same:
All of the measurements and cuts were done without having the tank on-hand to confirm exact positioning. Two fairly big errors we made were in failing to account for: (1) the depth of the overflow boxes and the gap from the back of the tank out in front of the wall, and (2) the room for the plumbing that would connect up into the bottom of the boxes. When the tile installer came to finish off the wall, he tiled precisely where we had put the cement backer board, and while that looked awesome, it created some big headaches.
Once the tank arrived and was sitting in its crate out in the garage, we could make more detailed measurements and try to see where things were going to line up on the stand and the wall behind the stand. The first thing we noticed was that the holes for the overflow boxes were too small and needed to be cut to allow more space at the bottom for the plumbing to attach. So the first thing we did is cut the the tile and cement board down 3" on both holes. Here is the bathroom view after the first cut:

And the laundry room view after the first cut:

Despite our best estimation, we really didn't realize the extent of the problems until the tank was up on the stand and we could see precisely where things would go. So once we had the tank up on the stand, we realized the holes were still too small to accommodate the plumbing connections to the bottom of the overflow boxes. So more cuts needed to be made:


Without boring you guys, lets just say that these cuts were horrifically difficult to pull off. The porcelain tile is harder than you can imagine. The blades required to cut stuff that hard are really expensive, and we went through three saws and 5 blades making these cuts. Not to mention the frustration of moving the tank, cutting the tile & backer board that we had just paid $$ to have installed. Ugh. That hurt. Mike was seriously regretting back-mounted overflows during that part of the install, let's just say that.
")
For the plumbing of the Reef Savvy Ghost Overflow boxes, we decided to use 1 full-siphon herbie style drain and 1 durso-style standpipe drain as the emergency drain in each box. The third drain bulkhead would be plugged in each box. The ghost overflows are pretty small. The internal boxes are really narrow to give that super nice, nearly invisible low profile look inside the display tank. The external boxes are 3" front-to-back. This brings up another difficulty we had. We had a hard time anticipating how much clearance the vertical plumbing connections would need coming up from under the stand to the overflow boxes themselves. Since the connections to the bottom of the boxes are 1" NPT threaded connections, we wanted to use unions there. And because the closest we could get to the wall with the back of the tank was about 0.5", and the wall with tile + cement board is nearly 7/8" thick, we had a clearance problem. This contributed to the need to lower the cutout of the holes for the overflow boxes, and also created the need to use some 45 degree elbows attached to the union fittings in order to offset the angle of the flex PVC used for the drain lines:


More to come. Thanks for watching!

revhtree
Owner Administrator
View Badges
Staff member
Super Moderator
Reef Squad
Partner Member 2024
Excellence Award
RGB
Photo of the Month
Article Contributor
R2R TV Featured
Hospitality Award
Article Administrator
Black Friday Sponsor
Partner Sponsor 2023
Industry Professional
My Aquarium Showcase
- Joined
- May 8, 2006
- Messages
- 47,856
- Reaction score
- 87,978
Love it you guys!
Thanks for that post, it helps me a lot in planning my plumbing. Because of the way my stand is made I can't get flush to the wall,so my drain and return pipes will have to go through the the wall, all through one spot or separately haven't figured that out yet

OP
OP
Mike&Terry
Wrasses, Angels, & Tangs, Oh My!
View BadgesPartner Member 2024
Excellence Award
Reef Of The Month
Photo of the Month
Article Contributor
Moderator Emeritus
Thanks Rev!Love it you guys!
Ain't that the truth!It NEVER works out the way you think it will.
Similar threads
- Price: 10,000.00
- Shipping NOT Available
- Replies
- 0
- Views
- 549
- Price: 3000 - 5700
- Shipping NOT Available
- Replies
- 4
- Views
- 574
- Price: 1
- Shipping NOT Available
- Replies
- 6
- Views
- 609


