Tony's 250 Build thread

OP
OP
T

Tony Hight

Community Member
View Badges
Joined
Jun 19, 2017
Messages
55
Reaction score
91
Rating - 0%
0   0   0
Two Minor Tweaks
After posting on #AskBRSTV I received a few good tips that had just completely slipped my mind. The first was with my plumbing as it exited the two Varios return pumps. I was using barbs and sized them at 1.25” to match the plumbing. I failed to even think that the barbs themselves are restricting me down from that measurement from the start. The amount of bends I needed to get the two UV’s installed was already causing me concern, so I decided to place a quick-ship order at BRS to get some different fittings. Luckily, the unions I used made this fairly easy and I ended up redoing from the pump to the hard plumbing on both pumps with 1.5” barbs and vinyl tubing instead. Now that I actually know my flow numbers, I’m glad I did this.

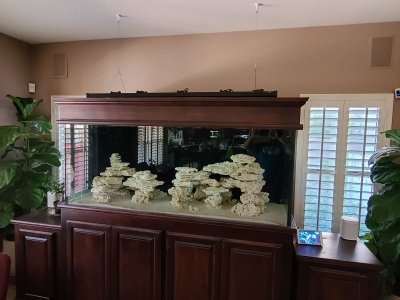
After posting the scape pictures someone had mentioned the possibility of collecting detritus in some areas. As I was building, the goal was coves with hiding spots so fish could “hide” in plain sight. I originally laid out the base rock with space in between to create some though-space where flow could pass. However, after that comment I went back and took a closer look and realized as I was building the right side, I ended up closing one of these areas off completely and would definitely collect detritus in that particular area. I debated for three days on redoing it since I had already glued. Finally, I took the plunge. I carefully tried to pry a few rocks apart. I was just about ready to give up when one section popped, and I was able to pull it out. I wish I would have taken a picture because this left a large rock jetting out with nothing underneath and the rest of the structure didn’t budge…a true testament to the BRS extra thick glue!

With that section out, I was able to remove the large rock, break a chunk off of another and get it right back together with great flow through that area. I’m glad I did this and the main reason I did, was I thought even if it takes me two hours to get it back, I’ll be enjoying it for years, so it is well worth it.

Before
20191208_190200.jpg


After
20200103_154004.jpg


The Parts Removed
20200103_153955.jpg


Before
20191219_143650.jpg


Before
20191219_143654.jpg


After
20191227_191340.jpg


After
20191227_191412.jpg
 
OP
OP
T

Tony Hight

Community Member
View Badges
Joined
Jun 19, 2017
Messages
55
Reaction score
91
Rating - 0%
0   0   0
Let There Be Water!!
I know there were many ways I could have done this. Ultimately, I had to wait to make 45 gallons of fresh RODI each time, so I opted to mix up the salt and carry it a bucket at a time to the tank. Reason: I wanted to get the water level in the tank to a level I could add power heads right away and not have water sitting still for over half a day until I could get more made.

I used all of my water containers, old salt buckets as well as some Home Depot buckets and even an old 5-gallon water jug to get as much water ready as I could. When all were full, I had another 45 gallons ready to go in the Brute as well as 45 gallons of RODI made that could be quickly turned into another batch of salt. Then...I began pouring. Ultimately, this got me to within a few inches of the weir on the overflow and I was able to get the Gyres going while I made more salt.

It wasn't until the next day I had enough made that I was able to bring the sump online along with the return pumps. No plumbing leaks, but I did have one minor drip on a bulkhead that just needed an extra turn and a leak at the UV union where I found the gasket had slipped when I was attaching it and wasn't fully sealing. Once those were fixed, all was well, and I am now up and running.

For some added filtration I have 10 Brightwell Aquatics Bio Bricks in the refugium area along with a few pieces of rock I had left.

20191229_211441.jpg
20191231_104745.jpg
20200101_203058.jpg
20200101_203105.jpg
 
OP
OP
T

Tony Hight

Community Member
View Badges
Joined
Jun 19, 2017
Messages
55
Reaction score
91
Rating - 0%
0   0   0
Sand
I went back and forth on this so many times at this point. I did sand in my first tank and converted it to bare bottom. From a maintenance standpoint, BB is the way to go. I designed this one with ½” black HDPE on the bottom as I was 100% sold on going bare bottom on this new tank from the start.

Regardless of what camp you’re in, there are pros and cons in doing both and it really comes down to personal preference on what you want for your tank. I have even heard and used the whole “if you want it to look natural, there is no sand in a natural coral reef” before. My thoughts on that at this point are, we are taking a piece of the ocean and transplanting it into an artificial environment in our homes. There is nothing natural about this or the hundreds of cords and wires I use to hook up every means of artificial life support there is to it to keep it all going. I want what is pleasing to myself and to my family who will spend the most time enjoying it for years to come.

Ultimately, I had to honestly admit that a sand bottom was the most pleasing to the eye despite the benefits I can see with BB so that is the route we decided to go…literally at the last minute with yet another quick ship order so I could maintain my progress while on vacation.

We used the Caribsea Arag-Alive Special Grade Reef Sand. There is a total of five bags (about 100lbs) to fill up the space and I’m about an inch or little less in the front to about an inch-and-a-half in the back. Now that it is done, and I can stand back knowing I can’t go back; I have zero regrets deciding to go sand despite being set on BB for over a year.

20191231_093454.jpg
 
OP
OP
T

Tony Hight

Community Member
View Badges
Joined
Jun 19, 2017
Messages
55
Reaction score
91
Rating - 0%
0   0   0
ATO and UVs Live!
I was a bit surprised by the amount of evaporation in just one day (about 3.5 gallons). Although, I shouldn’t have been seeing as my 120 used to evaporate about 15 gallons a week. 3.5 a day comes out to around 25 per week with just under double the water volume. My return only holds about 7 gallons so getting the ATO up was a necessity. I still had my old Smart ATO but decided to keep that as an emergency backup (or for QT tank later) and purchased the Tunze Osmolator 3155 for its reputation and safety backups. I will likely eventually plumb this directly to my RODI unit due to the safety measures it has, but for now I will continue to use my 13-gallon dog food container. Once I run my auto water change lines, I’ll also run the RODI line and I use the Apex to monitor the container. When it gets low, the Apex opens a solenoid and fills to the upper limit and then shuts off. From there, I’ll eventually plumb direct when I need the room in the extra cabinet.

The cabinet I had built matches the stand and has an open bottom and back so I can slide it right out without disconnecting anything as well as ensure any water spills go directly to the floor and don’t damage the wood.

I also got the UV’s up and running this evening as well. I have two 50-watt High Output UV’s, one connected directly to each return line running separate VarioS 8 pumps. I also got my flow meters hooked up to each line so I can monitor the flow I’m getting. The original goal was to run about 250gph on the right and 1500gph on the left which are the two recommended ranges for algae and protozoa. Unfortunately, with the fittings and distance I had to go, my left return tops out at about 900gph at 100% due to the head pressure. I have them set to run at 550 gph on the right and 850 on the left (30% and 70% speed respectively). This gets me a total of 1400gph through the system which should give me enough turn to work on algae while still giving me good contact time on the right pump to hopefully do some damage when it comes to parasites and diseases. I’ll ride with it this way to see how it works before deciding to change it. From about 65% to 100% power on both pumps, there is very little change in total gph pushed which leads me to believe the pipe is just too undersized.

What would I do differently next time now that plumbing is done, and I know my flow rates?
  • WATCH THIS VIDEO FIRST!!
  • After watching this video and based on my experiences with my achieved flow, I would have ran 2” plumbing to the UV and then up to a 2” flow sensor at the top before going into a 2” elbow and reducing down to 1” to get through the bulkhead. This would have gotten me all the flow I could ever need.
  • At a minimum, I would have ran 1.5” all the way up and then upsized for a 2” flow sensor instead of downsized to a 1” and then only downsized right at the bulkhead.

Ultimately, I have enough flow for the tank and get about 5.5x’s turnover at 1400gph. I can get up to about 1800gph if I pushed both pumps to their max. If I notice the UVs not doing quite what I want, I may start upsizing the pipe starting at the bulkheads replacing pipe between valves and unions as I can get to it. However, not sure if it will entirely justify an additional $300-400 or so in parts and pipe if all works well. We shall see.

20200103_143717.jpg
20200103_143728.jpg
20200103_143738.jpg
20200103_143743.jpg
20200103_143842.jpg
 

Caggii

New Member
View Badges
Joined
Sep 9, 2019
Messages
15
Reaction score
23
Rating - 0%
0   0   0
Awesome looking build I will be setting up my first tank that is about that size in the next few months here in Anthem definitely going to use yours for some ideas.
 
OP
OP
T

Tony Hight

Community Member
View Badges
Joined
Jun 19, 2017
Messages
55
Reaction score
91
Rating - 0%
0   0   0
Instagram Is Up
Somewhere I heard a great idea of having an Instagram account dedicated to your tank so you could go back in and see a history of your tank and inhabitants from the beginning. I decided to do that as well and got it caught up with all the build pics so far.

Search for reefjunkie365 or click here https://www.instagram.com/reefjunkie365/
 
OP
OP
T

Tony Hight

Community Member
View Badges
Joined
Jun 19, 2017
Messages
55
Reaction score
91
Rating - 0%
0   0   0
Lighting
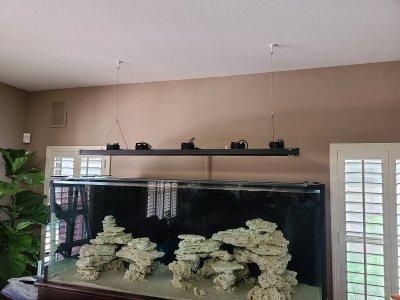
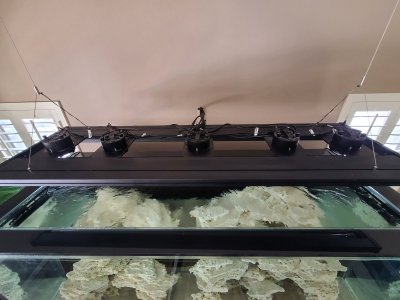
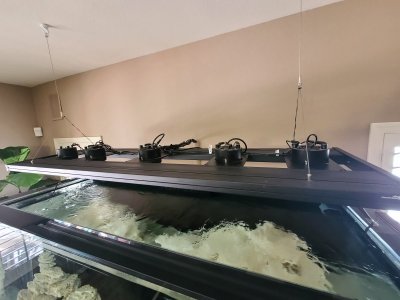
I am lighting the tank with an Aquatic Life T5 hybrid fixture and 4 Kessil 360we’s. The Kessils are evenly spaced across the top and I will be running 3 ATI Blue+ bulbs along with one Purple+. Current mounting height is 13” above the water. I won’t be turning the lights on until mid to late April so I’ll probably rent a par meter from BRS before then to check measurements.

20200104_232140 1.jpg
20200104_232147 1.jpg
20200201_162941.jpg
20200201_162950.jpg
20200201_162956.jpg
 
OP
OP
T

Tony Hight

Community Member
View Badges
Joined
Jun 19, 2017
Messages
55
Reaction score
91
Rating - 0%
0   0   0
Modification to the Return Lines
I originally had the returns open to maximize flow. However, I began getting a bit nervous as I tested feed modes of not only critters getting in there, but small fish swimming down the return lines as well.

I still wanted flow maximized so I decided to use a threaded coupling along with a 1” to 2” reducer coupling and a 2” screen. In total, this dropped my flow by about 5gph per side which isn’t bad. They are large from the side, but from the front are hardly noticeable. Also, I didn’t glue the screens in so easy to remove for cleaning.

20200111_123127.jpg
20200111_123244 1.jpg
20200111_194257.jpg
20200111_194327.jpg
 
OP
OP
T

Tony Hight

Community Member
View Badges
Joined
Jun 19, 2017
Messages
55
Reaction score
91
Rating - 0%
0   0   0
Modifying Reef Octopus Skimmer

One issue I have with the float sensor on the RO skimmers is that they in no way make it easy to remove the lid for cleaning away from the tank. I solved this by using some weather resistant connectors I found on Amazon. These are similar to what is on our pumps and controllers, but they are 2 pin and much smaller gauge to match the current wire.

I cut the wire for the float switch close to the lid and installed the new connector there. Also, of note is I cut the end of the float switch wire and it is wired to my breakout box instead of the skimmer controller so I have more functions I can accomplish with it when float switch is triggered. I have the switch naturally in the CLOSED position when down and OPEN when activated (upwards position). The other piece this solves is that when I disconnect the plug, it sends it into OPEN position. With my programming, when it is OPEN, my skimmer shuts off. One advantage of this is that all I have to do when performing skimmer maintenance is unplug the lid and the skimmer sill shut off and turn right back on once I put it all back together and plug the float switch back in.
20200116_205746.jpg
20200117_163320.jpg
20200117_164600.jpg
20200117_164640.jpg
20200117_183332.jpg
 
OP
OP
T

Tony Hight

Community Member
View Badges
Joined
Jun 19, 2017
Messages
55
Reaction score
91
Rating - 0%
0   0   0
RODI Top Off Float Switches
Decided to make high low float switches for my RODI top off container. These switches control my auto refill on this container. When the water triggers the low sensor, the solenoid opens to let new RODI water in. When the top float switch is triggered the solenoid will shut off. I also have a manual float on top in case of a float switch fail. In addition, I have my apex wet to shut the solenoid off and send a warning after 57 minutes which is two minutes longer than the average fill time of 55 minutes.

20200116_205756.jpg
20200116_205746.jpg


I used the same water-resistant connectors I did for my skimmer for this application as well. I also used PVC so I could easily remove the switches for cleaning of the RODI container and not have to readjust the positioning when putting them back in (this was experience from my previous tank).
 
OP
OP
T

Tony Hight

Community Member
View Badges
Joined
Jun 19, 2017
Messages
55
Reaction score
91
Rating - 0%
0   0   0
Containers Have Arrived!!
Going to be starting on my new mixing station with some added capacity (45-gallon trash can just won’t cut it anymore). I ordered these 2 Newesco 105-gallon storage containers form Tractor Supply. They didn’t have them locally but were able to special order them and shipping was minimal.

20200121_153454 2.jpg
 
OP
OP
T

Tony Hight

Community Member
View Badges
Joined
Jun 19, 2017
Messages
55
Reaction score
91
Rating - 0%
0   0   0
Keeping an Eye on the Tank
In addition to Apex monitoring, I wanted a way to check in on the tank when I’m away on work. I figure this can help put my mind at ease if I get a strange alert or help me walk my tank sitter through a solution while I can see what is happening.

I got 2 Wyze cams. Installed one under the tank to see the sump and one pointing directly at the tank that I can zoom in on. Likely won’t use much, but they were fairly inexpensive and well worth it for the peace of mind. Hoping Apex finds a way down the road to live stream these into the dashboard easily.


Wyze_Screenshot_1.png
Wyze_Screenshot_2.png
 
Last edited:
OP
OP
T

Tony Hight

Community Member
View Badges
Joined
Jun 19, 2017
Messages
55
Reaction score
91
Rating - 0%
0   0   0
My First Inhabitants
Went to the store to pick up my first two inhabitants. 2 Platinum Percula Clownfish. These guys look awesome and will have the tank to themselves for a little while. Only downside is, they’ll be living in the dark until probably mid-April.
Sorry for the blurry pictures - they are very tough to photograph.

20200107_195723.jpg
20200107_195734 (1).jpg
 
Last edited:
OP
OP
T

Tony Hight

Community Member
View Badges
Joined
Jun 19, 2017
Messages
55
Reaction score
91
Rating - 0%
0   0   0
Running the AWC Lines
This weekend’s project was running all the lines for the Auto Water Change and Auto RODI refill to the tank.

My garage is about 50ft from my tank so I need to run about 65ft worth of lines from behind my tank, along my outside foundation, through the garage wall and across the ceiling down to the Mixing Station. My laundry room is between these two points so I’ll also be running the waste from the RODI unit as well as the old SW back to that point as well and inside the laundry room to empty in the drain for the washing machine.

To protect form the AZ sun and to keep it all neat and tidy, I ran everything in 1.5” conduit. Total project took about two days to complete.

In total I have:
  • New RODI refill line from garage to tank
  • RODI Waste line ran from garage to laundry room drain at the midway point
  • New Saltwater line from garage to tank (ran through the DOS)
  • Old Saltwater line ran from tank to garage, through DOS and back to laundry room drain at the midway point
  • 75ft aquabus cable ran from the Apex at the tank to the DOS in the garage
  • Water supply line ran from after soft water unit across celling to mixing station with RODI unit
  • RO (not DI) line ran from RODI unit to the garage refrigerator for ice maker

1584388167360.png

1584388180602.png

20200209_105840.jpg
20200209_105848.jpg
20200209_145018.jpg
20200209_145031.jpg
20200210_174931.jpg
20200210_175005.jpg
20200209_110654.jpg 20200209_110705.jpg
 
OP
OP
T

Tony Hight

Community Member
View Badges
Joined
Jun 19, 2017
Messages
55
Reaction score
91
Rating - 0%
0   0   0
New Mixing Station Operational!
The new mixing station is operational finally! I used an old Vectra m1 return pump I had off of my old tank. All plumbing is 2” and I’m able to get about 1800gph flow for mixing. Off bot salt and RODI containers I have a 1.5” valve and barb for quick refilling into buckets if needed. In addition, I have a 1.5” valve into a 1” barb that I can attach 50ft of 1” vinyl tubing to in case I need to do some emergency refill at the tank.

At the top of the SW container I installed a Uniseal 2” bulkhead. The 2” pipe inside the container goes down about half way to a Tee where I reduce to 1.5” 9on both parts of the Tee) and then run another 1.5” pvc pipe to within 6” of the bottom. On the bottom of that I also have a optical sensor that will shut down the pump and alert me if the SW container is low. I also ran my New SW line from the bottom of the container to the DOS for my AWC refill.

After the first batch of salt, I noticed a dead spot on the bottom of the container, so I added an old Ecodrift 8.0 powerhead I had lying around aimed at the bottom. Now I can dump salt in, and no signs of any residue remain on the bottom.

20200301_144452 1.jpg
20200301_144423 1.jpg
 
OP
OP
T

Tony Hight

Community Member
View Badges
Joined
Jun 19, 2017
Messages
55
Reaction score
91
Rating - 0%
0   0   0
Getting the Trident Ready

Set up the shelf for the Trident and DOS that I'll be running on the tank. My goal is to have the Trident up and running by end of April. From now until then, I'll be bringing my levels up to where I will be running them full time with corals (465Cal, 12Alk, 1390Mag, 8.3Ph). To maintain these levels, I'll be using the DOS to add Calcium and Alkalinity controlled by the Trident.

20200320_195617.jpg

20200319_203028.jpg
20200319_203425.jpg
20200319_203725.jpg
20200320_181414.jpg
 
OP
OP
T

Tony Hight

Community Member
View Badges
Joined
Jun 19, 2017
Messages
55
Reaction score
91
Rating - 0%
0   0   0
Adjustments to the Lighting

Made some adjustments to the lighting this weekend based on some data BRS put out regarding light spacing on the Kessil 360x (pretty similar to the 360w's I'm running).

Now running 5 Kessil 360w's at 9" off the water. Spacing on each is 11" from tank edge, 21" from tank edge and 36" from tank edge (center light). This coupled with the 4x80watt T5's, should provide enough light for what will be an SPS dominant tank. I hope to rent a PAR meter soon to double check some key numbers in my set up and will share at that time.

20200326_153230.jpg 20200326_153614.jpg 20200326_153623.jpg 20200330_080128.jpg
 
OP
OP
T

Tony Hight

Community Member
View Badges
Joined
Jun 19, 2017
Messages
55
Reaction score
91
Rating - 0%
0   0   0
Dosing Containers
I will be dosing Calcium and Alkalinity to the tank to run elevated levels (12dkh Alk and 465 Mag). My goal for the dosing containers was to have something that I could put near the tank but hide in the back while also getting as large a container as possible. Since the components are stable once mixed, I wanted a set-it and forget-it method that I could fill and not have to worry for quite some time.

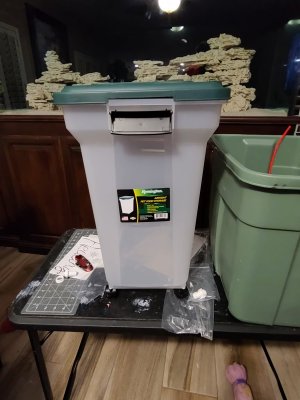
I ended up using airtight 55qt pet food storage containers which gives me right around 12-13 gallons of mixed Calcium and Alkalinity solution. They are on wheels which makes it easier to get them into place behind the side stands on the tank. These were the most durable I found and held water without any issue.

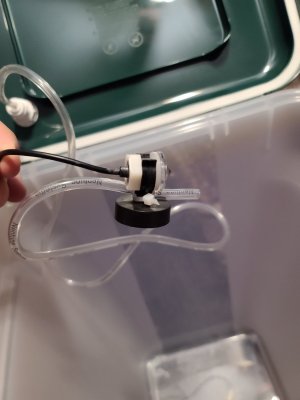
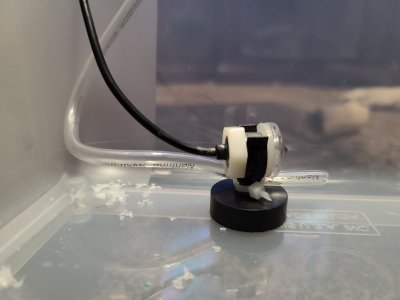
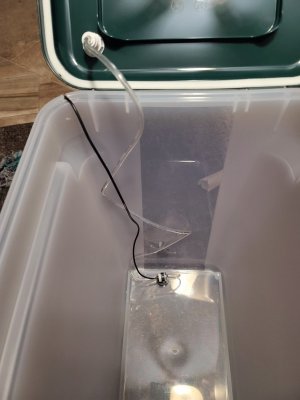
I started by drilling a whole in the lid to accommodate the ¼” bulkheads for the dosing tubing. I’ll be using my Apex to let me know when the mixture is too low and to shut down the DOS when it reaches that point. For this I used the optical sensor with magnet. I drilled out the lip just enough that the cable will past through and still allow the lid to close. From there, I have the magnet directly on the bottom of the container and zip tied the dose line just above the magnet to ensure it isn’t pulling directly from the bottom of the container as well as ensure it always stays below the cut off point of the optical sensor.

Since the containers are airtight, I drilled an additional small hole in the lid to allow air in as liquid is pulled out.

20200406_200935.jpg 20200406_210724.jpg 20200406_210839.jpg 20200406_210904.jpg
 

When to mix up fish meal: When was the last time you tried a different brand of food for your reef?

  • I regularly change the food that I feed to the tank.

    Votes: 24 27.9%
  • I occasionally change the food that I feed to the tank.

    Votes: 32 37.2%
  • I rarely change the food that I feed to the tank.

    Votes: 24 27.9%
  • I never change the food that I feed to the tank.

    Votes: 5 5.8%
  • Other.

    Votes: 1 1.2%
Back
Top