After reading a series of threads on various forums, I decided to make my own algae upflow scrubber. My design is inspired by @SantaMonica Thank you sir for all the information you have put out to the community!
I originally started this thread on MASC, my local forum in Colorado, but decided to share here as well. Below is a summary to date and I will continue to post updates.
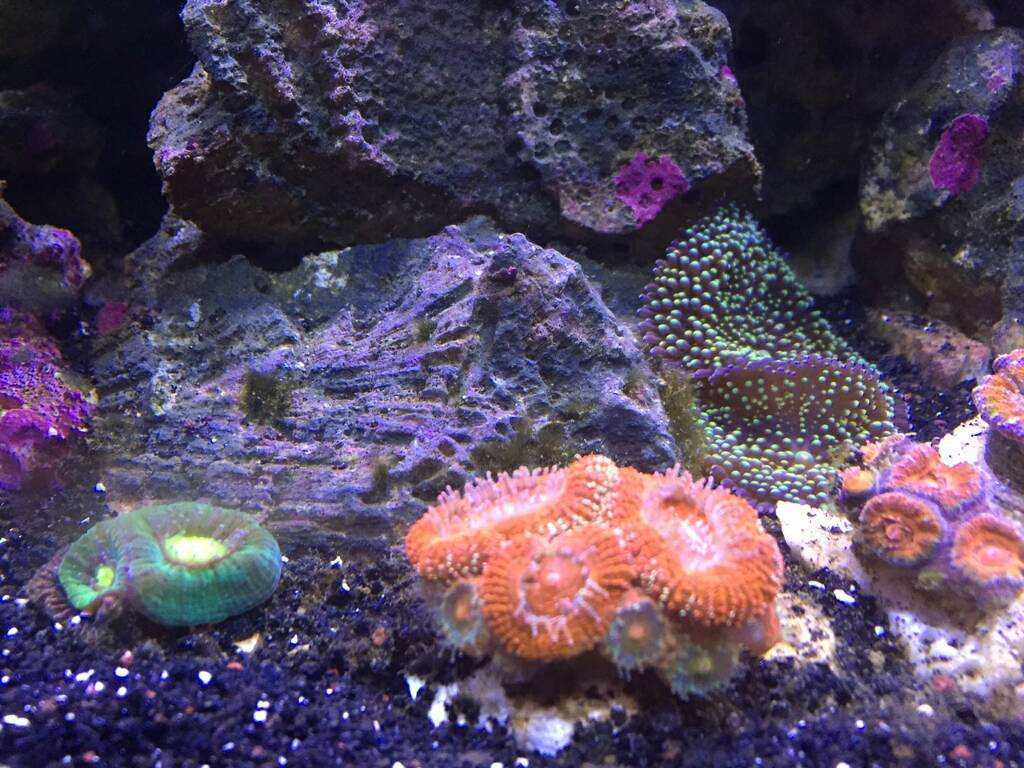
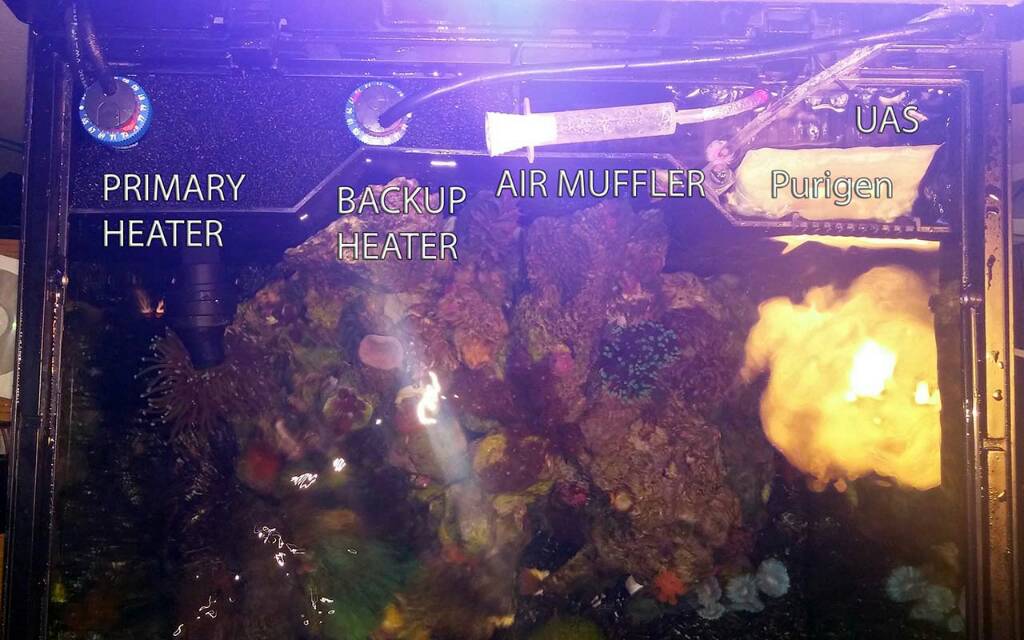
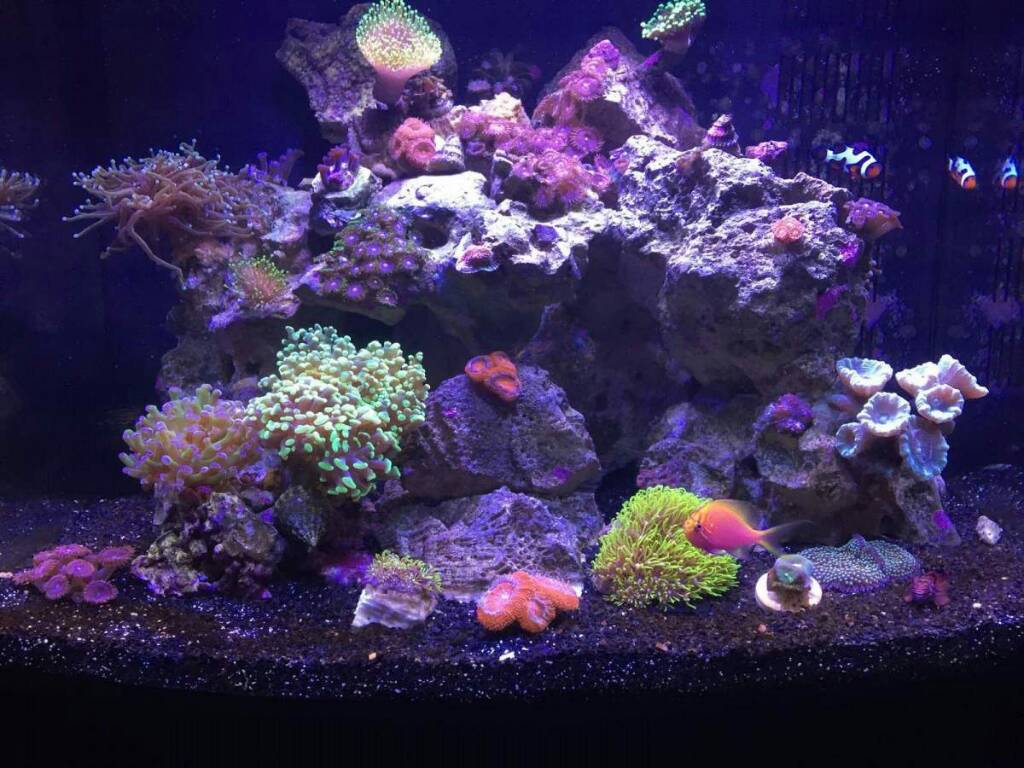
Background: I have a small 24 gallon Current Aquapod tank. The tank is now 9 months old and have I performed 5 gallon water changes every two weeks. Filtration consists of 20lbs of live rock 15lbs of live sand, 1 mechanical filter and 1 bag of Seachem Purigen. Livestock consists of 4 fish, 10 snails, 5 hermits, 1 shrimp and 30 corals. My numbers are consistently 1.024 salinity, 8.2 ph, 0 ammonia, 0 nitrate, 10-30ppm nitrate (varies depending on water changes), and 0.25ppm phosphate. The phosphate and nitrate have been climbing over the last 2 months and I have decided that I needed to work on a nutrient export strategy so I don't have to increase my water changes. Because my nano has very small compartments in back, I don't have space for a media reactor, skimmer or refugium. I do have space for an upflow algae scrubber...so here we go!
Parts List:
cross-stich mat, plastic sheet from Michaels
air pump (2 liter/min)
air tube, included in air pump
plastic dish from Thai food take out ($8 for pad thai....mmmm good!)
super glue gel
light (mine is led, DYI build I boaght off a friend)
timer
Step 1: Preparing the mat. You need to make the mat as rough as possible. I started with a belt sander, using 40 grit sand paper. This roughened the entire mat, cutting small grooves into the mat. After the first sanding, I then used my small hole saw to roughen the mat further. Holding it in my hand, I scraped it side to side and in circles. I tried using a drill, but did not work nearly as well as using by hand.
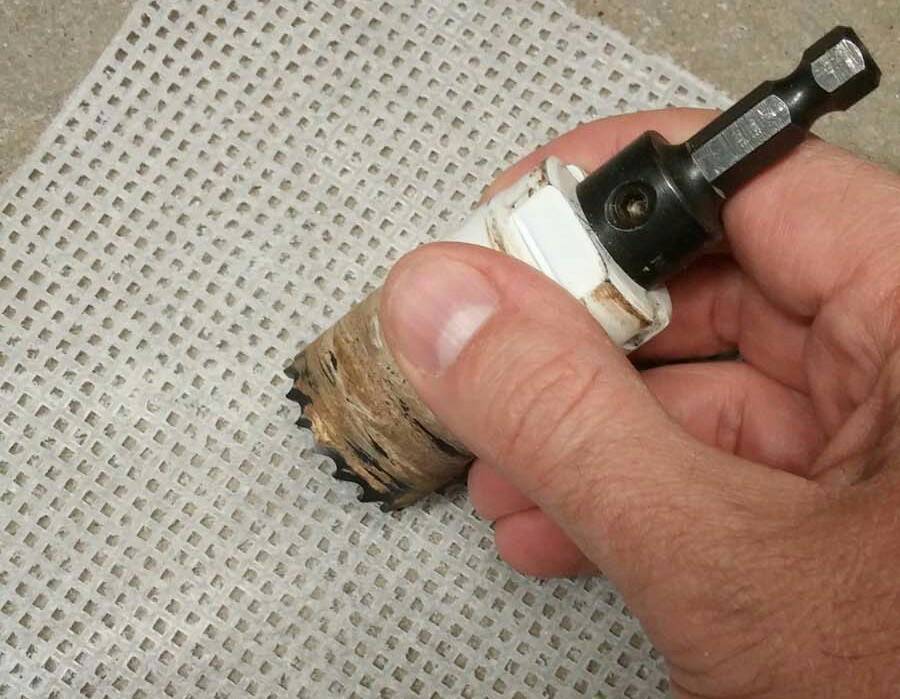
From all I have read, you'll want the mat to be as rough as possible to give the algae something to grab onto.
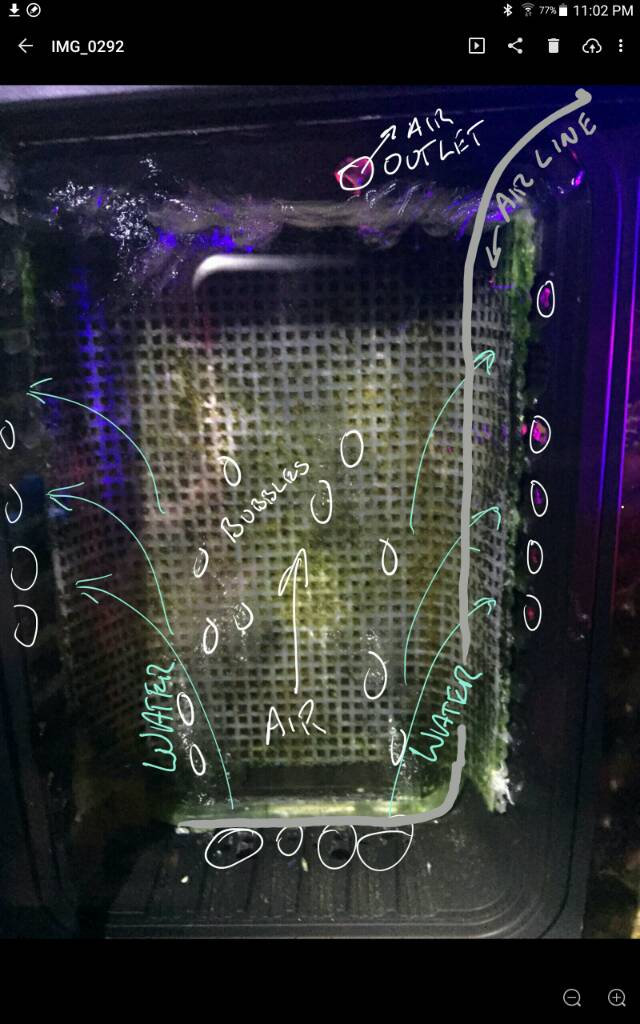
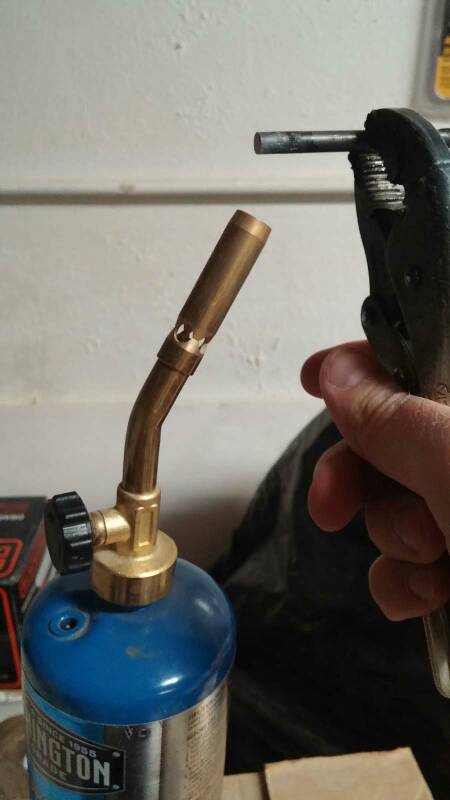
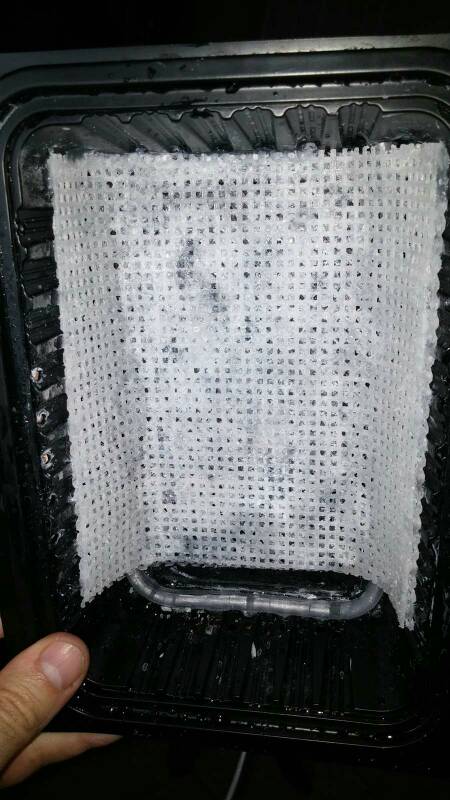
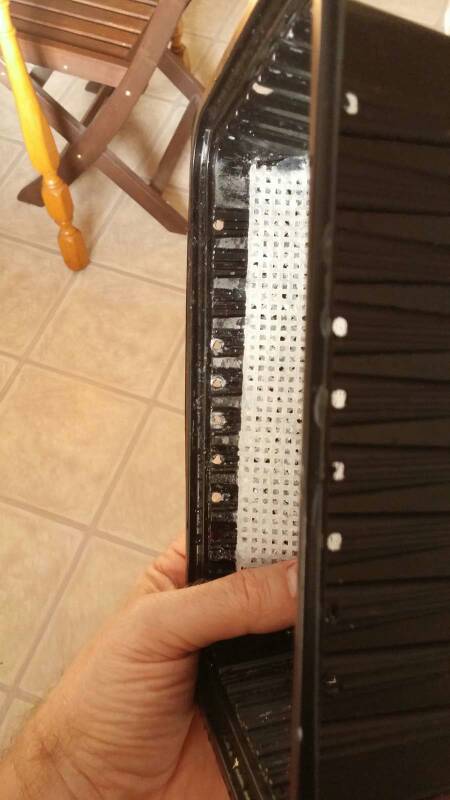
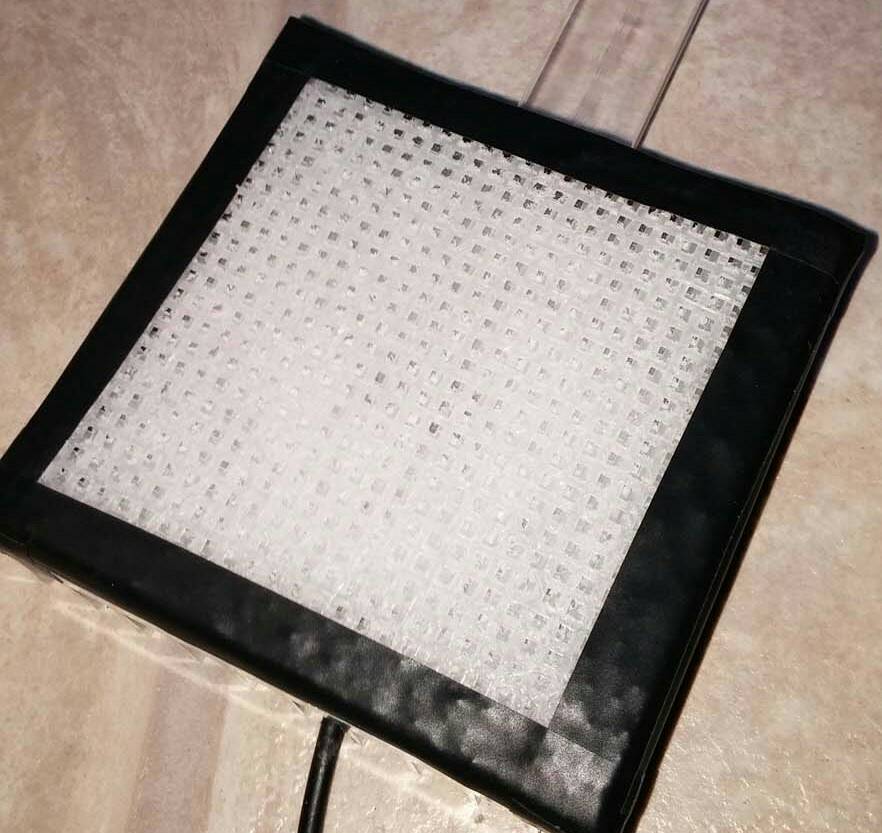
Step 2: Preparing the plastic dish: the soon to be UAS. Following Santa Monica's design; I put holes 2 large holes on the top (1/4", 1 for air tube and 1 for air release), 7 smaller holes (1/8") on each side for water outflow, and 11 small holes on the bottom for water inflow. To make the holes cleanly and precise, I melted them using a torch and drill bit. You will need good ventilation.

Step 3: Gluing everything together: Roughen up the plastic dish with sand paper and roughen up the air tube. This will help the glue stick to everything. Stick the air tube in and glue it down. I then cut a slice along the tube at the bottom and then a few cross cuts. This allows a place for the bubbles to come out. I cut 2 pieces of matting, one at a diagonal, the other square. and glued everything together. I used some help from Jack to hold the matting down while the glue set.
Final product:
Step 4: Light, I bought the light from a friend; copied from my friends thread, "Because its only 5 LEDs (using 4 660nm and 1 455nm LEDs) and the required voltage was only 12v I didnt need a driver. I just used a 500ma 12v pc fan power adapter."
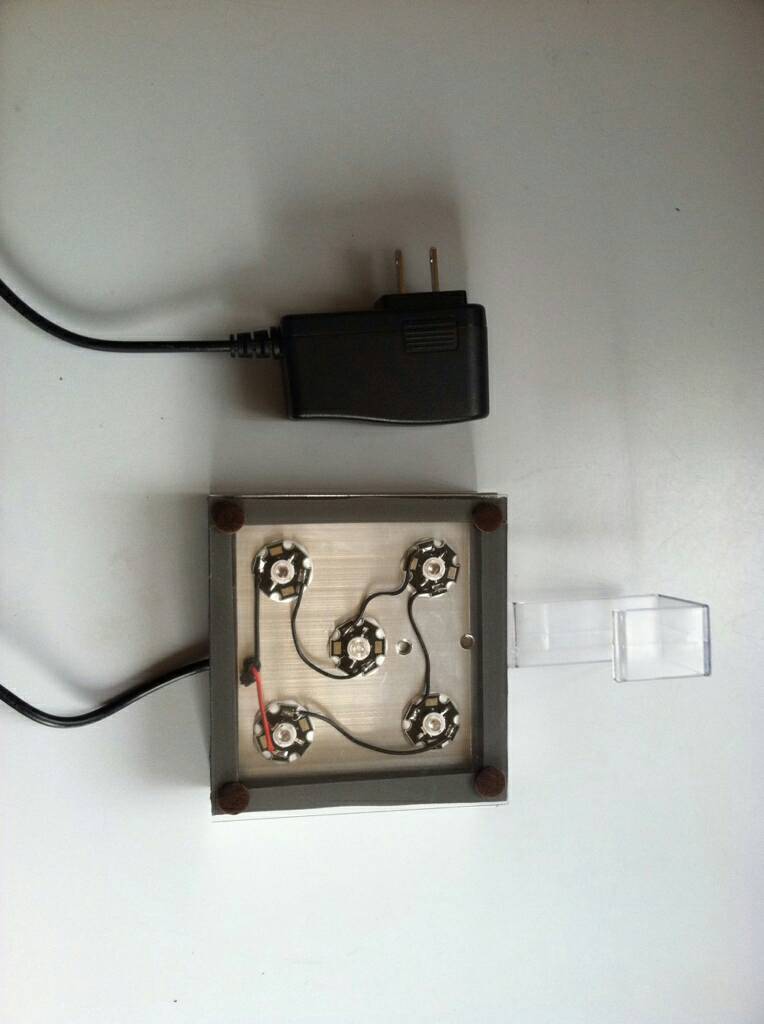
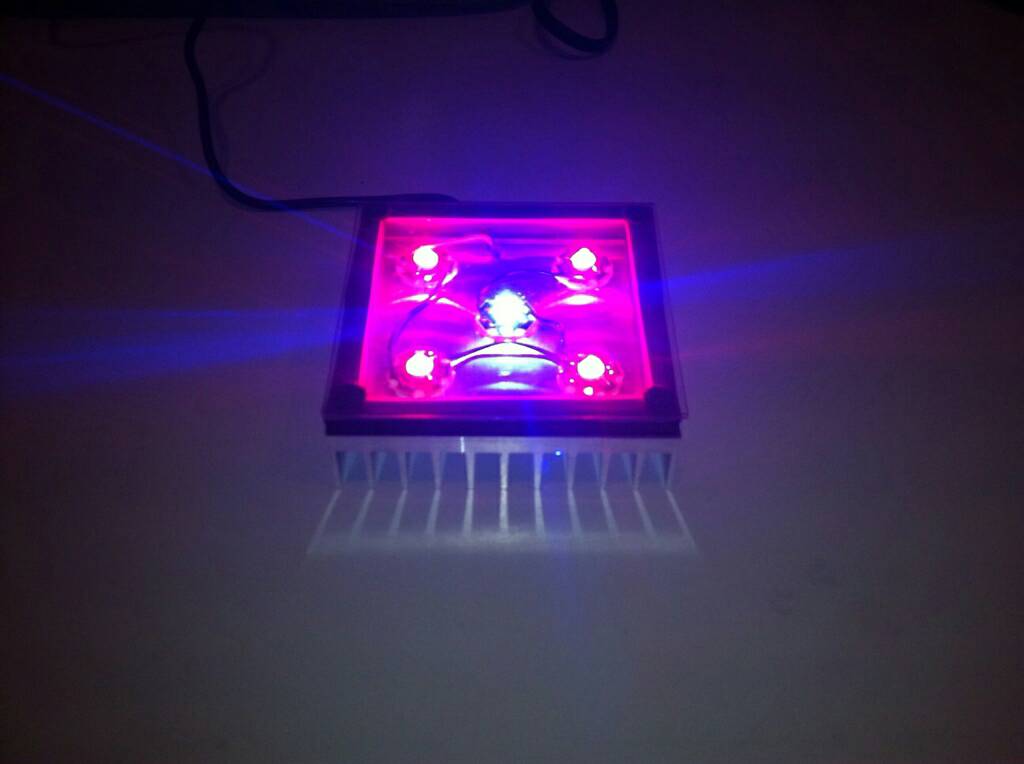
I adjusted for the Light intensity. Kris warned me that the light was very intense, so I sanded the acrylic shield to diffuse the light, and that still seemed really bright, so I took some leftover matting and taped it down over the light. This helped diffuse the light and I think will be the solution.Only time will tell.
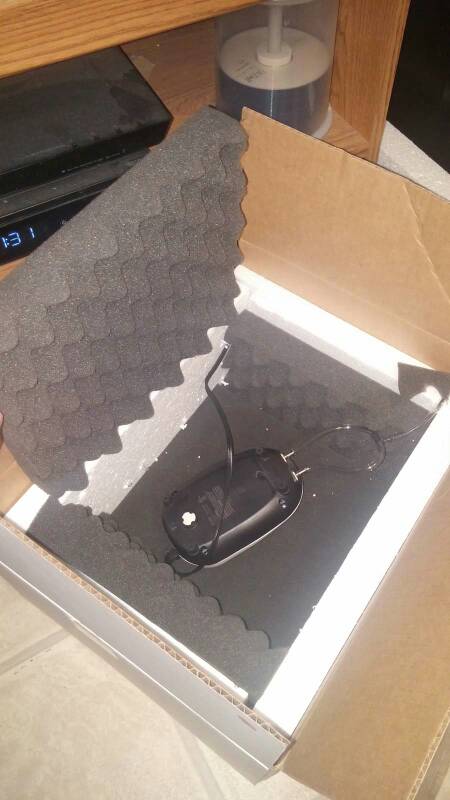
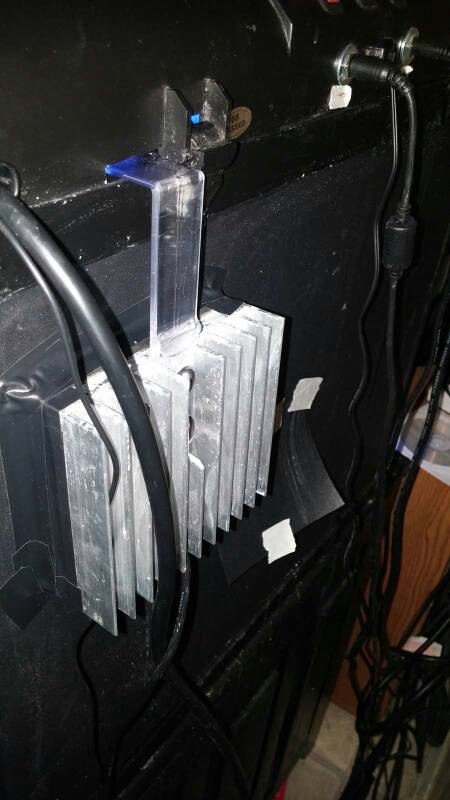
Step 5: Installation. I rearranged some items in the back, and also created a couple addons to help reduce the noise. First, I place the air pump in a insulated box, with egg crate foam, cut some air vents and stashed the whole thing in a cabinet. May have been a little overkill, but I can't hear the air pump at all! Next, I made an exhaust muffler, so that as the air leaves the UAS it is silenced. It is made from a simple $1 syringe from grocery store.
-------------------------------------------------------
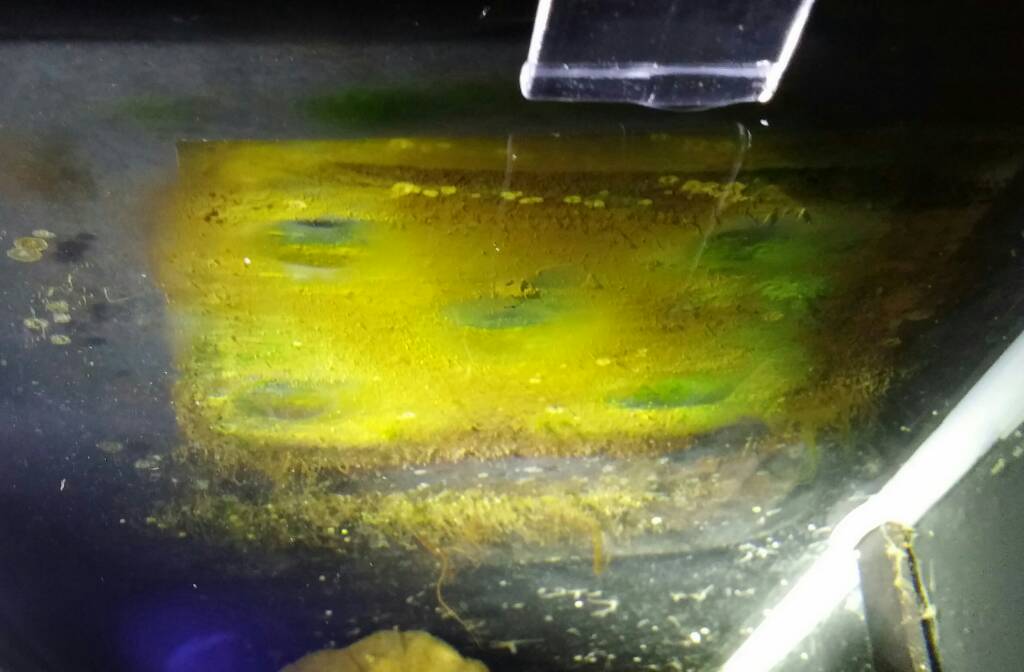
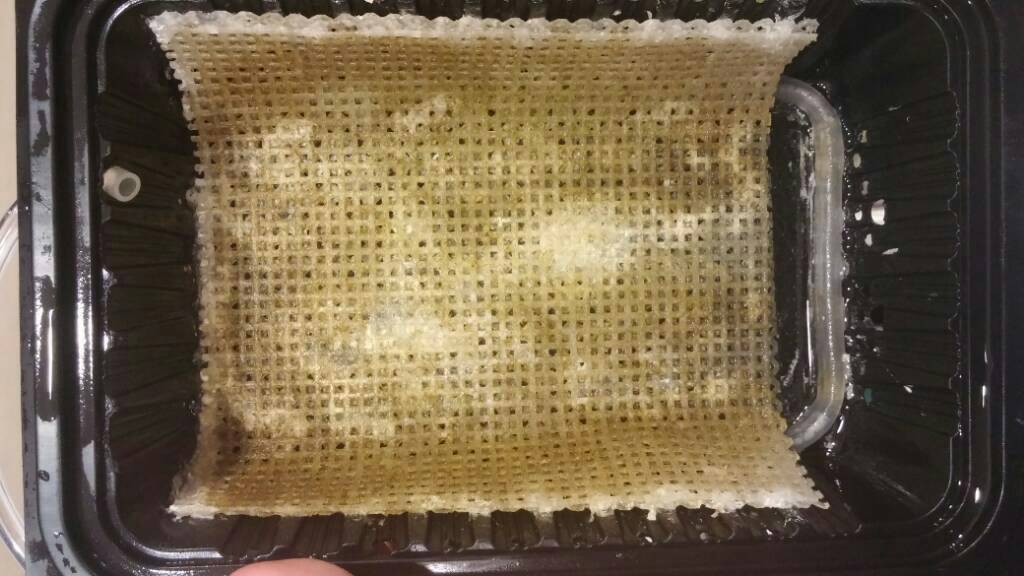
Day 1: NO3- 30ppm, PO4- 0.30ppm. I did my water change today, but took a couple photos right before I vacuumed up the algae. This is the starting point...not really that bad, but I am getting tired of cleaning the acrylic every day. I will consider it successful even if it helps keep the acrylic clean. I am going to start with running the LED 16 hours/day. We will see in a week how it all works.
And a small comment before the fish police show up : ) Yes, that is a ruby red mandarin in a 24 gallon tank. He was a "rescue" from a LFS (starving to death). I keep 10 gallons of copepod cultures going just for him and feed about 500 copepods daily.
-------------------------------------------------------
Day 7: NO3- 20ppm, PO4- 0.25ppm. Minor buildup on the screen. Looks to be mostly slime and not the green hair. Still optimistic because many people report that it can take a couple weeks to get a new screen started. I decided to up my light from 16 hours to 18 hours for the next week.
Maybe it's my optimism, but I have noticed a slight improvement in the DT. The sand looks a bit cleaner and didn't need to clean the acrylic as much as I had been. The numbers however, haven't shown a significant improvment.
---------------------------------------------------------
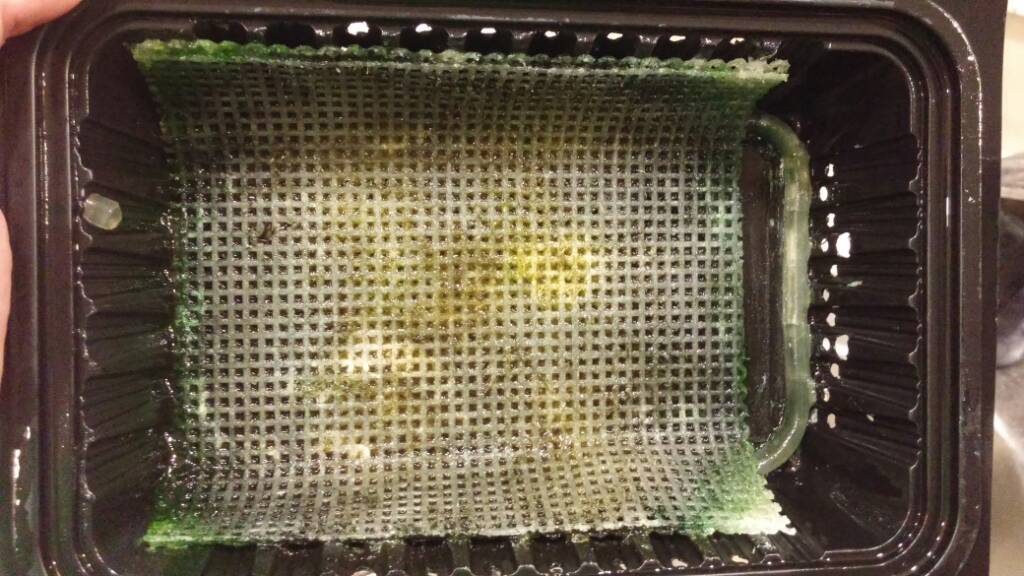
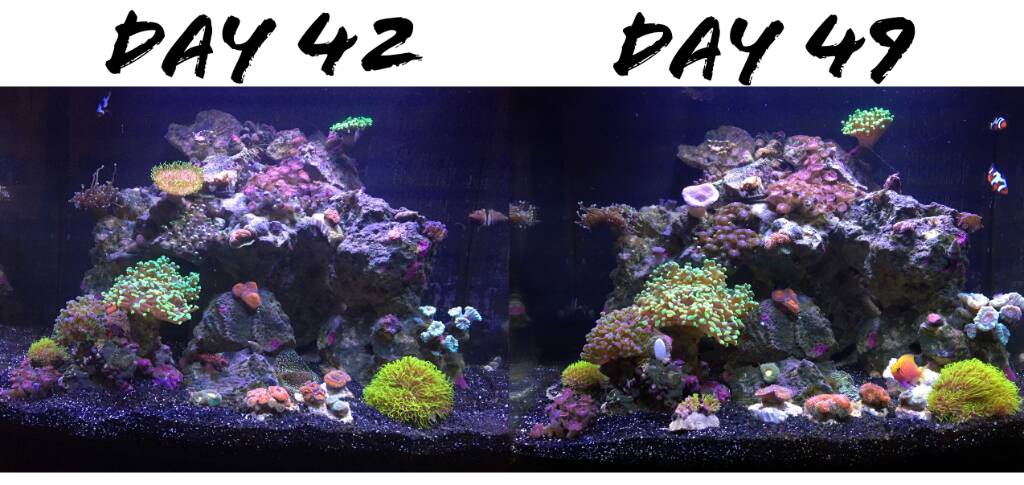
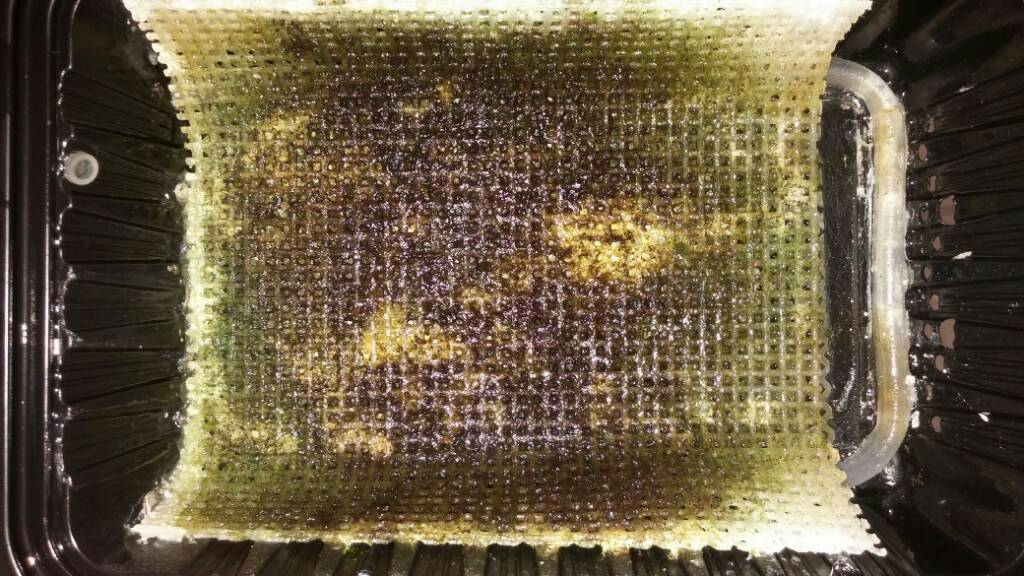
Day 15: NO3- 10ppm, PO4- 0.10ppm. Pulled the scrubber and brushed it off with a tooth brush. Definitely starting to grow and outcompete the algae in the tank. Not the thick mat of algae yet, but not sure I'll ever get that. I think the scrubber may be a bit oversized for my 24 gallons, the bio load and the amount I feed...Maybe I'll start feeding a little more. With all that said, the DT is looking good. No more algae in the sand, none of the rock and down to cleaning the acrylic 1-2 times week.
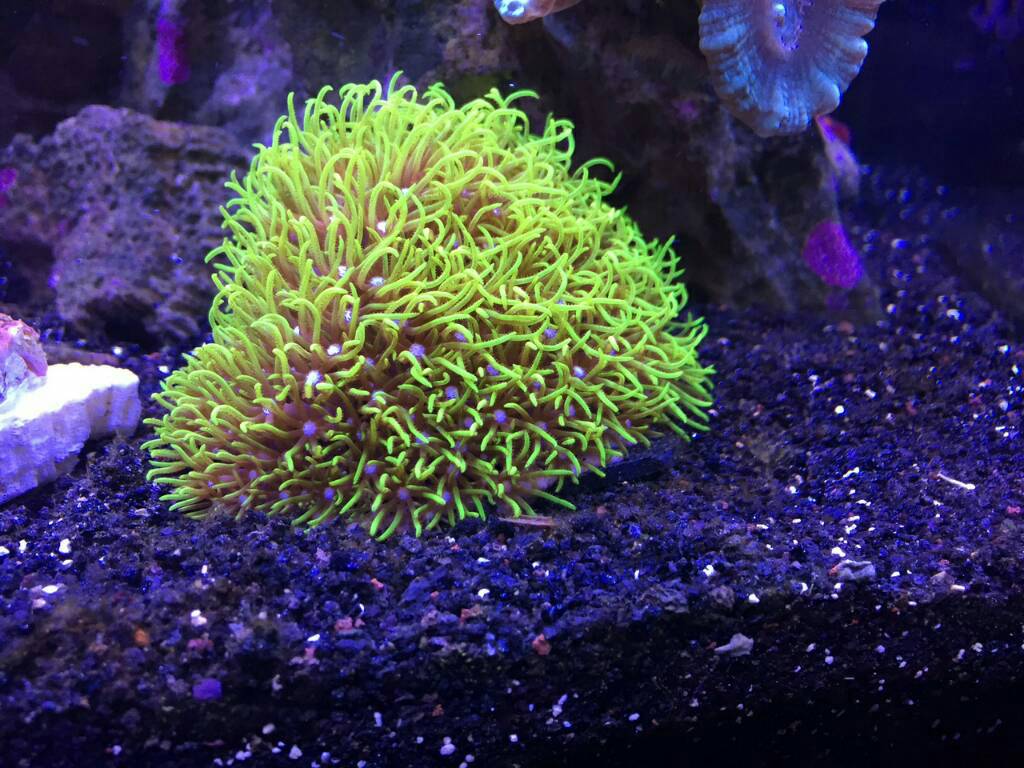
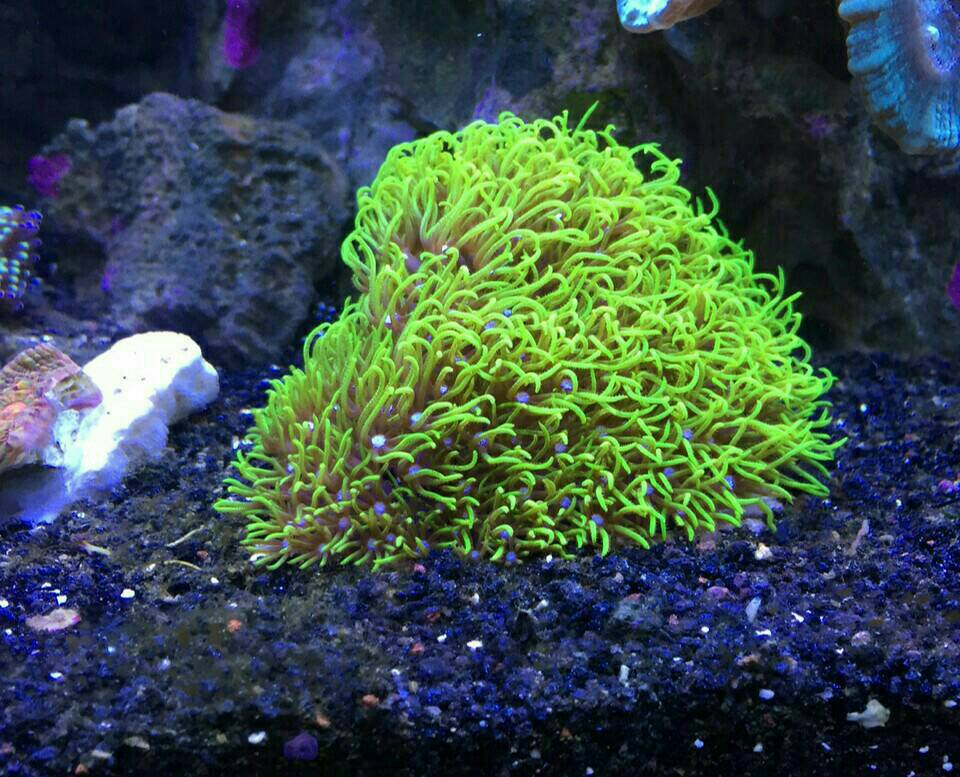
Did a couple water tests and the results are encouraging, both of the numbers are half of what they were last week. First pic was 14 days ago, second is yesterday. Both are close-ups of my GSP, same area of the tank. It's subtle, but I do believe the scrubber is helping. The whole tank shots don't show it as clearly.
---------------------------------------------------------
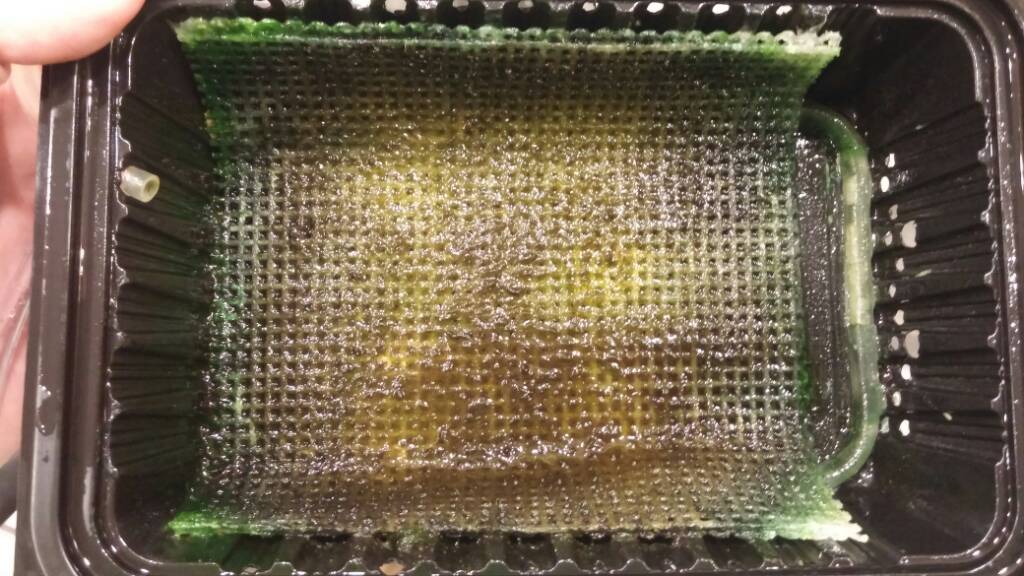
Day 21: NO3- 15ppm, PO4- 0.25ppm: Numbers have slightly increased from last week. The scrubber has more algae than last week, still more of a slime algae than hair.
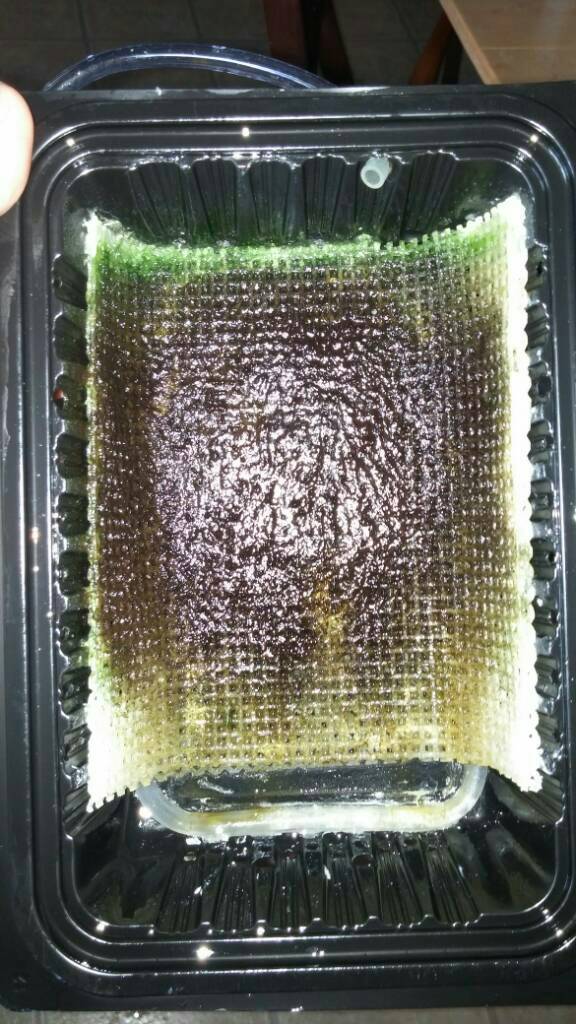
I did notice a build up of algae in the DT about 2 days ago, and now looking at the screen, I should have pulled the scrubber 2 days ago for a cleaning. The slime algae does not grow as thick and needs to be cleaned more frequently for the scrubber to be effective. Slime will still pull nutrients from the water column, but it grows in a thin mat and blocks the light to the base, potentially killing off the "roots", releasing nutrients back into the water. I suspect that might have been the case because the slight increase in nutrients.
---------------------------------------------------------
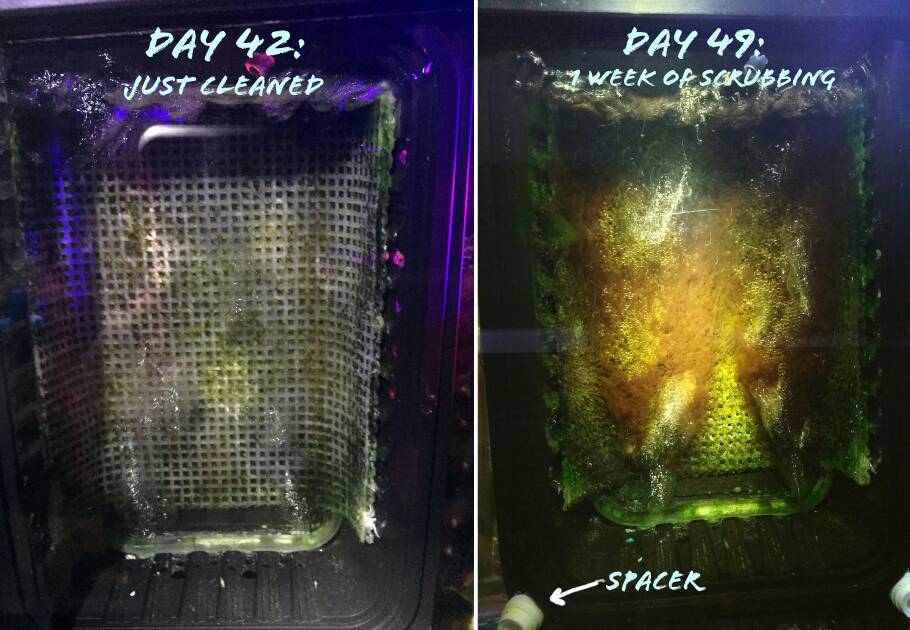
Day 28: NO3- 15ppm, PO4- 0.25ppm: Numbers held the same all week, did not climb or lower. Because I've been getting slime algae in the scrubber, I cleaned the screen 3 times this week. It was fascinating; after 2 days, algae started to appear on the sand, I pulled the scrubber and cleaned it. Within 12 hours the sand was clear. 2 days later, the sand started getting algae, pulled the scrubber and same thing, 12 hours and clear again. Moreover, my acrylic had film algae on Monday, and because I had a busy week, I ignored it all week. By today the acrylic was clear. I am a fan of algae scurbbers.
---------------------------------------------------------
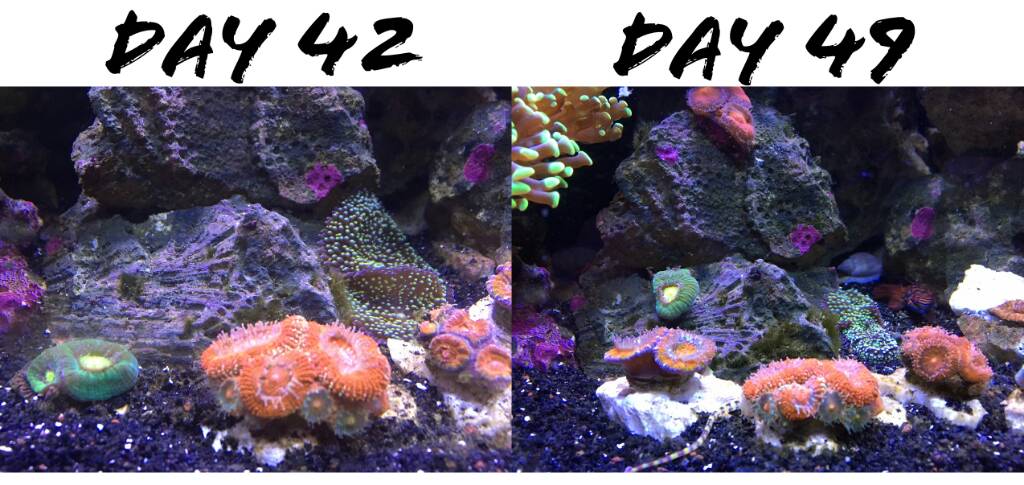
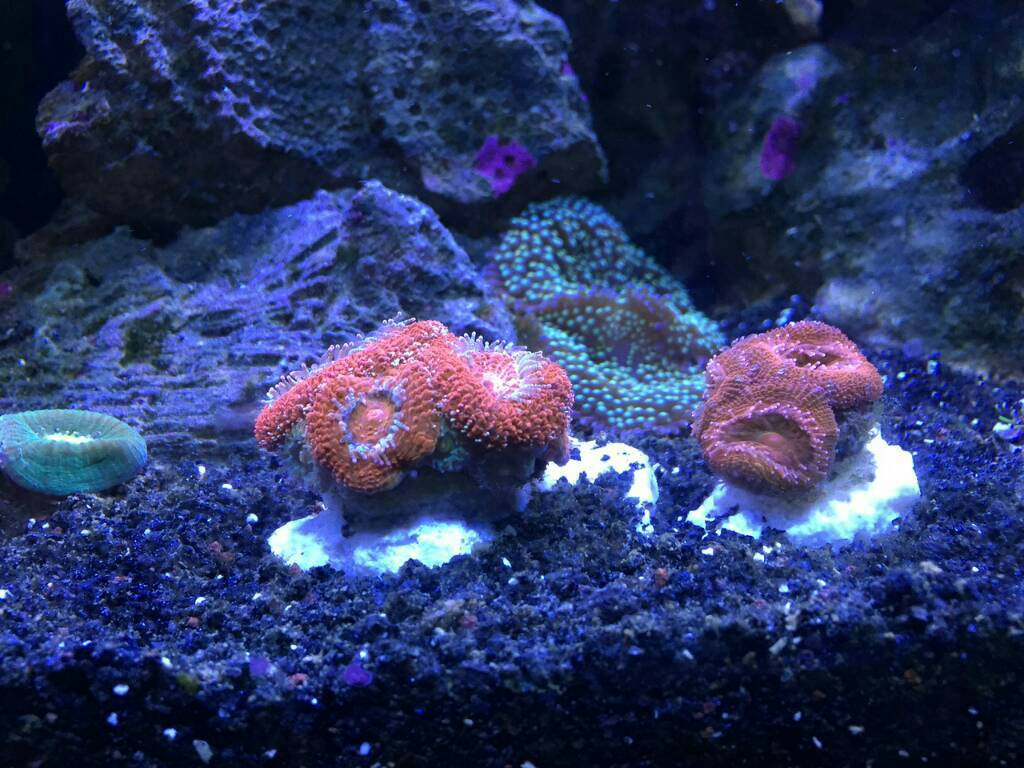
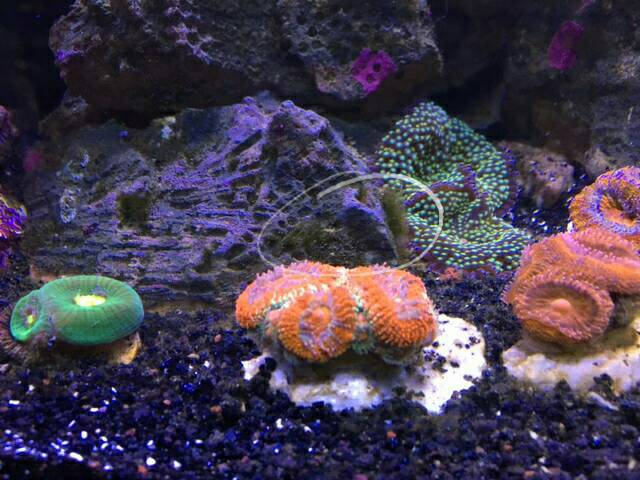
Day 35: NO3- 10ppm, PO4- 0.15ppm. Not going to post a photo of the screen again...looks identical to the one above, slime algae still, and cleaning it 2-3 times a week. Been reading about that, and decided that I should up my photo period on the scrubber from 18 to 21 hours. I also removed the diffuser a week ago. We'll see what happens this week. Other noteworthy items. I did not have to clean the acrylic at all in 7 days. This is a HUGE improvement compared to the need to clean every day when I started this project. Another interesting note, the sand is no longer growing algae, but now my rock has some hair algae in spots (circled below in photo). Again, was reading about this, and it is very interesting to see how the sand and rock can act like a sink and absorb nutrients when nutrients are high in the water column, and then release it as the nutrients in the water are reduced. Clearly the sand released stored nutirents first and reached a balance, hence why I had an algae bloom show there first. Now that the sand has reach equilibrium, the rock is now leaching nutrients, resulting in algae growth on the rock where the transfer is occuring. Once the rock stops leaching and reaches equilibrium with the water column, I expect I will then start to see a more significant decline in measured NO3 and PO4.
Through the course of this project, I have not increased the bioload, same number of fish, same feeding schedule and amount, same lighting, etc... On day 15 I removed my chemical (purigen) filtration and on day 28 I removed my mechanical (foam). My system is now 100% biofiltration, live rock & sand, and algae scrubber. I have maintained my biweekly 20% water change schedule and siphon as much detritus off the sand and rock as I can during WC. I am excited about the progress so far and my aquarium has never looked better!
I originally started this thread on MASC, my local forum in Colorado, but decided to share here as well. Below is a summary to date and I will continue to post updates.
Background: I have a small 24 gallon Current Aquapod tank. The tank is now 9 months old and have I performed 5 gallon water changes every two weeks. Filtration consists of 20lbs of live rock 15lbs of live sand, 1 mechanical filter and 1 bag of Seachem Purigen. Livestock consists of 4 fish, 10 snails, 5 hermits, 1 shrimp and 30 corals. My numbers are consistently 1.024 salinity, 8.2 ph, 0 ammonia, 0 nitrate, 10-30ppm nitrate (varies depending on water changes), and 0.25ppm phosphate. The phosphate and nitrate have been climbing over the last 2 months and I have decided that I needed to work on a nutrient export strategy so I don't have to increase my water changes. Because my nano has very small compartments in back, I don't have space for a media reactor, skimmer or refugium. I do have space for an upflow algae scrubber...so here we go!
Parts List:
cross-stich mat, plastic sheet from Michaels
air pump (2 liter/min)
air tube, included in air pump
plastic dish from Thai food take out ($8 for pad thai....mmmm good!)
super glue gel
light (mine is led, DYI build I boaght off a friend)
timer
Step 1: Preparing the mat. You need to make the mat as rough as possible. I started with a belt sander, using 40 grit sand paper. This roughened the entire mat, cutting small grooves into the mat. After the first sanding, I then used my small hole saw to roughen the mat further. Holding it in my hand, I scraped it side to side and in circles. I tried using a drill, but did not work nearly as well as using by hand.
From all I have read, you'll want the mat to be as rough as possible to give the algae something to grab onto.
Step 2: Preparing the plastic dish: the soon to be UAS. Following Santa Monica's design; I put holes 2 large holes on the top (1/4", 1 for air tube and 1 for air release), 7 smaller holes (1/8") on each side for water outflow, and 11 small holes on the bottom for water inflow. To make the holes cleanly and precise, I melted them using a torch and drill bit. You will need good ventilation.
Step 3: Gluing everything together: Roughen up the plastic dish with sand paper and roughen up the air tube. This will help the glue stick to everything. Stick the air tube in and glue it down. I then cut a slice along the tube at the bottom and then a few cross cuts. This allows a place for the bubbles to come out. I cut 2 pieces of matting, one at a diagonal, the other square. and glued everything together. I used some help from Jack to hold the matting down while the glue set.
Final product:
Step 4: Light, I bought the light from a friend; copied from my friends thread, "Because its only 5 LEDs (using 4 660nm and 1 455nm LEDs) and the required voltage was only 12v I didnt need a driver. I just used a 500ma 12v pc fan power adapter."
I adjusted for the Light intensity. Kris warned me that the light was very intense, so I sanded the acrylic shield to diffuse the light, and that still seemed really bright, so I took some leftover matting and taped it down over the light. This helped diffuse the light and I think will be the solution.Only time will tell.
Step 5: Installation. I rearranged some items in the back, and also created a couple addons to help reduce the noise. First, I place the air pump in a insulated box, with egg crate foam, cut some air vents and stashed the whole thing in a cabinet. May have been a little overkill, but I can't hear the air pump at all! Next, I made an exhaust muffler, so that as the air leaves the UAS it is silenced. It is made from a simple $1 syringe from grocery store.
-------------------------------------------------------
Day 1: NO3- 30ppm, PO4- 0.30ppm. I did my water change today, but took a couple photos right before I vacuumed up the algae. This is the starting point...not really that bad, but I am getting tired of cleaning the acrylic every day. I will consider it successful even if it helps keep the acrylic clean. I am going to start with running the LED 16 hours/day. We will see in a week how it all works.
And a small comment before the fish police show up : ) Yes, that is a ruby red mandarin in a 24 gallon tank. He was a "rescue" from a LFS (starving to death). I keep 10 gallons of copepod cultures going just for him and feed about 500 copepods daily.
-------------------------------------------------------
Day 7: NO3- 20ppm, PO4- 0.25ppm. Minor buildup on the screen. Looks to be mostly slime and not the green hair. Still optimistic because many people report that it can take a couple weeks to get a new screen started. I decided to up my light from 16 hours to 18 hours for the next week.
Maybe it's my optimism, but I have noticed a slight improvement in the DT. The sand looks a bit cleaner and didn't need to clean the acrylic as much as I had been. The numbers however, haven't shown a significant improvment.
---------------------------------------------------------
Day 15: NO3- 10ppm, PO4- 0.10ppm. Pulled the scrubber and brushed it off with a tooth brush. Definitely starting to grow and outcompete the algae in the tank. Not the thick mat of algae yet, but not sure I'll ever get that. I think the scrubber may be a bit oversized for my 24 gallons, the bio load and the amount I feed...Maybe I'll start feeding a little more. With all that said, the DT is looking good. No more algae in the sand, none of the rock and down to cleaning the acrylic 1-2 times week.
Did a couple water tests and the results are encouraging, both of the numbers are half of what they were last week. First pic was 14 days ago, second is yesterday. Both are close-ups of my GSP, same area of the tank. It's subtle, but I do believe the scrubber is helping. The whole tank shots don't show it as clearly.
---------------------------------------------------------
Day 21: NO3- 15ppm, PO4- 0.25ppm: Numbers have slightly increased from last week. The scrubber has more algae than last week, still more of a slime algae than hair.
I did notice a build up of algae in the DT about 2 days ago, and now looking at the screen, I should have pulled the scrubber 2 days ago for a cleaning. The slime algae does not grow as thick and needs to be cleaned more frequently for the scrubber to be effective. Slime will still pull nutrients from the water column, but it grows in a thin mat and blocks the light to the base, potentially killing off the "roots", releasing nutrients back into the water. I suspect that might have been the case because the slight increase in nutrients.
---------------------------------------------------------
Day 28: NO3- 15ppm, PO4- 0.25ppm: Numbers held the same all week, did not climb or lower. Because I've been getting slime algae in the scrubber, I cleaned the screen 3 times this week. It was fascinating; after 2 days, algae started to appear on the sand, I pulled the scrubber and cleaned it. Within 12 hours the sand was clear. 2 days later, the sand started getting algae, pulled the scrubber and same thing, 12 hours and clear again. Moreover, my acrylic had film algae on Monday, and because I had a busy week, I ignored it all week. By today the acrylic was clear. I am a fan of algae scurbbers.
---------------------------------------------------------
Day 35: NO3- 10ppm, PO4- 0.15ppm. Not going to post a photo of the screen again...looks identical to the one above, slime algae still, and cleaning it 2-3 times a week. Been reading about that, and decided that I should up my photo period on the scrubber from 18 to 21 hours. I also removed the diffuser a week ago. We'll see what happens this week. Other noteworthy items. I did not have to clean the acrylic at all in 7 days. This is a HUGE improvement compared to the need to clean every day when I started this project. Another interesting note, the sand is no longer growing algae, but now my rock has some hair algae in spots (circled below in photo). Again, was reading about this, and it is very interesting to see how the sand and rock can act like a sink and absorb nutrients when nutrients are high in the water column, and then release it as the nutrients in the water are reduced. Clearly the sand released stored nutirents first and reached a balance, hence why I had an algae bloom show there first. Now that the sand has reach equilibrium, the rock is now leaching nutrients, resulting in algae growth on the rock where the transfer is occuring. Once the rock stops leaching and reaches equilibrium with the water column, I expect I will then start to see a more significant decline in measured NO3 and PO4.
Through the course of this project, I have not increased the bioload, same number of fish, same feeding schedule and amount, same lighting, etc... On day 15 I removed my chemical (purigen) filtration and on day 28 I removed my mechanical (foam). My system is now 100% biofiltration, live rock & sand, and algae scrubber. I have maintained my biweekly 20% water change schedule and siphon as much detritus off the sand and rock as I can during WC. I am excited about the progress so far and my aquarium has never looked better!
Last edited: