Upgrade to a 60g cube, build.

Valkyrie

Active Member
View Badges
Joined
Jul 15, 2014
Messages
440
Reaction score
442
Location
Washington State
Rating - 0%
0   0   0
I don't know how long it's going to take me to set up, but I thought I'd go ahead and start working on a build thread now.

Last weekend I picked up a used 60g cube with a 20g sump. I've been in the market for one for quite some time. I'd admittedly grew out of the 29g and with a foul-tempered mated pair of maroons on the right end of the tank and blue spotted watchman goby with a tiger pistol shrimp on the left, I knew that if I were to have any more fish I'd need a larger aquarium. For some reason I became smitten with the idea of a 60 gallon cube when I watched one of @melev 's videos about his anemone cube.

The original plan was that I'd upgrade the 29g with the 60g cube and my 20g with a 40g cube. My husband made the suggestion that I upgrade the 20g with the 29g and use the 20g for its sump. Well, that's brilliant, why not!

So this wonderful cube that I picked up is drilled and has a built in over flow. Guess what I get to figure out? That's right, how the heck does this thing work? The previous owner had capped off a few connections and I would like to use this to its full potential. So I'll be spending some time studying youtube videos and reading about drilled aquariums and their sumps. I have a sump on my 55g but it's not drilled, it's just an HOB over-flow box and 10g sump, which is currently turned off because the in tank skimmer is a piece of junk, so I bought another Octopus (I bought one for my 20g and fell in love with the brand) to hang on the back of the 55. Stellar! That is one sweet skimmer. It's been skimming dark crap since day 3. Day 1 was light, but plentiful. Raised the cup a bit and viola'! Why oh why did I waste time and money on the SCA skimmer!?

The most complicated part is yet to come though. The 60 has to go in the exact same spot as the 29g. So I'll be using 6 buckets to move as much water as possible before moving the 29g out of the spot and the 60+sump into it, all the while making sure my beloved fish don't suffer too much. It'll be like a 50% water change.

Come to think of it, maybe I shouldn't run the sump right away, give it a week before I run it so that I can add fresh saltwater to it and it'll be like another water change. Maybe. Not sure if I'm going to just hang the Remora that's on the 29 onto the back of the sump or what exactly. Dang, this might be more complicated than I thought.

So here's some pics of the new2me tank.

60 with stand.jpg

It also came with a light hood that is to be suspended, I have vaulted ceilings so that's not going to happen. Here's the hood.
light hood.jpg


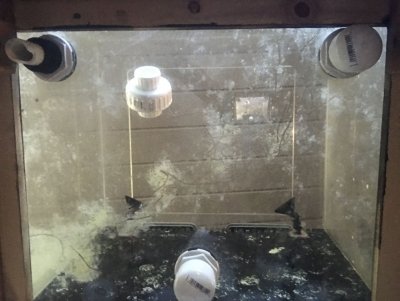
This is looking down through the top:
inside drilled.jpg

Then underneath:
underneath.jpg

Of course, hidden behind the overflow is a serious of pvc outflow and returns. I'll figure out which is which soon enough, seems pretty easy. The previous owner said something about a closed circuit (but again, he said he capped off a few), so I'll need to figure that out.

Nothing exciting here, looks like he made put together the sump himself, which is fine, but if I can't get it to work the way I want I might see about saving up some money and ordering a custom sump. Dunno yet.
20g sump.jpg


So this is the beginning. I can't promise when I'll next update. The goal is to have this running by Autumn, but I also am working on converting a room into my pottery studio and if I expect to have extra funds, I need to get the studio done and kiln pad finished.

TTFN
 

saltyfilmfolks

Lights! Camera! Reef!
View Badges
Joined
Feb 25, 2014
Messages
28,739
Reaction score
40,932
Location
California
Rating - 0%
0   0   0
Wow. That's sweet. Great bones there.
I guess my .02 , take all the time you need. Sounds like you have time so plumb that puppy right off the bat.
Are you still looking at a new satand for it?
Look for the biggest sump you can fit and still have room for an ato container. The elbow room is soooo worth it. It's easier to choose a skimmer and you can stick a huge refugium in or a set of reactiors if you need to. Personally I'm a refugium guy.
A 30 long tank might be a good size for it.

A friend of ours here on reef2reef is a closed loop guy. We could tag him if you have questions.
 
OP
OP
Valkyrie

Valkyrie

Active Member
View Badges
Joined
Jul 15, 2014
Messages
440
Reaction score
442
Location
Washington State
Rating - 0%
0   0   0
Wow. That's sweet. Great bones there.
I guess my .02 , take all the time you need. Sounds like you have time so plumb that puppy right off the bat.
Are you still looking at a new satand for it?
Look for the biggest sump you can fit and still have room for an ato container. The elbow room is soooo worth it. It's easier to choose a skimmer and you can stick a huge refugium in or a set of reactiors if you need to. Personally I'm a refugium guy.
A 30 long tank might be a good size for it.

A friend of ours here on reef2reef is a closed loop guy. We could tag him if you have questions.

No, I wasn't looking for stand for this set up. I need one for the 29g so I can run a refugium, using the 20g that currently is holding my lightning maroon, a clown goby, a chalk bass, some snails, 3 blue legged hermits and a Halloween hermit. It's going to be musical aquariums here. LOL

I love having a refugium. Even though, right now, I've got the system shut down on my 55g and just running the hob octo skimmer, I'm going to redesign the sump into solely a refugium. The octo skimmer is the bomb, so I might get another 20 long, so that I can have a larger area.

I like the set up for the cube, it's pretty roomy. I'm not sure I like the way it's divided up and I'll need a better skimmer than the hob remora that's currently on the 29.

I had a BRS video showing how to set up a DIY ATO and I'll be doing that for all 3 DTs, I've learned over the last year just how much it sucks to not have an ATO.

I will definitely need some input from someone that runs a closed circuit...er, closed loop, I guess is the right term.
 

saltyfilmfolks

Lights! Camera! Reef!
View Badges
Joined
Feb 25, 2014
Messages
28,739
Reaction score
40,932
Location
California
Rating - 0%
0   0   0
No, I wasn't looking for stand for this set up.
Ah, got it. I just skimmed that thread.. Good, Im glad the stand works. I thing from now on Ill always plan my stands first and then pick a tank for it. lol

I had a BRS video showing how to set up a DIY ATO and I'll be doing that for all 3 DTs, I've learned over the last year just how much it sucks to not have an ATO.
Oh yea, esp as the tank gets bigger. more room to evap. I havent seen the Brs vid. I made mine out of 12v floats and 12v pumps. 3 tanks and one store bought ato. and the store bought is almost the same as the ones I made.
This is the pump
http://www.ebay.com/itm/Submersible...ee0662e&pid=100033&rk=1&rkt=1&sd=371780387585
this is the float(keep an eye out you can get them cheaper you mostly want the float guards the actual floats go for $5 for 6)
http://www.ebay.com/itm/Auto-Top-Of...133769?hash=item3f7f7240c9:g:HDoAAOSwPK1ZRAc1
The store bought version.
http://www.ebay.com/itm/Aquarium-Au...132477?hash=item41c80c6fbd:g:8mgAAOSw8GtZRAkE


I will definitely need some input from someone that runs a closed circuit...er, closed loop, I guess is the right term.
Yup, closed loop, they're cool, no powerheads needed.

@justingraham is this tank set up well? or just too much hassle or advanced to get going again as a closed loop?
 

justingraham

5000 Club Member
View Badges
Joined
Jul 13, 2016
Messages
5,348
Reaction score
6,710
Rating - 0%
0   0   0
Ah I just skimmed thru till I saw my name when I'm done work I will re read and give u all the help possible.

But if everything lines up right u won't need to see any power heads at all in a 60 cube
 

justingraham

5000 Club Member
View Badges
Joined
Jul 13, 2016
Messages
5,348
Reaction score
6,710
Rating - 0%
0   0   0
Ok u peaked my interest so I looked back at the photos what I need from you is a decent picture or representation of where each hole is and aprox what size hole it is for the overflow and the ones inside the tank I think I figured it out but better safe then sorry
 

justingraham

5000 Club Member
View Badges
Joined
Jul 13, 2016
Messages
5,348
Reaction score
6,710
Rating - 0%
0   0   0
Thinking the way it is laid out whoever did it didn't think it thru

The one in the center looks to be the drain which I would cover with some rocks

And then the front two are the return which right after the bulkhead I would put a 45 then a penductor on both pointing to the opposite back side corner. But u would have to cover them with rocks as well

so unless u were planning on going for a three to four island landscape it design is dumb and I think silly
 

justingraham

5000 Club Member
View Badges
Joined
Jul 13, 2016
Messages
5,348
Reaction score
6,710
Rating - 0%
0   0   0
For a return closed loop pump I would go with a little giant or if u want control ability a vectra l1 I wouldn't do m1 but u could if ya wanted to I just like flow

It my mind more important then light
 
OP
OP
Valkyrie

Valkyrie

Active Member
View Badges
Joined
Jul 15, 2014
Messages
440
Reaction score
442
Location
Washington State
Rating - 0%
0   0   0
Thinking the way it is laid out whoever did it didn't think it thru

The one in the center looks to be the drain which I would cover with some rocks

And then the front two are the return which right after the bulkhead I would put a 45 then a penductor on both pointing to the opposite back side corner. But u would have to cover them with rocks as well

so unless u were planning on going for a three to four island landscape it design is dumb and I think silly

The one in the back is capped off. The one in the front right is capped off.
The one in the front was in use, but will need to be replaced anyway since the seller busted it when he dismantled.
The picture here is looking up through the bottom.
from below.jpg

3/4"
_____________________________________

In the back for the overflow, I'm not sure because I can't see the numbers very well, they *look* like the 1" pvc that I've used for an unrelated purpose.

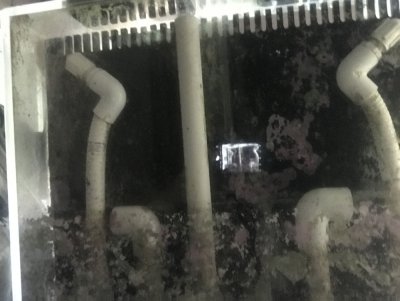
This is a pic of what is directly behind the overflow.
behind the overflow.jpg

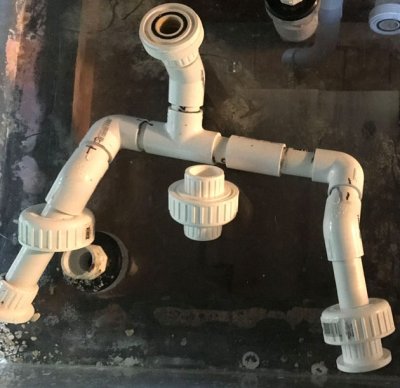
I get that the ones on the far ends are returns. What the tallest in the middle does and why the two shorties, is beyond me and how this piece piece in question.jpg fits in is still a mystery to me.

I'm still learning the terminology and how this sort of thing works. Since I'm not fully understanding the how, it's hard for me to grasp how to make it work and/or work better. Now I could do what I usually do and be as stubborn as a mule and try to figure it all out on my own, which can take me far longer than it should, or I can suck it up, set my ego aside and actually say, "I DON'T KNOW OR UNDERSTAND HOW THIS WORKS! PLEASE HELP!" So here I am.

I want it to work correctly, have good flow and work within my budget.

Thanks.
 

justingraham

5000 Club Member
View Badges
Joined
Jul 13, 2016
Messages
5,348
Reaction score
6,710
Rating - 0%
0   0   0
Well I would start fresh if it were me

Throw all the plumbing away and make it ur own

I can't really go into detail right now

But for the five holes in the overflow use the two on the outside as the returns and then for the three in the middle look up beam animal overflow.

As for the three inside the tank I would do what I said earlier
 

saltyfilmfolks

Lights! Camera! Reef!
View Badges
Joined
Feb 25, 2014
Messages
28,739
Reaction score
40,932
Location
California
Rating - 0%
0   0   0
The one in the back is capped off. The one in the front right is capped off.
The one in the front was in use, but will need to be replaced anyway since the seller busted it when he dismantled.
The picture here is looking up through the bottom.
from below.jpg

3/4"
_____________________________________

In the back for the overflow, I'm not sure because I can't see the numbers very well, they *look* like the 1" pvc that I've used for an unrelated purpose.

This is a pic of what is directly behind the overflow.
behind the overflow.jpg

I get that the ones on the far ends are returns. What the tallest in the middle does and why the two shorties, is beyond me and how this piece piece in question.jpg fits in is still a mystery to me.

I'm still learning the terminology and how this sort of thing works. Since I'm not fully understanding the how, it's hard for me to grasp how to make it work and/or work better. Now I could do what I usually do and be as stubborn as a mule and try to figure it all out on my own, which can take me far longer than it should, or I can suck it up, set my ego aside and actually say, "I DON'T KNOW OR UNDERSTAND HOW THIS WORKS! PLEASE HELP!" So here I am.

I want it to work correctly, have good flow and work within my budget.

Thanks.
It looks like someone got creative.
Likely you'll want to cap a bunch of those. Almost seems like they were playing with reverse undergravel filters.


Yea you'll need some help to figure it out. I would.


Hint(Justin likes cake)
 

ksfulk

Working back towards clean
View Badges
Joined
Jun 21, 2014
Messages
1,936
Reaction score
1,980
Location
Grand Rapids, Michigan
Rating - 0%
0   0   0
Assuming this is all for the drain and retun and not part of the closed loop, then this is what I think is going on here:

Blue arrows are split return. The manifold that is in the second picture appears to be the single return from the return pump, that should attach to the bulkheads at the bottom of the aquarium. Simple enough there. Without seeing what the bulkheads or the bottom of the tank looks like, I can be sure, but thats my educated guess.

Red arrows for drains. The drain looks weird, but here's my attempt at it. It looks like its a three drain bean animal setup, but the lower full siphon drains are really really low. Assuming they were draining at full effect, you would get a waterfall sound effect as water cascades over the overflow teeth. The tall middle pipe would be the emergency overflow. Perhaps the former owner was using a return pump that was a bit more powerful than his drains, and the two lower pipes were completely submerged and the emergency drain was taking care of the rest? I would raise both pipes up so they were about 3/4" and 1/2" below the weir teeth, so you dont have a ton of noise because of falling water.

Capture.PNG
Capture2.PNG
 
OP
OP
Valkyrie

Valkyrie

Active Member
View Badges
Joined
Jul 15, 2014
Messages
440
Reaction score
442
Location
Washington State
Rating - 0%
0   0   0
Well I would start fresh if it were me

Throw all the plumbing away and make it ur own

I can't really go into detail right now

But for the five holes in the overflow use the two on the outside as the returns and then for the three in the middle look up beam animal overflow.

As for the three inside the tank I would do what I said earlier

I'm with you. I'll come back with questions as they come about. Sound good?
 
OP
OP
Valkyrie

Valkyrie

Active Member
View Badges
Joined
Jul 15, 2014
Messages
440
Reaction score
442
Location
Washington State
Rating - 0%
0   0   0
Assuming this is all for the drain and retun and not part of the closed loop, then this is what I think is going on here:

Blue arrows are split return. The manifold that is in the second picture appears to be the single return from the return pump, that should attach to the bulkheads at the bottom of the aquarium. Simple enough there. Without seeing what the bulkheads or the bottom of the tank looks like, I can be sure, but thats my educated guess.

Red arrows for drains. The drain looks weird, but here's my attempt at it. It looks like its a three drain bean animal setup, but the lower full siphon drains are really really low. Assuming they were draining at full effect, you would get a waterfall sound effect as water cascades over the overflow teeth. The tall middle pipe would be the emergency overflow. Perhaps the former owner was using a return pump that was a bit more powerful than his drains, and the two lower pipes were completely submerged and the emergency drain was taking care of the rest? I would raise both pipes up so they were about 3/4" and 1/2" below the weir teeth, so you dont have a ton of noise because of falling water.

This helps, too! Thanks!

Everyone is so helpful and I sure appreciate it.
 
OP
OP
Valkyrie

Valkyrie

Active Member
View Badges
Joined
Jul 15, 2014
Messages
440
Reaction score
442
Location
Washington State
Rating - 0%
0   0   0
It looks like someone got creative.
Likely you'll want to cap a bunch of those. Almost seems like they were playing with reverse undergravel filters.


Yea you'll need some help to figure it out. I would.


Hint(Justin likes cake)

oh! I can make cake! LOL
 

justingraham

5000 Club Member
View Badges
Joined
Jul 13, 2016
Messages
5,348
Reaction score
6,710
Rating - 0%
0   0   0
Ask away

But like I said start with new bulkheads god forbid u get it all set up then a week into it running the bulkhead gaske goes.

What the other guy said about the overflow I agree with. Run a bean animal. And the two outside lines use as the returns. I would throw the original contraption out the window and hardplumb everything according to ur needs it's now ur tank make it that way

And then for the holes in the actual tank well the small ones use for a split return the big one for the drain. Use a high head pressure pump with penductors and I honesty believe u won't need power heads. If the return pump is any good.
This way will take some creative aquascaping but I believe will look and work better.

So for pumps I would go with a little giant 4mdq for the closed loop. This way the bulkheads are the same size as the pump inlet and outlets.
For a return pump I would personally go with a D.C. Pump. I prefer Ecotech but there are other cheaper options out there. U would want somewhere around 800-1000 gallons an hour for the return pump actual gallons an hour so a pump rated for 1500-2000 would do.

If memory serves me right the 4mdq does around 1000 gph which u will have as there is no head pressure on a closed loop and then say the return is a thousand that's 2000 gallons an hour turnover in ur tank roughly 33%. And then add in the penductors which just say it only boost it by 2x instead of the normal 4x just to be safe and ur at 50% turnover inside ur tank. Def no need for any power heads.

And with a good aquascape u will never see anything but rocks and water in ur 50% turnover tank. Boom baby.
 
OP
OP
Valkyrie

Valkyrie

Active Member
View Badges
Joined
Jul 15, 2014
Messages
440
Reaction score
442
Location
Washington State
Rating - 0%
0   0   0
Praise Google!

Bean animal- not at all what I expected!

I was clueless on the subject of penductors. Then discovered that Enductors and Penductors are the same things. Penductors were just manufactured by Penguin. Did that help my comprehension? A little, but I like that something can increase turnover so efficiently.

The little giant 4mdq, plus an Ecotech return is about $600 and that will have to wait. I may just go with Jecod/Jebao and spend just under 1/2 that. If it can keep me going for at least a year, it'll give me time to upgrade.

I will most definitely change out the bulkheads.
 

saltyfilmfolks

Lights! Camera! Reef!
View Badges
Joined
Feb 25, 2014
Messages
28,739
Reaction score
40,932
Location
California
Rating - 0%
0   0   0
Praise Google!

Bean animal- not at all what I expected!

I was clueless on the subject of penductors. Then discovered that Enductors and Penductors are the same things. Penductors were just manufactured by Penguin. Did that help my comprehension? A little, but I like that something can increase turnover so efficiently.

The little giant 4mdq, plus an Ecotech return is about $600 and that will have to wait. I may just go with Jecod/Jebao and spend just under 1/2 that. If it can keep me going for at least a year, it'll give me time to upgrade.

I will most definitely change out the bulkheads.
The jebao 5000 would prob work and be under 100.

Just a thing in the shopping list. Oddly, if you keep an eye on eBay and Amazon sometimes the prices just bottom out stupidly. I got both the jebao twonstage and three stage doser at exactly the same price $10 under what they usually sell for.

Shopping also requires patience in this hobby. ;Couchpotato


Good research btw.
 

Form or function: Do you consider your rock work to be art or the platform for your coral?

  • Primarily art focused.

    Votes: 20 8.3%
  • Primarily a platform for coral.

    Votes: 42 17.5%
  • A bit of each - both art and a platform.

    Votes: 161 67.1%
  • Neither.

    Votes: 11 4.6%
  • Other.

    Votes: 6 2.5%
Back
Top