Why doesn't this exist? Or does it?

DanP-SD

Active Member
View Badges
Joined
Jan 4, 2014
Messages
106
Reaction score
121
Location
San Diego, CA
Rating - 0%
0   0   0
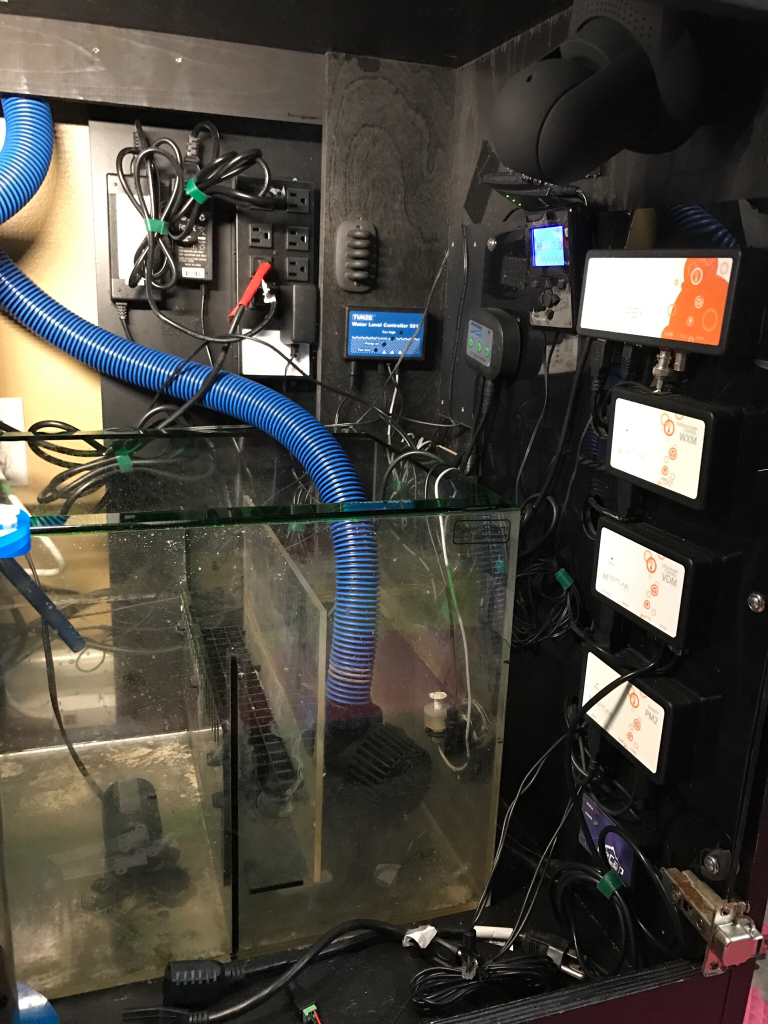
I don't think I'm at all unique among Apex users in this but I like to program momentary buttons to control all sorts of functions. Presently, I have two break out boxes with 7 different buttons to do things like turn on a light for a set time, activate a saltwater mixing pump, start a water change, or kill the skimmer and ATO for a couple hours.

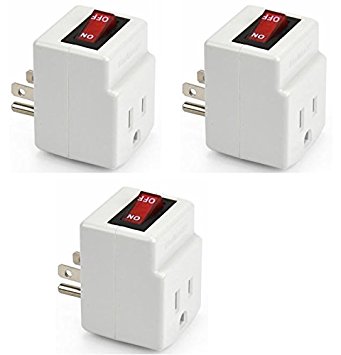
To set these up, I need a breakout box (which essentially just plugs into an I/O connector and breaks out the wires into 6 positive wires and a common bus), the momentary buttons, wires to connect the bottom to the BOB, and something to mount the buttons to (I typically drill square tube steel or square PVC pipe and mount them there).

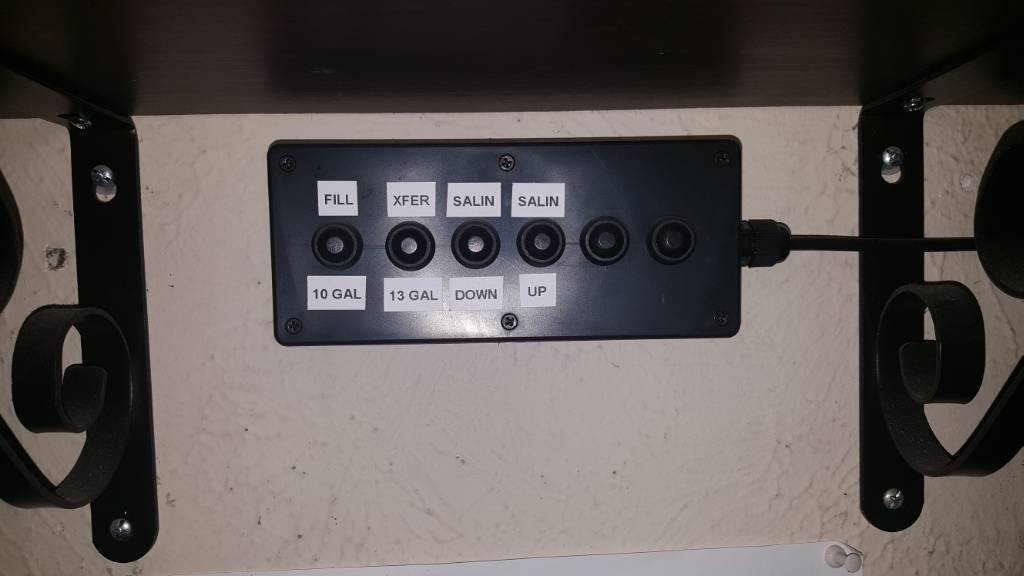
It seems like it would be easy -- for a fabricator, not me -- to make a compact, mountable box with 6 momentary buttons directly wired to a cable with an I/O plug. This seems like something Neptune or even a third-party like Avast could sell a lot of. It would replace the BOB and streamline the total bill of materials so I would anticipate it could be sold for a good profit while still saving the consumer money and headache. Has anyone seen anything like this out there?
 
OP
OP
D

DanP-SD

Active Member
View Badges
Joined
Jan 4, 2014
Messages
106
Reaction score
121
Location
San Diego, CA
Rating - 0%
0   0   0
Just found all the parts (I think) on Amazon and ordered them. I'm no engineer but am going to try to MacGyver something this weekend. I'll post pics and instructions if it works. The parts I ordered were an ABS project box with mounting tabs, a mini Din8 cable (male on both ends so I'll need to cut and strip the wires). I already have momentary buttons but I ordered a 4-channel spring terminal figuring I'd make one that allowed bare wire connections and buttons -- basically a hybrid BOB and button manifold all in one. Stay tuned.
 
OP
OP
D

DanP-SD

Active Member
View Badges
Joined
Jan 4, 2014
Messages
106
Reaction score
121
Location
San Diego, CA
Rating - 0%
0   0   0
IMG_0778.JPG
IMG_0779.JPG
IMG_0780.JPG
IMG_0781.JPG
IMG_0783.JPG
IMG_0784.JPG
IMG_0785.JPG
IMG_0787.JPG
IMG_0789.JPG
IMG_0790.JPG
IMG_0791.JPG
Assembled my FrankenBOB tonight. Basically it consists of a project box in which I drilled holes for momentary buttons and a Mini DIN8 cable. I mounted 4 momentary buttons for now but left room and wires to add two more in the future. I connected one terminal of all buttons on a common copper bus.

Then I cut one end off a male-to-male DIN8 and stripped the color wires. I wired the brown to the open terminal on button 1 (just the top left button), red to button two, orange to button three and blue to the button in position 5 (bottom row center). I left the yellow and blue wires open since I haven't installed buttons in what will be position 4 and 6. I connected the black wire to the bus with a little solder.

Then I secured the wire with a strain relief bushing and closed it all up.

Some pics above. I'll test it out this weekend and will post results.
 

LJC6780

Active Member
View Badges
Joined
Nov 23, 2016
Messages
119
Reaction score
40
Rating - 0%
0   0   0
I would love to know more about this! I just bought an 85 gallon system from someone (was running and fully stocked) and it has an apex with 3 probes, gyre, ATO, GFO, skimz, etc ... and I'd love to be able to hit a button and turn something on or off without having to get into the app and all for something quick. Is that what you are talking about here? Am I understanding you correctly?

I'm quite sure I could build this contraption but I don't have a clue what to do with it once built! Lol
 
OP
OP
D

DanP-SD

Active Member
View Badges
Joined
Jan 4, 2014
Messages
106
Reaction score
121
Location
San Diego, CA
Rating - 0%
0   0   0
Exactly. This box is designed to replace a break out box plus separate button manifold with just one box. You don't need to build something like this. You can buy a breakout box made by Neptune or Avast marine and separately wire buttons to it.

Whichever way you go, you can use a button for many applications. Some of the most common are: turn on a light for a set period of time, turn on a pump, initiate a water change, but it can be used for anything an Apex can control. This board has many threads showing how to set these functions up.
 
OP
OP
D

DanP-SD

Active Member
View Badges
Joined
Jan 4, 2014
Messages
106
Reaction score
121
Location
San Diego, CA
Rating - 0%
0   0   0
The initial prototype pictured above didn't work so this weekend I took to troubleshooting. First, I suspected my use of a stripped copper wire for the bus may have been the culprit so I replaced it with a pre-tinned 24 awg bus wire. Still no luck, so my next though was the mapping of the DIN8 wire was off.

When I initially built it, I tried copying the mapping used in Avast Marine's breakout box kit since they had clear instructions online (). I bought a mini DIN8 cable on amazon (https://www.amazon.com/gp/product/B000068OGI/ref=oh_aui_detailpage_o05_s00?ie=UTF8&psc=1) and tried wiring it the same way as the Avast kit.

So as part of my troubleshooting this weekend, I took out my multimeter and mapped every wire. They were totally different, confirming my suspicion. The attached pics show the mapping of the cable and how I wired it. So I rerouted the wires, tested all the connections and confirmed they were working. Then I plugged it into my Apex and, voila, it worked like a charm. In my quick and dirty diagram, the horizontal line represents the flat side of the plug.
IMG_0810.JPG

IMG_0811.JPG


A few notes: with this cable, black is switch 1, brown 2, red 3, orange 4 and purple is the bus. Yellow and green would be 5 and 6 respectively but i only needed four buttons. Blue is dead and you don't need the bare ground wire.

The other parts I used were:
Project Box (https://www.amazon.com/gp/product/B005FMWU06/ref=oh_aui_detailpage_o07_s00?ie=UTF8&psc=1)
Bus wire (https://www.amazon.com/gp/product/B0047ORQJI/ref=oh_aui_detailpage_o00_s01?ie=UTF8&psc=1)
Strain relief bushing (https://www.amazon.com/gp/product/B001BPT3TC/ref=oh_aui_detailpage_o01_s00?ie=UTF8&psc=1)
Momentary buttons (https://www.amazon.com/gp/product/B0131XF9KS/ref=oh_aui_search_detailpage?ie=UTF8&psc=1)

I bought larger volumes of many of these than I needed but I think these can be built for about $14 each -- and that's at retail pricing of all components. Considering a breakout box runs $40-$45 and that's before adding in the cost of buttons, it seems someone handy or in the business could build and sell these at a nice profit. For what it's worth, I claim no IP rights in these designs and would be thrilled to see someone make these and make a few bucks off of them. Consider any novelty in this thread public domain.
 
OP
OP
D

DanP-SD

Active Member
View Badges
Joined
Jan 4, 2014
Messages
106
Reaction score
121
Location
San Diego, CA
Rating - 0%
0   0   0
Another easy variation (which is slightly less expensive to build) is a combination of spring terminals and buttons. The terminals are great for things like float switches and pressure switches and the buttons cover the manual inputs. The hardest part about this is cutting the square hole in the project box to receive the spring terminal.

IMG_0813.JPG


They're not visible in the pic but the box has mounting tabs and is easily mounted to wood or drywall with four small screws. I hope someone in the business starts putting these out commercially. They're super easy with easily-sourced components and I suspect reefers would gladly pay more than the price of a basic breakout box.

Neptune? Avast? Why not offer something like this to save Apex users the time and hassle of buying and wiring up doorbells to automate tasks?
 

saltyfilmfolks

Lights! Camera! Reef!
View Badges
Joined
Feb 25, 2014
Messages
28,739
Reaction score
40,932
Location
California
Rating - 0%
0   0   0
Why not offer something like this to save Apex users the time and hassle of buying and wiring up doorbells to automate tasks?
why not pitch the Idea or offer your own as an aftermarket add on.

Thats sweet.
 
OP
OP
D

DanP-SD

Active Member
View Badges
Joined
Jan 4, 2014
Messages
106
Reaction score
121
Location
San Diego, CA
Rating - 0%
0   0   0
why not pitch the Idea or offer your own as an aftermarket add on.

Thats sweet.

Thanks. As a hobby, throwing a couple of these together as proof of concept is fun, but I have a full-time day job and commercializing these isn't in the cards for me. I think it could be profitable but is best done by someone with fabrication and distribution already established or with the time to make a go of it.
 

JamesP

Active Member
View Badges
Joined
Mar 21, 2017
Messages
363
Reaction score
265
Rating - 0%
0   0   0
I made one of these last year myself. Mini din cable and all. Used water resistant boat console switches since it is operated with wet hands. Also has water resistant gland nut where the cable enters the box. Works great.

f34348dfa8f1cb3672520231b79ce8eb.jpg
 

JamesP

Active Member
View Badges
Joined
Mar 21, 2017
Messages
363
Reaction score
265
Rating - 0%
0   0   0
I programmed it so you have to hold down the button for 5 seconds before it latches the virtual outlet that starts the action. I use fill 10 after I vacuum 2 buckets from the sand to add 10 gallons of salt water. I use xfer 13 to do a 10% water change with dos. I use salin up to add a small amount of salt water then after evaporation it raises salinity by a set amount. I use salin down to remove a set amount of tank water and let the ato add rodi lowering salinity by a small amount. Last 2 buttons are unused as of now but room for expansion.
 

pdt7361

Well-Known Member
View Badges
Joined
Feb 27, 2016
Messages
708
Reaction score
409
Location
St Louis
Rating - 0%
0   0   0
Do you have any details on how you wired up the 2nd one...the one with push buttons and the wire connectors? And which box did you buy for this and which spring terminals?
 
OP
OP
D

DanP-SD

Active Member
View Badges
Joined
Jan 4, 2014
Messages
106
Reaction score
121
Location
San Diego, CA
Rating - 0%
0   0   0
Same box as above for the first one. Same momentary buttons. Same DIN8 cable. All links are above.

The spring terminal is this one: https://www.amazon.com/gp/product/B00K800X2M/ref=oh_aui_search_detailpage?ie=UTF8&psc=1

For the wiring, the mapping was per the handwritten diagram above, so the following steps work:
1. Solder a strand of the bare bus wire to all four lower terminal prongs on the spring terminal and continue it through one terminal of each of the momentary buttons.
2. Solder the purple wire from the DIN8 to the bus wire. That completes the common wire connection.
3. Connect the black wire to the open terminal of the top momentary button and the brown wire to the bottom button.
4. Lastly, solder the red, orange, yellow and green wires in that order to the top terminal prongs of the spring terminal going right to left (looking at it from the back, so that they will number sequentially left to right from the front).

If you follow these steps, when you plug it into the Apex, the Apex will recognize them in the following sequence: top button, bottom button, spring terminals left to right. So, assuming you don't have another BOB connected , Sw1 (or whatever your Apex assigns the lowest value) is the top button and the rest number sequentially from there.
 
OP
OP
D

DanP-SD

Active Member
View Badges
Joined
Jan 4, 2014
Messages
106
Reaction score
121
Location
San Diego, CA
Rating - 0%
0   0   0
Btw, in my picture, the box with the two buttons and 4-way spring terminal is upside down. The cable actually exits from the bottom and the buttons are left of the terminals. My instructions above will make more sense that way too.
 

LJC6780

Active Member
View Badges
Joined
Nov 23, 2016
Messages
119
Reaction score
40
Rating - 0%
0   0   0
So which apex box do I attach one of these to? The more I have to pull out my phone and wait for the app to load just to flip a switch the more I want one!

Also, can you program this to do a specific feed cycle or to turn an outlet on for a certain amount of time or until you press the button again?

This is my setup.
2a958871911e75d87895fa7971d9ad12.jpg
 
OP
OP
D

DanP-SD

Active Member
View Badges
Joined
Jan 4, 2014
Messages
106
Reaction score
121
Location
San Diego, CA
Rating - 0%
0   0   0
You can plug it into the DIN 8 port on the Apex base unit or on a pH module. It's labeled "I/O."

As for programming, the limit is your imagination. I use one button to turn on my cabinet light for an hour, one to turn on a canopy light for an hour, one to kill my skimmer and Ato for two hours and one to start a water change. I have a separate thread on that, which I think I posted above. There are dozens of threads on other uses for such buttons.
 

LJC6780

Active Member
View Badges
Joined
Nov 23, 2016
Messages
119
Reaction score
40
Rating - 0%
0   0   0
Another easy variation (which is slightly less expensive to build) is a combination of spring terminals and buttons. The terminals are great for things like float switches and pressure switches and the buttons cover the manual inputs. The hardest part about this is cutting the square hole in the project box to receive the spring terminal.

IMG_0813.JPG


They're not visible in the pic but the box has mounting tabs and is easily mounted to wood or drywall with four small screws. I hope someone in the business starts putting these out commercially. They're super easy with easily-sourced components and I suspect reefers would gladly pay more than the price of a basic breakout box.

Neptune? Avast? Why not offer something like this to save Apex users the time and hassle of buying and wiring up doorbells to automate tasks?

So on this one, and like the Neptune one, what are the spring terminals for? I get he button part but the other is confusing me.

Also, how do you go about programming each button? Where will they show up? Aaaannnnddddd ... I currently am using my feed buttons to do similar things like FeedA is just the cabinet light on for 30 minutes. FeedB is pumps and Skimmer off for like 15 minutes. FeedC is for 30 and FeedD for 45. On each one I have the powerheads coming on first, return pump a couple minutes later, then Skimmer and finally the ATO after everything has leveled back out in the sump. And on D I have the heaters, carbon and GFO to go off also for maintenance.

I really like the idea of a door switch for the light to come on so I don't have to mess with it each time I want to peek inside. I also like the idea of switching lights to blues or whites or whatever.. I just don't know how to go about programming it all at this point.
 

High pressure shells: Do you look for signs of stress in the invertebrates in your reef tank?

  • I regularly look for signs of invertebrate stress in my reef tank.

    Votes: 35 31.3%
  • I occasionally look for signs of invertebrate stress in my reef tank.

    Votes: 26 23.2%
  • I rarely look for signs of invertebrate stress in my reef tank.

    Votes: 21 18.8%
  • I never look for signs of invertebrate stress in my reef tank.

    Votes: 30 26.8%
  • Other.

    Votes: 0 0.0%
Back
Top