


XSid'sReef - 40 Gallon Breeder AIO (Custom) build in progress

XSidsReef

Active Member
View Badges
Joined
Jul 9, 2026
Messages
155
Reaction score
274
What state or country do you live in
Missouri
Rating - 0%
0   0   0
My first tank thread! 😃

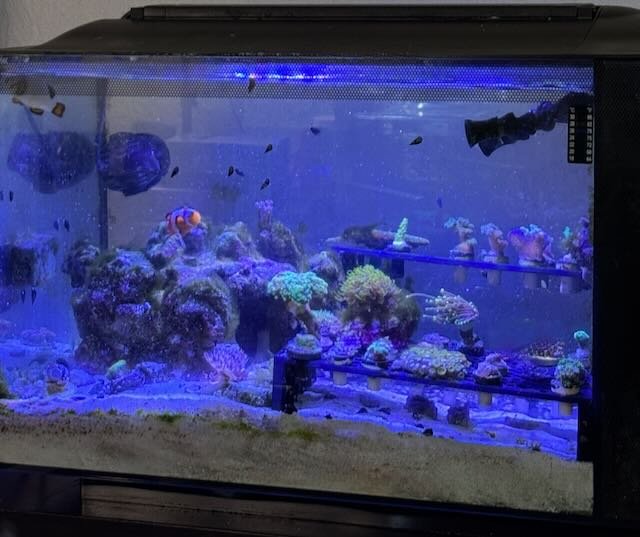
For starters, I've been running an EVO 13 with 3D printed filtration mods and a refugium in the sump. I created a HOB refugium but ultimately moved it back into chamber 2 to simplify the setup. It's looking rough at the moment between aiptasia (all gone now, yay berghia nudebranch) and the algae I admittedly let get way out of control from fear of siphoning out the nudebranch (and overfeeding, I'm sure). On top of that I'm behind schedule on the 40g and went far too strong on the WWC Anniversary sale event. That said, I've rearranged the EVO to have room for frag racks while maintaining 50% normalcy for the current inhabitants. Now I need to monitor the EVO like crazy and keep everything happy to the best of my ability while the 40 comes to fruition.

Here is the EVO now:
IMG_0045.jpeg


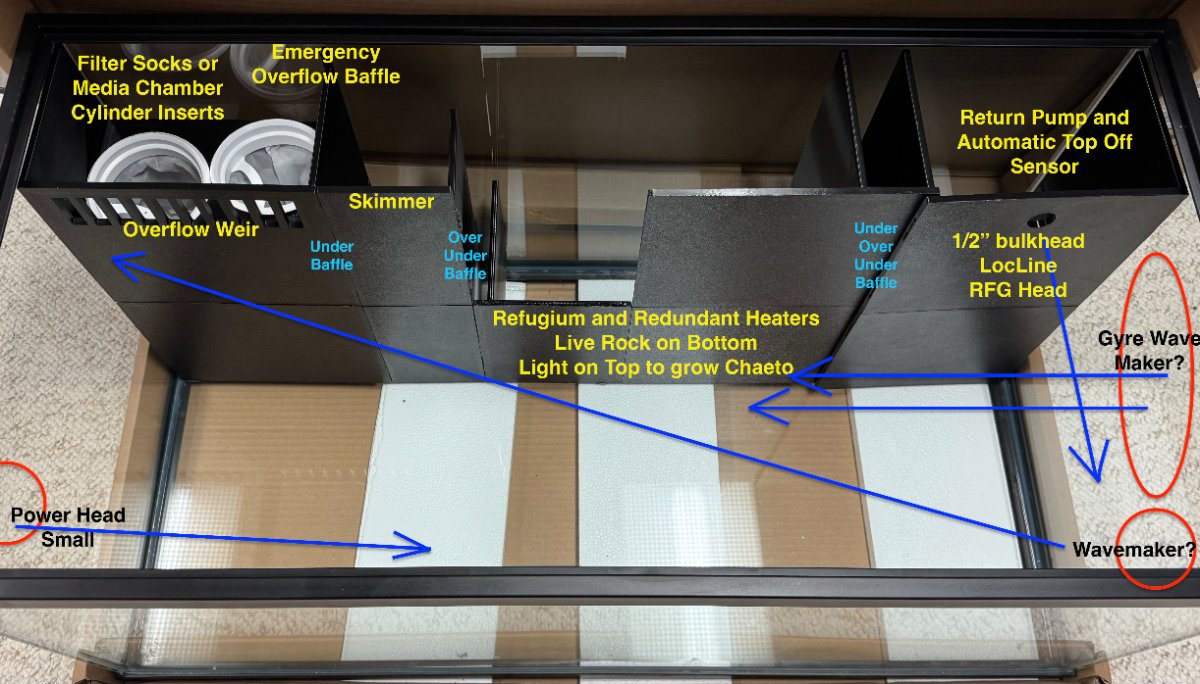
I've custom designed and printed (all but one last panel) an AIO wall and baffles for the back of the 40g breeder and am finally close to full assembly, sealing, and curing. Some model images and my current concept are attached. That gap next to the skimmer chamber and top of the refugium is the final piece printing now. I've got sock replacement cylinders for mechancial filtration queued up to print out next. There's extra room in the bottom of the overflow chamber for more biological media. The skimmer chamber is sized for a skimmer I already have on hand - if I need to go larger my Refugium is HUGE and I could create a insert divider to accommodate. I'll be using 1/2" tubing and an elbow to mount a RFG on some LocLine and connect to my return pump in the final chamber.

Notes:
  • Everything is printed in Sunlu black PETG & will be soaked for 48 hours in RODI to wash away any surface residue (all pieces are either 100% solid infill or in some cases 30% gyroid infill with 5 walls and 5 top & bottom layers).
  • I'll be creating a tray/bin or egg crate style rack for the bottom of the refugium for live rock rubble and additional biological filtration at the very bottom with plenty of room for Chaeto to grow and spin in the upper part of the chamber.
  • The stand for the skimmer will likely be honeycomb, and the space below can be filled with biological media.
  • Most chambers have extra space to accommodate additional enhancements as the tank and I grow together - maybe a small reactor or two - I have so much more to learn and probably several misconceptions to get over šŸ™ƒ

IMG_0039.jpeg


Fingers crossed šŸ˜…! Still have a lot to figure out, wave maker and powerhead placement, long-term/future lighting arrangements (starting with a ReefB KoralLED 70W). Have some MarcoRocks perfect mix Coraline to work with as well as some CaribSea LifeRock (mid to large and rubble) for the display. With some luck I might be able to have it up and beginning to cycle in a week or so.

I appreciate feedback and constructive criticism but, to my detriment, I can be a little stuck in my mindset and defensive at times. Please bear with me, I'm sorry if I don't change everything around quickly based on feedback, but I definitely appreciate your input and suggestions. The attached labeled image shows how things are laid out in my AIO and where I'm thinking of wave maker/powerhead locations, blue lines for flow direction. That should stabilize once I start working on the scaping. First I want to just get this up and running. I am aware I'm sacrificing a lot of space across the back of the tank, but I would like to have an uninterrupted display tank I can see clearly from my desk. I'll drill the next tank, I swear. 🫔 The remaining depth from front glass to AIO wall is greater than my EVO, and this will be much wider as well.


IMG_0044.jpeg

IMG_0043.jpeg

IMG_0042.jpeg

IMG_0037.jpeg
 
Last edited:
Oh - also - I have FritzZyme TurboStart 900, 40 lbs of AragAlive Live Reef Sand in Fiji Pink, 35 gallons of Pacific Ocean Water, PNS Deep Cycle, and Pink and Purple Coraline Algae in a Bottle to help things get started on the right foot.
 
Last edited:
I like the design and layout. Good work and ideas on your part!

My only input is to consider putting the wavemaker/gyre on the back wall in the middle. (Kind of above where the word 'heaters' falls.) Leave your sides open so you don't have any cords, etc. visible on the sides.

A 40 isn't that large and you may only need the gyre in the middle, depending on stocking and the size of the gyre. Maybe run it rotated 90 degrees and get a circular flow. You have the return on the right, and over flow on the left. Gyre or powerhead pushing water right, mounted on the back may get you a good circular.

Just me thinking.
 
I like the design and layout. Good work and ideas on your part!

My only input is to consider putting the wavemaker/gyre on the back wall in the middle. (Kind of above where the word 'heaters' falls.) Leave your sides open so you don't have any cords, etc. visible on the sides.

A 40 isn't that large and you may only need the gyre in the middle, depending on stocking and the size of the gyre. Maybe run it rotated 90 degrees and get a circular flow. You have the return on the right, and over flow on the left. Gyre or powerhead pushing water right, mounted on the back may get you a good circular.

Just me thinking.
Thanks! I’ll keep that in mind, it would be great to have the side views clear ā¤ļø
 
Very little progress yesterday due to life stuff, but finished printing and basic dry fit of parts. I'll need to file down/round the bottom right/left/and back bottom corners at a small 45 degree angle (maybe 1/2") to accommodate existing seals (should've planned for that, don't know where my mind went). Right now I have the return chamber offset for the visual.

IMG_0046.jpeg


Also printed a filtration cup I found on Makerworld that looks similar in shape and purpose to a NOSOK. No fine mesh, but holds floss or a coarse sponge. I'll revisit that later. The work continues - happy Friday!

IMG_0068.jpeg

IMG_0065.jpeg
 
Following along! Always love seeing 3D printed stuff!
 
I too have a 40b with a DIY AIO across the back. I bought it that way though. It’s certainly not the best design, but it’s been working great so far.
IMG_8728.jpeg
Looks beautiful, thanks!
 
8/4 Latest progress update:

The work continues. :)
I put together a stand (yay). I'll be removing the power strip on the top before I put on the self-leveling mat, otherwise it will be covered by the mat/tank. I might mount it on the underside to still have it available:

IMG_0158.jpeg


After the dry fit last week I chamfered surfaces intended to press against the tank's existing seals, scuffed panel contact surfaces and used CA gel to bond the upper and lower halves of each compartment, cured, did the same for connecting compartments to one another. I've since scuffed around each of the bonded panel seams, cleaned with isopropyl alcohol, and sealed them over with ASI 509 black silicone. The rest of the surfaces intended to contact glass have been scuffed in preparation for next steps. The AIO insert will sit for at least another 24 hours to cure before putting in the tank and taping. Once sealed into the tank I'm planning for 7-10 days curing time before a leak test.

IMG_0172.jpeg IMG_0186.jpeg

IMG_0193.jpeg
It's my first, I might clean it up a little with a razor blade after it's all done.

In the meantime, I've been working on a few updates:
Adapter for more narrow weir comb:
IMG_0199.jpeg
IMG_0196.jpeg

A skimmer stand for chamber 2:
IMG_0198.jpeg
this will fit in there with the flat ledge on the top.

A live rock basket for the bottom of the refugium:
IMG_0200.jpeg

Basket printing currently:
IMG_0197.jpeg

So, at least another week and a half before actual tank setup. Back to it!
 
8/14:

It's been a bit since my last update - getting closer to getting water in the tank. Tomorrow will be day 10 after applying the ASI silicone, so it will finally be ready to test the cured seals (woohoo!).

A lot of firsts for me on this project, so be prepared for things to look messy. :)

First, we have a print of the live rock rubble basket for the bottom of the refugium. I was operating on sleep debt, so the one here has a foot sticking out from one side instead of underneath. Printed a new one yesterday but haven't updated pictures.

IMG_0213.jpeg IMG_0214.jpeg

Then I put the AIO print into the tank and did my first tape job - at which point I got to thinking I probably should have made the wall and baffles separately as it would have been a lot easier to assemble. Oh well, I muddled forward and got fairly messy with silicone. I used some CA glue drops here and there as anchors to lock the PETG to the glass while the silicone began to skin and take hold. I also braced it with some plastic posts between the front of the tank and the AIO wall to hold it in place. I was excessive and heavy handed in silicone application, which I cleaned up later with a glass scraper razor blade tool at a low angle.

IMG_0219.jpeg IMG_0220.jpeg

I failed to take pictures of how it looked at its worst while curing. On day 7 I started working on cleaning up the overzealous black silicone I had managed to make a mess with. Still tidying up, but here are the initial cleanup results:

Back view of Overflow Chamber/Weir:
IMG_0659.jpeg

Back view of Skimmer chamber: (sized for Fluval PS2 I already have - skimmer stand printed separately).
IMG_0660.jpeg

Back view of Refugium:
IMG_0661.jpeg

Back view of Return chamber:
IMG_0663.jpeg

View from the front:
IMG_0664.jpeg


Updated Weir attachment, so it isn't a bunch of gaping holes fish and livestock would clearly swim/fall through:
IMG_0667.jpeg

Filter Sock/Media Tray in Overflow Chamber:
this ended up being a couple mm short from front to back, I made a new one yesterday but haven't taken updated pics.
IMG_0668.jpeg

That is where things have been sitting for the past week and a half while silicone cures. Soon I'll be able to load it with RODI water to test the AIO panel seal. I'll start with around 10-13 gallons for the initial test and add in a few iterations to see if there are any gaps/issues and go from there. I'm both excited and anxious. Wish me luck! šŸ˜…
 
Last edited:
Happy Monday!

AIO seals held with RO water testing this weekend. Live rock rubble in the bottom of the refugium chamber, Pacific Ocean water and 40lbs of Arag-Alive Fiji Pink are in there along with Fritz Turbo 900 now.

IMG_0754.jpeg


Mounted the light but will be making a wider mount base that works more happily with the tank’s rim.
IMG_0756.jpeg

Fun times to come :)

Link to the Tunze Giveaway thread :)
 
It's been about a week, so time for an update. The tank is up and running now for almost a week. I've got my two clownfish, Betty (White) and Jesse, in there happily feeding the bacteria since about 28 hours after the Fritz 900. Going slow, keeping the lights off 99% of the time.

Today I finally completed the rimmed tank mount adapter I made for the ReefB 72W light to place on the tank. I've been wrangling with prototypes this week - learned how to make a proper threaded screw and bolt/panel so it would fit properly, that was fun. I have yet to test PAR, but I picked up a Danoplus PAR meter so I can map out the tank. Will likely add a second light in the future and space them out, each 8 inches in from their respective end/side.

Here we have the mount itself, recessed in front and back for the actual light arm mount to fit into:

IMG_0990.jpeg

IMG_0991.jpeg

I tried to make it a nice flush fit so it would blend in from afar:
IMG_0993.jpeg IMG_0994.jpeg

IMG_0995.jpeg

The light and rocks aren't in their final configuration/position. Just tinkering for now. I acquired some other rock that might look good if I can clean it up (seems to have some type of dried bonding material slathered all over it). I haven't really tried to position the light yet since completing the mounting point today.

I'll probably need to figure out a different lid/top solution. For now it's the glass Imagitarium lid with the front open and without the back panel attached so I don't impede gas exchange.

I made a minor modification to a bucket for my ATO reservoir and have the ATO set up in the return chamber now.
IMG_0978.jpeg IMG_0977.jpeg

Not much going on in the refugium chamber yet. Just letting it roll with live rock rubble, carib-sea life rock frag zone pieces, and marine pure media gems while we get things up and running.
IMG_0980.jpeg

Might use a dual-heater mount to consolidate space and add a small drop in half height partition to keep the chaeto away from the heaters when I eventually add it in. Might also go with a more narrow/tall basket for the rock and stuff.

And here is what things look like tonight while testing the lamp mount:
IMG_0998.jpeg


*general note - I didn't know about clownfish genders and the larger one eventually becoming female back when I had named them. The larger used to be Walter (White), hence the other being Jesse (a la Breaking Bad).
 
Last edited:
Here's a link to the ReefB 72W Rimmed Mount Adapter I made if anyone would like it. I was thinking of making a flat plate that would go between the threaded M10 knobs and the inner glass below the rim but went with simple first just to get the light on there.
 
It's been about a week, so time for an update. The tank is up and running now for almost a week. I've got my two clownfish, Betty (White) and Jesse, in there happily feeding the bacteria since about 28 hours after the Fritz 900. Going slow, keeping the lights off 99% of the time.

Today I finally completed the rimmed tank mount adapter I made for the ReefB 72W light to place on the tank. I've been wrangling with prototypes this week - learned how to make a proper threaded screw and bolt/panel so it would fit properly, that was fun. I have yet to test PAR, but I picked up a Danoplus PAR meter so I can map out the tank. Will likely add a second light in the future and space them out, each 8 inches in from their respective end/side.

Here we have the mount itself, recessed in front and back for the actual light arm mount to fit into:

IMG_0990.jpeg

IMG_0991.jpeg

I tried to make it a nice flush fit so it would blend in from afar:
IMG_0993.jpeg IMG_0994.jpeg

IMG_0995.jpeg

The light and rocks aren't in their final configuration/position. Just tinkering for now. I acquired some other rock that might look good if I can clean it up (seems to have some type of dried bonding material slathered all over it). I haven't really tried to position the light yet since completing the mounting point today.

I'll probably need to figure out a different lid/top solution. For now it's the glass Imagitarium lid with the front open and without the back panel attached so I don't impede gas exchange.

I made a minor modification to a bucket for my ATO reservoir and have the ATO set up in the return chamber now.
IMG_0978.jpeg IMG_0977.jpeg

Not much going on in the refugium chamber yet. Just letting it roll with live rock rubble, carib-sea life rock frag zone pieces, and marine pure media gems while we get things up and running.
IMG_0980.jpeg

Might use a dual-heater mount to consolidate space and add a small drop in half height partition to keep the chaeto away from the heaters when I eventually add it in. Might also go with a more narrow/tall basket for the rock and stuff.

And here is what things look like tonight while testing the lamp mount:
IMG_0998.jpeg


*general note - I didn't know about clownfish genders and the larger one eventually becoming female back when I had named them. The larger used to be Walter (White), hence the other being Jesse (a la Breaking Bad).
You’ve been busy, looks great, well done!
 
I feel so productive today! Here's a link to the Rimmed ATO Mount for Imagitarium 40B I made. Now the tubing is more secure than tucking it behind another cord šŸ˜…

I ran across a really nice one here to get the job done, but it is sized for a 75 gallon rimmed tank if anyone needs one. I decided to make something a bit more snug for my specific setup.

IMG_1038.jpeg IMG_1037.jpeg
 

TOP 10 Trending Threads

HOW WOULD YOU FEEL ABOUT RECEIVING A FISH OR CORAL AS A HOLIDAY GIFT?

  • I’d love one, as long as it’s a species I chose

    Votes: 13 34.2%
  • I’d trust someone who knows my tank to choose

    Votes: 0 0.0%
  • I’d rather get a gift card and pick it myself

    Votes: 14 36.8%
  • I’d prefer gear or supplies instead

    Votes: 0 0.0%
  • Please don’t surprise me with livestock

    Votes: 11 28.9%
  • Other (Post in the comments)

    Votes: 0 0.0%
Back
Top
Home
Post thread…
Market
What's new