
exciting, one step closer.LET THERE BE (half) LIGHT!!! Side note, going to need to get a shade for these lights, straight into my eyes when sitting at my work desk.

Navigation
Install the app
How to install the app on iOS
Follow along with the video below to see how to install our site as a web app on your home screen.
Note: This feature may not be available in some browsers.
More options
You are using an out of date browser. It may not display this or other websites correctly.
You should upgrade or use an alternative browser.
You should upgrade or use an alternative browser.
A Novice Marine X 110.4 Build
- Build Thread
- Thread starter RWReefer
- Start date
- Tagged users None


OP
OP
Float valve arrived today, so we are officially making RO/DI water.

Tomorrow begins the work to break up the Marco rock and start to work on the HNSA setup. Apex arrived a day or two ago, and got the cabinet ordered to set up the controller station. Second Ecotech mount in the mail and hopefully here early next week to get both lights set up so I can order a lid. Slowly coming together.
Tomorrow begins the work to break up the Marco rock and start to work on the HNSA setup. Apex arrived a day or two ago, and got the cabinet ordered to set up the controller station. Second Ecotech mount in the mail and hopefully here early next week to get both lights set up so I can order a lid. Slowly coming together.
OP
OP
Another baby step closer today. 2nd light set up and got a couple shades (thanks @chemisfun11) to save my eyes while sitting at my desk.


OP
OP
After a little time off of the tank for end of year work push and family time over the holidays, got the Marco rock broken up and restocked. Superglue is curing now, then coming back around for Marco mortar to really give it strength. Aquascape comes apart into 5 pieces for easy transport.


looking good, as for the plumbing several good vids on YT of what to do and what NOT to do, think about it down the road, getting into it, access to things, shutting things off in a hurry etc. Once plumbed and filled it gets real tough to change it up. Patience is the key.

OP
OP
Luckily for me this is the only way I’ve knownlooks really good, the days of just piling live rock in the tank are not so much anymore.
being able to create your own is the way to go.
OP
OP
Appreciate the information. Luckily the marine x tank came plumbed with a sump, so it was as easy as connecting it all together. Will be working on making a controller cabinet to sit next to the stand to keep the electronics clear from the stand.looking good, as for the plumbing several good vids on YT of what to do and what NOT to do, think about it down the road, getting into it, access to things, shutting things off in a hurry etc. Once plumbed and filled it gets real tough to change it up. Patience is the key.
Nice scape OP. I'm also building my 110.4. I just wrapped up plumbing and controller phase over the holiday; leak testing and controller "shake down". Watch out for the manifold plug on the return assuming you leave it capped. I had to ratchet it down tighter than expected to seat the o-ring, which made me uneasy. In the end, the o-ring isn't visible but the drip stopped so solved. My Marco Rock shows up next week, and I can't wait to hammer the F out of it lol. But it'll be a busy Q1 for us with the kids travel sports starting up again (read: kiss weekends good bye). Slow and easy wins this race!

OP
OP
Appreciate the heads up. Haven’t put water to the tank yet so I’ll keep and eye out for that. Look forward to following along on your build.Nice scape OP. I'm also building my 110.4. I just wrapped up plumbing and controller phase over the holiday; leak testing and controller "shake down". Watch out for the manifold plug on the return assuming you leave it capped. I had to ratchet it down tighter than expected to seat the o-ring, which made me uneasy. In the end, the o-ring isn't visible but the drip stopped so solved. My Marco Rock shows up next week, and I can't wait to hammer the F out of it lol. But it'll be a busy Q1 for us with the kids travel sports starting up again (read: kiss weekends good bye). Slow and easy wins this race!
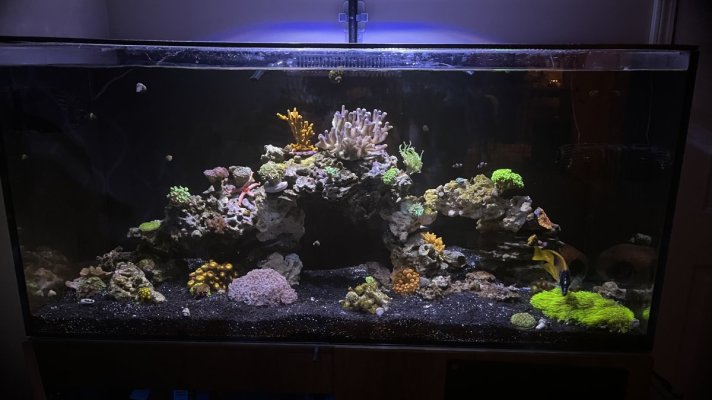
Wow I wish I had done my scape like this. I was in a bit of a rush getting the rock back in my tank after moving it and I really did not have time to fully plan a scape. This scape has me mind blown about it even fitting in the same tank I have. I’ll add a photo of my scape just for reference I feel like I don’t have any room for coral. It makes me a bit sad but I always find a spot to put that new frag.After a little time off of the tank for end of year work push and family time over the holidays, got the Marco rock broken up and restocked. Superglue is curing now, then coming back around for Marco mortar to really give it strength. Aquascape comes apart into 5 pieces for easy transport.
Attachments
OP
OP
Appreciate the thoughtful words. I think your scape looks great! Took me a couple iterations and a couple months to get here, with the advantage of being able to go slow and tinker around a lot.Wow I wish I had done my scape like this. I was in a bit of a rush getting the rock back in my tank after moving it and I really did not have time to fully plan a scape. This scape has me mind blown about it even fitting in the same tank I have. I’ll add a photo of my scape just for reference I feel like I don’t have any room for coral. It makes me a bit sad but I always find a spot to put that new frag.

The one thing I regret the most in not taking my time and planning it. You won’t regret taking it slowAppreciate the thoughtful words. I think your scape looks great! Took me a couple iterations and a couple months to get here, with the advantage of being able to go slow and tinker around a lot.
OP
OP
Aquascape is glued, mortared, dried, and now home.
I cut egg crate to match the rock shapes of the base to keep the rock off the glass, also gives the neat illusion right now that the rock is floating. The idea is that the egg crate props the rocks up about 0.5” so that when I add sand, the bed will be a little deeper without overtaking the rock work so the caves, swim lanes, etc still exist after sand is added.


I cut egg crate to match the rock shapes of the base to keep the rock off the glass, also gives the neat illusion right now that the rock is floating. The idea is that the egg crate props the rocks up about 0.5” so that when I add sand, the bed will be a little deeper without overtaking the rock work so the caves, swim lanes, etc still exist after sand is added.
Last edited:

are you not worried about stuff being trapped in that eggcrate over time and nothing being able to get in there thus a build up of gasses and bad bacteria? curiousAquascape is glued, mortared, dried, and now home.
I cut egg crate to match the rock shapes of the base to keep the rock off the glass, also gives the neat illusion right now that the rock is floating. The idea is that the egg crate props the rocks up about 0.5” so that when I add sand, the bed will be a little deeper without overtaking the rock work so the caves, swim lanes, etc still exist after sand is added.
OP
OP
I didn’t really think about it but I think it’ll be ok. Going to put a sand bed down to fill in all the gaps. Should be about an inch of sand above the egg crate. I don’t see it being much different than just having a sand bed. The total footprint of actual egg crate is significantly smaller than the footprint of the tank. It’s only at the touch points of the base, which I’d guess is no more than 1/50th the total footprint.are you not worried about stuff being trapped in that eggcrate over time and nothing being able to get in there thus a build up of gasses and bad bacteria? curious
Last edited:
OP
OP
Got the Midwest winter sand washer going. Bucket with holes drilled about 1” from the bottom for drainage. A bunch of cheesecloth folded on itself to hold the sand. Water running over egg crate scraps to distribute the flow over the entire bucket. Now I’m just in the timing phase to see how long it takes the sand to clear.


This is a great idea to clean the sand! How long did it end up taking you and was the cheese cloth sufficient in keeping the sand in the bucket?Got the Midwest winter sand washer going. Bucket with holes drilled about 1” from the bottom for drainage. A bunch of cheesecloth folded on itself to hold the sand. Water running over egg crate scraps to distribute the flow over the entire bucket. Now I’m just in the timing phase to see how long it takes the sand to clear.
Similar threads

- Replies
- 26
- Views
- 1,420
- Replies
- 18
- Views
- 258
- Replies
- 6
- Views
- 258
- Replies
- 1
- Views
- 77


