Let it Snow, Let it Flow, Let it Grow

TJ's Reef

Valuable Member
View Badges
Joined
Oct 26, 2013
Messages
2,454
Reaction score
289
Location
Everett, WA
Rating - 0%
0   0   0
Dave, we are a modern Forum here and DO NOT NEED Photo Bucket to post/host images any longer....... in the icons above second from right is an image link that will accept directly from your PC files and post an image not just a link as that old RF site still does.


Cheers, Todd


P.S. NICE Work buddy, maybe I'll get to mine in the next couple of weeks.
 
Last edited:

TJ's Reef

Valuable Member
View Badges
Joined
Oct 26, 2013
Messages
2,454
Reaction score
289
Location
Everett, WA
Rating - 0%
0   0   0

QUESTION ??? Are you using a 'Spiral Down' or just standard Flush Bit with bearing ???


Cheers, Todd
 
OP
OP
Pepcrylic

Pepcrylic

Active Member
View Badges
Joined
Apr 2, 2014
Messages
361
Reaction score
167
Location
Utopia
Rating - 0%
0   0   0
Standard straight bit 3/4'' shank X 1''. I havent used the spiral yet, I am told it is a better bit to use. My straight bit is still sharp and works for me and my seams
 
OP
OP
Pepcrylic

Pepcrylic

Active Member
View Badges
Joined
Apr 2, 2014
Messages
361
Reaction score
167
Location
Utopia
Rating - 0%
0   0   0
Dave, we are a modern Forum here and DO NOT NEED Photo Bucket to post/host images any longer....... in the icons above second from right is an image link that will accept directly from your PC files and post an image not just a link as that old RF site still does.


Cheers, Todd


P.S. NICE Work buddy, maybe I'll get to mine in the next couple of weeks.

Are you not seeing my photos?
 
OP
OP
Pepcrylic

Pepcrylic

Active Member
View Badges
Joined
Apr 2, 2014
Messages
361
Reaction score
167
Location
Utopia
Rating - 0%
0   0   0
Are you going to put it back into your original stand??

Yes it will fit into the existing stand. A couple of small mods. No big deal.
I will be tearing out the stand to reframe the wall behind it (divides the laundry room) Need to run some plumbing thru the lower half of the wall. I will also gain 3 1/2'' in depth to the bottom of the stand.
I will mount 90% of the electrical in the laundry closet away from the humid saltwater under the tank.
 
OP
OP
Pepcrylic

Pepcrylic

Active Member
View Badges
Joined
Apr 2, 2014
Messages
361
Reaction score
167
Location
Utopia
Rating - 0%
0   0   0
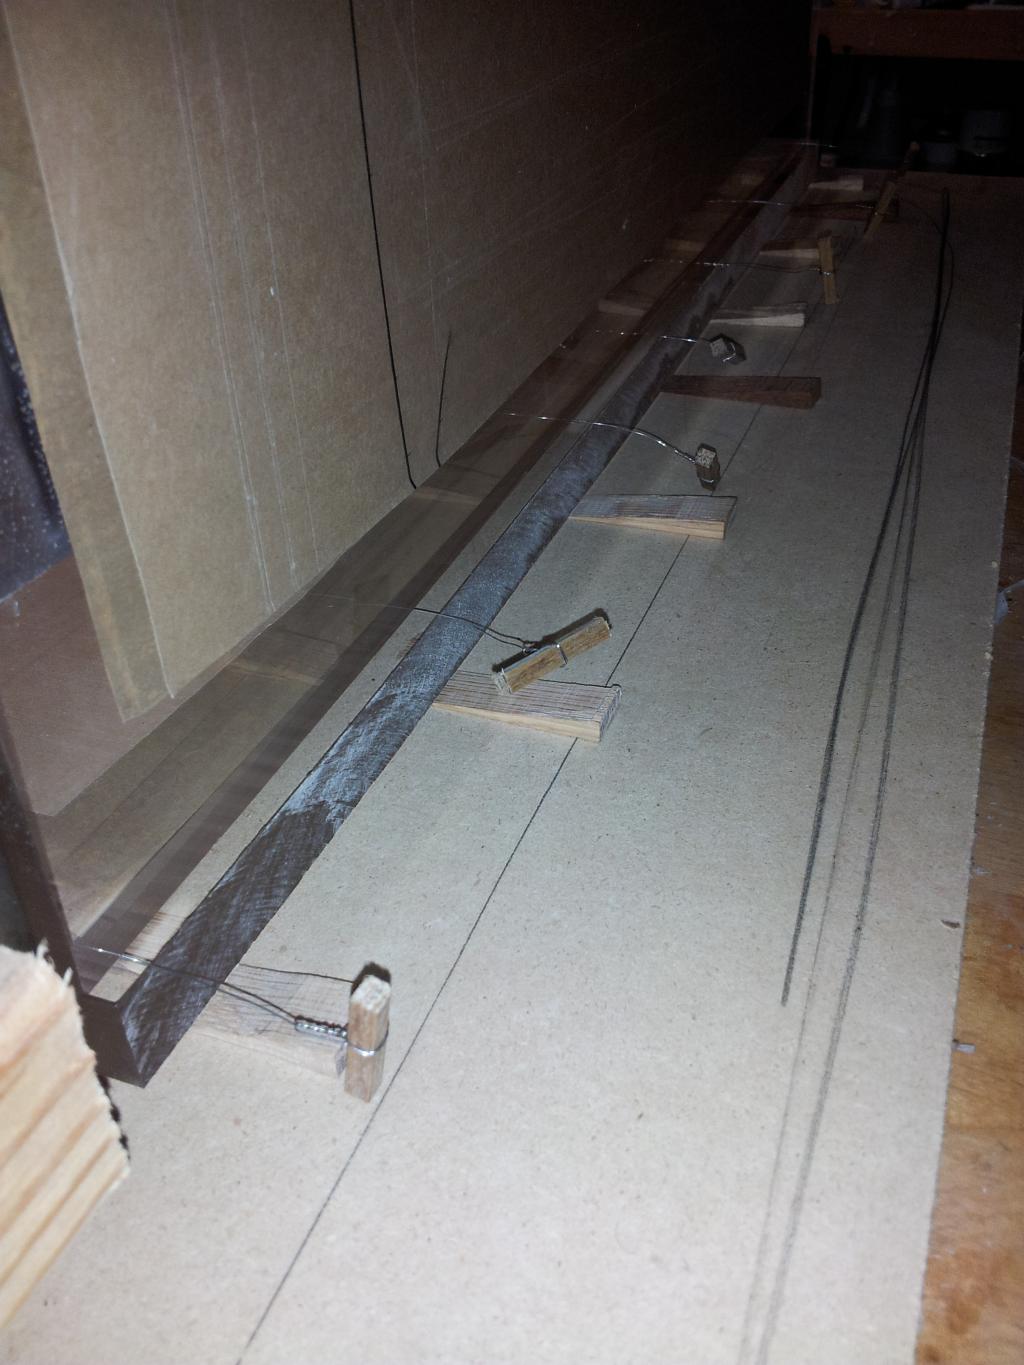
Now that all the edges have been prepped I am ready to weld the seams.
Here you can see that I have the pins set in place, the wedges under the panel will assist in closing up the joint when the pins are pulled. I let the solvent sit for about 60 seconds before I pull the pins


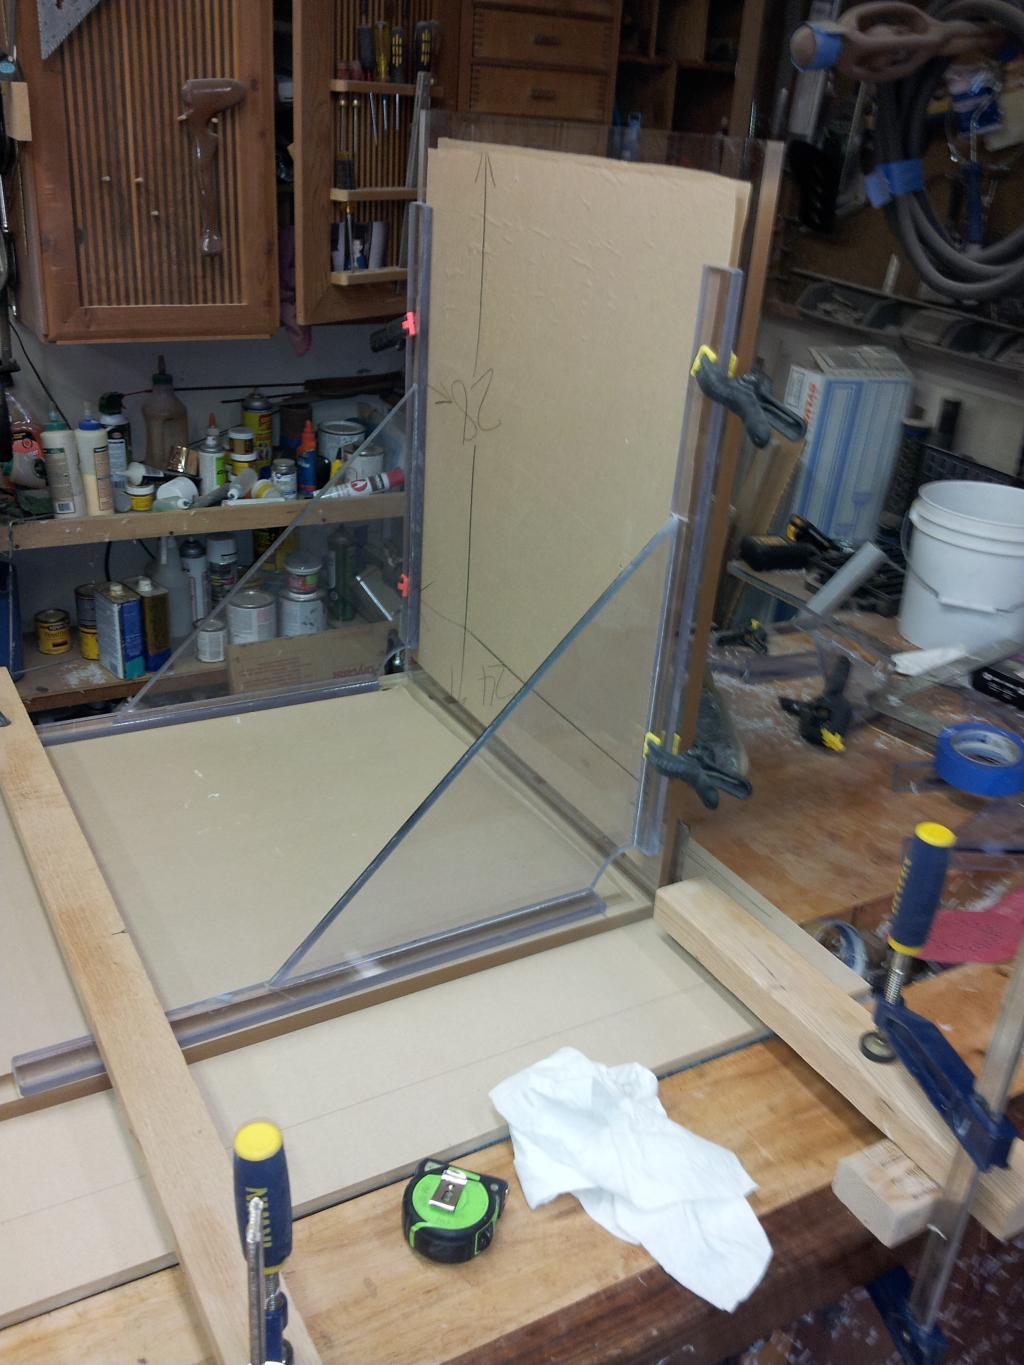
I clamp a small square to the bench on each end of the joint to assure the panel does not move from left to right while the pins are being pulled


I made some jigs a while back to keep panels square while welding


TJ's Reef

Valuable Member
View Badges
Joined
Oct 26, 2013
Messages
2,454
Reaction score
289
Location
Everett, WA
Rating - 0%
0   0   0
I sincerely want to thank you for posting this up Dave, very very nice of you to share your Mad Skills with the masses here on R2R. Cannot wait to see this 'Bad Boy' in person.

Cheers, Todd
 
OP
OP
Pepcrylic

Pepcrylic

Active Member
View Badges
Joined
Apr 2, 2014
Messages
361
Reaction score
167
Location
Utopia
Rating - 0%
0   0   0
It is my pleasure Todd,
Hope it will inspire others to go that one step further.
I have some ideas for this build that I have not seen anywhere else. I hope I can pull them off
 

SantaMonicaHelp

Valuable Member
View Badges
Joined
Oct 1, 2012
Messages
2,364
Reaction score
681
Location
Santa Monica, California, USA
Rating - 0%
0   0   0
Yes it will fit into the existing stand. A couple of small mods. No big deal.
I will be tearing out the stand to reframe the wall behind it (divides the laundry room) Need to run some plumbing thru the lower half of the wall. I will also gain 3 1/2'' in depth to the bottom of the stand.
I will mount 90% of the electrical in the laundry closet away from the humid saltwater under the tank.


It sounds like there're a lot of things on the list! I can't believe you are doing all these on your own! I'm impress and glad you are doing this! When do you think you can start the tank? Best wishes and luck to you my friend :)
 

rayn

Bluefin Believer
View Badges
Joined
Mar 25, 2014
Messages
3,351
Reaction score
2,806
Location
Illinois
Rating - 0%
0   0   0
Impressive to say the very least! I have always wondered/wanted to do something like this. I am following and learning as you teach.

First question. Can you explain the mdf tape thing again? What is the purpose of the mdf?
 

TJ's Reef

Valuable Member
View Badges
Joined
Oct 26, 2013
Messages
2,454
Reaction score
289
Location
Everett, WA
Rating - 0%
0   0   0
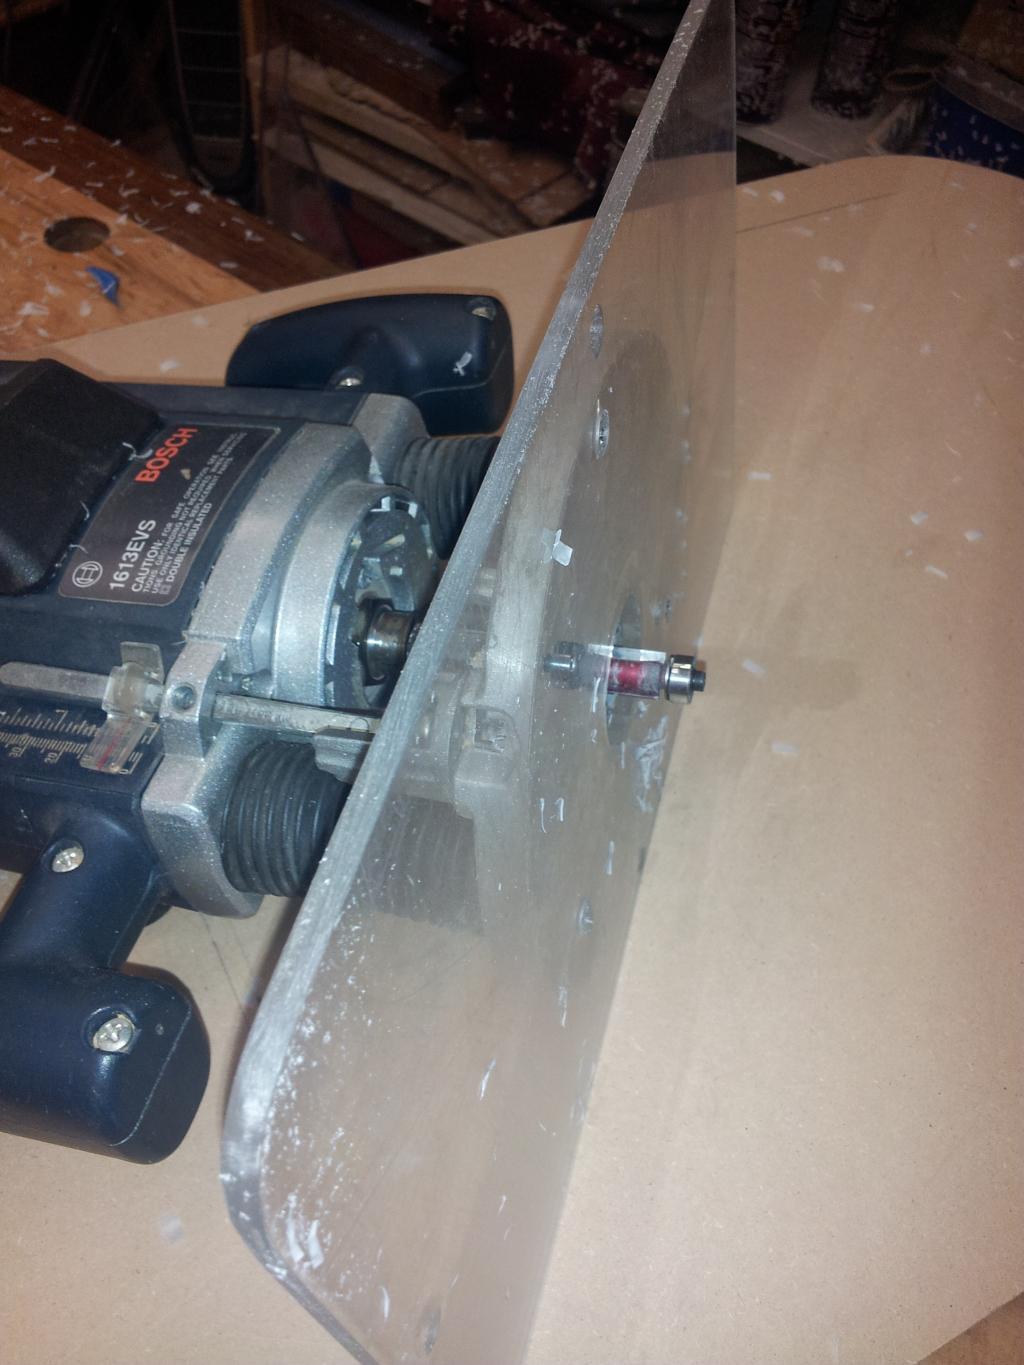
rayn, the MDF is a pattern jig only for the router and provides a very smooth guide for the roller bearing on Flush Router Bit. The layers of tape provide a two-step procedure in smoothing out the saw kerf marks, 1st to smooth it out and 2nd to smoooooooth it out enough to get a great edge for solvent welding.


Cheers, Todd
 

rayn

Bluefin Believer
View Badges
Joined
Mar 25, 2014
Messages
3,351
Reaction score
2,806
Location
Illinois
Rating - 0%
0   0   0
Okay, if I understand this correctly. The circular saw or table saw leave teeth marks in the acrylic. The mdf is cut, but doesn't show or have the marks like the acrylic. Tape the mdf to completely smooth it out, then have the roller of the router bit ride along the mdf tape, removing the tape after each pass to get a smoother cut each time...eliminating the teeth marks on the acrylic.

So sweet. My wife is going to hate you guys when I build another tank :xd:
 

TJ's Reef

Valuable Member
View Badges
Joined
Oct 26, 2013
Messages
2,454
Reaction score
289
Location
Everett, WA
Rating - 0%
0   0   0

Well rayn as long as your Dog House/Garage is full of fine tools and/or machinery all is good .....right ??? A mini fridge and stereo doesn't hurt either.


Cheers, Todd
 

143MPCo

ASSIST PROTECT DEFEND
View Badges
Joined
May 14, 2012
Messages
6,696
Reaction score
8,295
Rating - 0%
0   0   0
Tagging along... Very nice!
 

dbl

It Takes Less Energy to be Nice
View Badges
Joined
Mar 13, 2014
Messages
15,945
Reaction score
90,199
Location
SW Florida
Rating - 0%
0   0   0
If you wouldn't mind, could you go in to a little detail on the pin method. I'm wanting to build a sump and I've not seen the pin method. Is it merely to allow the solvent to better flow between the two panels being welded? Just want to understand a little more of your process.
 

TJ's Reef

Valuable Member
View Badges
Joined
Oct 26, 2013
Messages
2,454
Reaction score
289
Location
Everett, WA
Rating - 0%
0   0   0
Since Dave is logged off and presumably working or maybe playing in his DELUXE Shop I'll answer above question...lol

Yes, the pinning allows the solvent to soften both surfaces for a minute or so before being clamped down for completion of welding. The pins/thin guage wire is easier, more precise and allows for better solvent coverage than shims will. Another thing I've noticed as a positive is that with the small gap in between the solvent seems to want to be drawn into the gap rather than run across the sheet or down the front edge.


Cheers, Todd
 

143MPCo

ASSIST PROTECT DEFEND
View Badges
Joined
May 14, 2012
Messages
6,696
Reaction score
8,295
Rating - 0%
0   0   0
Since Dave is logged off and presumably working or maybe playing in his DELUXE Shop I'll answer above question...lol

Yes, the pinning allows the solvent to soften both surfaces for a minute or so before being clamped down for completion of welding. The pins/thin guage wire is easier, more precise and allows for better solvent coverage than shims will. Another thing I've noticed as a positive is that with the small gap in between the solvent seems to want to be drawn into the gap rather than run across the sheet or down the front edge.


Cheers, Todd

Todd, will this also reduce the micro bubbles that sometime I see on welded ends?
Thx
 

dbl

It Takes Less Energy to be Nice
View Badges
Joined
Mar 13, 2014
Messages
15,945
Reaction score
90,199
Location
SW Florida
Rating - 0%
0   0   0
Thanks Todd (and Dave). I will keep following along. Having no experience with acrylic, this is very helpful.
 

Just grow it: Have you ever added CO2 to your reef tank?

  • I currently use a CO2 with my reef tank.

    Votes: 8 6.3%
  • I don’t currently use CO2 with my reef tank, but I have in the past.

    Votes: 5 3.9%
  • I have never used CO2 with my reef tank, but I plan to in the future.

    Votes: 6 4.7%
  • I have never used CO2 with my reef tank and have no plans to in the future.

    Votes: 103 80.5%
  • Other.

    Votes: 6 4.7%
Back
Top