Let it Snow, Let it Flow, Let it Grow

OP
OP
Pepcrylic

Pepcrylic

Active Member
View Badges
Joined
Apr 2, 2014
Messages
361
Reaction score
167
Location
Utopia
Rating - 0%
0   0   0
Made it back from my "To Short Vacation" LOL
Lets get back to the build.

So with a closed loop flow in this tank, I need to know how and where the flow needs to be. That will all depend on the rock work.
So needless to say I have started the rock work before I have drilled the bottom of the tank. I ordered 70 lbs of tonga for the main structure. I need to exstend some of the simple long rocks to the heavy base of the structure. I use a 4'' grinder and a dremel to help aid in the connections of the rock. When I get to the point where the rock is assembled in the tank (just before the water) I will use a 2 part epoxy to help hold the rock in place , along with the white zip ties.
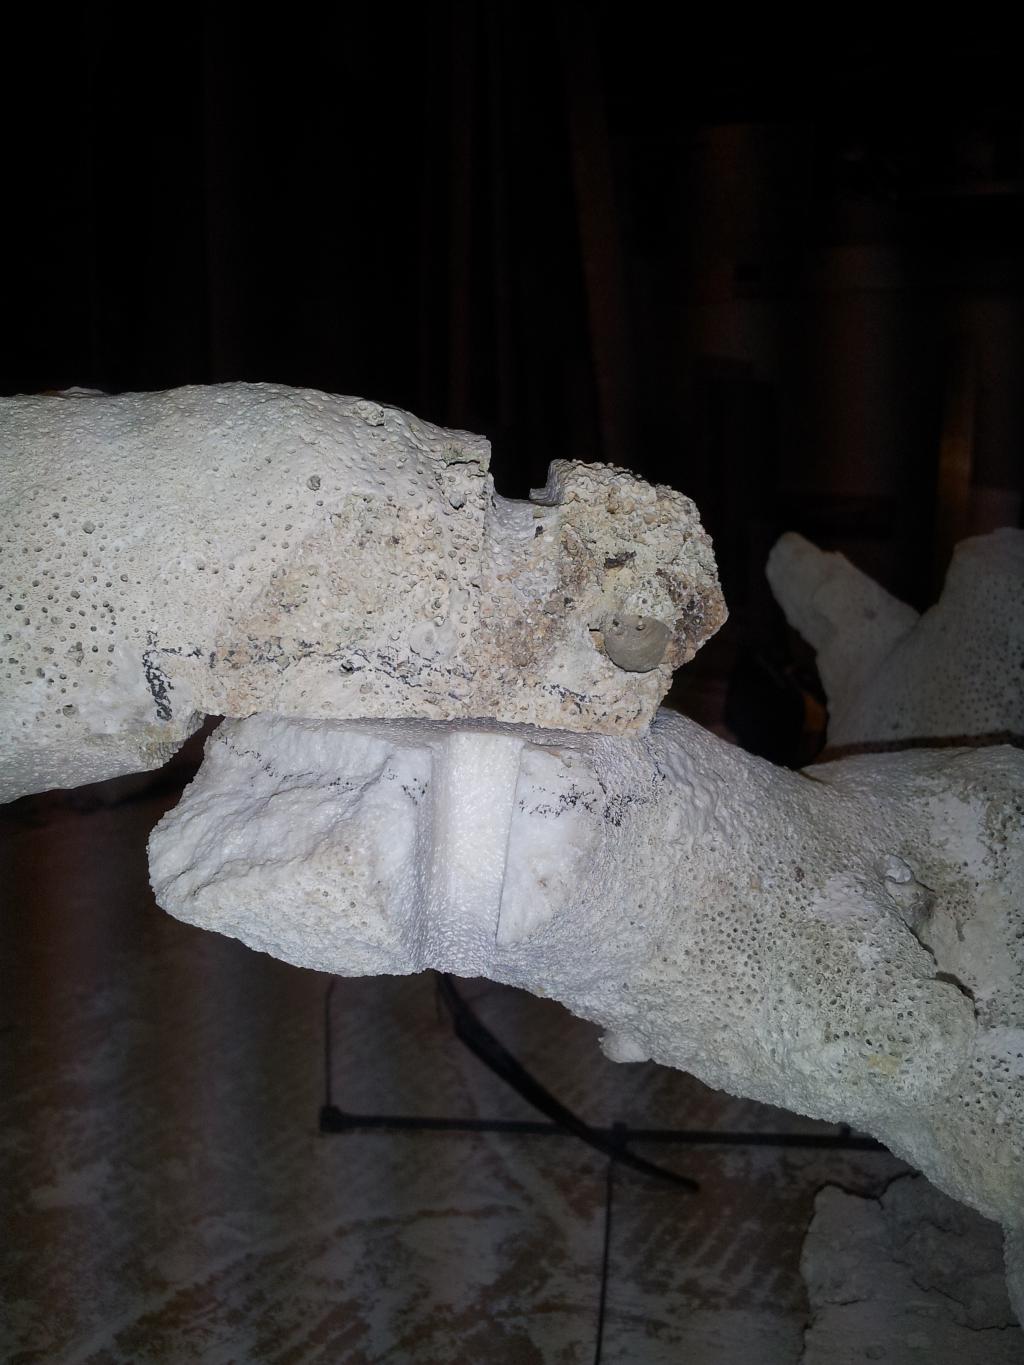
This is how I will prep all the tonga joints.

Mark the rock to a flat

Cut it with the grinder

Make a slot for the zip tie( dremel work)
 
OP
OP
Pepcrylic

Pepcrylic

Active Member
View Badges
Joined
Apr 2, 2014
Messages
361
Reaction score
167
Location
Utopia
Rating - 0%
0   0   0
The closed loop needs a drain. The drain needs to bee hidden from view. I also need to hide an outlet from the CL along with a return line. All of this plumbing will be in the back left corner of the tank. So with 3 plumbing lines coming out of the bottom of the tank in the corner i thought I would use a 10'' diam. acrylic tube , covered in rock to hide all 3 pipes in one shot. Alls I have to do is cover the 10'' acrylic tube with rock.
I had a 15-20 lbs pukani rock screaming "cut me up" So I did

Using a 4'' grinder I was able to get the inside curve of the rock to match the outside diam. of the 10'' diam acrylic tube.

It cut very easily. I was able to fit the pieces together fairly well


TJ's Reef

Valuable Member
View Badges
Joined
Oct 26, 2013
Messages
2,454
Reaction score
289
Location
Everett, WA
Rating - 0%
0   0   0
OK....... just leave us hanging Dave... so we can play that game in comfort my friend :couch2: or just grab a cup of Joe :ranger: don't matter none


Cheers, Todd
 
OP
OP
Pepcrylic

Pepcrylic

Active Member
View Badges
Joined
Apr 2, 2014
Messages
361
Reaction score
167
Location
Utopia
Rating - 0%
0   0   0
Well .... that didnt work. LOL
Suppose to be an underwater video from Cozumel
 

TJ's Reef

Valuable Member
View Badges
Joined
Oct 26, 2013
Messages
2,454
Reaction score
289
Location
Everett, WA
Rating - 0%
0   0   0
No worries Dave, keeping up with it on our FB page..... sure looks like you had a GREAT time.

Cheers, Todd
 

TJ's Reef

Valuable Member
View Badges
Joined
Oct 26, 2013
Messages
2,454
Reaction score
289
Location
Everett, WA
Rating - 0%
0   0   0
Funny... I was just thinking of blowing the dust off this thread by BUMPING it back to the front page... lol

I finally picked up all the acrylic for my new tank build and now need to clear some shop space and 'Honey Do's' off the list to get started. I'll give you a call in the next few days to see about borrowing your corner jigs and pull pins, maybe even you if time allows bud.

Cheers, Todd
 
OP
OP
Pepcrylic

Pepcrylic

Active Member
View Badges
Joined
Apr 2, 2014
Messages
361
Reaction score
167
Location
Utopia
Rating - 0%
0   0   0
So since I have a certain rockscape in mind for this tank I need to moch it up to be sure my flow will perform correctly.
Once I got the basic structure nailed down I can start to place the Closed Loop ( CL ) outlets. Easier said than done. My space in the stand is very limited. I have 40'' X 30'' X 42'' tall. The Oceans Motions motor/cylinder needs to fit along with all the unions and valves.
I layed everything out on a sheet of MDF, drilled the CL outlets, and the CL drain, along with the Return drains and return line.
Taking the time to do all of this might save my *** later down the line.
Here are a few pics of the CL plumbing and the layout of the Oceans Motions. The color chalk arrows indicate the 1-3, 2-4 ports of the OM and the flow direction of the port. There are 3 different levels in the tank. "Low" , "Mid" , and "High". Each CL outlet will be split into 2 levels, insuring all levels of the tank will get some flow.


OP
OP
Pepcrylic

Pepcrylic

Active Member
View Badges
Joined
Apr 2, 2014
Messages
361
Reaction score
167
Location
Utopia
Rating - 0%
0   0   0
Funny... I was just thinking of blowing the dust off this thread by BUMPING it back to the front page... lol

I finally picked up all the acrylic for my new tank build and now need to clear some shop space and 'Honey Do's' off the list to get started. I'll give you a call in the next few days to see about borrowing your corner jigs and pull pins, maybe even you if time allows bud.

Cheers, Todd

Sounds good bud,
The jigs are just collecting dust here. And I made plenty of pull pins. I am sure we can work out a time to weld up your seams.
 
OP
OP
Pepcrylic

Pepcrylic

Active Member
View Badges
Joined
Apr 2, 2014
Messages
361
Reaction score
167
Location
Utopia
Rating - 0%
0   0   0
Just a note
There will be much more rock added to the structure on the final assembly.
Didnt want to give up the "Whole" look I am shooting for so early in the build!! LOL
 

TJ's Reef

Valuable Member
View Badges
Joined
Oct 26, 2013
Messages
2,454
Reaction score
289
Location
Everett, WA
Rating - 0%
0   0   0
Well Dave....... almost looks like you are taking the simple path this time my friend. Just complicated enough to keep your interest level up but not SO COMPLICATED as to make every one else's head hurt trying to figure it out :squigglemouth::tongue::cry:
I'll be talking to you in the next few days then


Cheers, Todd
 
OP
OP
Pepcrylic

Pepcrylic

Active Member
View Badges
Joined
Apr 2, 2014
Messages
361
Reaction score
167
Location
Utopia
Rating - 0%
0   0   0
Time to build the overflow box. It will be 2 pieces of black and 2 pieces of clear. You will see the black ones ,and not the clear ones.
I cut the two pieces to the height as the sides of the tank. Tape the 2 pieces together, then sandwich them between a couple of pieces of MDF. I mounted a dado blade in the saw and set the blade to 1/4'' wide by 1 1/4'' high. I placed a jig on the crosscut sled. It has a 1/4'' tab mounted 1/4'' away from the blade. I make a pass with the material, place that cut on the tab and make another cut, so on and so on.


OP
OP
Pepcrylic

Pepcrylic

Active Member
View Badges
Joined
Apr 2, 2014
Messages
361
Reaction score
167
Location
Utopia
Rating - 0%
0   0   0
Lots of progress today. I will start off with the finished OF box


The majority of the box will be covered in rock. The clear panels face the rear of the tank and will not be seen
 
OP
OP
Pepcrylic

Pepcrylic

Active Member
View Badges
Joined
Apr 2, 2014
Messages
361
Reaction score
167
Location
Utopia
Rating - 0%
0   0   0
The man in BROWN drove up the driveway today


This order should take care of the Oceans Motions
 

TJ's Reef

Valuable Member
View Badges
Joined
Oct 26, 2013
Messages
2,454
Reaction score
289
Location
Everett, WA
Rating - 0%
0   0   0
VERY NICE Dave, having fun following this one along on two fronts.... gotta be nicer on here though.... so keep up the great work my friend.


Cheers, Todd
 
OP
OP
Pepcrylic

Pepcrylic

Active Member
View Badges
Joined
Apr 2, 2014
Messages
361
Reaction score
167
Location
Utopia
Rating - 0%
0   0   0
Started putting some of the CL pieces together.
Drilled my CL outlets in a sheet of MDF. I want to be sure all of this will fit under the stand before I drill the bottom of the tank.
So far so good


Now that I know I can get it all in there, I will drill and weld the bottom later this week
 
OP
OP
Pepcrylic

Pepcrylic

Active Member
View Badges
Joined
Apr 2, 2014
Messages
361
Reaction score
167
Location
Utopia
Rating - 0%
0   0   0
I drilled the bottom of the tank today


Now I can weld the bottom to the sides


This is what I look for on a freshly welded seam. Good squeeze out!!
 
OP
OP
Pepcrylic

Pepcrylic

Active Member
View Badges
Joined
Apr 2, 2014
Messages
361
Reaction score
167
Location
Utopia
Rating - 0%
0   0   0
Now that the bottom is now part of the tank, I can get started on getting the overflow box welded in place.
I drilled a couple of holes in the OF box to run 2 closed loop outlets. I made the mistake of using uniseals. I should have just used some cheap black bulkheads. Space is limited inside the OF box, and I want a low profile on the outside of the box as well.
I bought some 1'' to 3/4'' threaded fittings for this uniseal/bulkhead. Some of you might know just how hard it is to get the pipe thru a uniseal. What a PITA. This is what I did.
The fitting/insert


Sanded off the shoulder


Jigged up a clamp to push it in the uniseal ( lubed it with olive oil)


There ya have it. Home made slip to thread 1'' to 3/4'' low profile bulkhead


Back side snub


Just grow it: Have you ever added CO2 to your reef tank?

  • I currently use a CO2 with my reef tank.

    Votes: 8 7.0%
  • I don’t currently use CO2 with my reef tank, but I have in the past.

    Votes: 4 3.5%
  • I have never used CO2 with my reef tank, but I plan to in the future.

    Votes: 5 4.4%
  • I have never used CO2 with my reef tank and have no plans to in the future.

    Votes: 92 80.7%
  • Other.

    Votes: 5 4.4%
Back
Top