1st Tank.. 220 Gallon Reef Tank

JMFreefer

New Member
View Badges
Joined
Dec 4, 2023
Messages
18
Reaction score
55
Location
Cresco
Rating - 0%
0   0   0
Decided to dive in head first in the hobby, screw it right? Go big or go home as they say

Always loved saltwater fish, kept basic freshwater in the past(red bellied piranha). Wanted salt, looked into it a few times but never pulled the trigger

One night 2 or more years ago I went on a deep dive learning about coral and just the fascinating creatures that they are and it exploded my curiosity and amazement for the hobby.. I decided I wanted to keep these aliens. A living piece of art from another world

I mean how hard could it be right? ….

Went on Craig’s list and found a guy selling a Coast to Coast custom made 72x30x25 aquarium a Reef octopus 5000 Ext skimmer and some other equipment at a very fair price and locally, so I decided to pull the trigger… went that weekend and brought it home
IMG_1797.png
IMG_1798.png

(That’s the tank in his home before I took it out of the wall)

All done right? Ready for fish and coral. Super easy hobby ….. ughhhhh

Over two years later… reading article after article and watching video after video and having to learn basic woodworking, plumbing, electrical, chemistry and more. Spending an..? unusual() amount of money (F’n plumbing parts right?) I finally put water in this thing on 8/30.

After stalking these forums over the last few years, I decided to join and share all that I went through to this point as I’ve taken pictures along the way get any advice from seasoned reefers on my set up and suggestions on changes or whatever

Questions … what is the best way to present this? Should I dump the whole thing at once? From the start till today or add a little at a time here and there?
Is it best to add to the original post every time (is that possible?) or make new comments each time? Or both?

Looking forward to learning from everyone and getting opinions on my set up
 
OP
OP
JMFreefer

JMFreefer

New Member
View Badges
Joined
Dec 4, 2023
Messages
18
Reaction score
55
Location
Cresco
Rating - 0%
0   0   0
Tank is 72x30x25 Coast to Coast 1/2” glass aquarium, euro braced… it has 2 separate external weir boxes each drilled with 2 holes for drains
It’s also drilled for a closed loop… it has 6 3/4” holes drilled for sump/closed loop returns… the thing is well made

As stated when I bought it, it came with a Reef octopus 5000 Ext skimmer which I am using and 2 Reeflo Dart returns which I’m using.. a 6 stage BRS RODI set up, glass and net covers he even threw in salt… also came with A lot of other things (older AI led lights and such) which I’ve decided to replace with newer equipment along the way
 
Last edited:
OP
OP
JMFreefer

JMFreefer

New Member
View Badges
Joined
Dec 4, 2023
Messages
18
Reaction score
55
Location
Cresco
Rating - 0%
0   0   0
IMG_2079.jpeg


Decided to dedicate a chunk of my finished basement to the tank and wanted a saltwater mixing station behind it with easy access.. my original idea was to put the sump under the stand (which I decided to build the stand myself) the blue tape is the footprint that the tank will take up

The front rectangle is the tank the back is if I decided to put the sump behind the tank (I didn’t)
With this spot I have a good amount of space access to electricity, drainage for the rodi... have a utility sink right around the corner

To the left of the picture is the living room set up in my basement. I have a big bar and pool table and gym set up also right near the tank
Perfect place for the tank being viewable and a centerpiece of the downstairs
 
OP
OP
JMFreefer

JMFreefer

New Member
View Badges
Joined
Dec 4, 2023
Messages
18
Reaction score
55
Location
Cresco
Rating - 0%
0   0   0
Decided to build a stand to save some money … have some experience with basic woodworking but nothing extensive

I wanted to keep the back without a center brace for easier access thinking the sump will go under the stand .. I did end up center bracing the front of the stand eventually but honestly it didn’t need it .. I used 2x8 to support the 6ft span , no issues at all
IMG_2083.jpeg

IMG_2084.jpeg
IMG_2086.jpeg
IMG_2087.jpeg
IMG_2090.jpeg


Decided to go dry rock(we will see if I regret it later) and bought 200lbs Carib sea life rock
IMG_2119.jpeg


Playing with aquascapes…

IMG_2098.jpeg


Drove up to upstate NY and bought 2 100 gallon storage containers for my eventual water change station … next to the containers is a closet with my water pressure tank in it and where I mounted my RODI unit, also bought a water saver kit. Ran the drain through the wall to the right and down my drain for my washing machine

IMG_2578.jpeg


IMG_2345.jpeg

Put the tank on the stand and the rock in to check fit and make sure all is level then continued to work on the stand .. I did top the stand with a 1/2” sheet of plywood
IMG_2490.jpeg
IMG_2493.jpeg


I wanted the stand alittle higher then standard I believe it ended up at about 42” off the ground… I wanted to not have to bend when standing to look at the tank
 
OP
OP
JMFreefer

JMFreefer

New Member
View Badges
Joined
Dec 4, 2023
Messages
18
Reaction score
55
Location
Cresco
Rating - 0%
0   0   0
At this point I ran into some issues.. the electrical circuit that I had planned to use. Out of nowhere it stopped working.. I had nothing plugged in at all, went to plug in my charger no power.
This took forever to find the issue, turned out to be a loose connection in a random junction box in the ceiling… had been fine for 10 years then out of nowhere it breaks! Crazy timing… I had to pull part of the ceiling down every plug pulled out … very frustrating
I decided I needed a dedicated circuit just for the tank so I ran a new circuit on a 30amp breaker dedicated to the tank only which in the end is a blessing but this really put the brakes on the project at that time

Ended up after fixing my ceiling, painting the walls and ceiling and was finally ready to continue with the tank

This was around Black Friday and I decided screw it let’s get everything I need now and save 10-15% on everything
IMG_2452.jpeg
Went with a Bashsea SS60 sump and a matching 10G ATO tank. I wanted enough space in the sump that if the power went out it could handle that and having an external skimmer it gives me plenty of space for whatever add ons I’d like to do in the future… one section is for a refugium and that leaves me another whole chamber for whatever I need

IMG_2489.jpeg
IMG_2492.jpeg
IMG_2488.jpeg
IMG_2499.jpeg
IMG_2501.jpeg

IMG_2506.jpeg
IMG_2514.jpeg

Continued work on the stand wrapped it in oak and decided I didn’t want the sump under the stand… I wanted easy access without having to crawl under it every time I needed to do anything
I built platforms for both the sump and the water changing station to lift them and keep them off the ground

Bought white flex seal paint and painted the flat surfaces under the stand and on the platforms to help with any water spills
IMG_2545.jpeg

Project is moving along … this is where I went a tad crazy and just bought an outrageous amount of stuff … In my mind I said do it right from the start. Make it easy to do maintenance and take care of it and in the long run it will be better. And again Black Friday so I save alittle I guess

Plus I figured it’s easier to add everything in from the start as opposed to Frankensteining everything in as I go
I bought an Apex and integration was important I wanted everything on one app if possible… at that time Sicce and Kessil were the way to go … went overboard but I wanted to do it right from the beginning
IMG_2539.jpeg
IMG_2563.jpeg
IMG_2535.jpeg
IMG_2536.jpeg
IMG_2530.jpeg

Put some LEDs under the stand ….

Abnormal amount of valves went Spears on the gate valves and went with a company on Amazon from Canada for the ball valves … didn’t want to cheap out on the valves as I know in the long run the schedule 80 are exponentially better

Got bulkheads from Amazon and hated them ended up going with the schedule 80s from BRS much better for such an important part especially with the holes drilled at the bottom of the tank for the closed loop
 
OP
OP
JMFreefer

JMFreefer

New Member
View Badges
Joined
Dec 4, 2023
Messages
18
Reaction score
55
Location
Cresco
Rating - 0%
0   0   0
Welcome!
Looking forward to seeing this progress!
What sort of fish/coral are you planning on stocking?
I like your normal fish Tangs, clowns, gobys love Bangaii cardinals.... copperband is my favorite
Had to give some fish up for the corals
Porcupine puffer, some triggers

Coral wide SPS is my favorite but I like a lot of others also hammers, torches for movement… Zoas

It will most likely be a mixed reef In the end
 

Reefer_kano

Valuable Member
View Badges
Joined
Jun 27, 2022
Messages
1,134
Reaction score
1,983
Location
Lehigh Valley
Rating - 0%
0   0   0
This is going to be an amazing tank.
You said you drove up to NY. R u in the tri-state area? PA-NJ-NY?
 
OP
OP
JMFreefer

JMFreefer

New Member
View Badges
Joined
Dec 4, 2023
Messages
18
Reaction score
55
Location
Cresco
Rating - 0%
0   0   0
So a List of what I bought for the tank…

Apex controller w/extra power bar
2 Dos for auto water changes and dosing in the future

3 Neptune skys and 2 Kessil A360x Tuna blues .. I really couldn’t decide between the 2. I like the blanket diffused light of the sky’s and the shimmer of the Kessils so I went with both idk. Needless to say I should have enough light for the SPS I eventually want

Redundancy was super important and I wanted everything compatible with the Apex

So for the returns I went with
2 Sicce syncra SDC 9.0 (each can keep the tank going if theres an issue but run together neither needs to work too hard)

Bought a SDC 3.0 to pump to the Skimmer and 2 Xstream power heads for whatever I need a power head for in the tank in the mixing container etc.
And got a UltraZero (that thing is awesome to have around just in case)

A Pentair 40w UV sterilizer, A Tunze Osmolator 3155 for auto top off , 2 finnex 800w heaters and an INKBIRD.. again redundancy was super important so either can keep the water warm enough for some time in case of emergency

Got an abnormal amount of plumbing valves and various connections
Along with a bunch of quality of life additions… Python, Milwaukee Refractometer, Hanna and Salifert test kits and more

Needless to say the LFS and online places loved me that Christmas …

Now it was time to start plumbing this thing …. I had no clue and never plumbed before so I crash coursed on the internet and learned what I could and just dove right in (For anyone wondering if they can do it, Do your homework and just go for it, it’s not that bad)


IMG_4552.jpeg

( Best purchase ever! … this thing Idk what I would’ve done without it )

Started with my water changing station

Wanted enough water to make a real dent with an emergency water change if needed so I got the 2 100 gallon containers .. doing research and looking at a lot of setups on the web I decided I wanted the ability to take 5 gallon buckets if I needed so I added plumbing for Spickets both on the RODI and Salt containers put a check valve just so the salt couldn’t back up into the RO water (may have been overkill but whatever)

Using one of the Reeflo pumps that I got thrown in with the tank.. I set it up that I could pull from the RO side to fill the salt side… mix the salt side when making new water or hook up a quick connect hose and pump the water right into the tank with just a few valve changes … hooked the pump up to a on/off switch for ease.

Put float valves in both tanks and a 3 way ball valve with a pressure switch ran through the wall and hooked into the RO unit

Overall after using this multiple times, I love this setup for a water change station. It was alittle pricey in the end with the containers and all the valves but It does everything you would want or need from a water station. Totally worth it
My Reeflo pump is also my backup for my closed loop on the tank for when it needs any service I can just disconnect the water change pump and it plumbs right in
to the closed loop
IMG_2572.jpeg

IMG_2574.jpeg

IMG_2579.jpeg

IMG_2650.jpeg

IMG_2874.jpeg

(Used clear plumbing primer and glue I think this is important if you want it looking clean)

Eventually I will run my auto water change tubing and possibly an ATO for the tank top off container so it never would run dry .. not sure yet

It was a nice first project to get some plumbing experience for the tank plumbing I had ahead of me
 
OP
OP
JMFreefer

JMFreefer

New Member
View Badges
Joined
Dec 4, 2023
Messages
18
Reaction score
55
Location
Cresco
Rating - 0%
0   0   0
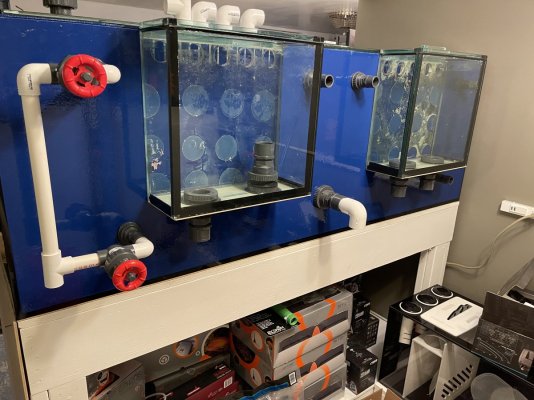
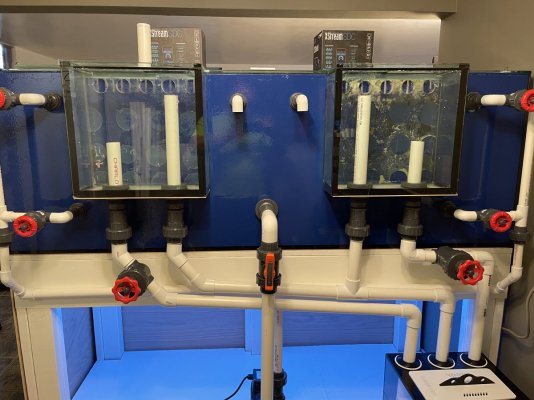
It’s time to dry fit some plumbing for the tank … I have 6 3/4” holes drilled for returns/closed loop an 1 1/4” drilled for the return loop intake …. Decided to make 4 of the 3/4 holes for the closed loop and the 2 middle 3/4s for the returns

My thought was the closed loop would take from the middle bottom of the tank and distribute it back to both the top and bottom of the tank on both ends to try and keep thing suspended until it can get down the weir
IMG_2581.jpeg


Wanted independent control over the amount of flow that each outlet would have so I put gate valves on each … in the tank I plan to split the loc line for each outlet and this way I can direct flow where needed and control the intensity of the flow depending on need with this set up

IMG_2584.jpeg


After connecting both closed loop returns and the closed loop intake pipe … I started on my overflow plumbing with the 2 main drain lines in the pic above
The tank is made with two independent herbie overflows, so each drain needed a quality gate valve for micro adjustments
Went with the outrageously expensive
1 1/4” spears schedule 80 gate valves, I think in the long run this was the best choice regardless of price

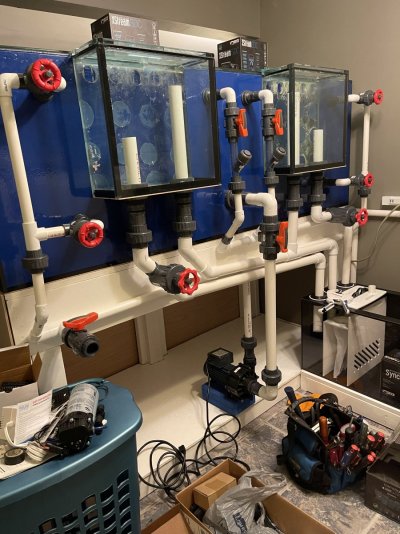
My thought is to make both outside drains my main drains for each overflow while making the inside ones the emergencies for each side… made sure to put as many unions as made sense

IMG_2588.jpeg
IMG_2591.jpeg

Above I have the main drains and emergency drains connected made sure the emergencies are straight open with nothing impeding
Then started to finish up the closed loop plumbing… put in a true union ball valve along with another union on the bottom of the drain and hooked up my second Reeflo, tried to make sure the unions matched as much as I could to the Reeflo on the mixing station for easy switching during maintenance or emergencies

The return for the closed loop goes up from the pump and tees off to both ends of the tank to the 4 returns …
Added the pipes inside the overflows also

IMG_2601.jpeg

Here I plumbed the return lines, put in ball valves to manually shut them off if I need also for the unions they add
I also put check valves in. My thought was it would stop some back flow when the power goes out.. eventually I took them out as they never returned to fully open after my test power outages, the plugs would get stuck partially open which effected the tank returning to the proper water levels

I added a union ball valve onto the closed loop return line.. this allows me to take my hose connect it to that and I can drain the tank almost all the way down just through the closed loop

This is all a dry fitting which actually most of it was short by 1/4” or so because being a plumbing rookie I didn’t take into account how much more the pipes go into the fittings when it’s glued compared to dry fitting … so most if not all this piping needed to be recut … that sucked!!
But this is the design of my finished plumbing

I think the design gives me a lot of flexibility having control of flow and having unions galore if changes or additions are needed.
Also it gives me an easy way to drain the tank if needed
Given this is my first plumbing ever and the amount of plumbing that was needed and attempting to design this whole thing to fit nicely with my stand and sump while giving me all the flexibility and need for the tank equipment and fish
I am extremely proud of this part of the project … one thing I love about hobbies like this is, along the way of learning the hobby and setting up everything you also learn real life skills that you can take with you even outside the hobby IMG_2580.jpeg IMG_2589.jpeg IMG_2597.jpeg
 
Last edited:

Reefing threads: Do you wear gear from reef brands?

  • I wear reef gear everywhere.

    Votes: 21 13.3%
  • I wear reef gear primarily at fish events and my LFS.

    Votes: 11 7.0%
  • I wear reef gear primarily for water changes and tank maintenance.

    Votes: 1 0.6%
  • I wear reef gear primarily to relax where I live.

    Votes: 23 14.6%
  • I don’t wear gear from reef brands.

    Votes: 91 57.6%
  • Other.

    Votes: 11 7.0%
Back
Top