300 gallon (ish) ULNS Mostly SPS Reef Build

DanP-SD

Active Member
View Badges
Joined
Jan 4, 2014
Messages
117
Reaction score
129
Location
San Diego, CA
Rating - 0%
0   0   0
Greetings. Back in 2018, I posted a walk-through of the 300 gallon reef tank I had built out over the prior few years. I waited until was fully up and running because I often prefer coming across build threads that are done – like binge watching a show that already has a few seasons in the bank.

Not too long after posting that build thread, we moved and sold the tank with the house. Since my wife and I have traveled a lot in the years since, I could never seem to find the right time to get my mind around a new tank build, but the ideas have been percolating and I finally decided to bite the bullet. This time, rather than wait until the tank is up and running, I’m going to try to post as I go. I gave the build out a head start over the posts, but I’m going to catch up quickly and then post more or less in real time so I can change plans along the way if anyone less rusty in reef best practices chimes in with better ideas than my own.

Before I get into the details of the build, here’s the concept and goals: I'm using the prior build as a starting point and adjusting from there. So the display tank will be in the 300ish range and I'll include a large sump and separate large refugium. My focus will be on SPS corals but it will be mixed with some LPS and small soft corals low in the tank. Emphasis will be on color and growth of corals so I’ll be lighting accordingly and plan to incorporate robust systems to maintain ultra-low nutrient levels while still providing ample nutrition and will dose for ionic balance and coral coloration.

A primary driver of the design will be automation. The prior tank was highly automated and this one will seek to incorporate the best ideas from that experience and a few new advances from recent product offerings. I still travel quite often so I’ll invest the upfront time to ensure automation while I’m away.

Overall, that will mean that at least the following major components in addition to the display tank:
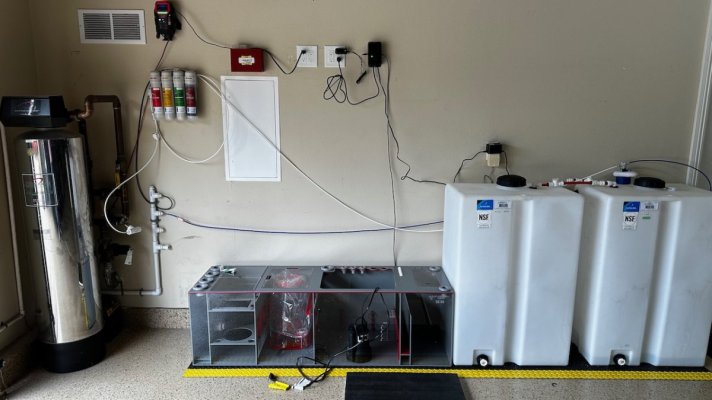
  • Large sump to accommodate robust nutrient filtration
  • Stand alone refugium – to provide a source of pods to feed the tank and possibly for nutrient export (if I don’t do a zeovit system – more on that below)
  • Multiple dosing containers and pumps. I think the last tank used 14 channels of dosing pumps but I believe I can make this work either with 11 (calcium, alkalinity, magnesium, balling part c, vinegar, 4 Korallen Zucht 4-part coral, 2 channels for automatic low-volume water changes) or with a few less if I make it a zeovit system.
  • Computer automation (Apex, Hydros or Profilux)
  • Large reservoirs for RO water and saltwater
  • Backup power systems
  • High par lighting
  • Automated feeding
  • Remote monitoring
  • Probably several systems I haven’t thought through yet.

    As I post this build, I am reminded of how helpful it has been to find all the build threads on R2R (including my own) so I’m going to try to journal this in some detail to make it useful for other reefers and the future me I picture tackling another build in 10 years and trying to remember what I used to know about doing this.

    So follow along and let’s see where this goes . . .
 
OP
OP
D

DanP-SD

Active Member
View Badges
Joined
Jan 4, 2014
Messages
117
Reaction score
129
Location
San Diego, CA
Rating - 0%
0   0   0
Update 1: Site Prep and Basic System Design

This project started, like my last build, with a woman with unending supplies of patience who I had the good sense to marry 32 years ago. On more than a few occasions in recent years, she has reminded me she misses having a reef tank in the house. Recently, we were rearranging furniture and trying to figure out the best use for a room that had been an office. To my surprise her two suggestions were to build a wine cellar into the closet and a reef tank into the credenza behind the desk. That credenza was against a wall that backs up to the garage so it was a great spot for a tank with filtration plumbed through the wall. Here are some photos of the site where the tank will go.

This shows the old office when it was first being set up before decor:

1053.jpeg


This is how it looked right before we started this project (except the desk has already been moved in this shot):
IMG_7276.jpeg


This is from just inside the front door, so the tank will be visible from much of the downstairs:
IMG_7279.jpeg


The desk in the middle of the built-ins will be replaced with a custom stand and cabinetry to match the side units.

Because we’ll be making this room a social gathering place, it was important to keep noise and smells in the garage. So all filtration and any noisy gear will be in the garage, I’ll use a silent overflow system and, out of an abundance of caution, I installed an exhaust fan to continuously draw air from the cabinet that surrounds the tank into the garage. This fan is set slightly higher than the top of the tank and below the lights so it will vent some of the heat from the lights, create some cooling flow across the water surface and, hopefully, avoid the need for a chiller. The cabinet is being built with tight tolerances in the upper section, a gap behind the tank for air flow and cables and discrete openings in the floor of the lower cabinet just behind the doors. The idea is the fan will create negative pressure and draw air in through the bottom, up behind the tank and out to the garage. I also had an electrician add the outlets shown in the picture below – two dedicated 20 amp circuits, one in the front and one on the other side of the wall in the garage. There’s already a 15 amp circuit on both sides of the wall that doesn’t get much use so this is undoubtedly overkill but the effort to run a second circuit while pulling conduit was negligible.

The exhaust fan is this unit: AIRTITAN T8, Crawl Space and Basement Ventilator Fan, WiFi-Integrated Controls, IP-55 Rated, Exhaust - AC Infinity.

IMG_7387.jpeg
IMG_7389.jpeg


Here are a few shots of the other side of the wall where the sump and filtration equipment will go:

IMG_7344.jpeg
IMG_7359.jpeg
IMG_7431.jpeg


Gear shown in this picture include two roto-mold 20 gallon reservoirs for RO water and saltwater (Den Hartog Ace Roto-Mold 20 Gallon Upright Rectangle Flat Bottom Tank SP0020-OM: Amazon.com: Industrial & Scientific). I may replace these in time with larger reservoirs but these worked well in the old 300g. The runner on the floor is also from Amazon (Amazon.com: American Floor Mats - Diamond Plate Runner Mats - Durable, Abrasion Resistant Vinyl Mats, Rolls Black, Yellow Edge 3/16" Thick x 2' x 10' : Automotive). I'll post more detail on the sump in a separate update.

The water filter in the corner is a whole-house filter that won’t be used for the aquarium. The spigot shown is straight municipal tap water and will supply my RO unit directly. Our municipal water is pretty clean and should be pretty easy on the RO unit. I considered tapping into the filtered line but the pressure drop from the whole house unit is considerable and the existing hose big gives me ample pressure for efficient RO filtration, so I’m going to work with that.

I plan to install two shelves directly above the whole house filter. The lower one will hold a refugium. It may seem like an odd location for a refugium but I want to gravity feed from the fuge to the display tank so that any pods don’t go through a return pump and it also keeps refugium populations out of the sump. I like to keep sumps as clean as I can and an in-sump fuge doesn’t help with that. Above the refugium will be a second shelf to hold two 10 gallon ATO reservoirs that will be plumbed to form a dump bucket system for automated higher-volume water changes with a lot of redundancy designed in.

In terms of tank design, the space dictated the dimensions to a degree. I went with a final design of 72” x 28” x 30” and ordered a Eurobraced tank with a starphire front. Technically, I have enough room to do a 78" tank between the bookcases but, like I did in my prior build, I've designed in a hidden compartment on each side of the tank behind the face of the wood surround (with a concealed-hinge door) where I can mount magnets. This serves as a great place to conceal powerhead magnets and keep gear like scrapers out of sight.

To get the final design right, I came up with the draft and got input from the manufacturer before finalizing it. Here’s the schematic I gave them:
2024 Reef Tank Build R2R.1.jpeg

The only change the manufacturer made from this is a slight move of the hole in the back right corner because the glass bracing is double thickness in the corner.

The overflow box shown is designed to accommodate a bean animal silent overflow, plus two return lines and a spare hole for an add-on drain or return line if needed.

The overall circulation will be that water flows from the tank to the sump, gets filtered in the sump, then one return pump returns water straight to the display tank and a second return pump will split flow into two lines – one to the display and one to the refugium. From the refugium, an overflow drain will flow water by gravity through the wall and into the display tank. It’ll enter the display tank through the ½” bulkhead in the back right corner of the top bracing and I’ll install a vertical ½” pipe of schedule 80 pvc with slots to return the refugium water and pods deeper into the tank (to keep them from flowing straight into the overflow).
 
OP
OP
D

DanP-SD

Active Member
View Badges
Joined
Jan 4, 2014
Messages
117
Reaction score
129
Location
San Diego, CA
Rating - 0%
0   0   0
Update 2: While the tank is being built

While waiting for the tank, I’ve been finalizing many of the other systems that support it. The key component to the filtration was the sump. There are a lot of good options out there. In hindsight, I wish I had seen the sumps Advanced Acrylics is putting out before I ordered from Synergy Reef. To be clear, the Synergy Reef sump I went with (SK-60 with Clarissa 5000 option) is fantastic. Build quality is impeccable and they were highly responsive throughout the process. I have no complaints and would highly recommend them. My only reason to prefer Advanced Acrylics is that John at AA has been every bit as responsive on the dosing container and QT he's building for me (more on those in later posts) and they're in SoCal, so I could pick them up and avoid the considerable cost of freight on a large sump. So, if you're in the west, I'd recommend Advanced Acrylics, but Synergy Reef has been great on the sump I got from them and I can whole-heartedly recommend them, especially if you're close enough to Tennessee to minimize freight costs.

Here are some closer shots of the Synergy Reef sump. The attention to detail on this product is impressive:

IMG_7428.jpeg
IMG_7429.jpeg
IMG_7430.jpeg


I don’t plan to plumb any of the primary circulation (drains and return lines) until the tank is in, but here’s a photo of some of the key pieces coming into place and set where I can rough out a lot of the plumbing and electrical.

IMG_7442.jpeg


At the outset, this photo shows only rough placement and no attention to cable management. I plan to install some sort of custom cabinet above the sump and reservoirs to allow for mounting of electronics on the surface with cables managed inside and out of view. Once that's in, I'll clean up all the cable mess for a neat install.

There are also a few plan changes reflected in this photo. First, the skimmer is sitting in the refugium section of the sump. The reason for this is that I’ve completed my research on the zeovit system and decided to use it for this tank, so I'm reserving the skimmer section for the zeovit reactor (which should be downstream from the skimmer). I've confirmed while leak testing the sump that the water level in the refugium and skimmer run at the same depth so the baffle to set depth in the skimmer section will also work in the refugium section, so I don't see any issue with the skimmer here, but I believe I can squeeze it and the zeovit reactor together in the skimmer section if necessary.

The zeovit tanks I’ve seen are undoubtedly some of the most stunning sps tanks around and I’ve used every other approach to nutrient management (denitrifiers, plenums, biopellets, carbon dosing). Zeovit feels like a final frontier.

One major reservation I’ve had about this system is the need for significant daily attention. I enjoy tinkering with my tanks daily so, ordinarily, it won’t be an issue, but I travel a lot and it’s important to design a system that can be highly automated. When I travel, there is typically someone home who can do daily routines, but I like to keep that to minimal foolproof tasks. Zeovit, on the surface, does not look particularly amenable to this approach but I’ve broken down all the tasks and dosing routines and believe it can be automated to a large extent.

I'll post more detailed write ups of automation systems in subsequent updates but, for now, I’ve lined up an automatic zeovit reactor being shipped from Japan. I plan to install a small refrigerator and plumb a closed circuit line through it into which I’ll dose bacterial and amino supplements. If I use any supplements that need to be shaken, I’ll install a magnetic stirrer. Ultimately, I’m not sure I can automate everything – and when I’m not traveling, I would prefer to keep an eye on things by manually managing most of the tank – but I think I can get it to a point where I’m comfortable leaving the tank under a family member’s care.

So, zeovit it is. In addition to moving the skimmer into the refugium section to allow the zeovit reactor to be placed downstream from the skimmer, I also upgraded the RO and saltwater reservoirs from 20 gallons to 80. The zeovit system requires consistent water changes and this will allow me to do about three weeks worth of automatic water changes without having to mix up a new batch of saltwater.

One change not yet visible in this picture is upgrading the RO system. My last tank was slightly larger than this one and ran fine on the Aquatic Life twist in shown above, but with the 80 gallon reservoirs, I need a faster output rate. So I’ve ordered the AquaFX Whale Shark 7-stage 200 gpd RO/DI unit and will replace the aquatic life unit with that.

Links for the devices in this pic:

Sump: Synergy SK-600 (this is the Clarisea 500 version but the fleece rollers are not yet installed).

Skimmer: Reef Octopus Regal 250-INT. In the final install, this will include a neck cleaner and collection cup. I may add a neck extension and/or skimmer stand as well as I fine tune the skimmer.

Reservoir Filler: I was pretty bummed to learn that Avast Marine discontinued their barrel tender. I had used both the original and version 2 in the past and found them to be great and dependable. This go around, I’m trying out the Hi-Lo system from Buckeye Hydro. It consists of these components:

Hi - Lo Tank Level Controller - Buckeye Hydro

https://www.buckeyehydro.com/shut-off-solenoid-valve-1-4/

https://www.buckeyehydro.com/transformer-for-aquatec-6800/

The idea with these units is to automatically turn on the RO unit when the RO reservoir is low, and turn it off when it’s full. Doing this instead of having it come on frequently every time the level drops helps avoid concentrating the solids that reach the effluent side of the RO membrane due to TDS creep when the RO Unit cycles on and off frequently. I'm currently testing this setup on my RO reservoir and will post impressions later. One thing I did note off the top is that the solenoid in this kit vibrates significantly and will need to be mounted with that in mind.

RO and Saltwater Reservoirs: Den Hertog 80 gallon rectangular utility tank from The Tank Source in Alpine, CA.

Backup Battery: On the last tank, I daisy-chained a couple of the Vortech Backup Battery units to ensure flow in the display tank in the event of a power outage. At the time, short of installing a generator, this was about the best option. Today, that’s not the case. The batteries in the Vortech unit are lead acid and a modest 18ah of capacity. Due to the nature of lead acid batteries, it’s likely that no matter how carefully the charge is maintained, they will be dead or greatly diminished in a few years.

I was looking for a more reliable system over the long-run and a lot more capacity. We live in San Diego where our biggest blackout risk is from wildfires. In the event of a fire in the area, it’s entirely foreseeable for SDG&E to shut off power for a few days. I got a bid on installing a small 10kw natural gas generator with a transfer switch and it came in at $10,000!! Not what I was looking to spend. So I looked into LiFePo4 (lithium iron phosphate) batteries as a good middle option that can greatly enhance the capacity and reliability of a lead system at a fraction of the cost of a generator. I have a small Bluetti LiFePo4 battery and ran a test. Using a cheap adapter from Amazon, I connected the DC output of the battery to the backup battery ports of a Vortech MP40, got the pump running on AC power and then disconnected the AC. The pump instantly switched to DC power and automatically reduced flow to what I gauge is enough to keep the tank oxygenated in a power outage.

While the battery I had on hand could do the trick, it didn’t have the capacity I wanted and has a very noisy charger with a high-speed fan. So I put together a DIY system of the following components:

Optima D400+ Charger (top left of the last picture above, mounted on wall)

12V 100ah LiFePo4 Battery (hiding in the bottom left corner behind the whole house filter)

3.5mm x 1.35mm Barrel Plugs (not shown yet) – these are the same plugs the Ecotech Battery Backup uses. I’ll splice ring terminals to the bare ends of these to connect them to the battery once I mount the vortech controllers and can measure the length of wire I need.

The setup will be simple: connect the terminal rings of the charger to the battery and connect the terminal rings of the barrel plugs to the battery. Plug the barrel into the small port on a couple MP40s. Done. The charger will condition and maintain the battery (LiFePo4 batteries last for many years). When power goes out, this setup will power two MP40s a long time. Each pump draws about 4.5 watts in backup mode and the battery provides 1200 watt hours at 12 volts load. So with two pumps running, I should get about 133 hours of run time.

While two MP40s in the display tank are sufficient to keep water oxygenated during an outage, I would like stronger flow and am considering adding a second 200 ah battery to back up one of the return pumps. Doing so with my Royal Exclusiv pumps would void the warranty which I’m not inclined to do on such an expensive pump so I may plumb in a lower cost DC pump to handle the flow line that goes from the sump through the refugium to the display and connecting it to a 200ah battery so that I’ll have flow through the tank in the event of a power failure. This could be a fun project once the tank is up and running and is one of the reasons I added an extra drain line to the tank. If I set up battery backup power for a return line, having an extra drain line would allow setting up the plumbing so that the overflow remains silent even when running on only one pump. More on that later.
 

Attachments

  • IMG_7436.jpeg
    IMG_7436.jpeg
    123.9 KB · Views: 18

cilyjr

Valuable Member
View Badges
Joined
Sep 28, 2011
Messages
1,378
Reaction score
1,332
Location
Arroyo Grande
Rating - 100%
1   0   0
It is hard to tell from that picture, but did you tap your RO filter before your softener? The reason I ask is I can see what looks like a prv right below the tap. You will get significantly longer life out of your ro membrane if you tap post water softener.

This is why the big commercial treatment plants are softening the water before they push it through their ro membranes.
 
OP
OP
D

DanP-SD

Active Member
View Badges
Joined
Jan 4, 2014
Messages
117
Reaction score
129
Location
San Diego, CA
Rating - 0%
0   0   0
It is hard to tell from that picture, but did you tap your RO filter before your softener? The reason I ask is I can see what looks like a prv right below the tap. You will get significantly longer life out of your ro membrane if you tap post water softener.

This is why the big commercial treatment plants are softening the water before they push it through their ro membranes.
Good question and an issue I’ve been torn on. Currently, it’s tapped into direct municipal water before the whole house filter. I did that because: 1) that’s where the hose bib is and 2) it’s better pressure. I’m considering tapping the post-filter water but it’s not a water softener. It’s a scale reducing system that uses Template Assisted Crystallization (TAC) to crystallize hardness minerals so they remain suspended in water and don’t form scale. I’ve been unable to find good info on whether this type of water would be better or worse for an RO/DI system.

Since the picture, I’ve updated the RO system to a more robust one and installed TDS meters. It looks like my tap water is typically below 100ppm tds and I’m getting zero TDS after the RO membranes, so I think my resin should last quite a while.

If anyone has any experience or insight into whether TAC treated water would be good for RO, I’d love to hear it.
 

cilyjr

Valuable Member
View Badges
Joined
Sep 28, 2011
Messages
1,378
Reaction score
1,332
Location
Arroyo Grande
Rating - 100%
1   0   0
It’s a scale reducing system that uses Template Assisted Crystallization (TAC) to crystallize hardness minerals so they remain suspended in water and don’t form scale
Oh,
We have been pulling these things out left and right over the past couple of years and replacing them with standard softeners.

When I read into them a few years ago, what I read was this method was scientifically viable but that it needs to be changed pretty regularly every year to year and a half. I don't think these systems are designed to replace the media. Maybe I'm wrong.

We cut one open once and it was literally an empty tube not even baffles. That was a halo brand that the customer had bought directly from the home show. Maybe somebody accidentally sold them a empty show unit, I do not know.

That said, I tend towards skepticism.

I have a very good friend that lives in the northwest section of San Diego and my mother-in-law lives in Ramona. I don't know what area you're in but it can get pretty warm out there if all of your stuff is in the garage are you going to cool it with a chiller?
 
OP
OP
D

DanP-SD

Active Member
View Badges
Joined
Jan 4, 2014
Messages
117
Reaction score
129
Location
San Diego, CA
Rating - 0%
0   0   0
I’m a bit skeptical about it too. I’ve reached out to the manufacturer for more info but am leaning toward pulling it out.

We’re pretty coastal and are a lot cooler than Ramona but a chiller is a distinct possibility. I’ve planned out too potential places to put one but neither is ideal. Last tank stayed cool with just fans so I’m hoping I can do the same this go around but, as you noted, I have a decent amount of water flowing through the garage this time.

I installed a high-volume exhaust fan in the garage a few years ago and it does a pretty good job keeping it cool but I’m prepared to add a chiller if it’s not enough.
 

cilyjr

Valuable Member
View Badges
Joined
Sep 28, 2011
Messages
1,378
Reaction score
1,332
Location
Arroyo Grande
Rating - 100%
1   0   0
installed a high-volume exhaust fan in the garage a few years ago and it does a pretty good job keeping it cool
You may be ok. I am in Pismo Beach. All of my equipment is in a shed. My advantage is I'm only a mile from the beach so it's never that hot in the summer and never that cold in the winter.
Most of the summer I can just open the shed doors and it's fine. I do have a central air conditioning system though the really hot days I button everything up and use that. The shed is not air-conditioned but the display tank which is 320 gallons is.
 

Building with glass and silicone: Have you ever built a tank or had a custom tank built?

  • I have built an aquarium.

    Votes: 25 14.2%
  • I have had a custom tank built.

    Votes: 40 22.7%
  • I have never built a tank or had a custom tank built.

    Votes: 103 58.5%
  • Other.

    Votes: 8 4.5%
Back
Top