Amalee’s 75g Build

AmaleeC

Well-Known Member
View Badges
Joined
Oct 16, 2019
Messages
595
Reaction score
546
Rating - 0%
0   0   0
Hello everyone! So I never thought I’d start a build thread, but here I am. I currently own a Waterbox 20. But I got a 75g with a stand during a trade and at first I doubted my decision but I am actually very happy I went through with the trade! The overall budget is $1000 including livestock.

Equipment:
  • Eshopps pf1000 HOB Overflow ($94)
  • Orlushy 300W heater ($22)
  • (2) Bags of Instant Ocean Sea Salt ($18)
  • (6) CaribSea Super Naturals Aquarium Sand, 10 lbs. ($33)
  • (2) Nature's Ocean 12-Inch Coral Base Rocks for Aquarium, 40-Pound ($104)
  • DIY Sump: Tank ($21), Materials ($25)
  • Jebao OW-25 Wavemaker ($55)
  • Plumbing materials bought at Home Depot ($25)
  • (2) VIPARSPECTRA Timer Controlled Dimmable 165W lights ($238)
  • Rio Plus 2500 Pump ($65)
  • DIY Light Hanger ($45)
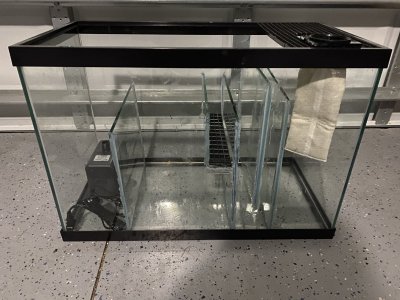
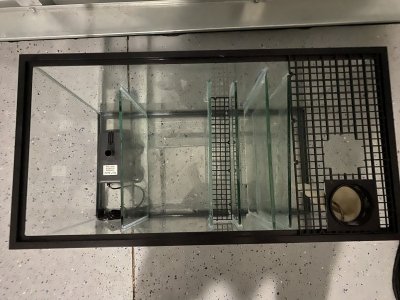
So far I’ve got a stock list going, I picked out my lights and the shipments of rock, and salt are already slowly coming in. I’m building my own sump, which has been a lot more work than anticipated. But PetCo has the dollar per gallon deal, so I got a 20g and cut up a plastic container we had as means of “dividers” just to see how it works. If that doesn’t go well, plexi glass it is! I’m excited to have it finished tomorrow and have it all set up.Going into this, I knew absolutely nothing about tools but with some help from my family, we redid the stand and I’ve learned a lot about blades, drills, hammers, sanding, and so on. I also re-painted the trim on the tank and spray painted the back of the tank black.

Before and after pics of the stand and tank are included below!

Before:
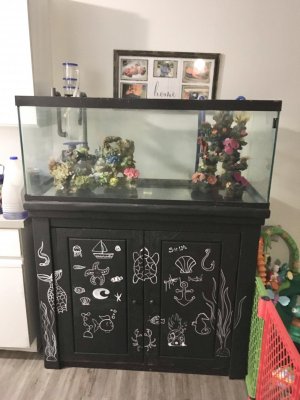
49C5413C-F71C-4D0A-9CF1-6A3CF72B6B9B.jpeg

After:
123A7A2F-6075-4CDF-B01C-170D01E96AD6.jpeg
 
Last edited:

fishguy242

Cronies..... INSERT BUILD THREAD BADGE HERE !!
View Badges
Joined
Jan 21, 2020
Messages
43,089
Reaction score
248,174
Location
Illinois
Rating - 100%
1   0   0
hi very nice,if siliconing baffles in sump highly rec glass 1/8" thinner than width of 20 ,silicone ,glass,plastic,acrylic ,do not work together,love the stand ,happy reefing
 
OP
OP
AmaleeC

AmaleeC

Well-Known Member
View Badges
Joined
Oct 16, 2019
Messages
595
Reaction score
546
Rating - 0%
0   0   0
silicone ,glass,plastic,acrylic ,do not work together
Yeah I’m already starting to see that. I was avoiding buying glass but I just might have to spend the extra money. That’s okay though - I’ll get some help and get on it. And thank you! I have one of my first blisters from hard work ;Hilarious

Interested to see how this goes. Take it slow with the cycle
Thank you! Since my 20 is already up and running, I’m going to let this tank cycle all the way through the ugly stages too (diatoms, cyano, GHA, etc.). I want to use Fritz Turbo Start or a Microbacter7 product while dosing ammonia to start the cycle. I’m going to visit my LFS (WWC) and speak with them on which method they like better to get a cycle going. Technically, there’s several methods I can go with and I just want to have their input
 
Last edited:

fishguy242

Cronies..... INSERT BUILD THREAD BADGE HERE !!
View Badges
Joined
Jan 21, 2020
Messages
43,089
Reaction score
248,174
Location
Illinois
Rating - 100%
1   0   0
morning go with 3/16ths or 1/4' glass ,too thin will bow and crack ,few pieces should not be too exp,get raw ,be careful just take sanding sponge to sharp edges very easy,they will charge you more for"polished edges" careful again sharp like razor raw but prob 1/2 cost
 
OP
OP
AmaleeC

AmaleeC

Well-Known Member
View Badges
Joined
Oct 16, 2019
Messages
595
Reaction score
546
Rating - 0%
0   0   0
morning go with 3/16ths or 1/4' glass ,too thin will bow and crack ,few pieces should not be too exp,get raw ,be careful just take sanding sponge to sharp edges very easy,they will charge you more for"polished edges" careful again sharp like razor raw but prob 1/2 cost
Thanks
 
OP
OP
AmaleeC

AmaleeC

Well-Known Member
View Badges
Joined
Oct 16, 2019
Messages
595
Reaction score
546
Rating - 0%
0   0   0
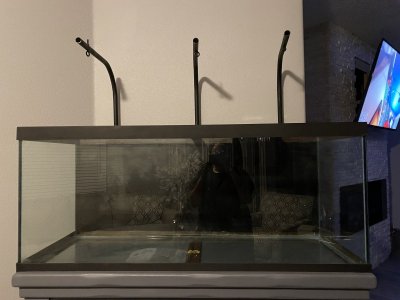
Today I built the light hangers! Definitely took me awhile and a lot of hard work. But I have saved myself a lot of money.

I used 3 conduit ($5.70 ea.), 3 screw eye w/ hex nut ($2 ea.), 9 tube straps ($5.6 per pack of 20), 9 carriage bolts @ $3.51, and 9 hex nuts @ $1.53. For about $35, I made 3 light hangers to hold my lights. I also bought two spray paint bottles to color them black and a neat chain to hang the lights down with instead of what the ropes they originally come with. So that’s an additional $10. Still saved some money and have a nice design. :)

Tomorrow I’ll be working on the plumbing which after hours of researching, I have finally figured out! Couldn’t get to it tonight as I work early tomorrow and had to redo the first baffle on my sump. It was a little crooked so the water would flow through that corner only, instead of having a more uniform flow. No worries. 20 mins later and it was fixed. Leaving it to cure now.
8302FD6A-E36B-4476-922A-E539C0119580.jpeg
 

Marc2952

Valuable Member
View Badges
Joined
Nov 23, 2019
Messages
1,539
Reaction score
979
Rating - 0%
0   0   0
My guess is you doing the herbie method for your overflow box? I got the same HOB and itll be perfect for that setup. I suggest you either get a DC pump or a gate valve so you can create that perfect siphon.
 
OP
OP
AmaleeC

AmaleeC

Well-Known Member
View Badges
Joined
Oct 16, 2019
Messages
595
Reaction score
546
Rating - 0%
0   0   0
My guess is you doing the herbie method for your overflow box? I got the same HOB and itll be perfect for that setup. I suggest you either get a DC pump or a gate valve so you can create that perfect siphon.
Yes, I’ll definitely be going with the Herbie method. Originally, I bought the pf300 until I realized I needed two drains to go Herbie.

I bought a ball valve instead, so I’m able to get the perfect siphon. I only saw gate valves made of brass and after looking it up I found that overtime, they corrode. So I went with a 1” PVC Ball valve from Home Depot. It should still get the job done if I’m not mistaken.
 

Bo.

Impatient as always
View Badges
Joined
Feb 25, 2020
Messages
1,913
Reaction score
9,406
Location
Albuquerque
Rating - 0%
0   0   0
Yes, I’ll definitely be going with the Herbie method. Originally, I bought the pf300 until I realized I needed two drains to go Herbie.

I bought a ball valve instead, so I’m able to get the perfect siphon. I only saw gate valves made of brass and after looking it up I found that overtime, they corrode. So I went with a 1” PVC Ball valve from Home Depot. It should still get the job done if I’m not mistaken.

The only issue I have with Home Depot ball valves is they can stick and take a little force to move which makes fine adjustments difficult for tuning.

I like your light mounts, can't wait to see it up and running!
 
OP
OP
AmaleeC

AmaleeC

Well-Known Member
View Badges
Joined
Oct 16, 2019
Messages
595
Reaction score
546
Rating - 0%
0   0   0
they can stick and take a little force to move
Oh man, I didn’t know that :rolleyes: I guess it’s kinda my only option if I wanted to finish right away.. I wonder if there’s like an aquarium safe lubricant or something similar that you can use to make things slide over more smoothly? I’ll have to look into it. For the time being, I guess I know where I want my union to be lol
 

Marc2952

Valuable Member
View Badges
Joined
Nov 23, 2019
Messages
1,539
Reaction score
979
Rating - 0%
0   0   0
Yes, I’ll definitely be going with the Herbie method. Originally, I bought the pf300 until I realized I needed two drains to go Herbie.

I bought a ball valve instead, so I’m able to get the perfect siphon. I only saw gate valves made of brass and after looking it up I found that overtime, they corrode. So I went with a 1” PVC Ball valve from Home Depot. It should still get the job done if I’m not mistaken.
Inreally suggest a gate valve, much more accurate.
 
OP
OP
AmaleeC

AmaleeC

Well-Known Member
View Badges
Joined
Oct 16, 2019
Messages
595
Reaction score
546
Rating - 0%
0   0   0
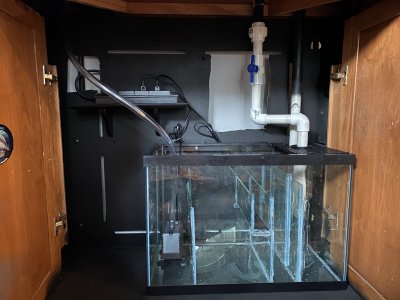
The plumbing is officially finished!! ;Happy
Unfortunately there wasn’t enough room to add a union, a gate valve, and three 45 degree elbows. So I had to do two 90’s to get both the valve and a union in. I know it’ll complicate the flow but I was sort of limited on options there...

I put a small shelf in the stand as well to hold the power strip. This should help in keeping everything nice and neat. ATO reservoir is going to go right underneath it, it has a lid and whoever had the stand before put a huge hole in the back for whatever reason. So I’m not concerned about the humidity ruining the shelf :)

I’ve got the dry rock rinsed and ready to be shaped. I’ve also got 20g of RODI waiting to be mixed.

15EB0481-9456-4F46-B49A-EEF815D5BF8A.jpeg
 

mch1984

Valuable Member
View Badges
Joined
Nov 20, 2017
Messages
2,000
Reaction score
6,756
Location
Midland, TX
Rating - 0%
0   0   0
Looking good, if you ever decide to redo the plumbing I agree with above. Go gate valve, not because you have to but because it makes your life easier. Sump looks awesome. Looking foward to following along.
 
OP
OP
AmaleeC

AmaleeC

Well-Known Member
View Badges
Joined
Oct 16, 2019
Messages
595
Reaction score
546
Rating - 0%
0   0   0
Thanks for the recommendations everyone! Super helpful for future reference. If I ever were to upgrade or redo the plumbing, I will definitely go gate valve with the traditional 45 degree elbows.

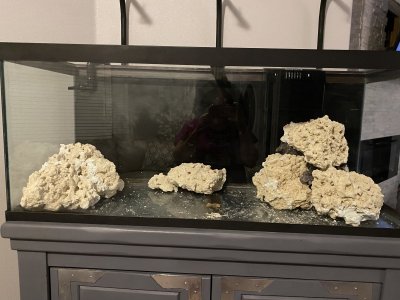
We didnt do anything crazy for the aquascape and I’m glad we didn’t because the second we went to bring the rocks from outside to inside, the adhesive fell apart. :rolleyes: We tried some hydraulic cement from Home Depot as well as JB Waterweld Epoxy sandwiched with superglue.

The pieces are relatively large/heavy though, and I made sure they flattest piece of rock is what’s touching the glass bottom. I also ensured they were stacked perfectly atop one another without wiggling. So I’m confident in the scapes security as long as I don’t have any extremely large fish (which I don’t intend to have any).

I’ve got a mound to the left, an island in the far back, and a small “hill” to the right. In between the crevices of the hill are smaller pieces of rock with dead coralline.

5B85A7D1-C2EF-45D2-A927-F38EF58C86A0.jpeg
 
OP
OP
AmaleeC

AmaleeC

Well-Known Member
View Badges
Joined
Oct 16, 2019
Messages
595
Reaction score
546
Rating - 0%
0   0   0
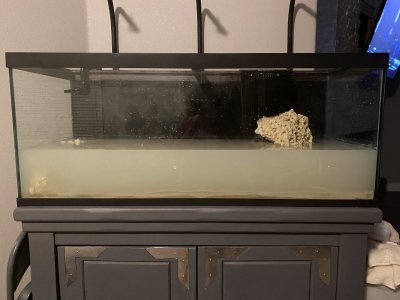
We also started adding some saltwater on this lovely evening. We’re almost done!

3D1974D0-5D18-48F3-83DA-66C1223AA6CF.jpeg

I ended up purchasing a new Jebao OW-25 as the wavemaker and it’s on it’s way. Amazon didn’t consider it a necessity so it wouldn’t receive 2 day shipping. Which is okay, I prefer they’re shipping the necessities out over things for my tank :) So I checked eBay and ordered it there while saving $10! I have some air stones I can throw in the 75 so the water isn’t completely stagnant.

My ATO is attached to my 20, so I’ll be doing top offs manually as the tank cycles and I’m going to look into DIY lids.

I’ll be starting the cycle with some Microbacter7. I’d like to allow the tank to cycle through the ugly phases (Dino’s, cyano, GHA) before I officially put livestock in. While it’ll be awhile, I’ve been doing research and looking at what I’d like to add. As of right now:
  • (2) Firefish
  • (1) Maroon Clown
  • (1) Melanarus Wrasse
  • (1) Lawnmower Blenny
  • (1) Engineer Goby
  • (1) Azure Damselfish
  • (3f) Lyretail Anthias
I’m looking forward to my Melanarus shifting into being a male, as well as seeing the transformation in one of my Lyretails. I’m sure it’s a very cool, but lengthy process to observe. Any opinions on fish that shouldn’t be added or fish you think should be added are welcome! Thank you all for following along so far in this journey :)
 
Last edited:

Bo.

Impatient as always
View Badges
Joined
Feb 25, 2020
Messages
1,913
Reaction score
9,406
Location
Albuquerque
Rating - 0%
0   0   0
I like your timeline as it's very similar to my own, and stock list starts out very similar, swapping maroon for oscillaris (two kiddos) and melanarus for a paracheilinus. Firefish pair are my first as well, and will be until my cuc is established. When do you plan on adding yours? My firefish go in Sunday, they've been at the lfs for a couple of weeks already
 

Clear reef vision: How do you clean the inside of the glass on your aquarium?

  • Razor blade

    Votes: 161 61.5%
  • Plastic scraper

    Votes: 69 26.3%
  • Clean-up crew

    Votes: 91 34.7%
  • Magic eraser

    Votes: 45 17.2%
  • Other

    Votes: 69 26.3%
Back
Top