Changing overflow styles in large acrylic tank?

Fish Werx

Active Member
View Badges
Joined
Feb 7, 2017
Messages
367
Reaction score
391
Location
Wilmington, NC
Rating - 0%
0   0   0
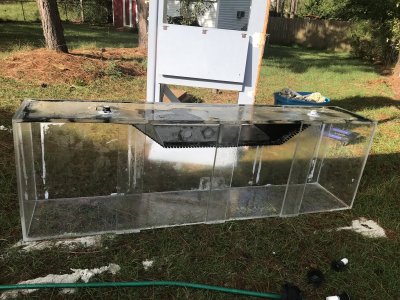
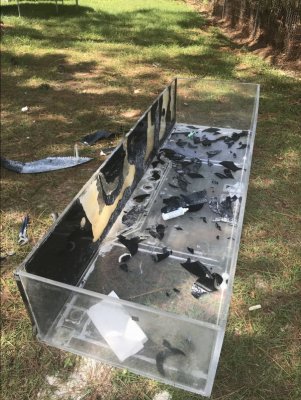
So, here it goes.... Im thinking seriously about picking up a 300g acrylic tank and system from an individual. I need more room for growing livestock, the price is good, and it isnt too far away from me.

Only problem is, I believe it is plumbed with those ghost style overflow boxes on the top corners of the back wall. That means there is plumbing behind the tank, which moves it out from the wall where I want to place the tank. I do not really like that idea. I would rather place it as close to the wall as possible, and definitely do not want to see plumbing behind my tank as I will be looking directly at the side of the tank every time I walk into my front door!

Is it possible to remove and plug the holes in the back wall of the tank? Reliably so there are no leaks! They are located near the top of the tank with no real water pressure, so I think that helps?

Also, my system now has the dual back internal overflows that go all the way from water level to the bottom of the tank and are drilled through the bottom glass. Is there a place to purchase those style overflow pieces? All I can find is the ghost style boxes and the like that you drill through the back wall. No one seems to carry the old school overflows anymore...

Thanks for any help, advice, tips, general rambling etc.......
 

Anthony Mckay

Community Member
View Badges
Joined
Apr 23, 2017
Messages
91
Reaction score
53
Rating - 0%
0   0   0
So, here it goes.... Im thinking seriously about picking up a 300g acrylic tank and system from an individual. I need more room for growing livestock, the price is good, and it isnt too far away from me.


Only problem is, I believe it is plumbed with those ghost style overflow boxes on the top corners of the back wall. That means there is plumbing behind the tank, which moves it out from the wall where I want to place the tank. I do not really like that idea. I would rather place it as close to the wall as possible, and definitely do not want to see plumbing behind my tank as I will be looking directly at the side of the tank every time I walk into my front door!

Is it possible to remove and plug the holes in the back wall of the tank? Reliably so there are no leaks! They are located near the top of the tank with no real water pressure, so I think that helps?

Also, my system now has the dual back internal overflows that go all the way from water level to the bottom of the tank and are drilled through the bottom glass. Is there a place to purchase those style overflow pieces? All I can find is the ghost style boxes and the like that you drill through the back wall. No one seems to carry the old school overflows anymore...

Thanks for any help, advice, tips, general rambling etc.......

Hello.
If you got hold of a couple of pieces of acrylic (i would recommend the same thickness as the aquarium) that can cover the holes and use acrylic cement it will be as strong as the original tank.
The acrylic cement actually fuses the acrylic together rather than glues it. To get the cement all the way under put sewing pins under the edge then using the syringe apply the cement. Its pretty much the same principle as joining edges. Lots of vids on eBay but Joey DIY King has a good one on building acrylic aquariums on YouTube.
Hope this helps
 

JoshH

Tank Status: Wet...ish, growing things....
View Badges
Joined
Dec 3, 2016
Messages
9,994
Reaction score
35,394
Location
Humble
Rating - 0%
0   0   0
A quick search for corner overflow's on ebay or amazon will get you what you need there. :)
 
OP
OP
Fish Werx

Fish Werx

Active Member
View Badges
Joined
Feb 7, 2017
Messages
367
Reaction score
391
Location
Wilmington, NC
Rating - 0%
0   0   0
A quick search for corner overflow's on ebay or amazon will get you what you need there. :)
Yeah, I was looking for the back wall overflows. You know, the double wall rounded ones that come on reef ready aquariums, not corner ones. Thats part of the problem with whats on it now. I dont want to see any of the overflow or plumbing from the side of the tank. Maybe I am calling them the wrong thing?

I know.... Picky, picky......
 
OP
OP
Fish Werx

Fish Werx

Active Member
View Badges
Joined
Feb 7, 2017
Messages
367
Reaction score
391
Location
Wilmington, NC
Rating - 0%
0   0   0
This is what Im talking about.
IMG_1415.HEIC.jpg
 

JoshH

Tank Status: Wet...ish, growing things....
View Badges
Joined
Dec 3, 2016
Messages
9,994
Reaction score
35,394
Location
Humble
Rating - 0%
0   0   0
oh center overflows my bad lol if you're feeling handy and you've got your acrylic glue out you could always just make your own overflow. Another option to avoid filling holes and adding overflows would be to put a trim piece between your tank and the wall to fill in the gap created by the plumbing behind the tank. Something to match your stand and removable for easy access. This would successfully hide the plumbing and keep the ability to plumb returns and a BA drain. It does seem almost impossible to find those overflows now.
 
Last edited:
OP
OP
Fish Werx

Fish Werx

Active Member
View Badges
Joined
Feb 7, 2017
Messages
367
Reaction score
391
Location
Wilmington, NC
Rating - 0%
0   0   0
oh center overflows my bad lol if you're feeling handy and you've got your acrylic glue out you could always just make your own overflow. Another option to avoid filling holes and adding overflows would be to put a trim piece between your tank and the wall to fill in the gap created by the plumbing behind the tank. Something to match your stand and removable for easy access. This would successfully hide the plumbing and keep the ability to plumb returns and a BA drain. It does seem almost impossible to find those overflows now.
Actually, adding a trim piece was my first thought. Because I am building the stand and everything from scratch. Maybe I"ll make a shallow bookshelf or display piece on both sides to cover the plumbing and whatnot... But, if I could get that little bit of extra space for viewing I was going to try.... Thanks for the thoughts.
 

JoshH

Tank Status: Wet...ish, growing things....
View Badges
Joined
Dec 3, 2016
Messages
9,994
Reaction score
35,394
Location
Humble
Rating - 0%
0   0   0
If you just went with a flat trim piece that fit in behind the tank you could achieve 100% viewing and not see any plumbing. But you're welcome, tried to give you every option I could think of. :)
 
OP
OP
Fish Werx

Fish Werx

Active Member
View Badges
Joined
Feb 7, 2017
Messages
367
Reaction score
391
Location
Wilmington, NC
Rating - 0%
0   0   0
If you just went with a flat trim piece that fit in behind the tank you could achieve 100% viewing and not see any plumbing. But you're welcome, tried to give you every option I could think of. :)
I know Im being super ridiculous picky. But the overflows that are in the tank are those floating corner overflows. So, you see a little 3"x 8" window of overflow right at the top of the tank sides. And I am really trying to be ok with that. But Im being just crazy stupid about the looks of this tank.... Maybe I can get my hands on a little bit of black acrylic and cut two little rectangles and install them on the inside of the wall in the overflows? At least then it would just be two little black rectangles in the upper corners of the sides.... IDK?!?! Haha! Im going to drive myself crazy I think!
 

JoshH

Tank Status: Wet...ish, growing things....
View Badges
Joined
Dec 3, 2016
Messages
9,994
Reaction score
35,394
Location
Humble
Rating - 0%
0   0   0
lol no such thing as super rediculously picky, it's a big investment and you should love every part of your set up. the black acrylic piece is a good idea and would be a rather easy fix.
 

Zephrant

Active Member
View Badges
Joined
Sep 14, 2017
Messages
111
Reaction score
75
Location
Spokane, WA
Rating - 0%
0   0   0
I usually avoid gluing to a tank that has held water for long. Risk of causing stress cracks to form when the glue hits the acrylic. It can be done if you dry it out enough, but it takes weeks of completely dry air/tank.

If you don't like the clear boxes, you can get black ones and replace them.
 

cromag27

octoaquatics.com - ig = @octoaquatics. view my sig
View Badges
Joined
Sep 7, 2013
Messages
8,249
Reaction score
11,239
Location
arizona
Rating - 0%
0   0   0
This here. Not only that, but once an acrylic tank has held water, it's probably no longer 100% square. Trying to weld an overflow at this point would be difficult, especially if you aren't already proficient in acrylic cutting, prepping and welding.

I usually avoid gluing to a tank that has held water for long. Risk of causing stress cracks to form when the glue hits the acrylic. It can be done if you dry it out enough, but it takes weeks of completely dry air/tank.

If you don't like the clear boxes, you can get black ones and replace them.
 

Pntbll687

Valuable Member
View Badges
Joined
Oct 4, 2017
Messages
2,094
Reaction score
2,609
Rating - 0%
0   0   0
I had the same problem. My tank is 220 and has a center overflow, but was going to be used peninsula style and separate the kitchen from living room. I was getting the set up for free from my mother in law, so I couldn't say no. I ended up taking the plumbing out, and painting it black with krylon fusion spray paint. Made viewing the tank from the back side SO MUCH BETTER.

If you REALLY wanted to you could seal off the bulkheads and remove the overflow, then either build your own, or go with a hang on overflow box. I built an overflow for my smaller tank. Cost was about $50
 

Jose Berry

Active Member
View Badges
Joined
Aug 6, 2018
Messages
186
Reaction score
297
Location
United States
Rating - 0%
0   0   0
C34D1C3F-BB96-40B5-A677-DE8FA0E03596.jpeg I am currently working on my 225g project. Tank was cheap but I’m going in the opposite directions as you are...currently going to remove the center over flow and add a ghost over flow instead. This is what I’ve learned so far before I start the project.

Buy acrylic that matches the same thickness but go over by 2” on either side for any hole you plug up.
Buy weld-on#40, it may seem a lot harder to use then 3 or 4 but it’s made for making aquariums, the show tanked uses it for seemless bonding and it makes for a solid repair.

Dremal tool works best. If you have any uneven spots sand with 400 then 600 and then 2000 wet sand. Then proceed to use novus 3 and 2.

I hope something was useful. If anything I hope y’all keep tabs on my build. It will be my biggest so far. Rebuilding stand and tank.
 

Ratherbeflyen

Well-Known Member
View Badges
Joined
Mar 9, 2018
Messages
571
Reaction score
935
Location
Houston
Rating - 0%
0   0   0
The type of overflow is a personal choice for sure. If I was in your place, and all I cared about was seeing the plumbing, I would build a new overflow box for the outside portion of the overflow that was longer/taller. If you want, you can make the overflow box the same height as the tank and then all you would see is what ever color acrylic you used to build the box and one plumbing fitting going into the stand on the back.

I converted my tank from an internal to an external overflow, but my tank is glass so I used glass and silicone.

upload_2018-10-4_14-46-17.png

upload_2018-10-4_14-48-5.png
 

Reefing threads: Do you wear gear from reef brands?

  • I wear reef gear everywhere.

    Votes: 17 14.3%
  • I wear reef gear primarily at fish events and my LFS.

    Votes: 7 5.9%
  • I wear reef gear primarily for water changes and tank maintenance.

    Votes: 1 0.8%
  • I wear reef gear primarily to relax where I live.

    Votes: 19 16.0%
  • I don’t wear gear from reef brands.

    Votes: 67 56.3%
  • Other.

    Votes: 8 6.7%
Back
Top