Custom 525xl with fast cycle and early livestock

Toob

Active Member
View Badges
Joined
Mar 21, 2022
Messages
200
Reaction score
249
Location
Norcal
Rating - 0%
0   0   0
Hello - I started this tank, a 525xl, on June 24th 2022. It is my second reef tank (the first was a reefer 170, so this is a large upgrade). I started my 170 in February, so still pretty new to the hobby.

I decided to start the 525xl with completely dry rock from Marco, dry sand, and hybrid lighting. I also decided to basically skip-cycle and start stocking both coral and fish from Day1. I did a lot of research (and still do) before starting the 170, and it never made sense to me (and still doesn't) why people wait 2, 4 or even 6 months for their tanks to cycle. Corals consume ammonia, nitrite isn't harmful to marine fish, and certain brands of bottled bacteria have proven to work in as little as a day anyway. I also wanted to minimize water changes (I have only done one significant WC so far during the first 4 months), and keep things as simple as possible. Like many, I also wanted to find success with SPS, though my reef would be mixed overall.

Before I backtrack in time to the build, here's a shot of the tank as of this week, at 4 months old. Several of the SPS frags I put in during the first few days are still alive and encrusting (some have grown more than others, some have died too), I've got about 19 fish, and a bunch of happy goni:
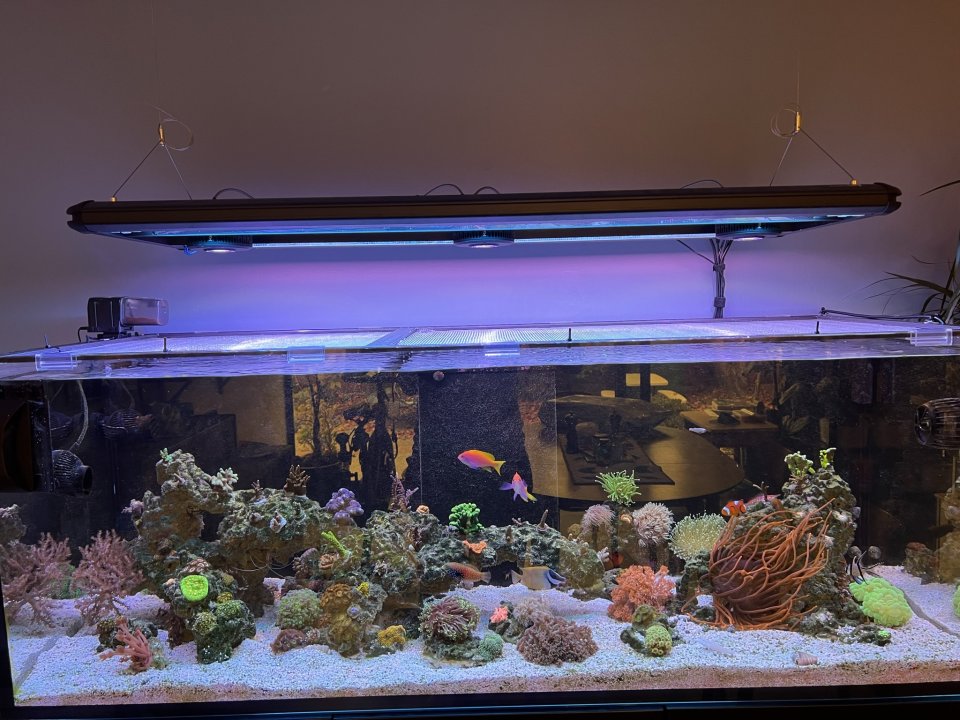
IMG_7027.JPEG
 
OP
OP
Toob

Toob

Active Member
View Badges
Joined
Mar 21, 2022
Messages
200
Reaction score
249
Location
Norcal
Rating - 0%
0   0   0
As noted above, I knew almost immediately I'd be upgrading to a larger tank. I was inheriting a friend's old 525xl, decided to order the matching cabinet from Red Sea (big mistake...) and do all the plumbing myself (not a big mistake). I started aquascaping in the garage with a piece of plywood and a bunch of Marco rock:

IMG_5887.jpeg


I really wanted to go with something minimalistic that made the tank appear long (as opposed to tall) so I left a lot of negative space above the rock. I ended up adding more rock later after the tank was up and running, but tried to stick with this general theme.
IMG_6387.JPEG


Parts piling up in the garage:

IMG_6148.jpeg


I liked my Advanced Acrylics ATO so much that I ordered my sump from John as well. Always prompt shipping and love their products. Again, highly recommend. Decided to go with a Clarisea SK5000 mechanical filtration (I learned that I HATE changing filter socks and fleece), a Nyos 120 skimmer, and a Varios8 return pump using my old Varios2 from the 170 as backup.

Building the cabinet. I was thrilled the new tank would be on tile flooring (dining room) instead of the carpet in the living room where the Reefer170 was located:

IMG_6146.jpeg


The electronics side lined up with a freshly installed GFCI outlet:

67503959147__EC69285A-F8B3-46BA-AFDF-976B1543146A.jpeg


I can't tell you how much this process has made me despise Red Sea - and I will likely upgrade tanks again at some point to something from another company - partly out of principled spite alone. Aside from the terrible experience with the Reefwave app and their CS team during my Reefer170 days, I encountered more issues with the cabinet.

When you order the cabinet standalone, it does *not come with the hardware needed to assemble it*. That's right - none of the cams, screws, hinges, or feet. Nobody told me this when I ordered the cabinet, of course. I only discovered this when I unboxed it to assemble. Also - this hardware set (made largely of super cheap IKEA style assembly bits) is another $250 - which is absolutely insane. Literally 3 baggies of pot metal screws and some plastic dowels. ALSO - this $250 hardware kit *still does not include the feet*! what the heck, red sea? Anyway I ordered some adjustable feet on amazon and epoxied some m10 nuts onto them so they are essentially a better version of the red sea feet anyway (that kit costs another $250, btw... so $500 total in utterly cheap hardware on top of the $1000 price of the cabinet itself).

Anyway, cabinet assembled and tank placed - won't be moved again:

IMG_6150.jpeg
 
OP
OP
Toob

Toob

Active Member
View Badges
Joined
Mar 21, 2022
Messages
200
Reaction score
249
Location
Norcal
Rating - 0%
0   0   0
I decided to go with a Spears gate valve for the drain, and some ball valves for reactors in-line with the return. I wish I had taken more pics of the plumbing process, but I really enjoyed this part of the build. I ended up going with a flexible 1" line plumbed to the Clarisea on the back side, unlike this pic. You can see my test fitting the reactors as well (one large for carbon, one small for GFO):


IMG_6224.jpeg


I ended up swapping the gate valves on the reactors to ball valves for faster on/off. You really don't need the minute adjustment the gate valves provide for this application, and in retrospect I'm glad I made this change to the design. Here's a shot of the reactors installed with the new valves. You can also see the L-bracket I screwed to the wall for the attachment of my H80, since the angle on the arm is a little funky to adjust:

IMG_6372.jpeg


Overall shot of the sump-in-progress (with the UV mounted to the ceiling):

IMG_6371.jpeg


Finally, filling the tank with water:

67760127226__669CCB74-9C23-4D00-800B-A8AD5C988D41.jpeg


You can see the 48" Aqualife Hybrid LED/T5 light I chose. I wanted a hybrid system based on a lot of my research. This also allowed me to reuse the a360x from my old tank (though I added 2 more). So 3x a360x total and 4x T5 bulbs. Figured this would give me the "bath" of light from the T5s and the flexibility of LED. Pretty happy with the choice so far, but more on that later.
 
OP
OP
Toob

Toob

Active Member
View Badges
Joined
Mar 21, 2022
Messages
200
Reaction score
249
Location
Norcal
Rating - 0%
0   0   0
I performed the transfer in just a couple of hours on June 24th, the tank's official birthday. It was pretty hectic so I didn't get many pics, but everyone survived the move. I used the PVC+Sponge method to get the Anemone off the rock that I transferred from the old tank. This only took a couple of hours. You can see I've also started adding some corals, including a torch, mushroom, and monti. All three are alive and well - the monti nearly died at one point, but has bounced back quite healthy. The mushroom and torch have grown considerably.

Remember these corals were added on Day 1, along with a pair of Clownfish, a cleaner shrimp, and a blenny:

IMG_6448.JPEG
 
OP
OP
Toob

Toob

Active Member
View Badges
Joined
Mar 21, 2022
Messages
200
Reaction score
249
Location
Norcal
Rating - 0%
0   0   0
I added some more fish and corals a few days later, including a couple of Anthias and a Tomini Tang (who turned out to be an *******, and was given to a friend with an established tank):

IMG_6440.JPEG


Added a big goni I got from a friend, also still alive and well:

IMG_6709.JPEG


A tort of some kind (cali? oregon?):
IMG_6660.JPEG


Some Zoas:

IMG_6710.JPEG


And a toadstool being occupied by Bakey, my fat blenny:

IMG_6515.JPEG


You can see more corals in the background I didn't mention. All in all, I had probably 20-25 frags and 10 or so fish within the first month. And one black widow BTA. Here's a shot of the tank at the end of July:


IMG_6717.jpeg

You can see my pod culture going on the left - it was important to me to get a big pod population going right away. Daily dosing of phytofeast caused my pod population to explode, and it's still going strong.
 

Creating a strong bulwark: Did you consider floor support for your reef tank?

  • I put a major focus on floor support.

    Votes: 53 40.5%
  • I put minimal focus on floor support.

    Votes: 27 20.6%
  • I put no focus on floor support.

    Votes: 47 35.9%
  • Other.

    Votes: 4 3.1%
Back
Top