Custom Cade S21200 build journey

Corals4Reef

New Member
View Badges
Joined
Nov 9, 2020
Messages
23
Reaction score
83
Location
Tampa
Rating - 0%
0   0   0
Hey everyone. I recently joined R2R and wanted to share my current journey on my Cade 1200 build. I have been in the hobby for over 20 years, but due to a move I left my last tank in Florida and have been out of the hobby for the last 5 years. One positive of Covid has been no travel for work which led me back to the hobby.

I started researching tanks in mid 2020 and explored custom tanks with my LFS, Reef Savvy, Planet, and finally settled on the Cade 1200. I wanted to go with Reef Savvy, but at the time the build time was too far off, which is somewhat ironic as my current build does not seem to be happening sooner.

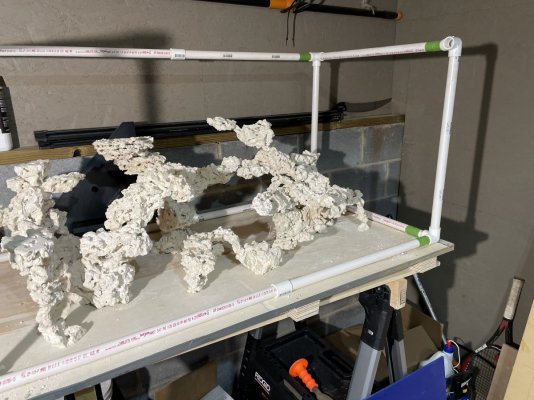
I am planning on an SPS dominant tank and ordered the Cade 1200 from Algaebarn (great experience and service) during the November special and received the tank, rock, salt, sand around Thanksgiving, and the journey begins.

EF1AD25E-C5EC-402F-A38C-90724C5B655F.jpeg

4F673D21-CF9B-4958-AF6E-8CAD2956969C.jpeg


I determined I wanted to go predominately with GHL, so I began obtaining my equipment:
- Abyzz A100 return pump
- GHL Profilux
- GHL Standalone Doser
- GHL Mitras Lx7 x 2
- MP40s x 2
- GEO 36AFR custom sump (more to follow on this experience)
- Nyos skimmer
- GHL ION Director on order

1706ACC6-D244-4579-8382-E8B1393FF569.jpeg


I thought this would be a good start for the build thread. I will have more to follow on the work over the last 3 months to include my approach to replacing the Cade sump. I am looking forward to learning from all of you as I go through this journey.
 
OP
OP
Corals4Reef

Corals4Reef

New Member
View Badges
Joined
Nov 9, 2020
Messages
23
Reaction score
83
Location
Tampa
Rating - 0%
0   0   0
Cade in the room.
tempImage77Wwvu.jpg


Next was customizing the sump. When I ordered the Cade, I knew I wanted a filter roll rather than socks. But was not sure how to accommodate in the Cade sump. When I received the Cade I evaluated the sump and decided to remove the sump and replace with a GEO sump. It was a little challenging to remove the sump, had to remove the doors and the sump had blocks to secure in place. In the end I was able to remove the sump and then unscrewed and removed the PVC board between the electronics.
Added a Philips Hue strip with motion so anytime I open the door the lights are on and I can also tell Alexa to turn off/on.
tempImageRWC4ju.jpg


I ordered a sump from GEO, the 36 AFR in November in blue/black. I understood the timing was 12-15 weeks. Recently contacted GEO on the status and it is looking like end the May, bummer, but understandable. More time to build.
36 AFR sump ordered with Nyos Skimmer (left) in blue/black color (right)
10581399-C6C4-4DC9-AFC6-5EE9CEFB9BE5.jpeg
D1F93B94-4082-415A-A590-37075217A247.jpeg

I ordered a PVC sheet from Home Depot for color matching and placed in the bottom the stand. Getting another one for back.
tempImage8mKO34.jpg
 

PanhandleReef

Active Member
View Badges
Joined
Dec 22, 2018
Messages
131
Reaction score
230
Rating - 0%
0   0   0
I ordered the same sump back in mid October and haven’t heard anything. Guess now I know I’ll be waiting a while longer. Definitely a bummer.
 

Dom

Full Time Reef Keeper
View Badges
Joined
Apr 29, 2016
Messages
5,776
Reaction score
6,341
Location
NY
Rating - 0%
0   0   0
What material is the cabinet made of?
 
OP
OP
Corals4Reef

Corals4Reef

New Member
View Badges
Joined
Nov 9, 2020
Messages
23
Reaction score
83
Location
Tampa
Rating - 0%
0   0   0
I ordered the same sump back in mid October and haven’t heard anything. Guess now I know I’ll be waiting a while longer. Definitely a bummer.
I contacted him about two weeks ago since it had been 13 weeks since I ordered. His repsonse was he was really behind, working 80 hours a week to catch up but mine would be the end of May. You may get yours sooner, sounds like you ordered about a month before me. Hard to wait though.
 
OP
OP
Corals4Reef

Corals4Reef

New Member
View Badges
Joined
Nov 9, 2020
Messages
23
Reaction score
83
Location
Tampa
Rating - 0%
0   0   0
I have been delayed in posting, work took over. I wanted to share my aquascaping. When I ordered the CADE from Algaebarn it was during the November special and I received lbs of dry rock. In prior tanks I had always used live rock and the back wall or stacking approach. This time I wanted to try the negative space approached. Thanks to the BRS video, I ordered the glue, etc and set up the PVC frame and followed the approached they outlined.
tempImageSzlbPm.jpg

It took a couple of weekends, longer that expected.
tempImageiumHwW.jpg

Since I had to move it the scape upstairs to the the tank, I created 3 separate islands, with a small 4th in the middle to add some dimension. It is not easy to see in the pictures. I then used mortar and secured all the pieces together. When moving one of the overhangs broke off, which I was worried about any way, it worked out well that it broke.
tempImageteE49N.jpg

Now, for placing it in the tank.
tempImageyOqZmz.jpg

Once I got in the tank, I decided to add some additional rocks on the right for SPS. Also, I secured all three islands together with superglue and then mortar.
I had initially intended bare bottom, and debated and debated and finally decided to go sand, may regret later, but atheistically struggled with the bare bottom. So added sand.
tempImageqYiME7.jpg


Still waiting on the GEO sump, so empty tank for another 45 days or so. Next up is my Mitras set up and 8020 light rack.
 

Attachments

  • tempImageNGTy3k.jpg
    tempImageNGTy3k.jpg
    206.3 KB · Views: 45
OP
OP
Corals4Reef

Corals4Reef

New Member
View Badges
Joined
Nov 9, 2020
Messages
23
Reaction score
83
Location
Tampa
Rating - 0%
0   0   0
Continuing my build with my light setup.

I had decided to go with 2 Mitras Lx7. I originally ordered the flex mount light brackets from GHL that attach to the stand. The challenge faced was there was no way to attach them to the CADE aluminum stand. They were made to bolt/attach to the back of the stand, but I could not locate a good spot to attach them on the left or right.

I decided to go the 8020 route and credit to Vinny’s build as he outlined the needed pieces. I was able to attach it to the center of the stand in the PVC board.
E8B828DE-E1D0-47EC-9AD7-A4A0F20C9AEE.jpeg


I used components from the GHL flex mount to attach it. I then created a t-mount for the Mitras.
8E23C143-91C9-4DC4-B78B-CB57F990127C.jpeg


Using the clear PVC holders from the flex mount, I cut them and rounded so they would be symmetrical. I drilled the center hole larger to accommodate the bolt for mounting to the 8020.

2A67BD19-FFB5-4202-9954-52CFC3576118.jpeg


F84735C5-955E-4FE1-9528-9A2F9D41CD61.jpeg


I ran the cables in the 8020 with clip holders and plugged in the lights to test.

2B26EBCB-A501-4970-B755-D8E4CD89A0AD.jpeg


3E46F06F-B450-4FB4-9D64-788145E06AD3.jpeg


When I get the water going, I will run a par test. Next up is to work on a water mixing station and I need to determine equipment layout. The GHL dosers and Profilux will not fit into the CADE electrical area.
 

uscggirl

Active Member
View Badges
Joined
Mar 12, 2021
Messages
132
Reaction score
196
Location
Iowa
Rating - 0%
0   0   0
Continuing my build with my light setup.

I had decided to go with 2 Mitras Lx7. I originally ordered the flex mount light brackets from GHL that attach to the stand. The challenge faced was there was no way to attach them to the CADE aluminum stand. They were made to bolt/attach to the back of the stand, but I could not locate a good spot to attach them on the left or right.

I decided to go the 8020 route and credit to Vinny’s build as he outlined the needed pieces. I was able to attach it to the center of the stand in the PVC board.
E8B828DE-E1D0-47EC-9AD7-A4A0F20C9AEE.jpeg


I used components from the GHL flex mount to attach it. I then created a t-mount for the Mitras.
8E23C143-91C9-4DC4-B78B-CB57F990127C.jpeg


Using the clear PVC holders from the flex mount, I cut them and rounded so they would be symmetrical. I drilled the center hole larger to accommodate the bolt for mounting to the 8020.

2A67BD19-FFB5-4202-9954-52CFC3576118.jpeg


F84735C5-955E-4FE1-9528-9A2F9D41CD61.jpeg


I ran the cables in the 8020 with clip holders and plugged in the lights to test.

2B26EBCB-A501-4970-B755-D8E4CD89A0AD.jpeg


3E46F06F-B450-4FB4-9D64-788145E06AD3.jpeg


When I get the water going, I will run a par test. Next up is to work on a water mixing station and I need to determine equipment layout. The GHL dosers and Profilux will not fit into the CADE electrical area.
That is a beautiful light set up!!
edit: and the aquascape is gorgeous as well!
 

ReefStash

Well-Known Member
View Badges
Joined
Jun 30, 2020
Messages
572
Reaction score
1,265
Location
Naples
Rating - 100%
2   0   0
Continuing my build with my light setup.

I had decided to go with 2 Mitras Lx7. I originally ordered the flex mount light brackets from GHL that attach to the stand. The challenge faced was there was no way to attach them to the CADE aluminum stand. They were made to bolt/attach to the back of the stand, but I could not locate a good spot to attach them on the left or right.

I decided to go the 8020 route and credit to Vinny’s build as he outlined the needed pieces. I was able to attach it to the center of the stand in the PVC board.
E8B828DE-E1D0-47EC-9AD7-A4A0F20C9AEE.jpeg


I used components from the GHL flex mount to attach it. I then created a t-mount for the Mitras.
8E23C143-91C9-4DC4-B78B-CB57F990127C.jpeg


Using the clear PVC holders from the flex mount, I cut them and rounded so they would be symmetrical. I drilled the center hole larger to accommodate the bolt for mounting to the 8020.

2A67BD19-FFB5-4202-9954-52CFC3576118.jpeg


F84735C5-955E-4FE1-9528-9A2F9D41CD61.jpeg


I ran the cables in the 8020 with clip holders and plugged in the lights to test.

2B26EBCB-A501-4970-B755-D8E4CD89A0AD.jpeg


3E46F06F-B450-4FB4-9D64-788145E06AD3.jpeg


When I get the water going, I will run a par test. Next up is to work on a water mixing station and I need to determine equipment layout. The GHL dosers and Profilux will not fit into the CADE electrical area.
Sick scape! Nice work.
 

AlgaeBarn

Marine Aquariums Made Easy!
View Badges
Joined
Oct 14, 2013
Messages
2,416
Reaction score
3,510
Location
Denver, Colorado
Rating - 100%
1   0   0
Continuing my build with my light setup.

I had decided to go with 2 Mitras Lx7. I originally ordered the flex mount light brackets from GHL that attach to the stand. The challenge faced was there was no way to attach them to the CADE aluminum stand. They were made to bolt/attach to the back of the stand, but I could not locate a good spot to attach them on the left or right.

I decided to go the 8020 route and credit to Vinny’s build as he outlined the needed pieces. I was able to attach it to the center of the stand in the PVC board.
E8B828DE-E1D0-47EC-9AD7-A4A0F20C9AEE.jpeg


I used components from the GHL flex mount to attach it. I then created a t-mount for the Mitras.
8E23C143-91C9-4DC4-B78B-CB57F990127C.jpeg


Using the clear PVC holders from the flex mount, I cut them and rounded so they would be symmetrical. I drilled the center hole larger to accommodate the bolt for mounting to the 8020.

2A67BD19-FFB5-4202-9954-52CFC3576118.jpeg


F84735C5-955E-4FE1-9528-9A2F9D41CD61.jpeg


I ran the cables in the 8020 with clip holders and plugged in the lights to test.

2B26EBCB-A501-4970-B755-D8E4CD89A0AD.jpeg


3E46F06F-B450-4FB4-9D64-788145E06AD3.jpeg


When I get the water going, I will run a par test. Next up is to work on a water mixing station and I need to determine equipment layout. The GHL dosers and Profilux will not fit into the CADE electrical area.

Maybe we need to make that bracket a real product. Love it!
 

Clear reef vision: How do you clean the inside of the glass on your aquarium?

  • Razor blade

    Votes: 120 58.5%
  • Plastic scraper

    Votes: 62 30.2%
  • Clean-up crew

    Votes: 74 36.1%
  • Magic eraser

    Votes: 34 16.6%
  • Other

    Votes: 61 29.8%
Back
Top