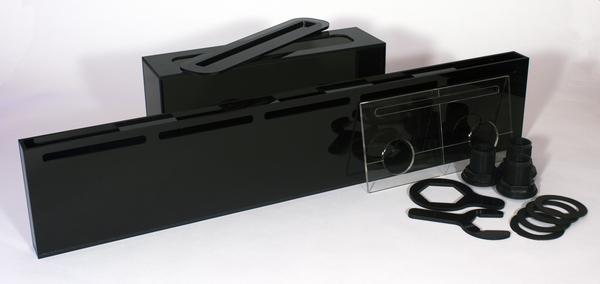
DIY external back overflow, am I underestimating this?

Bars

Well-Known Member
View Badges
Joined
Nov 23, 2019
Messages
544
Reaction score
650
Location
The Netherlands
Rating - 0%
0   0   0
I'll be ordering a custom made tank in a few weeks and want to drill the holes for the overflow myself. Since this tank isn't extremely wide and internal overflow chambers are just an eyesore, I'd love to make an external overflow. It'll also give me the space to use a herbie style drain without having this enormous internal chamber.

I think it'll be pretty straight forward: drill a few holes in the back where you want the waterline to be, put together a nice chamber and silicone it to the outside of the tank, stick a bulkhead through with some type of guard on it so fish can't get through and done. Might not be the prettiest, but it'll do in my mind. Of course I need to drill the bottom of the external chamber as well, that I understand :)

Is this correct? Am I overlooking something here?
One of those premade ghost overflows is out of my budget, so that's not an option.
 

JosephM

Valuable Member
View Badges
Joined
Nov 22, 2020
Messages
1,561
Reaction score
1,049
Location
Lincolnton
Rating - 0%
0   0   0
It really is that easy as long as it’s not tempered. Make sure they’re nice diamond hole saw drill bits and take your time. Don’t apply anymore pressure then what the drill gives it. Use corded if possible for more torque. I personally used a kit because buying all the separate pieces you’re only saving a few dollars. But once again. Make sure it is not tempered or you’ll shatter the glass
 

fade2black

Is this thing on?
View Badges
Joined
Sep 29, 2006
Messages
472
Reaction score
513
Location
Mentor, OH
Rating - 0%
0   0   0
There are a few companies that make these. Eshopps makes one too.

 
OP
OP
Bars

Bars

Well-Known Member
View Badges
Joined
Nov 23, 2019
Messages
544
Reaction score
650
Location
The Netherlands
Rating - 0%
0   0   0
It really is that easy as long as it’s not tempered. Make sure they’re nice diamond hole saw drill bits and take your time. Don’t apply anymore pressure then what the drill gives it. Use corded if possible for more torque. I personally used a kit because buying all the separate pieces you’re only saving a few dollars. But once again. Make sure it is not tempered or you’ll shatter the glass
Thanks :) I was mostly questioning myself about the overflow part though, I've read up so much about glass drilling already lol. The tank isn't ordered yet, so if I change my mind I can still let it get drilled for me. I'll be sure to ask the builder what type of glass it is though!
 
OP
OP
Bars

Bars

Well-Known Member
View Badges
Joined
Nov 23, 2019
Messages
544
Reaction score
650
Location
The Netherlands
Rating - 0%
0   0   0
There are a few companies that make these. Eshopps makes one too.

That's one of those that's out of my budget :p
Which is also part of my question: what does that internal box do? Is it necessary? Because if not, I can just get a few bulkheads for $20 and a drill bit for another 15 and make it myself. I have enough glass laying around to make a chamber large enough to fit a herbie.
 
OP
OP
Bars

Bars

Well-Known Member
View Badges
Joined
Nov 23, 2019
Messages
544
Reaction score
650
Location
The Netherlands
Rating - 0%
0   0   0
Alright thanks! Makes it easier for me to understand what I'll be doing :)
Shouldn't be too hard to make either. I want a dark blue background, so it'll look better anyway than a random pitch black box I guess.
 

Ratherbeflyen

Well-Known Member
View Badges
Joined
Mar 9, 2018
Messages
571
Reaction score
935
Location
Houston
Rating - 0%
0   0   0
My tank was originally an internal overflow that I converted to an external overflow exactly as you describe. I went with a 3 drain bean animal system. For the holes in the back of the actual tank, I downloaded a template for an acrylic overflow I could buy that I could switch to if mine didn't work. Like this one, https://synergyreef.com/Manuals/SynergyReefOverflowInstall.pdf

It cost me about $10 for the sheet of glass I used and I love the finished product. I went with tinted glass to cut down on algae etc.

IMG_2606.JPG


The external box is ~23"wide x 4" front to back x 16" deep. (I would not do 16" deep again, 12" is more than enough.)

IMG_20171119_163107.jpg


The internal piece is the same 24" wide x 4" deep x 1.5" front to back.

IMG_20171119_163124.jpg


I also built a screen and lid that fits inside the internal portion. That keeps livestock out of the drains and the black acrylic lid prevents algae from growing inside the overflow.

IMG_20180510_235835(1).jpg


The overflow combined with a 3D background I built makes the overflow almost disappear.


IMG_20180510_235528.jpg


IMG_20180510_234006.jpg


Almost 3 years later, the drain has been problem free and I love the natural tank look free from drains and equipment.


IMG_20201211_225220.jpg
 
OP
OP
Bars

Bars

Well-Known Member
View Badges
Joined
Nov 23, 2019
Messages
544
Reaction score
650
Location
The Netherlands
Rating - 0%
0   0   0
My tank was originally an internal overflow that I converted to an external overflow exactly as you describe. I went with a 3 drain bean animal system. For the holes in the back of the actual tank, I downloaded a template for an acrylic overflow I could buy that I could switch to if mine didn't work. Like this one, https://synergyreef.com/Manuals/SynergyReefOverflowInstall.pdf

It cost me about $10 for the sheet of glass I used and I love the finished product. I went with tinted glass to cut down on algae etc.

IMG_2606.JPG


The external box is ~23"wide x 4" front to back x 16" deep. (I would not do 16" deep again, 12" is more than enough.)

IMG_20171119_163107.jpg


The internal piece is the same 24" wide x 4" deep x 1.5" front to back.

IMG_20171119_163124.jpg


I also built a screen and lid that fits inside the internal portion. That keeps livestock out of the drains and the black acrylic lid prevents algae from growing inside the overflow.

IMG_20180510_235835(1).jpg


The overflow combined with a 3D background I built makes the overflow almost disappear.


IMG_20180510_235528.jpg


IMG_20180510_234006.jpg


Almost 3 years later, the drain has been problem free and I love the natural tank look free from drains and equipment.


IMG_20201211_225220.jpg
Awesome! I might steal this idea :D
 
OP
OP
Bars

Bars

Well-Known Member
View Badges
Joined
Nov 23, 2019
Messages
544
Reaction score
650
Location
The Netherlands
Rating - 0%
0   0   0
My tank was originally an internal overflow that I converted to an external overflow exactly as you describe. I went with a 3 drain bean animal system. For the holes in the back of the actual tank, I downloaded a template for an acrylic overflow I could buy that I could switch to if mine didn't work. Like this one, https://synergyreef.com/Manuals/SynergyReefOverflowInstall.pdf

It cost me about $10 for the sheet of glass I used and I love the finished product. I went with tinted glass to cut down on algae etc.

IMG_2606.JPG


The external box is ~23"wide x 4" front to back x 16" deep. (I would not do 16" deep again, 12" is more than enough.)

IMG_20171119_163107.jpg


The internal piece is the same 24" wide x 4" deep x 1.5" front to back.

IMG_20171119_163124.jpg


I also built a screen and lid that fits inside the internal portion. That keeps livestock out of the drains and the black acrylic lid prevents algae from growing inside the overflow.

IMG_20180510_235835(1).jpg


The overflow combined with a 3D background I built makes the overflow almost disappear.


IMG_20180510_235528.jpg


IMG_20180510_234006.jpg


Almost 3 years later, the drain has been problem free and I love the natural tank look free from drains and equipment.


IMG_20201211_225220.jpg
By the way, what dimensions did you use for both the external and internal chambers? Also, did you install the bulkheads first and then attach the internal chamber to the back glass?
 

brahm

Active Member
View Badges
Joined
Mar 4, 2010
Messages
492
Reaction score
357
Location
Mammoth Lakes,Ca
Rating - 0%
0   0   0
I did this on one of my tanks, worked great took up 0 space inside the tank and was as cheap as it gets. I had a small screen (sometimes) over the bulkhead no overflow box, 100% wish my current tank was setup this way.
1613470611540.jpeg

1613470297047.jpeg
 

Ratherbeflyen

Well-Known Member
View Badges
Joined
Mar 9, 2018
Messages
571
Reaction score
935
Location
Houston
Rating - 0%
0   0   0
Awesome! I might steal this idea :D

By the way, what dimensions did you use for both the external and internal chambers? Also, did you install the bulkheads first and then attach the internal chamber to the back glass?
I made the internal baffle the size between the side of the tank the center brace. It came out to be a little less than 24". Then made the external portion the same width.

As previously mentioned, I drilled the holes in the back of the display tank the size and location of a ghost overflow. For the depth of my overflow, I made the internal portion just deep enough to cover those holes. Then made the top about 1/2" lower than the desired water height. Depending on the size of your return pump, that is about where the water level will be. In my case about 4". It's 1 1/2" front to back, because that's the size I needed to get my hands to the bottom of the 4" baffle. For water flow, I think 3/4" would have been more than enough.

As for the external portion of the overflow. The depth of the box, is a trade-off between water volume that drains down when the return pump is off and the potential for a siphon to draw air from the surface. If it's too shallow, the full siphon drain will constantly draw air from the surface breaking the siphon and make your drain hard to tune. if it's really deep, you just need a place for all that water to go when the return pump is off. Mine is 16" top to bottom, but it doesn't need to be that big. Especially if you have a small sump. I also made the box the size I needed so I could get both the bulkheads and my hands in the overflow to install them after it was constructed. I used 1 1/5" bulkheads only because the return pump has 1 1/2" return line, but it was way overkill. 1" drains would be what I would use if I did it again. Based on the size of the bulkheads, my hands, and sump size, I made the external box ~24"x16"x4".

I run a pretty high turnover at about 2500 gallons per hour. If you're running 500 GPH, you could shrink the size. You'd have to go bigger if your going to run 5000 GPH.

I started by cutting the glass to size. Then drilled the holes I needed for the bulkheads. Constructed the box bottom, back, and sides on the bench with silicone. Let that cure for about an hour then siliconed the box to the back of tank. Silicone doesn't like to stick to cured silicone. So there is a line between silicone not sticking and being to wet to hold together. You could also could it in place on the tank. It would be a little harder to make smooth seams that way, but certainly doable.
 

Peng1606

Active Member
View Badges
Joined
Jan 18, 2020
Messages
100
Reaction score
96
Rating - 0%
0   0   0
If your tank hasn’t been built yet have you considered a coast to coast overflow? Can be done on side or back depending on how you want your tank configured.
I have mine on back glass where it’s height is where I want the water level to be and the overflow box runs along the length of whole back. Just thin layer of water skims off whole length and flows over into overflow box. Do a search on coast to coast external overflow. No issues with it at all.
 
OP
OP
Bars

Bars

Well-Known Member
View Badges
Joined
Nov 23, 2019
Messages
544
Reaction score
650
Location
The Netherlands
Rating - 0%
0   0   0
If your tank hasn’t been built yet have you considered a coast to coast overflow? Can be done on side or back depending on how you want your tank configured.
I have mine on back glass where it’s height is where I want the water level to be and the overflow box runs along the length of whole back. Just thin layer of water skims off whole length and flows over into overflow box. Do a search on coast to coast external overflow. No issues with it at all.
I haven't yet. If I understand correctly, the (in my case) back glass would need a recess (is that's what it's called?) correct? I assume that'll cost me big bucks, since simply drilling 2 holes would cost me close to $100 already.

Also came across this pic here on R2R:
1613979564145.png

That got me thinking. What if I'd ask for the back panel to be, say, 2'' less tall than the sides and front and make the external overflow chamber exactly the same length as the tank itself. Would there be any significant risks in doing it that way? In that case it would probably cost me just a tad more for the larger overflow chamber.

I do like the design to be honest, since that would completely eliminate any overflow boxes in the DT.

Edit: might as well just make the tank wider and place a divider between the would be overflow and DT.
 
Last edited:

Ratherbeflyen

Well-Known Member
View Badges
Joined
Mar 9, 2018
Messages
571
Reaction score
935
Location
Houston
Rating - 0%
0   0   0
I personally ruled out a coast to coast overflow. I like the idea of additional surface flow, but my tank has a large center brace and I'm not going to have a section of overflow I can't access. If I had a rimless tank, I would consider a coast to coast overflow, but I've never seen a 200+ gallon tank with no bracing.
 
Back
Top