DIY reef-pi build log

sjeff35

Active Member
View Badges
Joined
Jun 14, 2018
Messages
172
Reaction score
356
Location
Corrales, NM
Rating - 0%
0   0   0
I made a blank version anyway haha. I figured it may hopefully encourage people to remix it easier :)
Here it is:
https://www.thingiverse.com/thing:3660375
The box can always just be printed and then I/O holes can be cut out with a dremel or a drill if people prefer that option.

That's awesome. I'm going to play around with this now.

Thanks
 

MaccaPopEye

Well-Known Member
View Badges
Joined
Jan 5, 2016
Messages
697
Reaction score
1,232
Rating - 0%
0   0   0
Nice! Can you add these to the reef-pi group on thingiverse?
oops, thought I did that last night, but I have made sure they are both in there now :)

That's awesome. I'm going to play around with this now.

Thanks
No worries, have fun and good luck :) One other tip I can suggest is when doing the sketches, I use a lot of construction lines to make sure everything is lined up where I want it but I am pretty sure the Lars video tutorials cover those a fair bit
 

sjeff35

Active Member
View Badges
Joined
Jun 14, 2018
Messages
172
Reaction score
356
Location
Corrales, NM
Rating - 0%
0   0   0
First version...I just printed in draft mode to see what it was like. I didn't make any modifications.

upload_2019-5-31_13-4-56.png
 

MaccaPopEye

Well-Known Member
View Badges
Joined
Jan 5, 2016
Messages
697
Reaction score
1,232
Rating - 0%
0   0   0
First version...I just printed in draft mode to see what it was like. I didn't make any modifications.

upload_2019-5-31_13-4-56.png
Awesome!

I also forgot to mention in the description on thingi that the logo and text boxes are designed so that if you pause the print at the right height you can change the filament and make a multi colour print (that's why its got different layer heights for different areas). I just insert the M600 command at the right layer in the G-code (if you are using Marlin). There is better ways to do single extruder, multi coloured prints without staggering layer height but I haven't gotten round to trying them out yet :)
 

sjeff35

Active Member
View Badges
Joined
Jun 14, 2018
Messages
172
Reaction score
356
Location
Corrales, NM
Rating - 0%
0   0   0
I’m jealous :/)

If we can come up with a design that works and has all the standoffs for the different parts and the holes and cutouts for connections, I'll print one in any color you want and ship it to you! You deserve a few for all your hard work on this project!
 

sjeff35

Active Member
View Badges
Joined
Jun 14, 2018
Messages
172
Reaction score
356
Location
Corrales, NM
Rating - 0%
0   0   0
Awesome!

I also forgot to mention in the description on thingi that the logo and text boxes are designed so that if you pause the print at the right height you can change the filament and make a multi colour print (that's why its got different layer heights for different areas). I just insert the M600 command at the right layer in the G-code (if you are using Marlin). There is better ways to do single extruder, multi coloured prints without staggering layer height but I haven't gotten round to trying them out yet :)


NOOOOOOOOOOOOOOOOWWWWW you tell me! :p

I have not tried that yet, but I should one day. I need to check and make sure my printer can do that! That would be pretty awesome!
 

sjeff35

Active Member
View Badges
Joined
Jun 14, 2018
Messages
172
Reaction score
356
Location
Corrales, NM
Rating - 0%
0   0   0
Im planning to get a creality ender .. https://www.amazon.com/dp/B07DYL9B2S/ , still thinking what extra gears i may need, or just the printer is enough (and filament of course)


DO IT!!! Get the printer and a few rolls of filament. I ended up buying an airtight plastic bin and a bottle of silica beads to keep them dry. That's really the only thing I added.

I have a unit very similar to that one, the Anycubic I3 mega. Paid about the same amount. It works great for what it is!
I can't wait to see what you can create!
 

MaccaPopEye

Well-Known Member
View Badges
Joined
Jan 5, 2016
Messages
697
Reaction score
1,232
Rating - 0%
0   0   0
NOOOOOOOOOOOOOOOOWWWWW you tell me! :p

I have not tried that yet, but I should one day. I need to check and make sure my printer can do that! That would be pretty awesome!
Woops haha, it took me a bit of practise and fine tuning but the M600 command is pretty good, you may need to manually enable it in Marlin though. Then I just slice the model like normal and then manually add "M600" into the G-code right before each layer that I want the colour to change. It pauses at that height and will retract the current filament out (distance it retracts can be changed in marlin) and then it waits for you to notice. You can then change the colour and tell it to start printing again, it will prime the nozzle, let you wipe off the excess and then when you tell it to resume, off it goes. It's a cool way to make a multi-colour print with only 1 extruder, you can see what it looks like in the pics I uploaded to thingi.

But it's just an option, I kinda like that the layers are staggered anyway as you can still see the details even when it is printed in one colour :)

Im planning to get a creality ender .. https://www.amazon.com/dp/B07DYL9B2S/ , still thinking what extra gears i may need, or just the printer is enough (and filament of course)
Awesome :) You really shouldn't need anything other than the printer and some filament to get started. The Ender 3 should be more than good enough out of the box that they don't really need upgrades to print well, it's all about nailing down the slicer settings!
 

Ranjib

7500 Club Member
View Badges
Joined
Apr 16, 2016
Messages
9,843
Reaction score
17,058
Location
Pleasant Hill, Concord
Rating - 0%
0   0   0
Woops haha, it took me a bit of practise and fine tuning but the M600 command is pretty good, you may need to manually enable it in Marlin though. Then I just slice the model like normal and then manually add "M600" into the G-code right before each layer that I want the colour to change. It pauses at that height and will retract the current filament out (distance it retracts can be changed in marlin) and then it waits for you to notice. You can then change the colour and tell it to start printing again, it will prime the nozzle, let you wipe off the excess and then when you tell it to resume, off it goes. It's a cool way to make a multi-colour print with only 1 extruder, you can see what it looks like in the pics I uploaded to thingi.

But it's just an option, I kinda like that the layers are staggered anyway as you can still see the details even when it is printed in one colour :)


Awesome :) You really shouldn't need anything other than the printer and some filament to get started. The Ender 3 should be more than good enough out of the box that they don't really need upgrades to print well, it's all about nailing down the slicer settings!
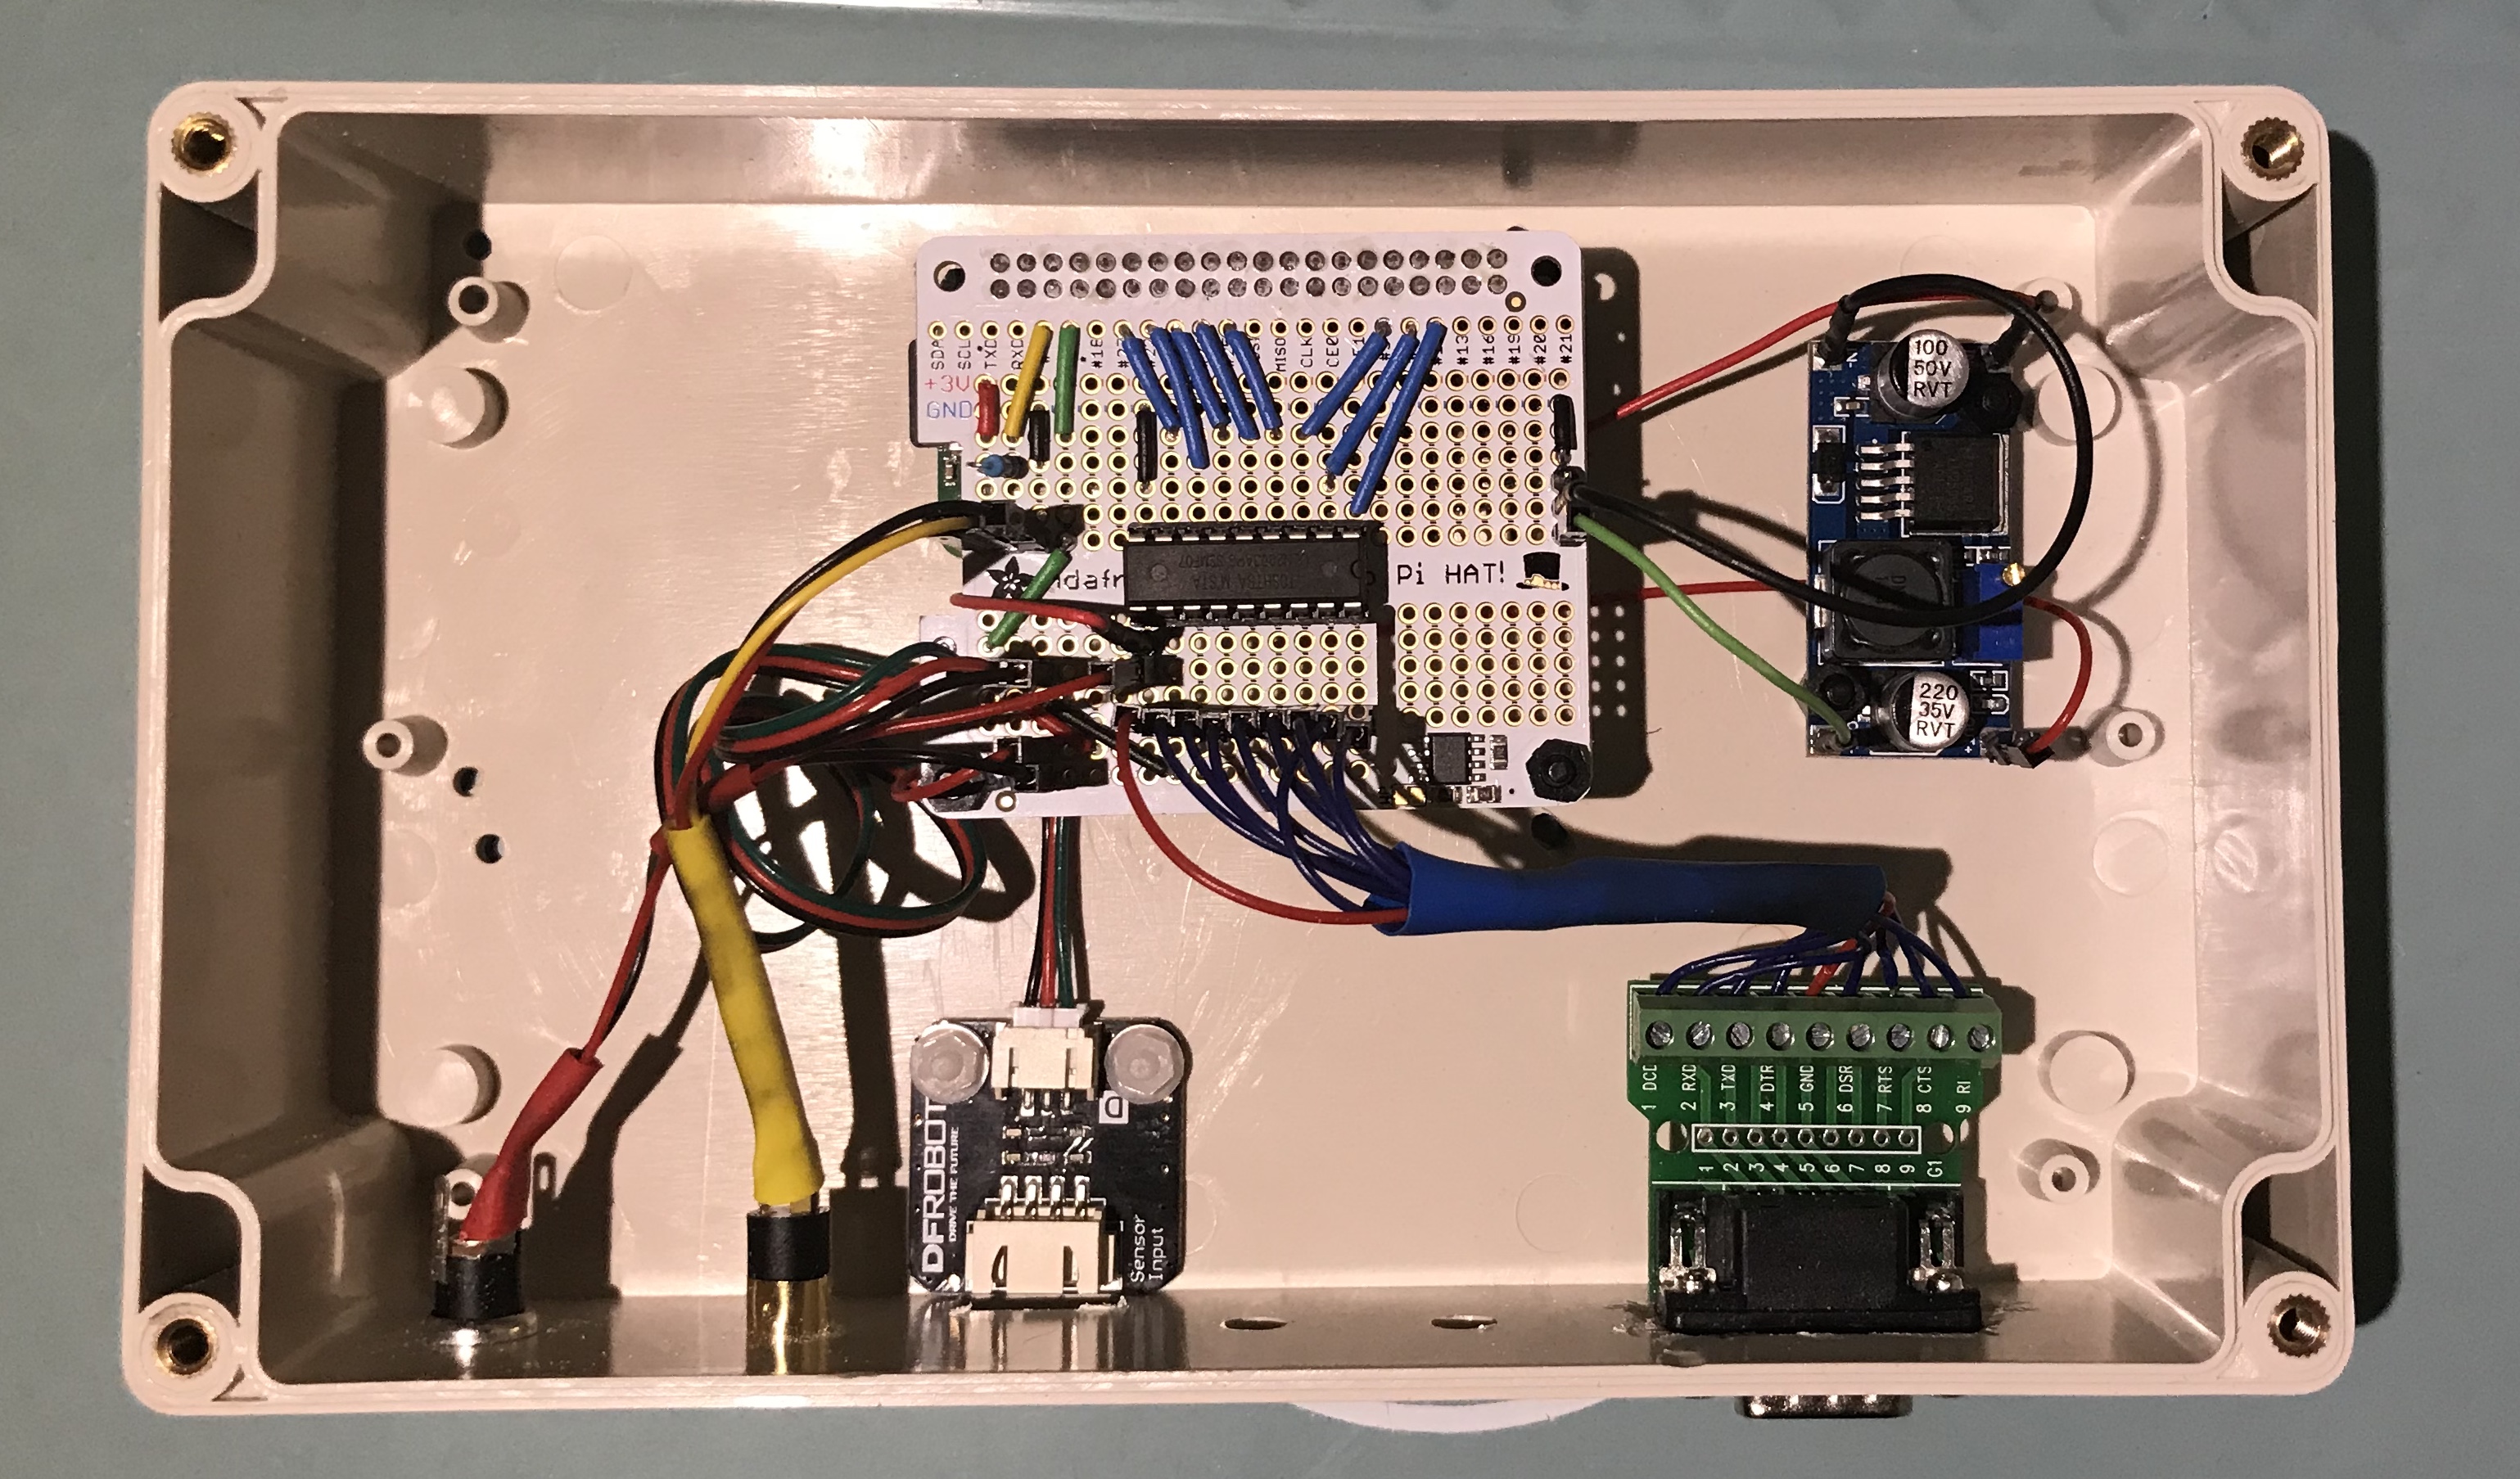
Any beginner resources you would recommed? I want to get started with modeling the first enclosures while the printer arrives (will order sometime next week). Im looking at something that will replace this:
sensors_CCDBD9FA-E28C-497E-AF6D-AAF850C8B7C4.jpeg


so .. a smaller enclosure, with standoffs for mounting the ato circuit, pi, lm2596 and mounting holes for the ato sensor, power in, temp sensor and db9 connector.


Apologies if im drfting this thread... i'll start a dedicated thread soonish
 

crusso1993

7500 Club Member
View Badges
Joined
Oct 21, 2018
Messages
8,671
Reaction score
44,649
Location
SW, FL, USA
Rating - 0%
0   0   0
@dantimdad - started off with an Ender 3 and, if I'm not mistaken, added some add-ons for better easier/better printing/prints. Maybe he'll chime in and offer some input as he's become very good with it!
 

Ranjib

7500 Club Member
View Badges
Joined
Apr 16, 2016
Messages
9,843
Reaction score
17,058
Location
Pleasant Hill, Concord
Rating - 0%
0   0   0
I have three enders now and have done some inexpensive mods to improve them

What help we're you needing?
Beginner friendly resources on getting started with 3D printing for the time being. I want to start printing enclosures first for my controller (7x4 “) with standoffs for mounting raspberry pi and couple of other ICs and holes for panel mount audio and barrel jacks (power sensor etc). After that I want enclosures for peristaltic pump, various types of contraption for sensors , probes etc.
 

sfgabe

Active Member
View Badges
Joined
Sep 7, 2018
Messages
169
Reaction score
264
Rating - 0%
0   0   0
Beginner friendly resources on getting started with 3D printing for the time being. I want to start printing enclosures first for my controller (7x4 “) with standoffs for mounting raspberry pi and couple of other ICs and holes for panel mount audio and barrel jacks (power sensor etc). After that I want enclosures for peristaltic pump, various types of contraption for sensors , probes etc.

The modeling is probably the biggest learning curve, if cad-type work is not something you're used to. Before making big plans for designing and printing exactly the right enclosures, I would go for some simple stuff first. Download some pi enclosures or stands from thingiverse and see how they're doing it, and make some super simple boxes, etc. with sketchup. The first thing everyone prints are printer mods (feet, camera holders, etc.), so find some you like and use those as printing practice. Fun cookie cutters for the kids are also easy things to start with.

For designing things to fit pre-existing parts you'll want some decent digital calipers to get measurements just right, and probably glue sticks and a very thin pallet knife to get things stuck and unstuck to the bed.
 

sjeff35

Active Member
View Badges
Joined
Jun 14, 2018
Messages
172
Reaction score
356
Location
Corrales, NM
Rating - 0%
0   0   0
@Michael Lane

I'm having a brain fart!!! :p

I finally got around to messing with the HAT I picked up from you months ago. I'm kind of force to as the reef pi I had running my Kessil bit the dust after a power outage we had.

I'm totally stumped and I know I'm probably missing something really easy, but I can't for the life of me at the moment figure out how to connect the light1 jack to my Kessil. There's 4 wires on the jack, only 3 on the female jack. What am I missing here?

Thanks
 
OP
OP
Michael Lane

Michael Lane

Well-Known Member
View Badges
Joined
Aug 11, 2018
Messages
677
Reaction score
1,123
Rating - 0%
0   0   0
@sjeff35 I'm not really familiar with Kessil lights, but I think they are 1-10v control. I don't recall if they are pwm or analog. I think Ranjib's guide used a transistor based amplifier to run Kessil lights.

I'm helping another reefer with a pwm to analog conversion, so let me know how it was set up before and I can probably help a little better.
 

sjeff35

Active Member
View Badges
Joined
Jun 14, 2018
Messages
172
Reaction score
356
Location
Corrales, NM
Rating - 0%
0   0   0
@sjeff35 I'm not really familiar with Kessil lights, but I think they are 1-10v control. I don't recall if they are pwm or analog. I think Ranjib's guide used a transistor based amplifier to run Kessil lights.

I'm helping another reefer with a pwm to analog conversion, so let me know how it was set up before and I can probably help a little better.


Hi Michael,

Thanks for getting back to me.

I'm using @Ranjib's basic transistor based (or was using). I'm not sure if it's pwm or analog.

I guess I was thinking I could wire up the HAT like I had it before with the Kessil.
 

Stuck to your aquarium: Do you put reef-related stickers on or around your reef system?

  • I have reef-related stickers everywhere!

    Votes: 0 0.0%
  • I have some reef-related stickers on or around my reef system.

    Votes: 0 0.0%
  • I have some reef-related stickers, but not on my reef system.

    Votes: 1 50.0%
  • I don’t have reef-related stickers, but I am interested in getting some.

    Votes: 1 50.0%
  • I have no interest in reef-related stickers.

    Votes: 0 0.0%
  • Other.

    Votes: 0 0.0%
Back
Top