electrical idiot builds a controller - a reef pi build

OP
OP
Mikeneedsahobby

Mikeneedsahobby

Well-Known Member
View Badges
Joined
Sep 16, 2018
Messages
516
Reaction score
922
Rating - 0%
0   0   0
A few clean up items that I forgot to mention yesterday in my euphoria of building my very own thermometer.

1) Thank you to all the people with reef-pi builds. I read most them, don't understand most of what I read, always get a little smarter, and never comment. So thank you even though you don't even know I am there. looking at you diamond1 (you were the most influential in convincing me to do this)
2) Thank you Ranjib and theatrus! Making a thermometer was much easier than I imagined.
3) Thank you to people that leave me words of encouragement here. Despite my poor grammar you come and read and comment, I appreciate it. My grammar issues are due to English being a second language for me. I learned American growing up and have never overcome this deficiency.

4) Now that I have attached theatrus's (theatrus'es?) baseboard to the raspberry PI a few lines needed to be changed in the config.txt file. I used ssh to logon to the raspberry pi and then sudo nano to edit the file. theatrus provides the code in his documentation and I removed the line Ranjib had me add as one of theatrus's lines did the same thing.

5) Up until now I have been using a standard mini usb cable and whatever plug I found to power the Raspberry PI zero. With the base board the Pi is powered by the baseboard itself and the usb cable is not needed. The baseboard is powered by a 12V 2A AC/DC wall power converter. I bought a 2 pack on amazon for $14.

I have started looking into a housing for the controller and I need a DB9 cable to the power outlets. The next things I want to work on are to coat the temperature probe to prevent corrosion in the tank and to get a mini touch screen attached so that laptop is not needed to see the status or make small changes.
 

Diamond1

Valuable Member
View Badges
Joined
Oct 17, 2013
Messages
1,368
Reaction score
1,911
Location
Cleveland Ohio
Rating - 0%
0   0   0
A few clean up items that I forgot to mention yesterday in my euphoria of building my very own thermometer.

1) Thank you to all the people with reef-pi builds. I read most them, don't understand most of what I read, always get a little smarter, and never comment. So thank you even though you don't even know I am there. looking at you diamond1 (you were the most influential in convincing me to do this)
2) Thank you Ranjib and theatrus! Making a thermometer was much easier than I imagined.
3) Thank you to people that leave me words of encouragement here. Despite my poor grammar you come and read and comment, I appreciate it. My grammar issues are due to English being a second language for me. I learned American growing up and have never overcome this deficiency.

4) Now that I have attached theatrus's (theatrus'es?) baseboard to the raspberry PI a few lines needed to be changed in the config.txt file. I used ssh to logon to the raspberry pi and then sudo nano to edit the file. theatrus provides the code in his documentation and I removed the line Ranjib had me add as one of theatrus's lines did the same thing.

5) Up until now I have been using a standard mini usb cable and whatever plug I found to power the Raspberry PI zero. With the base board the Pi is powered by the baseboard itself and the usb cable is not needed. The baseboard is powered by a 12V 2A AC/DC wall power converter. I bought a 2 pack on amazon for $14.

I have started looking into a housing for the controller and I need a DB9 cable to the power outlets. The next things I want to work on are to coat the temperature probe to prevent corrosion in the tank and to get a mini touch screen attached so that laptop is not needed to see the status or make small changes.

Glad I could assist you in joining in the reef-pi club. Personally I have never done anything like this before and the end result has been most satisfying.
 

Ranjib

7500 Club Member
View Badges
Joined
Apr 16, 2016
Messages
9,843
Reaction score
17,058
Location
Pleasant Hill, Concord
Rating - 0%
0   0   0
We really appreciate the kind words. It keeps us motivated, and shows the very best of reef2reef value, empathy . Thank you

I know for sure this thread will help everyone who is not so familiar with electronics to learn and try, and it will help us, the developers to understand how to make reef-pi easier to build/use less confusing.
 
OP
OP
Mikeneedsahobby

Mikeneedsahobby

Well-Known Member
View Badges
Joined
Sep 16, 2018
Messages
516
Reaction score
922
Rating - 0%
0   0   0
We really appreciate the kind words. It keeps us motivated, and shows the very best of reef2reef value, empathy . Thank you

I know for sure this thread will help everyone who is not so familiar with electronics to learn and try, and it will help us, the developers to understand how to make reef-pi easier to build/use less confusing.
:)
 
OP
OP
Mikeneedsahobby

Mikeneedsahobby

Well-Known Member
View Badges
Joined
Sep 16, 2018
Messages
516
Reaction score
922
Rating - 0%
0   0   0
I am back from Mexico. The steak was phenomenal! I had a taste of Jose Cuervo Reserva de la Familia, I may have a new favorite tequila!


I have heard people have been having problems with their inexpensive temperature probes corroding or failing while sitting in saltwater. I decided to pot mine in epoxy. Epoxy, once cured, in chemically inert, nearly indestructible, and will never corrode or break down. I had some let over from my ski building days.

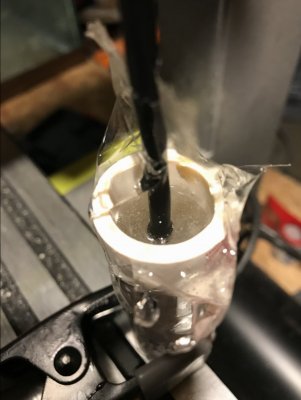
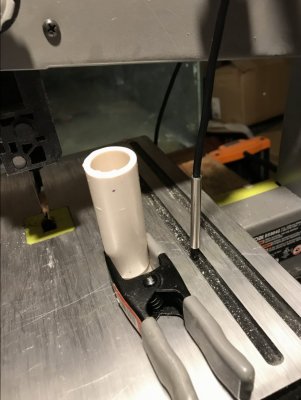
First I needed a mold to hold the epoxy and probe. I wanted a cylindrical shape and it needed to be large enough to ensure the probe could hang inside without hitting the side. I settled on 3/4 pvc pipe. I would have used 1/2 if I had some. I cut a length slightly longer than the probe. I messed around with my tools until I found a clamp method that allowed the probe to hang inside without touching the bottom or sides. I also cut off the heat shrink around the probe. It won't help the epoxy seal.
IMG_7726.JPG

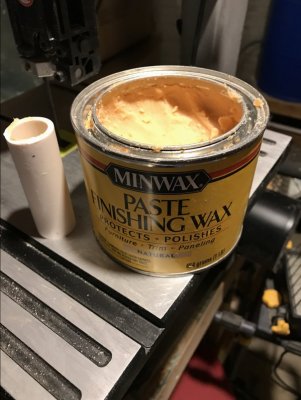
Epoxy bonds to almost everything. But it doesn't bond to wax or packing tape. I used packing tape to seal off the bottom and I smeared wax inside. This allows the mold to come off after the cure.
IMG_2055.JPG

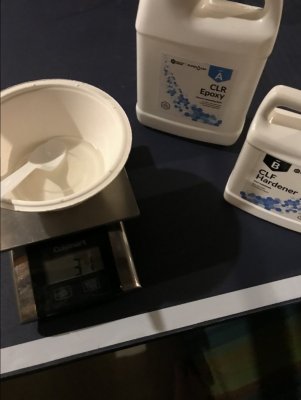
The epoxy I used is a 2 part epoxy that mixes 2:1 epoxy to hardener. I add 21 grams of epoxy and 10 grams of hardener then mixed. The epoxy I am using is pretty commonly used to build skis, snowboards, and surfboards. Other epoxies would work as well.

IMG_6059.JPG

Next I put everything into position and spooned the epoxy into the mold until it was nearly full. Then I went away for 24 hours.
IMG_7685.JPG IMG_5589.JPG

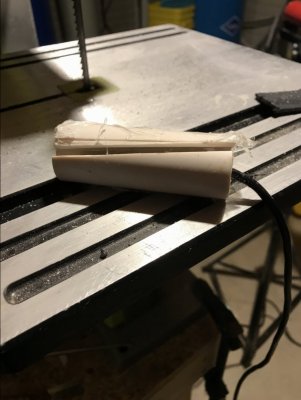
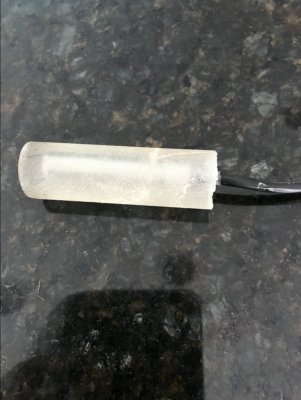
The next day, I used my band saw to cut slits on each side of the PVC. (use a clamp to hold the pipe and keep fingers away from the blade). the probe potted in epoxy slid right out. I cleaned the wax off with some soap and sliced the end of the epoxy with the band saw to give a flat bottom.
IMG_7393.JPG IMG_4775.JPG

And I have a protected temp probe!!!

After finishing this, my recommendation is don't follow this example. Go buy a good probe that is already made to survive. Like this one for $12.

https://www.amazon.com/DROK-Tempera...SY340_FMwebp_QL65&keywords=drok+ds18b20&psc=1
 
OP
OP
Mikeneedsahobby

Mikeneedsahobby

Well-Known Member
View Badges
Joined
Sep 16, 2018
Messages
516
Reaction score
922
Rating - 0%
0   0   0
Life lesson. When your 40+ you will often get beat in soccer by 20 year olds. But at least us oldies made it interesting and only lost by 2! Brains (+ a little cheating) almost defeats speed.

When I was planning to build a reef-pi, I decided I wanted a permanently mounted screen. I purchased this 5" 800x480 touch screen to use for $75
https://www.adafruit.com/product/2260

Today I hooked it up. The display connects to the raspberry pi through a mini/mini usb cord and mini/ std HDMI cable. The USB provides power at 5V / 1 amp and transmits the touch screen commands. The HDMI transmits the video. I was a little worried about not having enough power for everything just using the single 12v 2.5a supply to the baseboard, but it works.

I plugged it all together and got a screen full of random lines..... Time to read the instructions. These things are not quite the plug and play I am used to. Luckily the fix wasn't bad. These trolls are fairly complacent.

On the third page of the adafruit guide it gives some code to put into the config.txt file. I know this file and I know how to modify it! Terminal open. sudo nano /boot/config.txt. copy paste. save. and the reboot! All fixed! The trolls are happy and my screen is displaying correct.

So now I can see the Raspberry pi windows (gui i think it is called) on the new screen but not reef-pi. I had asked Ranjib a few weeks ago how to display reef-pi on the raspberry pi. It requires a browser pointed at http://localhost . This brings up reef-pi in the browser. I moved the browser around to get as much screen showing as possible. There was some command somewhere called decorate that I shut off and it got rid of an unneeded title bar. This helped.

Next the layout isn't very good for this small of a screen. I used chromium's zoom feature to zoom to 80% and then used the config button on the dashboard to change the graph size to display better. I settled on 600x200 for the graphs. This gets 4 graphs fully in display.

And finally, Here is the picture that sums up my project so far!
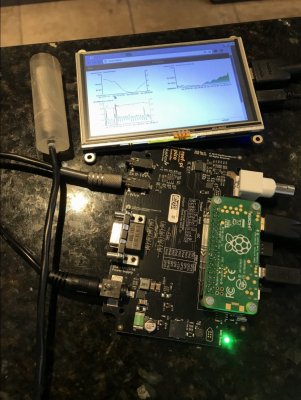
IMG_6733.JPG

I'm not sure if the screen is necessary at this point. I thought it would be nice to see the key parameters and make changes at the tank without another device. But now I know other devices are easy to use. This little display is hard to use. Chromium is very slow on a pi zero. and the selections are very small. I will need a stylus for sure. If I did it again, I probably wouldn't get a screen, and if I did get a screen it would be larger with more pixels.

Next: I still need to get some plugs installed so this thing will be a controller and not a thermometer. Also I need to put it in something.
 

Ranjib

7500 Club Member
View Badges
Joined
Apr 16, 2016
Messages
9,843
Reaction score
17,058
Location
Pleasant Hill, Concord
Rating - 0%
0   0   0
Life lesson. When your 40+ you will often get beat in soccer by 20 year olds. But at least us oldies made it interesting and only lost by 2! Brains (+ a little cheating) almost defeats speed.

When I was planning to build a reef-pi, I decided I wanted a permanently mounted screen. I purchased this 5" 800x480 touch screen to use for $75
https://www.adafruit.com/product/2260

Today I hooked it up. The display connects to the raspberry pi through a mini/mini usb cord and mini/ std HDMI cable. The USB provides power at 5V / 1 amp and transmits the touch screen commands. The HDMI transmits the video. I was a little worried about not having enough power for everything just using the single 12v 2.5a supply to the baseboard, but it works.

I plugged it all together and got a screen full of random lines..... Time to read the instructions. These things are not quite the plug and play I am used to. Luckily the fix wasn't bad. These trolls are fairly complacent.

On the third page of the adafruit guide it gives some code to put into the config.txt file. I know this file and I know how to modify it! Terminal open. sudo nano /boot/config.txt. copy paste. save. and the reboot! All fixed! The trolls are happy and my screen is displaying correct.

So now I can see the Raspberry pi windows (gui i think it is called) on the new screen but not reef-pi. I had asked Ranjib a few weeks ago how to display reef-pi on the raspberry pi. It requires a browser pointed at http://localhost . This brings up reef-pi in the browser. I moved the browser around to get as much screen showing as possible. There was some command somewhere called decorate that I shut off and it got rid of an unneeded title bar. This helped.

Next the layout isn't very good for this small of a screen. I used chromium's zoom feature to zoom to 80% and then used the config button on the dashboard to change the graph size to display better. I settled on 600x200 for the graphs. This gets 4 graphs fully in display.

And finally, Here is the picture that sums up my project so far!
IMG_6733.JPG

I'm not sure if the screen is necessary at this point. I thought it would be nice to see the key parameters and make changes at the tank without another device. But now I know other devices are easy to use. This little display is hard to use. Chromium is very slow on a pi zero. and the selections are very small. I will need a stylus for sure. If I did it again, I probably wouldn't get a screen, and if I did get a screen it would be larger with more pixels.

Next: I still need to get some plugs installed so this thing will be a controller and not a thermometer. Also I need to put it in something.
Yup pi zero is not good for GUI, I also worry it may negatively impact the controller performance. I had used a dedicated program in past to show off some key parameters ising led character display ... but did not actively maintained it afterwards. If I do get time, I’ll defini get back to this. It’s not going to be something like full reef-pi ui,,, but more like something that can be powered by pi zero, low power consumer, can be run stand alone, without network (physically attached ), and interfaced with some mechanical buttons (spst, spdt , latching , momentary etc )
 

Hillbillyreefer

Active Member
View Badges
Joined
Jan 12, 2019
Messages
123
Reaction score
150
Rating - 0%
0   0   0
Watching this with great interest.

Thank you guys for all the hard work and especially for documenting it. I haven’t done any electronics tinkering since I was a kid with my new heath electronics kit, but with your help tackling this shouldn’t be too difficult.

Mike were you in Puerto Vallarta? We were at a resort that had a lounge that looked exactly like that last summer.
 
OP
OP
Mikeneedsahobby

Mikeneedsahobby

Well-Known Member
View Badges
Joined
Sep 16, 2018
Messages
516
Reaction score
922
Rating - 0%
0   0   0
Watching this with great interest.

Thank you guys for all the hard work and especially for documenting it. I haven’t done any electronics tinkering since I was a kid with my new heath electronics kit, but with your help tackling this shouldn’t be too difficult.

Mike were you in Puerto Vallarta? We were at a resort that had a lounge that looked exactly like that last summer.
Building this thing has been far easier than it should be! I expected I would have epically funny failures but no! It all works easy! Maybe the failures are still to come.

I wish I was in Puerto Vallarta. That bar pic is in Ann Arbor, Michigan. Two days before I was in Saltillo Mexico. Here is a pic.
7FECAF0D-9271-4626-8D5E-CCBBAE3122DE.jpeg
 

jhoop

Active Member
View Badges
Joined
Jan 10, 2014
Messages
156
Reaction score
179
Location
Cleveland Ohio
Rating - 0%
0   0   0
I am also working on the reef-pi. one question I have is when I breadboard the settings like temp probes. I set up the dashboard. I then re boot or turn off and I am losing the settings I set up in the dash board. Is there a way to save the settings ? Names, and other settings after a re boot ?
 
OP
OP
Mikeneedsahobby

Mikeneedsahobby

Well-Known Member
View Badges
Joined
Sep 16, 2018
Messages
516
Reaction score
922
Rating - 0%
0   0   0
I am also working on the reef-pi. one question I have is when I breadboard the settings like temp probes. I set up the dashboard. I then re boot or turn off and I am losing the settings I set up in the dash board. Is there a way to save the settings ? Names, and other settings after a re boot ?
Hmm... I haven’t had this issue at all. All my settings are being saved. I suspect your trolls are hungry. Do you know if they like pepperoni? If not try buffalo wings.

But seriously @Ranjib ???
 

Creating a strong bulwark: Did you consider floor support for your reef tank?

  • I put a major focus on floor support.

    Votes: 60 38.5%
  • I put minimal focus on floor support.

    Votes: 35 22.4%
  • I put no focus on floor support.

    Votes: 55 35.3%
  • Other.

    Votes: 6 3.8%
Back
Top