Good day everyone , I just received few days ago the IonDirector ( one week ago ) on my both aquariums and KH Director ( three weeks ago ) .
- KH DIRECTOR : initial setup is really easy with GHL videos , all went smooth and I double checked with Hanna KH checker that I trust alot but difference was around -18/-20 % approx of the KH Director , so I readjusted the ratios on the KH to show less reading by -15 % and since then Al is smooth , and in all cases it’s not a major problem if KH is between 8 to 9 as long as it’s fixed and the director is doing amazing job in that , the swings are minimal and I’m running now between 8.5 to 8.9 daily swings as I set it up to 8.8 . So I have to admit it’s a great great device, and every few days I recheck with Hanna checker and they are going great with the same difference ratio .
a general notice : buy extra reagent as you will have to run test many times initially to be sure 100% no bubbles exist at all in the tubes otherwise it will be mess readings .
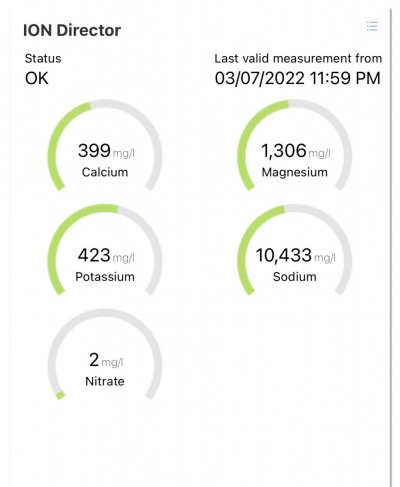
- IonDirector : the first setup was a hell of trouble till I get it done , would be great if there was a GHL official video for the setup to help people the second unit was way way easier as I already took notice of all things learning from my initial mistakes , one important setup advise ( soak the ion prob for like 1 hour in ro water before using the saltwater ) it helps stabilize the probe a lot , the first unit I let it soak for like 20-30 min ( probably was too excited to install it quick ) and I suffered a bit with miss readings till it work correctly . Regarding the readings , I had a bottle of reference solution to compare readings and all matched ok with the initial bottle readings , the readings are consistent from both devices yet in one of them still struggling with nitrate reading , one time reads 11 the second time 0 so I need to re-check with Hanna to be sure where I stand which I will do this week .
The most important tip again is to buy more reagent as for my first unit till I get things done I made like 15 tests over two days so the reagent bottle are like 30 % less , so I would advice again to always have a spare bottles till you get things done then after that one test per day would be enough once you stabilize the results .
I will post again here this week the results of all tests using Hanna checkers and the ionD , yet they mentioned clearly that we should not count on those differences as the ionD use a different technology than the normal checkers but it would be a good reference to understand where you stand with the differences . I still need to run like two or three more tests to stabilize the results then I will make the comparison accordingly .


- KH DIRECTOR : initial setup is really easy with GHL videos , all went smooth and I double checked with Hanna KH checker that I trust alot but difference was around -18/-20 % approx of the KH Director , so I readjusted the ratios on the KH to show less reading by -15 % and since then Al is smooth , and in all cases it’s not a major problem if KH is between 8 to 9 as long as it’s fixed and the director is doing amazing job in that , the swings are minimal and I’m running now between 8.5 to 8.9 daily swings as I set it up to 8.8 . So I have to admit it’s a great great device, and every few days I recheck with Hanna checker and they are going great with the same difference ratio .
a general notice : buy extra reagent as you will have to run test many times initially to be sure 100% no bubbles exist at all in the tubes otherwise it will be mess readings .
- IonDirector : the first setup was a hell of trouble till I get it done , would be great if there was a GHL official video for the setup to help people the second unit was way way easier as I already took notice of all things learning from my initial mistakes , one important setup advise ( soak the ion prob for like 1 hour in ro water before using the saltwater ) it helps stabilize the probe a lot , the first unit I let it soak for like 20-30 min ( probably was too excited to install it quick ) and I suffered a bit with miss readings till it work correctly . Regarding the readings , I had a bottle of reference solution to compare readings and all matched ok with the initial bottle readings , the readings are consistent from both devices yet in one of them still struggling with nitrate reading , one time reads 11 the second time 0 so I need to re-check with Hanna to be sure where I stand which I will do this week .
The most important tip again is to buy more reagent as for my first unit till I get things done I made like 15 tests over two days so the reagent bottle are like 30 % less , so I would advice again to always have a spare bottles till you get things done then after that one test per day would be enough once you stabilize the results .
I will post again here this week the results of all tests using Hanna checkers and the ionD , yet they mentioned clearly that we should not count on those differences as the ionD use a different technology than the normal checkers but it would be a good reference to understand where you stand with the differences . I still need to run like two or three more tests to stabilize the results then I will make the comparison accordingly .