GoodVybes's 90G RR w/ Triton Sump

GoodVybes

Community Member
View Badges
Joined
Nov 19, 2019
Messages
41
Reaction score
41
Rating - 0%
0   0   0
INTRO

Hi All! Getting back into the hobby after over 20 years. I was into saltwater tanks before I dropped out in the late 90s, and recently felt I finally have the money/room/time/patience to give it a go again. My first thought was to stand up a fish-only SW tank. Then I got to reading about the advances in reef keeping and knew it was something I wanted to explore. So here is the start of my journey. Decided to post a build thread to take advantage of something I had no access to my last go-around, and that's this online reefing community. Feel free to chime in at any time with questions/comments/complaints, especially if you see me headed down the wrong path!

Just a little background. I'm in the Pittsburgh, PA area and working on this build with the help of online resources (BRStv, R2R, etc.) and a couple great local fish stores, AquaWorld in Emsworth, Wet Pets in the South Hills, and The Reef Gallery in Zelienople. I'll be posting each part of the build in separate comments to try to keep things organized. So without further ado, let's get started on the build!

Current Progress

IMG_1240.JPG


IMG_1263.JPG
IMG_1035.JPG


Contents
1. Tank and Stand
2. Sump
3. Protein Skimmer
4. Water Making Station
5. Pumps and Plumbing
6. Lighting
7. In-Tank Flow
8. Rocks and Sand
9. Heater and Controller
10. ATO
11. Dosing
12. Tank Lid
13. Fish
Misc
 
Last edited:
OP
OP
GoodVybes

GoodVybes

Community Member
View Badges
Joined
Nov 19, 2019
Messages
41
Reaction score
41
Rating - 0%
0   0   0
Tank and Stand

The tank is an Aqueon 90G RR with an off-center MegaFlow system. The dimensions are 48" L x 18" D x 24" H. Went with this tank because it was the largest size that worked both with the available space and my budget. I felt I could afford some higher end components without breaking the bank with this tank. Went with the MegaFlow tank because of the pre-drilled holes and an overflow that hid all plumbing. Now, I bought the tank 6 months ago thinking two drilled holes would be plenty for whatever I decided in the future. 20 years ago drilling tanks for one overflow was considered somewhat exotic and something you took to the LFS to have done by a pro. I can't go wrong with this "Reef Ready" tank, I thought to myself! Of course, the first thing I read about after buying the tank was Herbie and Bean Animal overflows requiring three to four drilled holes, so there went that...

I ordered the stand custom from Wet Pets. It is an oak cabinet-style stand, painted black. I went custom because I wanted the extra height (the stand is 36" tall instead of the standard 30"), and I wanted a quality oak stand because this will likely be the centerpiece of my living room.

IMG_0751.JPG
IMG_0752.JPG


UPDATE (12/14/2019): Decided to paint the back of the tank black. Rust-oleum black gloss enamel. Took about three coats to block all the light coming through. I would recommend flipping the tank on its front side so the back is facing up and you are painting it as a flat horizontal surface. I tried leaving it on the stand and painting it vertically. Ended up with drip marks near the top where I kept adding paint to gaps caused by gravity. Can't tell from the font of the tank, so I'm not too concerned, but I would have like to have kept it a bit cleaner looking considering it is permanent.

IMG_0770.JPG
 
Last edited:
OP
OP
GoodVybes

GoodVybes

Community Member
View Badges
Joined
Nov 19, 2019
Messages
41
Reaction score
41
Rating - 0%
0   0   0
Sump

While researching sumps, I noticed many companies offered a Triton variant. After some reading, I decided that long term I wanted to grow into that system of filtration. It is new to me, so I know there will be a big learning curve, but I intend to take my time on this. That being said, I looked into a dozen or so OTS systems, and narrowed it down to about two or three, one being the TS-34 Triton sump from Synergy Reef. I liked the amount of thought put into the sump, and it had a lot of features I would need down the road. The one thing I did not like about Synergy was the price. So, I stopped down at my LFS to see some other options. As luck would have it, they actually had a Synergy Reef TS-34 in mothballs from a project they went another direction on, and they made me an offer I couldn't refuse. Shout out to Jeff at AquaWorld for making my sump decision quick and easy!

IMG_0757.JPG

Sump Specs
  • Model: Synergy Reef TS-34​
  • Dimensions: 34"x16"x15" (Total Water Volume 30 GAL)​
  • Refugium Section: 14.5"x14.5"x11.75" (Actual Volume 9.3 GAL)​
  • Skimmer Section: 9.75"x14.5"​
  • Return Pump Section: 6.75"x14.5"​
  • 4x1/4" John Guest tubing holders for Triton dosing / ATO​
  • 4 Port Probe Holder​

Once I got the sump home, I did a leak check on it and it paid off. I found a small leak along the back bottom seam. Took it back to the LFS, and they repaired it free of charge with an acrylic rod. The sump is now leak-free.


Getting the sump into the stand was another challenge. With no one to help me lift the tank off the stand so that I could drop the sump in, I had to remove a support in the back of the stand and push the sump in from the back. Hopefully, that is not something I have to do often ;Nailbiting.

The next challenge was dealing with the sump dimensions. The stand can accommodate a sump 16" wide, which this sump is (although Synergy Reef's website says 15". Maybe I got an older model?). However, the hinges used on the cabinet doors overhang slightly into my usable space. Sure enough, it was enough to make contact with the sump and prevent me from sliding the sump all the way over to the left wall, basically wasting about 3" of space in the stand.

IMG_0725.JPG
IMG_0715.JPG


I went online to look for alternative hinges and found Blum nickel-plated hinges that did the trick!

IMG_0726.JPG
IMG_0798.JPG


With all that taken care of, I put a 1/4" piece of closed-cell PVC foam board (from TAP Plastics) down on the base of the stand and installed the sump.

IMG_0800.JPG
 
Last edited:

Sinfullchef

Community Member
View Badges
Joined
Sep 20, 2019
Messages
39
Reaction score
138
Rating - 0%
0   0   0
Looking good! Welcome to R2R and back to the obsession!! (Read: hobby)
 

Topreefer92

Active Member
View Badges
Joined
Apr 16, 2018
Messages
192
Reaction score
137
Rating - 0%
0   0   0
Awesome looking build. I would still coat the hinges alittle with some vaseline helps with anything that isnt coated in the nickle!
 
OP
OP
GoodVybes

GoodVybes

Community Member
View Badges
Joined
Nov 19, 2019
Messages
41
Reaction score
41
Rating - 0%
0   0   0
Awesome looking build. I would still coat the hinges alittle with some vaseline helps with anything that isnt coated in the nickle!
Thanks for the advice! I know corrosion is always an issue with the cabinet hinges, so any tips are appreciated. I'll probably buy a second set, knowing they'll need replaced sometime down the road...
 
OP
OP
GoodVybes

GoodVybes

Community Member
View Badges
Joined
Nov 19, 2019
Messages
41
Reaction score
41
Rating - 0%
0   0   0
Protein Skimmer

I don't have a ton of space in the skimmer section of the sump, so I was looking for a non-recirculating skimmer with an internal motor. AquaWorld once again came through for me here. They still had the skimmer they bought for my sump stored in the back, and it ended up being a pretty high quality unit that fit perfect. For a little more than I intended to spend, I was able to grab a Royal Exclusiv Mini Bubble King 160. From what I have read about this unit, the extra money spent here will be worth it in the long run. Only downside, it's not one of their DC models.


IMG_0754.JPG
IMG_0755.JPG


Skimmer Specs
  • Model: Royal Exclusiv Mini Bubble King 160
  • Base plate: 18cm x 18cm / roughly 7in x 7in
  • Height: 56cm / 22in
  • 600 l/h Air
  • 1000l/h Water
 
Last edited:
OP
OP
GoodVybes

GoodVybes

Community Member
View Badges
Joined
Nov 19, 2019
Messages
41
Reaction score
41
Rating - 0%
0   0   0
Water Making Station

Got ahead of myself this weekend and decided to put up a little water making station in my basement for when the time comes to finally add water to the tank. I took advantage of BRS's Black Friday deals, and picked up their 7-stage RO/DI Pro system. Probably overkill for my tap water, but the price was right. Standard 44G Rubbermaid Brute trash cans for holding/mixing/moving the water.

IMG_0828.JPG
IMG_0829.JPG
 
Last edited:
OP
OP
GoodVybes

GoodVybes

Community Member
View Badges
Joined
Nov 19, 2019
Messages
41
Reaction score
41
Rating - 0%
0   0   0
Misc

  • Electrical
    • Replaced the standard 15A circuit breaker protecting the circuit my tank is on with a 15A CAFCI/GFCI dual function breaker. 1960's house, so the circuit is run with Aluminum wire, for which I don't think they make a GFCI outlet.
    • Replaced the old existing outlet near the tank with a new CO/ALR outlet
 
OP
OP
GoodVybes

GoodVybes

Community Member
View Badges
Joined
Nov 19, 2019
Messages
41
Reaction score
41
Rating - 0%
0   0   0
Coming along nicely!
What are your plans for this tank, in terms of livestock?
Hi! Thanks for checking out the thread. As far as initial livestock, my thought was to start with a couple of clowns to cycle the tank. Once things stabilized and I start getting some algae growth, I was going to follow BRS's recommendations, adding yellow and brisletooth tangs, a lawnmower blenny, and a six line (or similar) wrasse.

In regard to corals, I was again going to go with BRS recommendations for new tanks and tank owners. Zoanthids, Leathers, Xenia, GSP, Euphyllia, Bubble Corals, Duncans, Candy Canes, and Mushrooms are some of the ones they recommend for beginners.

How I do with this crew over the next year will dictate any long term plans I have for this tank.
 
OP
OP
GoodVybes

GoodVybes

Community Member
View Badges
Joined
Nov 19, 2019
Messages
41
Reaction score
41
Rating - 0%
0   0   0
Pumps and Plumbing

For the return pump, I chose the Vectra M2 Centrifugal Pump from Eco Tech Marine.

IMG_0837.JPG

The Triton filtration method recommends turning the water over about 10x per hour through the sump. With a 5ft. head, this pump looks like it will deliver about 1400GPH at full power, plenty for my 90G tank. I went with a DC model to give me some flexibility in tuning the flow through the sump without having to add valves to the return line. I've read that the MegaFlow overflow on the tank can handle anywhere between 600GPH with a 1" non-siphon drain to over 1000GPH with a 1" drain at full siphon, so I'll probably have to dial the pump back.

For the drain, I decided not to go with the Durso drain setup that came with the MegaFlow overflow. The #1 issue that drove me crazy all those years ago with my old aquariums was the noise from the drain. I can't tell you how thankful I am to see all the work done by the likes of Richard Durso, Herbie, and Bean Animal since the early 2000's. I researched all three before settling on the Herbie configuration. The Durso would probably work well on a non-Triton system, but it seems like noise is still an issue with it when running over 350GPH or so, and definitely at the +900GPH I may be running. In the name of keeping things simple, I decided not to drill a third hole for the Bean Animal drain. However, I am going to run some worst case scenarios with my Herbie setup when I'm doing a leak check, and if I come across a situation where my system will flood because the emergency drain can't handle the flow, I might bite the bullet and re-configure to the Bean Animal while I still can.

So, with those decisions made, I went to work on a plan:

IMG_0810.JPG

I apologize for the poor picture, but did want to point out that sketching out the plumbing was a huge help. Caught several mistakes early to cut down on the number of return trips to the hardware store. Funny story from this exercise: I spent a good part of the day trying to decided whether to use the 1" bulkhead for my full siphon drain and the 3/4" bulkhead for the emergency drain, or visa versa. Those are the two options that come with the MegaFlow accessory kit. I read all sorts of arguments both ways, and though it makes sense to use the bigger drain for an emergency, I was worried a 3/4" full siphon wouldn't handle my day-to-day flow requirements. Then, just out of curiosity, I measured the pre-drilled holes in the tank to see if they would accommodate Schedule 80 bulkheads, and found that both hole sizes were exactly the same! Both holes were drilled to 1.75", which works with 1" ABS bulkheads. So my dilemma was over. I would use 1" bulkheads for both the full siphon and the e-drain! The drawing also shows a 1" return line option that I decided not to go with. I wanted to use the Loc-Line adapter that came with the accessory kit so I went 3/4" on the return.

Got online during Black Friday, and ended up with this a few days later:

IMG_0813.JPG


IMG_0807_LI.jpg
IMG_0809_LI.jpg

Stayed up late last night and was able to dry-fit the entire setup. The following images show my progress. I was hoping to get some feedback on the design before gluing, so by all means, let me know what you think!

IMG_0817.JPG
IMG_0820.JPG

IMG_0826.JPG
IMG_0835.JPG

IMG_0830.JPG
IMG_0834.JPG

IMG_0832.JPG
IMG_0831.JPG


In the overflow box, the emergency drain is set 1/2" below the weir. The main drain is 6" below the top of the e-drain. I used a Spears gate valve in the main drain line to help with tuning and left the e-drain free of any valves. I put a flapper-style check valve on the return line, and drilled a small anti-siphon hole in the last 90deg elbow before the Loc-Line. Speaking of the Loc-Line, that and the strainer on the return pump were the only two things out of the MegaFlow accessory kit that I ended up using. Maybe I'll use the leftover Durso fittings for my QT tank.

Each bulkhead on the sump was over-sized, so I added reducing bushings at the bulkheads to convert the 1 1/2" bulkheads to 1", and the 1" bulkhead on the return line to 3/4".

I will be running the flexible braided tubing from the return pump to the barbed bulkhead in the sump once I'm ready to finalize the setup. I also need to add a piece of PVC from the main drain bulkhead on the sump that will drop down into the sump below the water line. I'll add that once I know where my water line will sit in the sump.

Update (1/16/2020): Time has been short since the holidays, so I've spent what I had working on the tank instead of writing about it. That being said, a lot has happened since my initial "plumbing" post.

First off, my design of the plumbing had to change. Once I started welding the pipe, I lost some of the flex I had in the straight run from my e-drain to the sump, and I had to torque the tubing more than I was comfortable with to make things fit. So, I scrapped my initial design, moved to a different set of bulkheads on the sump, and added a few 90 degree angles. Here is the final result:

IMG_0870.JPG


I let everything cure for 24 hours and then filled the tank to check for leaks. To my surprise, everything stayed dry as a bone! I did check to make sure the e-drain could handle the max flow of my return pump in the event of a full blockage of my main drain. Video of that test is below. The tank can also handle the full volume of the sump's return chamber if I keep the level around 9". Much above that, and I will have a flood if both the main and e-drain are completely blocked.


Tips:
  • I highly recommend using the ratchet-style PVC cutter that looks like a pruning shear. Super clean cuts and no burrs or dust. The one I used worked up to 1 1/4" PVC and made the job a lot easier. $13 from a big box hardware store, and worth every penny.
  • Though the Schedule 80 fittings look nice, I recommend you look around to see if your local hardware stores carry them. I needed one extra 1" 90 degree fitting, and found that the Home Depot, Lowes, True Value, and Grainger near me did not carry Schedule 80. I had to order online and wait 7 days unless I wanted to pay more than the part was worth for shipping. If I had to do it over, I would probably go with the white Schedule 40 fittings that can be found just about anywhere.
  • If you are concerned about appearance, buy clear PVC primer ahead of time. Not the standard purple primer that you can find anywhere. Again, the clear stuff was not in stock at any of my local stores except Grainger.
 
Last edited:
OP
OP
GoodVybes

GoodVybes

Community Member
View Badges
Joined
Nov 19, 2019
Messages
41
Reaction score
41
Rating - 0%
0   0   0
Lighting

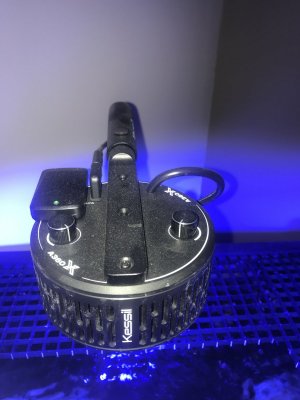
I did quite a bit of research around lighting, and one brand and model kept coming up as one "you couldn't go wrong with." So I waited for Black Friday again, and picked up two Kessil A360X Tuna Blue LED aquarium lights for the display tank. I was able to save roughly $40 each. I also just recently picked up a Kessil H80 Tuna Flora refugium light for the sump. The H80, along with Kessil's flexible goose-neck mount work perfect in the limited stand space.

IMG_0878.JPG


IMG_0876.JPG
IMG_0880.JPG

BRStv has a great review of the A360X, where you can get a good idea of what performance to expect from this light. AI Primes and EcoTech Radion lighting also made my short list, but in the end, I liked Kessil's ease of use and lineup of features. I plan on manually setting these lights up for now, but upgrading to the WiFi dongle later to tap into some of the advanced settings.

I currently have the A360X lights set about 7 3/4" above my water line.

Update (6/2/2020): Added Kessil's a360x WiFi dongle to the lights and daisy-chained the two lights together using a Kessil's 90 Degree K-Link 10ft cable. The K-Link cable appears to be a standard USB-C cable, and lots of folks say just to buy one for much cheaper off Amazon. You can go this route for sure, but one thing I couldn't find on the cheaper cables was the small o-ring on each end that comes on the Kessil cable, which gave me piece of mind that the connections were a bit more waterproof. I didn't see anyone mention this in their recommendations to go cheaper, so I thought I'd throw that out there. The difference in price was $10-$15.

IMG_1265.JPG

Current Settings at Peak Hours (1-3pm)
Mounting Height:
8" Off Top of Water
CLR: 20
INT: 75
VI: 100
R: 20
G: 0
I believe these are the recommended settings from the following BRS test:


I'm rolling with these for now until I find a reason to change. I couple of folks have mentioned the tank looks too blue, so I may adjust things to make them slightly more visually appealing, but personally I like the look.
 
Last edited:
OP
OP
GoodVybes

GoodVybes

Community Member
View Badges
Joined
Nov 19, 2019
Messages
41
Reaction score
41
Rating - 0%
0   0   0
In-Tank Flow

I wanted to add some additional flow to the display tank, and decided to go with a couple of 2450GPH Hydor Koralia pumps. I was tempted to go with EcoTech's VorTech pumps, but figured this was an area I could save some money. Ran into a sale at my LFS, and better yet got a gift card for Christmas, so I tacked on Hydor's Koralia Smart Wave pump controller for good measure.

IMG_0877 (2).JPG

So far, I am really happy I didn't spend hundreds more on the VorTechs. The Hydor setup is super simple, the mounting option for the pump is pretty slick, and the pumps are quiet. Also, I barely notice the black wires against the black background. I have one pump on each side of the tank, about a third of the way down and about a third of the way back. The pump controller allows you to select simultaneous or alternating options, with settings from 5 seconds to 6 hours between transition. It also has a feed mode. Right now I have it rocking back and forth every 5 minutes. I increased the time a little because you will hear a small click/chatter when the pump kicks on, but it is almost unnoticeable at longer intervals. I mounted the controller in the stand above the sump. I'll get better pictures eventually.

IMG_0904 (2).JPG

IMG_0902.JPG
 
Last edited:
OP
OP
GoodVybes

GoodVybes

Community Member
View Badges
Joined
Nov 19, 2019
Messages
41
Reaction score
41
Rating - 0%
0   0   0
Rocks and Sand

For the sand, I stuck with what I found to be the #1 recommended product out there, Special Grade Arag-Alive! Live Reef Sand from CaribSea. I got four 20lb bags on sale from Petsmart for about $19 a bag.

As for the rocks, I decided to go with dry rock. The other damp and wet rock options would have just been too expensive for my taste, and as I mentioned before, I plan to be patient with this tank and I'm curious to see what I can grow on my own. That being said, at the going rate I was still spending $250-$300 for the 90 pounds of dry rock I intended to buy. I did find a place selling mined rock out of Florida for around $1.85/pound (www.addictivereefkeeping.com) and decided to take a chance to save a few bucks. Rocks came about two weeks after I ordered, and I will say that I'm a little torn on the decision save money here. The rocks are fairly dense and not near as porous as they are made out to be on the website, but for the money, I can't really complain. One of those "you get what you pay for" situations. I could have paid double and got a few nicer pieces. But in the end, the idea is to cover them all in coral anyways, so I guess we'll see if this pays off.

Here's a picture of the aquascape I've come up with so far:

IMG_0904 (2).JPG

This is not my strong suit, to say the least, and kudos to all of you out there who have put together some works of art. I felt like I was just banging rocks together for an hour until things stopped falling down. In the end, I just wanted to make sure I had plenty of caves, some small archways, and plenty of flat spots at different water levels to place coral. My guess is I'll probably buy a few nicer pieces of rock and rearrange this a few times before I settle on something. If anyone has any constructive comments, I'm open to anything.
 
Last edited:
OP
OP
GoodVybes

GoodVybes

Community Member
View Badges
Joined
Nov 19, 2019
Messages
41
Reaction score
41
Rating - 0%
0   0   0
Heater and Controller

To heat the tank, I went with Bulk Reef Supply's 600 Watt Titanium heater and controller combo. The combo is nice because the heater, controller, and temperature sensor can all be individually replaced if you find you have a problem. I ended up buying two combos, using one for spare parts. I liked the easy-to-read controller and the fact that one controller could handle two heaters. Right now, I only have one combo in use. I may put the second heater in for some redundancy and use the second controller and probe as a backup alarm. If I had it to do again I would have probably bought two 300 Watt heaters for redundancy, but the cost difference isn't going to break the bank. One other nice thing about this combo is the length of the sensor and power cords. That gave me a lot of flexibility in mounting the controller. Other units that I looked at would not have worked on my system unless I mounted the controller outside of the stand, which I didn't want to do at this time.

IMG_0898 (2).JPG
 
Last edited:
OP
OP
GoodVybes

GoodVybes

Community Member
View Badges
Joined
Nov 19, 2019
Messages
41
Reaction score
41
Rating - 0%
0   0   0
ATO

After about a month of topping off the tank every day, I decided an ATO and reservoir were going to be my next additions to the system. I was losing on average about 3L of water a day in evaporation, and needed something that would get me through at least a week, so I targeted a 10 gallon reservoir. I decided to check out Synergy Reef again to see if they had something to go along with my sump. I know this is another great place to save some money, but the wallet lost out on this decision as I went with their 10 gallon Storm Cloud container. The dimensions fit my stand almost perfectly, and the smoked/solid sides worked well to keep light out. I paired the container up with a Tunze Osmolator 3155 water level controller based on reviews from BRS. One thing I found out was the black tubing that comes with the Osmolator does not play well with the 1/4″ John Guest tubing holders on the container. I believe the OD of the tube is too big, and I made it rain in my stand when I tried hooking everything up with the Tunze black tubing. I couldn't seem to push it in to the fitting far enough to make a good seal. However, standard 1/4" tubing did not fit the Tunze pump. So, I ran the Tunze black tubing from the pump to the bottom of the 1/4" fitting, then had to run standard 1/4" tubing from the top of the container fitting to the fitting on the return pump section of my sump.

IMG_0965 (2).JPG
IMG_0998.JPG

IMG_1038.JPG
 
Last edited:
OP
OP
GoodVybes

GoodVybes

Community Member
View Badges
Joined
Nov 19, 2019
Messages
41
Reaction score
41
Rating - 0%
0   0   0
Dosing

As I mentioned earlier, I wanted to try and grow into the Triton method of dosing. With the addition of the 10 gallon ATO container, I was now officially running out of room in the stand, so I had to get a little creative with the dosing pumps and containers that I needed for Triton's 4 part dosing.

I went to Home Depot and found Rubbermaid adjustable shelving kits. I picked up a couple of low profile rails that fit between the side of my stand wall and the ATO container, four floating shelf brackets, a couple of boards, and some stainless steel hardware. This allowed me to build a little shelving system in what room I had left to house the dosing pumps and containers. For the containers, I went to the local Big Lots and picked up four food grade 2L plastic containers for $2 each that are short with a big opening for refilling:

IMG_1043.JPG


Then, I followed BRS's recommendation for making DYI dosing containers:


I purchased the materials from BRS, and learned quickly to always buy a few extra fittings. I'm not sure what I'm doing wrong with these tube fittings, but I found that once I inserted the acrylic 1/4" tube into the bottom of the 1/4" push connect bulkhead, that sucker was not coming out. Not only that, but it did not always make a great seal when inserted and I ended up having to scrap a couple assemblies because they were drawing air into my dosing lines. But all in all, I spent about $8 per container.

IMG_1228.JPG

For the dosing pump, I couldn't pass up the deal they had on Chewy.com for the Jebao DP-4 Auto Dosing Pump. I read both good and bad reviews on this unit, but for the $60 they were going for at the time, I figured I had to at least see for myself. The better quality options were 4x-5x the price.

IMG_0995.JPG

There are a couple of good YouTube videos out there that show how to setup and calibrate this unit so I'm not going to go over that here, but if I stumble back on the videos I found most helpful, I'll post the links here.

IMG_1037.JPG
IMG_1231.JPG


IMG_1035.JPG

My experience so far has been pretty good. I've used this setup now for about six months. All four pumps still work (the pump came with a spare just in case). I have noticed a slight time drift. The pumps are about 10 minutes ahead of where they were when I programmed them. Calibration seems to be spot on. All four pumps are set to dose the same amount every two days, and all four dosing containers have almost the same amount of solution left in each. I'm going to pull the unit in a couple of weeks to re-calibrate and re-fill the dosing containers and I'll know more about where things sit.

As for dosing amounts, I'm currently at 8mL of each part, every two days. My coral load is very low right now. My alkalinity has been around 8 dKH (checked daily with a Hanna) and my calcium is sitting around 420-430 (checked weekly with a Hanna) for the past month and I'm about ready to send in my first ICP-OES test. I'll post the results once I get them back.
 

Creating a strong bulwark: Did you consider floor support for your reef tank?

  • I put a major focus on floor support.

    Votes: 49 42.6%
  • I put minimal focus on floor support.

    Votes: 24 20.9%
  • I put no focus on floor support.

    Votes: 39 33.9%
  • Other.

    Votes: 3 2.6%
Back
Top