@QuickrdenU I think the hidden fasteners would be fine for a light mount. The counter bore are great for structural integrity, but would be overkill for this. The neon_reefer mounts would be slick 

Follow along with the video below to see how to install our site as a web app on your home screen.
Note: This feature may not be available in some browsers.

That's great!I use tnutz.com and really like their pricing and shipping costs. Here's my order for a similar weighted tank, but a different size. This configuration should work for your 4 foot just fine, but I used ultra light. I think you may need to go up to the regular weight.
This order (attached PDF) made a 38"x24"x24"high with no center support (it does have a horizontal center support on top and bottom). You can tweak the sizes to your 75 gallon. To increase the height of the stand, you would want longer 21" pieces that have the "M8 x 1.25 x 30mm deep tap". The tap is to screw in the leveling feet. Note that the vertical legs are 21" because the top is made of 3" 80/20 which gives you the rest of the inches for the total height of the stand.
The "15 Series 2 Hole Inside Corner Bracket" are what I used to attach wood to the stand. You wouldn't need those if you plan on skinning it another way. The total cost was under $400 with shipping included, but it would be a little cheaper if you go with silver parts.
If you're interested in this stand (the design is a copy of what alufab made me for a 125 gallon), just let me know and I can check your parts order and do a quick deflection check. I managed to get this right on the first order, but I did a ton of checking lol.


Here's the original alufab design for a 125 gallon I had built awhile back that I tweaked to achieve the tnutz order to give you a better idea since I don't have a picture of just the stand for some reason.

how are you mounting your lights?Order arrived and I put it together. Somehow I managed to order 8 feet and forgot to order the bottom center piece. I planned on putting 3/4 plywood on top and on the bottom for the sump. So now I either have to order a piece for that or just put a block of wood under the center to stop the plywood from bowing.
If you use 3/4” plywood I wouldn’t worry about having a support. If you don’t feel confident or want to use a thinner plywood you could always take a couple 2x4’s and attach them to the underneath of the plywood to stiffen the plywood up instead of the cross bar.Order arrived and I put it together. Somehow I managed to order 8 feet and forgot to order the bottom center piece. I planned on putting 3/4 plywood on top and on the bottom for the sump. So now I either have to order a piece for that or just put a block of wood under the center to stop the plywood from bowing.
I didn't read through the whole thread so forgive me if i missed it but you should add misumi at the top of your list for the following reasons:
T-Slot aluminum extrusion is an ideal material for building modern, strong tank stands and canopies. And it isn’t as difficult as you might think, essentially you are playing with a supersize Erector kit! Using simple fastening methods and careful planning, even an individual with no experience can build a high tech stand quickly and easily!
Standard DIY disclaimers applies - The author is not responsible for anything you build based on information in this article.
Why use T-Slot extrusion over wood?
Building with T-Slot has a number of advantages over building with wood. Aluminum extrusion is stronger and lighter than wood. Once the cuts are made, it can also be put together and taken down easily. And while it isn’t exactly cheap, designing and building your own stand need not be overly expensive either.
One of the keys to successfully building your T-Slot stand is careful planning and design. I order my T-Slot and brackets from Zyltech (zyltech.com), where you can have bars precision cut to specific sizes for a small fee. Other T-Slot suppliers also offer custom cutting services, and I highly recommend this since extrusion can be a challenge to cut precisely on a home miter saw. If you choose to cut the bar yourself, it is recommend to use a blade designed for cutting aluminum extrusion, like a 60-72 tooth carbide tipped triple chip blade. Always use proper eye and safety protection when cutting T-Slot, cutting has a tendency to produce tiny/sharp/hot aluminum shavings!
3030 profile bar. 30mm x 30mm
What profile (size) do I need?
Profile refers to the size/thickness of the T-Slot bar used. Common profiles are 2020 (20mmx20mm) , 3030 (30mmx30mm), 4040 (40mmx40mm) etc. Aluminum extrusion is very strong, and in most cases you will not need to build with anything over 3030. For example, a 36” 3030 bar supported on 2 ends can support 3,573 lbs! For very large systems, you might choose a larger profile.
(From left to right) reinforced corner bracket, tee plate, 90 corner plate
How do I attach it?
The simplest way to attach T-Slot is by using external plates or supported corner brackets. These brackets attach to the exterior of the bar, and are anchored in place by T-Bolts and Nuts. I prefer the look and strength of external plates in most situations. They also make it much easier to add slide-in panels between the bars for aesthetic purposes.
So, let's build a stand!
For the purposes of this sample build, we will use the simplest types of external fasteners, plates and corner brackets
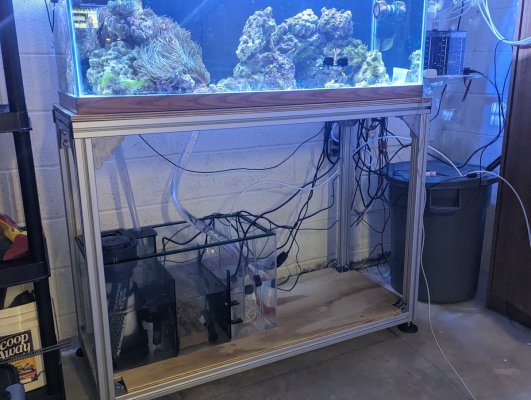
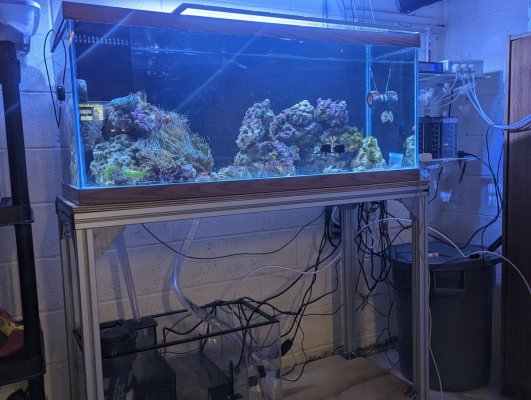
In the example build for this article, we will build my custom 68g acrylic tank stand seen here.
(The basic aspects of the tank can easily be duplicated to your specific tank needs).

My custom AIO is 32”w x 26”d x 20”h, holding approx. 68-72 gallons max. Figuring 10 lbs/gal with water/rock/etc, the stand should hold a minimum of 720 lbs. With 3030 bar, this could easily be accomplished even without the additional front center braces, but I like to include at least one center brace on med/larger tanks.
The stand height is 32”, converting to mm is 813mm, so the stand has 4 bars cut to 813mm.
- The 4 front width top/bottom bars are 753mm (front of tank is 813mm, minus the 30mm bars on the left and right)
- The 4 side top/bottom bars are 600mm (side of tank is 660mm, minus the 30mm bars on the left and right)
- X’s denote where corner or center plates are attached. There are a total of 16 90deg plates used on the corners, and 8 Tee Plates used for the inside and outside of the center braces.

Using a Hex wrench and M5 nuts/bolts (M5 for 3030 bar, the nut/bolt size will change depending on profile) - loosely thread a bolt on the back of each bolt to attach the plate. Then place the plate over the rail and tighten/hand torque it into position. Tighten the bolts well, but don’t over tighten them, it can make them extremely hard to remove if you need to make adjustments or disassemble it!

I had 2 pieces of white acrylic cut that easily slide into place when using exterior plates. These can make nice decorative or mounting features. I also attach a padded neoprene tape to the top of the stand where it meets the tank.


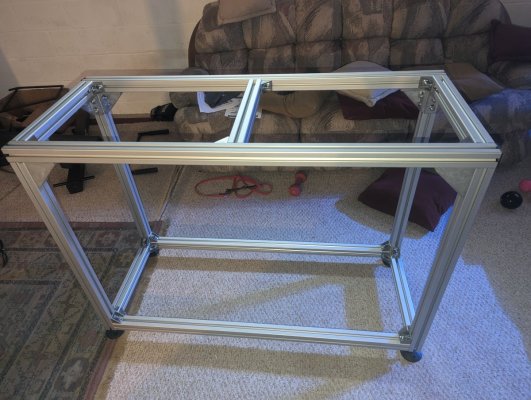
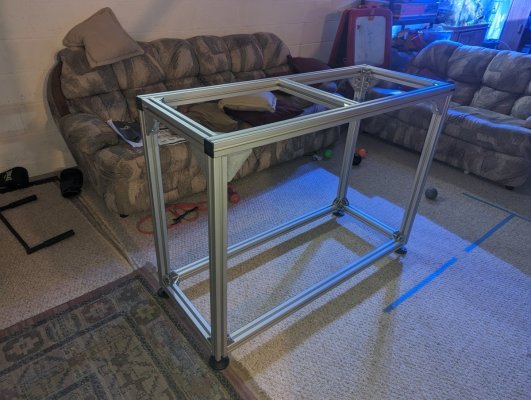
Additional images from the construction of this stand
These are just the basics, once you are comfortable working with it, any number of other features can be included on your T-Slot stands - like lighting canopies, shelving, doors, caster brackets, etc!


I hope this information is helpful to your future T-Slot project endeavors!
- Zach (polyppal)
Some T-Slot suppliers you might consider:
8020 http://8020.net
Amazon http://amazon.com
Grainger http://grainger.com
Openbuilds http://openbuildspartstore.com
Orange Aluminum http://orangealuminum.com
Parco http://parco-inc.com
Zyltech (my preferred supplier) http://zyltech.com
I have a t5 kessil hybrid fixture that hangs from the ceiling.how are you mounting your lights?
Tnutz was quite a bit cheaper.I didn't read through the whole thread so forgive me if i missed it but you should add misumi at the top of your list for the following reasons:
Global supplier
modern user-friendly interface (8020 is pretty dated by comparison)
instant pricing and ordering
free cutting
online config for modifications
CAD download of part with modifications
I used to use 8020 pretty much exclusively 15 years ago but since I've started using misumi, I never use 8020. I don't know of any reason to use anyone other than misumi TBH.
i didn't see that on his list. IMO, there are more factors besides price but your mileage may vary.Tnutz was quite a bit cheaper.
PM’dI Made these for the sky LEDS on 8020 15 series . Customer was very happy with the fitment and look. Nylon washers and SS hex bolts included...


T-Slot aluminum extrusion is an ideal material for building modern, strong tank stands and canopies. And it isn’t as difficult as you might think, essentially you are playing with a supersize Erector kit! Using simple fastening methods and careful planning, even an individual with no experience can build a high tech stand quickly and easily!
Standard DIY disclaimers applies - The author is not responsible for anything you build based on information in this article.
Why use T-Slot extrusion over wood?
Building with T-Slot has a number of advantages over building with wood. Aluminum extrusion is stronger and lighter than wood. Once the cuts are made, it can also be put together and taken down easily. And while it isn’t exactly cheap, designing and building your own stand need not be overly expensive either.
One of the keys to successfully building your T-Slot stand is careful planning and design. I order my T-Slot and brackets from Zyltech (zyltech.com), where you can have bars precision cut to specific sizes for a small fee. Other T-Slot suppliers also offer custom cutting services, and I highly recommend this since extrusion can be a challenge to cut precisely on a home miter saw. If you choose to cut the bar yourself, it is recommend to use a blade designed for cutting aluminum extrusion, like a 60-72 tooth carbide tipped triple chip blade. Always use proper eye and safety protection when cutting T-Slot, cutting has a tendency to produce tiny/sharp/hot aluminum shavings!
3030 profile bar. 30mm x 30mm
What profile (size) do I need?
Profile refers to the size/thickness of the T-Slot bar used. Common profiles are 2020 (20mmx20mm) , 3030 (30mmx30mm), 4040 (40mmx40mm) etc. Aluminum extrusion is very strong, and in most cases you will not need to build with anything over 3030. For example, a 36” 3030 bar supported on 2 ends can support 3,573 lbs! For very large systems, you might choose a larger profile.
(From left to right) reinforced corner bracket, tee plate, 90 corner plate
How do I attach it?
The simplest way to attach T-Slot is by using external plates or supported corner brackets. These brackets attach to the exterior of the bar, and are anchored in place by T-Bolts and Nuts. I prefer the look and strength of external plates in most situations. They also make it much easier to add slide-in panels between the bars for aesthetic purposes.
So, let's build a stand!
For the purposes of this sample build, we will use the simplest types of external fasteners, plates and corner brackets
In the example build for this article, we will build my custom 68g acrylic tank stand seen here.
(The basic aspects of the tank can easily be duplicated to your specific tank needs).
My custom AIO is 32”w x 26”d x 20”h, holding approx. 68-72 gallons max. Figuring 10 lbs/gal with water/rock/etc, the stand should hold a minimum of 720 lbs. With 3030 bar, this could easily be accomplished even without the additional front center braces, but I like to include at least one center brace on med/larger tanks.
The stand height is 32”, converting to mm is 813mm, so the stand has 4 bars cut to 813mm.
- The 4 front width top/bottom bars are 753mm (front of tank is 813mm, minus the 30mm bars on the left and right)
- The 4 side top/bottom bars are 600mm (side of tank is 660mm, minus the 30mm bars on the left and right)
- X’s denote where corner or center plates are attached. There are a total of 16 90deg plates used on the corners, and 8 Tee Plates used for the inside and outside of the center braces.
Using a Hex wrench and M5 nuts/bolts (M5 for 3030 bar, the nut/bolt size will change depending on profile) - loosely thread a bolt on the back of each bolt to attach the plate. Then place the plate over the rail and tighten/hand torque it into position. Tighten the bolts well, but don’t over tighten them, it can make them extremely hard to remove if you need to make adjustments or disassemble it!
I had 2 pieces of white acrylic cut that easily slide into place when using exterior plates. These can make nice decorative or mounting features. I also attach a padded neoprene tape to the top of the stand where it meets the tank.
Additional images from the construction of this stand
These are just the basics, once you are comfortable working with it, any number of other features can be included on your T-Slot stands - like lighting canopies, shelving, doors, caster brackets, etc!
I hope this information is helpful to your future T-Slot project endeavors!
- Zach (polyppal)
Some T-Slot suppliers you might consider:
8020 http://8020.net
Amazon http://amazon.com
Grainger http://grainger.com
Openbuilds http://openbuildspartstore.com
Orange Aluminum http://orangealuminum.com
Parco http://parco-inc.com
Zyltech (my preferred supplier) http://zyltech.com
Join some 8020s to make a long 8040 and hang the lights similar to your photo, just without the bend.Any suggest how to hang these lights with 8020? Back wall isn’t accessible all the way down because aquarium is against wall

I didn't read through the whole thread so forgive me if i missed it but you should add misumi at the top of your list for the following reasons:
Global supplier
modern user-friendly interface (8020 is pretty dated by comparison)
instant pricing and ordering
free cutting
online config for modifications
CAD download of part with modifications
I used to use 8020 pretty much exclusively 15 years ago but since I've started using misumi, I never use 8020. I don't know of any reason to use anyone other than misumi TBH.
Why so ?Thanks for mentioning. Been increasingly annoyed at 8020 for various reasons.