IM Nuvo 50 EXT Build - First Reef Tank

Shippers

New Member
View Badges
Joined
Aug 28, 2023
Messages
11
Reaction score
6
Location
Toronto
Rating - 0%
0   0   0
Hi All,

After sitting on the sidelines and reading R2R posts and watching BRS YouTube videos - I've decided to take the plunge and try to start my first salt water, reef tank.

Initially, I was going to start with a Fluval Flex Marine kit from my LFS (Big Al's, for those in Canada).
fluval flex.jpg


This seemed like an OK starting point, but after doing some further reading and thinking about stocking lists I became worried I would out grow this quickly. So, while the price was right, I continued looking for a larger AIO solution.

This lead to looking at RedSea AIO, Waterbox AIO and Reef Casa AIO tanks. These all looked good, but were expensive and I was still worried about the ability to add new equipment, etc. in the pre-set size of the AIO sump. Queue more over-thinking...

After sleeping on it, I convinced myself that a small-med. display tank with a small sump was the best option. This required Kijiji. After checking Kijiji postings for several weeks I located a good candidate, a gently used Innovative Marine Nuvo 50 EXT Lagoon tank with custom stand... I traded messages and arranged a pick-up after hours. The equipment barely fit in my SUV, but it was a success. Great transaction, great seller and I arrived home with an empty 50 EXT.

empty tank 2.jpg
empty tank.jpg

empty tank 3.jpg
 
OP
OP
Shippers

Shippers

New Member
View Badges
Joined
Aug 28, 2023
Messages
11
Reaction score
6
Location
Toronto
Rating - 0%
0   0   0
My Kijij purchase also came with a custom sump that fit the stand.
empty sump.jpg


This seemed reasonable, and I am going to use this to get started.

My initial return pump is an Eheim CompactON+ 3000, which fits the return chamber on the right. The two chambers toward the left are similar in size, and not much can fit in the bubble trap/baffle in the middle.

Another part of my Kijiji purchase was an AquaMaxx AC-80 protein skimmer. It fits in the left-most chamber (which is also first chamber in the water flow direction), but does not fit in the middle chamber. Online research suggests that the AC-80 is a reasonably sized skimmer for this application and should support a reasonable bioload in the 50 gallon display.

With limits on where the protein skimmer will fit, I've decided to use the middle chamber for my heater and possibly as some type of refugium (maybe... not sure how to set that up yet). For now, just the heater. To support this set-up I selected the Ehiem Jager 150W heater.

Before getting anything wet I put together a mock-up of the sump arrangement. I think this should be alright.

proposed sump set up.jpg


The bottom of the IM stand is not watertight. To help control leaks or small over flows/spills, I decided to line the bottom of the stand with a water proof plastic (a $1.00 shower curtain from the dollar store, folded over a few times). This fits in the base of the stand and is wrapped around the lower frame portions of the stand. This gives a depth of about 1" to help catch overflows before they spill onto the floor.

As a further spill protection (and to protect the carpet) I've placed a plastic chair mat (the kind that let's you wheel your office chair around...) underneath the entire stand assembly. Together, I hope to spot and fix any drips/leaks before they spread.

There is no filter sock in this set-up. Thoughts?
 
OP
OP
Shippers

Shippers

New Member
View Badges
Joined
Aug 28, 2023
Messages
11
Reaction score
6
Location
Toronto
Rating - 0%
0   0   0
With the sump mock-up complete, I was ready to consider aquascaping.

I do not have an existing tank, or reef buddy from which to source trusted liverock. Therefore, I decided to build my scape using dry rock to reduce the chances of complications. I looked into the CaribSea liferocks, but ultimately decided to go with the basic Marco Dry Rock. I like the fact that it is not harvesting from a living reef and that it's relatively inexpensive. I also don't mind the look of it when getting started.

Before buying the rocks I watched a ton of BRS videos on aquascaping dos and don'ts. I considered traditional designs, habitat designs and fancy negative space designs. Ultimately, I decided to try for a hybrid that would have some negative space, but also some decent habitat and swim-through caves.

I purchased a variety of dry rock pieces from my LFS, including some standard rocks, flat-bottomed foundation pieces, double-flat ledges and some fancy premium ledges that didn't have the flat-machined appearance. On the dining room table, I tried a few aquascape options.

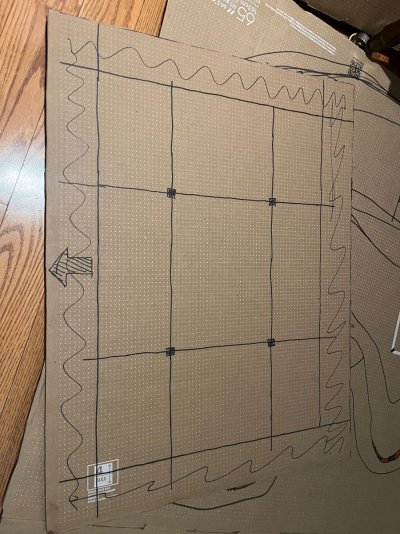
To help plan for the aquascape I decided to make a template of the bottom of my tank. I used cardboard.
aquascape-template-jpg.3312611


This cardboard sheet fits the bottom of my tank pretty tightly.

I knew I did not want to position my scape against the tank walls, because that would be too hard for cleaning. To avoid this, I marked a 3 inch perimeter around the edges of my template. This was a "no go" zone when building.

To make things more artistic, I also tried to adopt the rule of thirds, and marked the 1/3 distances in both directions, with the intersections marked using black squares. These would be my preferred focal points. I used some corner cardboard pieces to track the height of the scape. The tank is 18" deep, and I did not want to build much about 11" or 12" in most locations.

I started by putting my foundation pieces on the black dots - the intersection of my rule-of-thirds lines. I then started building up, and creating some nooks and crannies, and a double swim-through arrangement.


aquascape mock up 2.jpg


This created the large, main aquascape. I also considered a couple separate islands that would be spaced from the main scape.


aquascape mock up 1.jpg
aquascape mock up 3.jpg

aquascape mock up 4.jpg


Two islands became a little fussy, so I decided to consolidate the rocks and form a single island - but the island has it's own swim-through.

aquascape island.jpg
aquascape mock up 5.jpg


Together, these two structures filled in my template nicely, didn't pass my maximum height guides and stayed out of the buffer zones around the edges. I was pretty happy with this.

aquascape template.jpg
 
Last edited:

Propane

Valuable Member
View Badges
Joined
Jun 8, 2022
Messages
1,056
Reaction score
2,485
Location
Milky Way
Rating - 0%
0   0   0
Looks like a good starting point. Can’t wait to see your build thread.
 
OP
OP
Shippers

Shippers

New Member
View Badges
Joined
Aug 28, 2023
Messages
11
Reaction score
6
Location
Toronto
Rating - 0%
0   0   0
When I was happy with the layout for the aquascape I took it apart so that I could glue everything in place.

I thought I tracked where everything came from, but things did not go together in exactly the same way. There was no going back now however, as I was gluing each layer as a re-built it. It would take a hammer to change my mind now.

Using the glue accelerator I was able to secure each piece within a couple minutes, and the overall structure took shape. It also felt solid enough to move as one piece.

While crossing my fingers, I lifted the entire aquascape and dry-fit it within the tank.

aquascape in tank.jpg


I think it went OK, and I was pretty happy with the fit.
 
OP
OP
Shippers

Shippers

New Member
View Badges
Joined
Aug 28, 2023
Messages
11
Reaction score
6
Location
Toronto
Rating - 0%
0   0   0
With the rocks in place I had dueling priorities for my next steps. Sand and water.

I am planning to do a fishless cycle, so using live sand seemed like a good plan. But, before I could add the sand I thought that I should have some water ready to keep it wet.

My initial thought was to buy ready-made salt water from my LFS. This sounded easy. However, after reading a number of posts where people had problems with the consistency of store-bought water - and further thinking ahead to the needs for top-up and water change water, I decided that an RODI system would be a better call.

Kijiji to the rescue again.

I was able to source a new, in box AquaticLife 100GPD 4-stage unit for less than 50% of retail cost.

rodi_.jpg


I thought this should be enough, given that the total volume of my system is only about 50 gallons.

I was ready to make water - but I didn't have a container to store it. I had a couple orange home depot buckets, but was worried that they were not 100% reef safe. And, they were too small.

Countless forum posts and online videos suggested that Rubbermaid Brute containers (the gray ones at least) were food safe and reef safe. It seems a little strange that a garbage can would be made food safe, but who am I to argue with the internet.

Ultimately, I was able to track down a 20 gallon Brute can at my local Staples - and it was on sale as part of the back to school shopping blitz (weird, but OK). With a new garbage can in hand I took over the bathroom to start making water.

RODI unit.jpg
 
OP
OP
Shippers

Shippers

New Member
View Badges
Joined
Aug 28, 2023
Messages
11
Reaction score
6
Location
Toronto
Rating - 0%
0   0   0
My RODI system is quite slow. It's supposed to be 100GPD, but it takes 2 hours to make 5 gallons (which I think is closer to 50 GPD if my math is correct...). This is a bit annoying, but I can wait.
 
OP
OP
Shippers

Shippers

New Member
View Badges
Joined
Aug 28, 2023
Messages
11
Reaction score
6
Location
Toronto
Rating - 0%
0   0   0
Now that water is being made, I started with the sand.

Online reviews suggested that Caribsea live sand was a good option. Fiji Pink and Special Grade appeared to be the fan favourites. Without much justification, I decided on Fiji Pink. Using an online sand calculator, I concluded that about 35lbs of sand should give me about 1" sand bed. This sounded ok. Not so deep that it will cause issues, but hopefully still enough for snails and other critters to dig in. We'll see.


live sand.jpg


I added the sand. It looked ok.

sand in no water.jpg


The bag says that this sand contains a bio-magnet clarifier. I thought this was mixed into the sand. The internet tells me that this was actually a small package - like a ramen flavour pack - that should be in the bag. I completely emptied my bag into the tank. I did not see any small package.

I was somewhat concerned about this, so I dug through the sand in the tank with my hands trying to feel for a package. I assume it would feel different enough from the sand that I would be easily able to find it. I did not find anything. Either, there was no package in my bag of sand - or the package is lost in the tank somewhere. It is hard to believe that I would not be able to feel it in only 1" of sand, or see it poking up... but I did not. The package is lost.
 

Propane

Valuable Member
View Badges
Joined
Jun 8, 2022
Messages
1,056
Reaction score
2,485
Location
Milky Way
Rating - 0%
0   0   0
I have never seen a clarifying package in my sand bags lol. 3 bags so far.
 
OP
OP
Shippers

Shippers

New Member
View Badges
Joined
Aug 28, 2023
Messages
11
Reaction score
6
Location
Toronto
Rating - 0%
0   0   0
After sand comes water.

First, I had to pre-mix the salt. I chose Fritz RPM salt mix. It comes in a blue box, and is priced between Instant Ocean and Red Sea mixes. The FLS employee said it was fine.

I hope it's fine.

I mixed in the salt in the garbage can using a Sicce 1.5 return pump.
sicce pump.jpg


It seemed to mix OK, with very little residue. I used an auxiliary heater to heat the mixing bucket to 78 degrees while mixing. I think that helped.

Then I realized it was going to be hard to get the water from the bucket into the tank. I did not want to lug the garbage can around my house. I had a Sicce return pump, so I thought I could use that to also pump the water from the bucket to the tank. I needed a hose.

I went to the FLS to see if they had options. They suggested that I could use the vinyl tubing that is part of the Python gravel cleaning/siphon system. That sounded reasonable. I needed about 35-40 feet. I was told it would be $4.00/foot. That did not sound reasonable.

I asked for a price check. It was confirmed, $4.00/foot, or about $160.00 for the length I needed. Yikes.

While standing in the aisle I decided to google vinyl tubing. I located a 40ft length of vinyl tubing that was being offered for sale at home depot. It fit my pump. Total price $19.86. Home depot for the win.

tube.PNG
 
OP
OP
Shippers

Shippers

New Member
View Badges
Joined
Aug 28, 2023
Messages
11
Reaction score
6
Location
Toronto
Rating - 0%
0   0   0
Water - Check.
Salt - Mixed.
Pump - Check.
Tubing - Check.

Time to start filling the tank. I was able to produce and mix 15 gallons of salt water in my can. I tested the salinity using a handy refractometer.

Refractometer.jpg


1.023 (ish) based on my first reading. Not bad for following the default mixing instructions. I wonder if a Hanna Checker would be more useful going forward, but for now, we check by eye.'

15 gallons went in the tank. I had to wait another 6 hours to produce 15 more gallons of RODI water, and then another 45 mins to mix in the second batch of sale. 1.024 (ish) on the salt telescope. Looked good.

We slowly pumped the water into the tank, and tried to have it trickle down the rocks or along the wall to minimize stirring up the sand. That did not work. The sand was stirred. The water became cloudy. Very cloudy.
Cludy after sand.jpg

I became a bit worried, as the internet told me some people had trouble with long-term clouding using Fiji Pink - and - I had still not found my clarifying package... oh my.

Cloudy sand with HOB starting.jpg


I didn't want all the dust, etc. in the sump. But I wanted it out of the water. To help resolve this, I stopped filling the tank before I reached the overflow to keep the water in the tank. Then, I added an old HOB filter I had around the house, with a filter floss and carbon cartridge (an Aqueon Quietflow LED 30 with standard cartridge). I ran this for about 24 hours.

The water looked "clearer" (more clear?). This was good news.

Water cleared up adding some top up.jpg

water cleared up adding some top up 2.jpg


With things looking clear, I added more water to fill the tank, overflow and start filling the sump.
 

Propane

Valuable Member
View Badges
Joined
Jun 8, 2022
Messages
1,056
Reaction score
2,485
Location
Milky Way
Rating - 0%
0   0   0
Moving right along. Are you updating in real time?
 
OP
OP
Shippers

Shippers

New Member
View Badges
Joined
Aug 28, 2023
Messages
11
Reaction score
6
Location
Toronto
Rating - 0%
0   0   0
Moving right along. Are you updating in real time?
I'm playing catch-up on the first week or so of set-up, etc. I had the tank sitting around for a couple weeks before I could get to the rest of it - but the build was done mostly over the long weekend.

Thanks for following along.
 

robotrash

Active Member
View Badges
Joined
Aug 24, 2023
Messages
309
Reaction score
390
Location
Springfield, IL
Rating - 0%
0   0   0
How's the tank going?

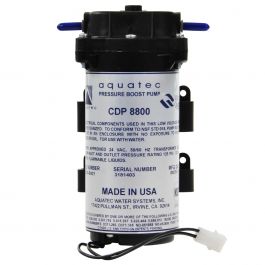
Also wanted to mention that if your RO\DI setup isn't producing even close to the advertised amount you may want to check your water pressure before the membrane. Low pressure at that point can also wear out the membrane faster. There are different requirements for different membranes but I think a 100GPD should be fed at least 50psi with 80 being ideal.

I'm on a well system so have low-ish pressure. I put in an inline pump on my RO\DI setup and that worked a treat. One like this:


Might be worth looking into if you notice you're burning through the membrane!
 

Medicreefer

Active Member
View Badges
Joined
Oct 5, 2012
Messages
233
Reaction score
114
Location
Massachusetts
Rating - 0%
0   0   0
Hi All,

After sitting on the sidelines and reading R2R posts and watching BRS YouTube videos - I've decided to take the plunge and try to start my first salt water, reef tank.

Initially, I was going to start with a Fluval Flex Marine kit from my LFS (Big Al's, for those in Canada).
fluval flex.jpg


This seemed like an OK starting point, but after doing some further reading and thinking about stocking lists I became worried I would out grow this quickly. So, while the price was right, I continued looking for a larger AIO solution.

This lead to looking at RedSea AIO, Waterbox AIO and Reef Casa AIO tanks. These all looked good, but were expensive and I was still worried about the ability to add new equipment, etc. in the pre-set size of the AIO sump. Queue more over-thinking...

After sleeping on it, I convinced myself that a small-med. display tank with a small sump was the best option. This required Kijiji. After checking Kijiji postings for several weeks I located a good candidate, a gently used Innovative Marine Nuvo 50 EXT Lagoon tank with custom stand... I traded messages and arranged a pick-up after hours. The equipment barely fit in my SUV, but it was a success. Great transaction, great seller and I arrived home with an empty 50 EXT.

empty tank 2.jpg
empty tank.jpg

empty tank 3.jpg
Love this tank! Was looking at buying one but now they force you to buy the whole package with their sump which I am not a fan of. Maybe I should start looking for a used gem like this!
 

Reefing threads: Do you wear gear from reef brands?

  • I wear reef gear everywhere.

    Votes: 20 13.7%
  • I wear reef gear primarily at fish events and my LFS.

    Votes: 10 6.8%
  • I wear reef gear primarily for water changes and tank maintenance.

    Votes: 1 0.7%
  • I wear reef gear primarily to relax where I live.

    Votes: 22 15.1%
  • I don’t wear gear from reef brands.

    Votes: 83 56.8%
  • Other.

    Votes: 10 6.8%
Back
Top