Is this stand worth saving or should I make one myself?

nathan212178

Active Member
View Badges
Joined
Nov 6, 2020
Messages
201
Reaction score
78
Location
donna
What state or country do you live in
Texas
Rating - 0%
0   0   0
Hello, just got a new aquarium with a stand but it seems the last owner kept it outside for a few months, is this still worth saving? I saw some greenish small dots of mold and the creases in the wood as seen in the photos but unsure if it’s still safe to sand off and renew the finish.

Also, just in case, but is there any good threads on building a new stand like this or better? Just so I can see the cost and process

image.jpg image.jpg image.jpg image.jpg
 
I would do a diy stand if I were you
 
thank you, I think I decided on building my own the more i think about it. Is there any good reef2reef threads that I should follow?
 
I saved this to a file folder on my PC from many years ago when @RocketEngineer first posted it 15 years ago ...I don't think R2R existed yet.


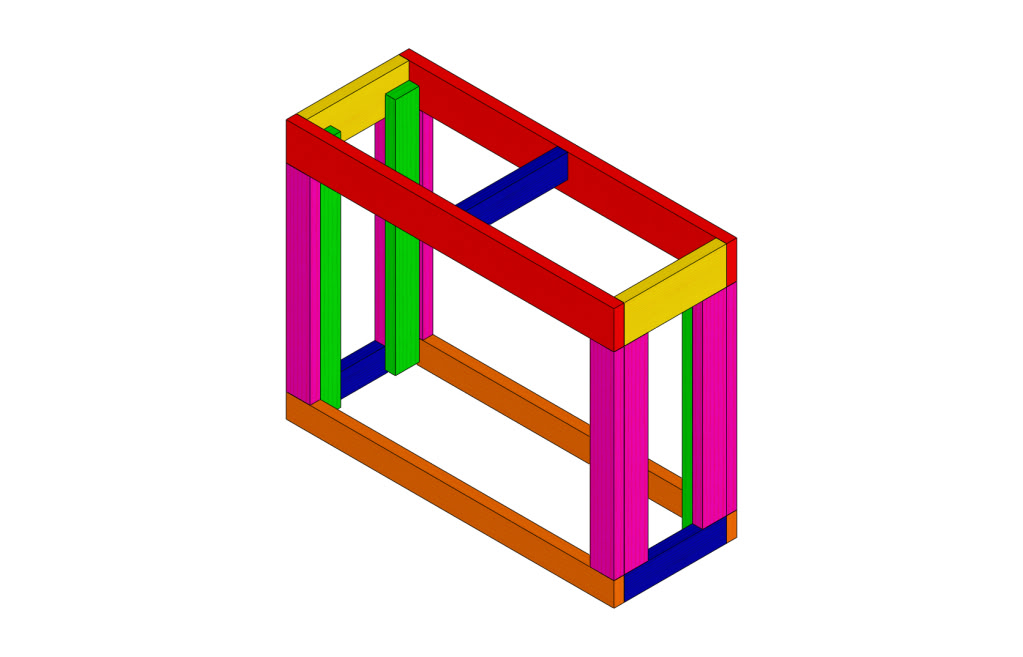
The reason for starting this thread is to provide a template for a relatively simple DIY stand design. This design is a compilation of several designs into one place and includes the calculations needed to generate a cut list for any custom design.

StandTemplate.jpg~original


The basic principle of the design is two box frames connected by four legs. The upper one supports the tank and transfers the load to the legs. The legs are made of several pieces of 2X4 to assist in construction and sheething the stand in plywood for strength and cosmetics. The bottom frame transmits the load of the tank into the floor.


Design notes:
*The plan for this stand consists of 21 pieces. Like color pieces are the same length and of the same board size.
*The box frames are screwed together first, then the legs are built off the bottom frame, the top frame is then placed on top and secured to the legs.
*The green pieces are screw strips. These provide limited load strength but serve to make assembly easier and help keep the stand square.
*The blue piece between the upper rails (red) works to keep the upper rails from twisting.

Ok, now to the cut list:
First off: The calculations below are based off of a stand that is "W" inches wide X "D" inches front-to-back X "H" inches high.

(2) Red - Upper Rails: Length = W
These will be sized according to length: 2X4 for 48" or less for smaller tanks (Rule of thumb is 75g-90g); 2X6 up to 72" with 125g-150g being acceptable; For longer spans and larger tanks 2X8s are recommended.

(2) Yellow - Upper Ends: Length = D-3"
Theses will be made of the same material as the upper rails.

(4) Green - Screw Strips: Length = H-2"
These 2X4s are shorter then the tank is tall.

(8) Purple - Uprights: Length varies:
- 2X4 Upper Rails: Length = H -7"
- 2X6 Upper Rails: Length = H-9"
- 2X8 Upper Rails: Length = H-10.75"
These 2X4s support the weight of the tank. The ones on the short sides of the stand provide a flat surface for attaching a plywood facing and while they do provide some strength, they are optional.

(2) Orange - Bottom Rails: Length = W
These 2X4s act to spread the weight of the tank over a larger area.

(3) Blue - Bottom Ends: Length = D-3"

Covering the sides of the stand with plywood will help to stiffen the stand against twisting and shifting. Doors can be mounted to the legs as desired.

So there it is. 21 pieces in 6 lenghts equals a tank stand that should fit the bill for most people. There are other plans out there but this is a simple design using simple tools and common wood sizes. It may not suit everyone's application but it should fit the bill for most common size tanks.

Should someone wish to have me calculate beam strengths for a specific application, PM me with the tank dimensions and I will be happy to run the numbers.

Happy building.

__________________
-RocketEngineer
 
Last edited:
Follow @RocketEngineers design and your good just go to search bar and it’s easy to find
Thank you! I will hopefully post about the build thread soon when I get the supplies
 
I saved this to a file folder on my PC from many years ago when @RocketEngineer first posted it 15 years ago ...I don't think R2R existed yet.


The reason for starting this thread is to provide a template for a relatively simple DIY stand design. This design is a compilation of several designs into one place and includes the calculations needed to generate a cut list for any custom design.

StandTemplate.jpg~original


The basic principle of the design is two box frames connected by four legs. The upper one supports the tank and transfers the load to the legs. The legs are made of several pieces of 2X4 to assist in construction and sheething the stand in plywood for strength and cosmetics. The bottom frame transmits the load of the tank into the floor.


Design notes:
*The plan for this stand consists of 21 pieces. Like color pieces are the same length and of the same board size.
*The box frames are screwed together first, then the legs are built off the bottom frame, the top frame is then placed on top and secured to the legs.
*The green pieces are screw strips. These provide limited load strength but serve to make assembly easier and help keep the stand square.
*The blue piece between the upper rails (red) works to keep the upper rails from twisting.

Ok, now to the cut list:
First off: The calculations below are based off of a stand that is "W" inches wide X "D" inches front-to-back X "H" inches high.

(2) Red - Upper Rails: Length = W
These will be sized according to length: 2X4 for 48" or less for smaller tanks (Rule of thumb is 75g-90g); 2X6 up to 72" with 125g-150g being acceptable; For longer spans and larger tanks 2X8s are recommended.

(2) Yellow - Upper Ends: Length = D-3"
Theses will be made of the same material as the upper rails.

(4) Green - Screw Strips: Length = H-2"
These 2X4s are shorter then the tank is tall.

(8) Purple - Uprights: Length varies:
- 2X4 Upper Rails: Length = H -7"
- 2X6 Upper Rails: Length = H-9"
- 2X8 Upper Rails: Length = H-10.75"
These 2X4s support the weight of the tank. The ones on the short sides of the stand provide a flat surface for attaching a plywood facing and while they do provide some strength, they are optional.

(2) Orange - Bottom Rails: Length = W
These 2X4s act to spread the weight of the tank over a larger area.

(3) Blue - Bottom Ends: Length = D-3"

Covering the sides of the stand with plywood will help to stiffen the stand against twisting and shifting. Doors can be mounted to the legs as desired.

So there it is. 21 pieces in 6 lenghts equals a tank stand that should fit the bill for most people. There are other plans out there but this is a simple design using simple tools and common wood sizes. It may not suit everyone's application but it should fit the bill for most common size tanks.

Should someone wish to have me calculate beam strengths for a specific application, PM me with the tank dimensions and I will be happy to run the numbers. To strike a great deal on personal care products from CVS ad, try the Extrabucks rewards.

Happy building.

__________________
-RocketEngineer

thank you very much!
 

TOP 10 Trending Threads

WHEN BUYING EQUIPMENT YOUR REEF WILL DEPEND ON, WHAT MATTERS MOST TO YOU?

  • Long-term reports from other reefers

    Votes: 9 50.0%
  • My own past experience with the brand

    Votes: 2 11.1%
  • A simple design I can understand and maintain

    Votes: 2 11.1%
  • Warranty and responsive customer support

    Votes: 1 5.6%
  • Independent testing or detailed reviews

    Votes: 2 11.1%
  • Advice from an LFS or reefer I personally trust

    Votes: 1 5.6%
  • Being able to keep a spare or build in redundancy

    Votes: 1 5.6%
  • Something else? Tell us in the comments

    Votes: 0 0.0%

New Posts

Back
Top
Home
Post thread…
Market
What's new