That’s a beauty. I never checked out aqua sd before and I was surprised to see some reasonable pricing and reasonable shipping costs. It won’t be for a while but my next order may come from there. Kinda jealous I don’t think I have room for another nem after seeing this one.Still waiting on parts for the AWC system. Installed the light kit under the stand last night - works fantastically well and plenty of light. They include an extra wire length, so I had plenty of wire to do 2 strips under the top and one under the bottom shelf. Will get a pic later.
And, got my butt clown a nem. (this word was not butt...)


Navigation
Install the app
How to install the app on iOS
Follow along with the video below to see how to install our site as a web app on your home screen.
Note: This feature may not be available in some browsers.
More options
You are using an out of date browser. It may not display this or other websites correctly.
You should upgrade or use an alternative browser.
You should upgrade or use an alternative browser.
jcolliii's IM25 Lagoon journey - MASTERTRONIC up and running!


OP
OP
- Joined
- Jan 9, 2020
- Messages
- 1,030
- Reaction score
- 1,768
ASD and to some extent WWC are the only places I order from mostly these days. Both have decent prices if you do the eBay auctions, otherwise WWC's prices are much too high. ASD's prices on their website are usually pretty darn good, and they almost always have at least 10% off, even when listing new things, and their shipping rate is pretty good too. Their frags and corals are among some of the cleanest I have ever received, and only ever see few baddies come off during the dipping process. So, yeah, they are easily one of the best.
Running into a problem over the last couple of days with two of my sps, and with more on the way, need to do something... my Valhalla mini colony started to STN, but it was pale for a couple of weeks. May have been due to a PO4 spike that I didn't see right away, but I think it's been due to relatively low pH since the rescape in general.
Some things that I think I know:
1) dying the rock may have interfered with its buffering capability. If it 'sealed' the surface of the coral rock, that may be helping to keep the aragonite from buffering the system and keeping pH fairly low. My high pH (even with an outside vent feeding the skimmer) hovers around 8, and low hovers in the 7.7. My growth when I could maintain pH in the 8.2-8.3 high and 8 low range was fantastic.
2) barebottom with the artificial rock may have worked better because there was a but more of it maybe? Although, mostly, the best growth was during summer when I had windows open and very high pH. Again, a pH connection. Barebottom does keep nutrients under control, but even my nitrate has seemed to be creeping up lately...
3) Nitrates... hmmm. I have been a BIG advocate of Salifert test kits, but I have struggled with nitrates rising lately.
Elucidating on 3 a bit more, I made a standard solution today using my ESV Nitrate solution. I have tested nitrates in my tank when they were limiting last year, and found that the NO3 rise when using the ESV stuff was exactly what it was supposed to be (again, using Salifert test kit). So, the formula they use is hopefully pretty acurate. According to them, 1ml of the ESV soln will raise 20 gallons of water 1ppm in nitrate, so scaling that to 1 quart RODI water with 0 TDS, 1ml of that soln should contain 80ppm of nitrate. I wanted a 10ppm standard, so I used 0.12ml measured with a medical grade syringe to put together a stock soln that should be exactly 10ppm nitrate. Should be.
I then tested this solution using my trusty Salifert kit. The color indicated by the test was ever so slightly darker than the color swatch for 25ppm. Hmmm...
This made me upset. I hate Hanna products because their accuracy is critically dependent on the volume of sample being SUPER accurately measured (in fact, I found that I could only get repeatable results with one of their products using kimwipes on the vials and a lab-grade micropipetter for the samples; when following that procedure, I could get values for standards within their stated error). I had previously tested my Salifert kits (Ca, Mg, and NO3) using standards and found them to be quite accurate. I had never tested THIS kit, though. Didn't want to go in to the lab yesterday, so used what I had to make my standard.
So, I thought screw it - and ordered a Hach NI-11 kit. This is a lab-grade visual colorimeter-type, but there are several differences between card-type tests and this one.
.jpg")
First, the Hach kits use their standard, high-precision pillow pack reagents. These are lab grade reagents, and will be the same reagent packs that I use for geochemical work this coming summer on an NIH-funded grant (hopefully). Those samples will be analyzed with a calibration curve made from a series of calibration standards with known concentrations. To get the concentration with the Hach test kit, you compare the sample side-by-side with a high-accuracy transparent continuous-gradient color disc lit from behind until you see exactly the shade of amber in your sample, and then read off the number indicated. It ain't cheap, but should be very accurate. The kit I got was the -40ppm one, and I believe they do a low-range version as well. Kit is $120 from Amazon and comes with 100 reagent pillows (which are incidentally MUCH easier to work with that the Hanna ones and don't trap reagent in their corners). Additional sets of 100 reagents can be bough for about $40. I will gradually be converting over to all Hach kits. The PO4 kit has three separate procedures for low range (0-0.8ppm), medium range (0-4ppm), and high range (0-40ppm) all using the same color disc. Once you have a disc holder/reader, adding capability is just buying the reagents and the disc (although, once you have done that you're pretty close to the full cost of the kit).

I'll be adding sand back to my scape to address the low pH, and adding some more rock as well as I rescape. I may also remove my Seachem Matrix that I have in either side, and bust up a bunch of coral and start using that instead. The matrix looks like it is a glass product like artificial scoria or something like that. Using rubble in bags will give more of a buffering capacity.
It's always something. I may put my incoming SPS frags in my office tank until getting this sorted. That tank runs at around pH 8.1 and doesn't have a lot of element use right now.
Running into a problem over the last couple of days with two of my sps, and with more on the way, need to do something... my Valhalla mini colony started to STN, but it was pale for a couple of weeks. May have been due to a PO4 spike that I didn't see right away, but I think it's been due to relatively low pH since the rescape in general.
Some things that I think I know:
1) dying the rock may have interfered with its buffering capability. If it 'sealed' the surface of the coral rock, that may be helping to keep the aragonite from buffering the system and keeping pH fairly low. My high pH (even with an outside vent feeding the skimmer) hovers around 8, and low hovers in the 7.7. My growth when I could maintain pH in the 8.2-8.3 high and 8 low range was fantastic.
2) barebottom with the artificial rock may have worked better because there was a but more of it maybe? Although, mostly, the best growth was during summer when I had windows open and very high pH. Again, a pH connection. Barebottom does keep nutrients under control, but even my nitrate has seemed to be creeping up lately...
3) Nitrates... hmmm. I have been a BIG advocate of Salifert test kits, but I have struggled with nitrates rising lately.
Elucidating on 3 a bit more, I made a standard solution today using my ESV Nitrate solution. I have tested nitrates in my tank when they were limiting last year, and found that the NO3 rise when using the ESV stuff was exactly what it was supposed to be (again, using Salifert test kit). So, the formula they use is hopefully pretty acurate. According to them, 1ml of the ESV soln will raise 20 gallons of water 1ppm in nitrate, so scaling that to 1 quart RODI water with 0 TDS, 1ml of that soln should contain 80ppm of nitrate. I wanted a 10ppm standard, so I used 0.12ml measured with a medical grade syringe to put together a stock soln that should be exactly 10ppm nitrate. Should be.
I then tested this solution using my trusty Salifert kit. The color indicated by the test was ever so slightly darker than the color swatch for 25ppm. Hmmm...
This made me upset. I hate Hanna products because their accuracy is critically dependent on the volume of sample being SUPER accurately measured (in fact, I found that I could only get repeatable results with one of their products using kimwipes on the vials and a lab-grade micropipetter for the samples; when following that procedure, I could get values for standards within their stated error). I had previously tested my Salifert kits (Ca, Mg, and NO3) using standards and found them to be quite accurate. I had never tested THIS kit, though. Didn't want to go in to the lab yesterday, so used what I had to make my standard.
So, I thought screw it - and ordered a Hach NI-11 kit. This is a lab-grade visual colorimeter-type, but there are several differences between card-type tests and this one.
First, the Hach kits use their standard, high-precision pillow pack reagents. These are lab grade reagents, and will be the same reagent packs that I use for geochemical work this coming summer on an NIH-funded grant (hopefully). Those samples will be analyzed with a calibration curve made from a series of calibration standards with known concentrations. To get the concentration with the Hach test kit, you compare the sample side-by-side with a high-accuracy transparent continuous-gradient color disc lit from behind until you see exactly the shade of amber in your sample, and then read off the number indicated. It ain't cheap, but should be very accurate. The kit I got was the -40ppm one, and I believe they do a low-range version as well. Kit is $120 from Amazon and comes with 100 reagent pillows (which are incidentally MUCH easier to work with that the Hanna ones and don't trap reagent in their corners). Additional sets of 100 reagents can be bough for about $40. I will gradually be converting over to all Hach kits. The PO4 kit has three separate procedures for low range (0-0.8ppm), medium range (0-4ppm), and high range (0-40ppm) all using the same color disc. Once you have a disc holder/reader, adding capability is just buying the reagents and the disc (although, once you have done that you're pretty close to the full cost of the kit).
I'll be adding sand back to my scape to address the low pH, and adding some more rock as well as I rescape. I may also remove my Seachem Matrix that I have in either side, and bust up a bunch of coral and start using that instead. The matrix looks like it is a glass product like artificial scoria or something like that. Using rubble in bags will give more of a buffering capacity.
It's always something. I may put my incoming SPS frags in my office tank until getting this sorted. That tank runs at around pH 8.1 and doesn't have a lot of element use right now.
Last edited:
Following along!

OP
OP
- Joined
- Jan 9, 2020
- Messages
- 1,030
- Reaction score
- 1,768
Lots going on today - new corals showed up, new rocks showed up, and new sand (ghasp!) showed up.
Let's take the corals first. Got a call from the UPS store around 11 - perfect, just when they were supposed to be there. Go down to UPS, and they charge 10 bucks for hold-for-pickup now. That seems to be new... Just did a hold for pickup at Fedex not that long ago... no charge there. Notice that UPS tracking is also crap lately? Downhill... But neither here nor there. They got here when they were supposed to - that is a big win for UPS up here.
Excellent packaging as always from ASD, multiple heat packs inside, even better. Got the corals out, very nicely bagged. One mille, one freebie, one nem, one more acro, and one massive blue-purple and green crazy colored bowerbanki! But... wait... where is that other mille - I bought two so I could have an instant mini colony? Hmmm...

So, I float them, bring the nem to work with me and shoot ASD an email before teaching and afternoon meetings. Get an email later that day saying sorry, but the coral wasn't looking good, so we didn't send it, but we'll give you store credit.
Totally not acceptable to me. My tank is nearly full, I have just about everything I want - except for a mille mini colony - and now I have credit, but oh yeah I have to pay 40 bucks for shipping becaue I wasn't contacted about a replacement before my package shipped? Totally not acceptable. I am sure that ASD will make it right, they always do, but just a bit odd to me.
Everything looks healthy, acclimated, and then dipped everyone and the corals are settling in nicely. The smaller of the 2 mille frags I bought (the single stick, not the double with nubs all over it) looks to be settling in nicely, just a tiny bit of those fuzzy polyps are starting to peek out. The Goni is closed up yet, and the two acros are not showing any PE yet, but one is a smooth skin type, so not alot there even when they're there.
But WOW, that bowerbanki. That thing is going to eventually be a centerpiece. It is a gorgeous dark blue-purple with that green rim. Nice looking haul, but overall, just a bit of an issue. I know they have to be super busy when they ship all of this stuff out, and mistakes happen, but knowing in advance you're shipping an order that is incomplete, and assuming the customer will be okay with what you decide to do is a bit shoddy, IMO. Again, I am sure they will fix it with a refund.
Still not puffed up yet, but getting there. Just checked again, and both of the other acros are beginning to have PE, so settling in nicely after only a bit over an hour.

Let's take the corals first. Got a call from the UPS store around 11 - perfect, just when they were supposed to be there. Go down to UPS, and they charge 10 bucks for hold-for-pickup now. That seems to be new... Just did a hold for pickup at Fedex not that long ago... no charge there. Notice that UPS tracking is also crap lately? Downhill... But neither here nor there. They got here when they were supposed to - that is a big win for UPS up here.
Excellent packaging as always from ASD, multiple heat packs inside, even better. Got the corals out, very nicely bagged. One mille, one freebie, one nem, one more acro, and one massive blue-purple and green crazy colored bowerbanki! But... wait... where is that other mille - I bought two so I could have an instant mini colony? Hmmm...
So, I float them, bring the nem to work with me and shoot ASD an email before teaching and afternoon meetings. Get an email later that day saying sorry, but the coral wasn't looking good, so we didn't send it, but we'll give you store credit.
Totally not acceptable to me. My tank is nearly full, I have just about everything I want - except for a mille mini colony - and now I have credit, but oh yeah I have to pay 40 bucks for shipping becaue I wasn't contacted about a replacement before my package shipped? Totally not acceptable. I am sure that ASD will make it right, they always do, but just a bit odd to me.
Everything looks healthy, acclimated, and then dipped everyone and the corals are settling in nicely. The smaller of the 2 mille frags I bought (the single stick, not the double with nubs all over it) looks to be settling in nicely, just a tiny bit of those fuzzy polyps are starting to peek out. The Goni is closed up yet, and the two acros are not showing any PE yet, but one is a smooth skin type, so not alot there even when they're there.
But WOW, that bowerbanki. That thing is going to eventually be a centerpiece. It is a gorgeous dark blue-purple with that green rim. Nice looking haul, but overall, just a bit of an issue. I know they have to be super busy when they ship all of this stuff out, and mistakes happen, but knowing in advance you're shipping an order that is incomplete, and assuming the customer will be okay with what you decide to do is a bit shoddy, IMO. Again, I am sure they will fix it with a refund.
Still not puffed up yet, but getting there. Just checked again, and both of the other acros are beginning to have PE, so settling in nicely after only a bit over an hour.
OP
OP
- Joined
- Jan 9, 2020
- Messages
- 1,030
- Reaction score
- 1,768
Also got the new Tropic Eden Moracca (the stuff they used to call 'Pukani' and changed for some reason) rock from Premium Aquatics. There is not a lot on this rock online in terms of pics, descriptions, impressions, etc., so this might be valuable for folks considering it.
Even though it also came via United Package Smashers, the amazing job that PA did with the packaging meant that not even a single corner was damaged. Each piece was wrapped in two layers of the big bubble wrap and then wrapped in plastic wrap as well. The entire contents were wrapped with craft paper type inner padding and air pillows on the top. Very nicely packaged.

I ponied up for this rock because it has the look. I was expecting 5 pieces based on the description that PA had on their site, but was pleased to see six wrapped up chunks.

Unwrapping one revealed one of the 'stem' type pieces that I ordered. The idea is that the built in 'stems' or risers on these rocks will make standing them up off the bottom or off of other rocks will be easier I bought two pieces like this so I could build off of those.

Here is the top side of that 'stem' piece (next to our dinner that was waiting for the oven to warm up). It really, REALLY looks like Pukani.

The stem part. My first impressions on the color is that it's a bit on the bright side, and is also quite glossy. This rock is pretty darn light - this is 16lbs, and is EASILY enough to do what I want (see the last photo below). I am a bit worried that the color treatment, whatever it is, may limit the ability of the interior of the rock to be seeded by microbes, but we'll see. It does look extremely like what it is supposed to look like though - very irregular, variation in shapes and sizes, and in color as well. Color is a bit on the bright side, but really the color is there so it doesn't look quite so awful before being covered up, so I can deal with it as long as I don't have to look at stark white, blinding, new rock.

Here is the complete contents of the box unwrapped and placed on a 24x30 cutting mat. The footprint of a 25 lagoon is a couple inches less in both directions, so I should have plenty to achieve what I hope to - which will be on the minimalist side anyhow.
Also got the Tropic Eden flakes today as well. Nice looking stuff, somewhat smaller than the crushed oyster shells we used to use as substrate back in the day, but still coarse enough that it shouldn't move around, and hopefully with enough porosity that low pH dead spots in the sand bed will not happen. Looking to be a fun weekend coming up.
Stay tuned.
Even though it also came via United Package Smashers, the amazing job that PA did with the packaging meant that not even a single corner was damaged. Each piece was wrapped in two layers of the big bubble wrap and then wrapped in plastic wrap as well. The entire contents were wrapped with craft paper type inner padding and air pillows on the top. Very nicely packaged.
I ponied up for this rock because it has the look. I was expecting 5 pieces based on the description that PA had on their site, but was pleased to see six wrapped up chunks.
Unwrapping one revealed one of the 'stem' type pieces that I ordered. The idea is that the built in 'stems' or risers on these rocks will make standing them up off the bottom or off of other rocks will be easier I bought two pieces like this so I could build off of those.
Here is the top side of that 'stem' piece (next to our dinner that was waiting for the oven to warm up). It really, REALLY looks like Pukani.
The stem part. My first impressions on the color is that it's a bit on the bright side, and is also quite glossy. This rock is pretty darn light - this is 16lbs, and is EASILY enough to do what I want (see the last photo below). I am a bit worried that the color treatment, whatever it is, may limit the ability of the interior of the rock to be seeded by microbes, but we'll see. It does look extremely like what it is supposed to look like though - very irregular, variation in shapes and sizes, and in color as well. Color is a bit on the bright side, but really the color is there so it doesn't look quite so awful before being covered up, so I can deal with it as long as I don't have to look at stark white, blinding, new rock.
Here is the complete contents of the box unwrapped and placed on a 24x30 cutting mat. The footprint of a 25 lagoon is a couple inches less in both directions, so I should have plenty to achieve what I hope to - which will be on the minimalist side anyhow.
Also got the Tropic Eden flakes today as well. Nice looking stuff, somewhat smaller than the crushed oyster shells we used to use as substrate back in the day, but still coarse enough that it shouldn't move around, and hopefully with enough porosity that low pH dead spots in the sand bed will not happen. Looking to be a fun weekend coming up.
Stay tuned.

OP
OP
- Joined
- Jan 9, 2020
- Messages
- 1,030
- Reaction score
- 1,768
Scape 3.0 continues to take shape.
I may have to trim down to get the proportions to look right, but I am leaning toward a 2 floating-ish island rockscape with a diagonal valley just separating the two with one taller than the other and each only two layers tall.

Bit tough to see with the 3/4 view what would be going on.

But at front viewing height, it really comes into its own. The bases are a piece of liferock - one of my local stores carries miscellaneous liferock shapes, so just grabbed one, sawed it in half to make a couple of flat base pieces, and used the sand/baking soda-superglue method to join them, which incidentally is SUPER slick and dry in literally no time at all. I will never go back to epoxy sticks, ever. The base on the left is toward the back and will require that upper part be more permanently joined before it will balance. I will probably silicone each base to a flat piece of something to make them even more stable. Should have lots of sand space. Dunno, have to play a bit more with it tomorrow.
I may have to trim down to get the proportions to look right, but I am leaning toward a 2 floating-ish island rockscape with a diagonal valley just separating the two with one taller than the other and each only two layers tall.
Bit tough to see with the 3/4 view what would be going on.
But at front viewing height, it really comes into its own. The bases are a piece of liferock - one of my local stores carries miscellaneous liferock shapes, so just grabbed one, sawed it in half to make a couple of flat base pieces, and used the sand/baking soda-superglue method to join them, which incidentally is SUPER slick and dry in literally no time at all. I will never go back to epoxy sticks, ever. The base on the left is toward the back and will require that upper part be more permanently joined before it will balance. I will probably silicone each base to a flat piece of something to make them even more stable. Should have lots of sand space. Dunno, have to play a bit more with it tomorrow.
OP
OP
- Joined
- Jan 9, 2020
- Messages
- 1,030
- Reaction score
- 1,768
Glued up the test of the rocks today. I am really liking this baking soda method. All you need to do is get the rocks lined up where you want them, then prop them up so that they stay - I used some old bowls upside down and a couple rock spacers. Then, you add a bit of the really runny superglue to where you want to join the pieces together, and spoon a bit of baking soda in there - the baking soda neutralizes the acid in the superglue and accelerates the curing reaction - and it really liberates quite a bit of heat. You just build up multiple 'coats' until the area is joined. I then add some sand and superglue to the top to hide the glue.

One small piece done. After I got the outside done, I would get some in behind so that the joint was supported from both sides. I did that for 3 or 4 places on each joined piece and man are they strong, almost instantly. Here is that piece joined together after just two of these joints.

Afterward, I just washed it down really relly to make sure all of the loose sand and debris were gone - you do get quite a bit of baking soda in there, and want to get it all out so that the ALK doesn't rise when I put it in.
I removed everything from the tank, added the one island on the right side and then the sand. I took all of the black rocks off of their bases and have that piled up on the left side for now to get this stuff seeded. So, basically all of the rock that was in the tank is back in the tank. Will dose some more bacterial product and turn the skimmer off for a couple of days. Everything is back in the tank, just wherever I could find a spot right now. Need to think about color and shape before starting to stick stuff back on. Too cloudy to get a picture right now. The left island is a bit wobbly on just the cut base rock, so I siliconed the whole assembly to a 6" piece of acetal plate so it will be stable in the tank. I think it's going to look great when all put together.
Going to be fun thinking about coral placement tonight!
One small piece done. After I got the outside done, I would get some in behind so that the joint was supported from both sides. I did that for 3 or 4 places on each joined piece and man are they strong, almost instantly. Here is that piece joined together after just two of these joints.
Afterward, I just washed it down really relly to make sure all of the loose sand and debris were gone - you do get quite a bit of baking soda in there, and want to get it all out so that the ALK doesn't rise when I put it in.
I removed everything from the tank, added the one island on the right side and then the sand. I took all of the black rocks off of their bases and have that piled up on the left side for now to get this stuff seeded. So, basically all of the rock that was in the tank is back in the tank. Will dose some more bacterial product and turn the skimmer off for a couple of days. Everything is back in the tank, just wherever I could find a spot right now. Need to think about color and shape before starting to stick stuff back on. Too cloudy to get a picture right now. The left island is a bit wobbly on just the cut base rock, so I siliconed the whole assembly to a 6" piece of acetal plate so it will be stable in the tank. I think it's going to look great when all put together.
Going to be fun thinking about coral placement tonight!
OP
OP
- Joined
- Jan 9, 2020
- Messages
- 1,030
- Reaction score
- 1,768
How it's sitting for the night. Was a ton of work today. The second island isn't going in until the silicone is completely cured - probably not until tomorrow evening, or more likely Monday. Broke my big cap in 3 pieces getting it off its rock. Think I should be able to Frankenstein it back together. Being distracted by the winter Olympics...


OP
OP
- Joined
- Jan 9, 2020
- Messages
- 1,030
- Reaction score
- 1,768
And one of the tiny drips that my Lithophyllon produced, that I glued onto the rock near the parent has markedly expanded. I do think that many coral must spread by dripping little blobs of tissue around them... full mouth and little ring of tentacles all round it. That baby torch is also growing FAST.

Looking good. Did I miss a change to your lights?How it's sitting for the night. Was a ton of work today. The second island isn't going in until the silicone is completely cured - probably not until tomorrow evening, or more likely Monday. Broke my big cap in 3 pieces getting it off its rock. Think I should be able to Frankenstein it back together. Being distracted by the winter Olympics...

Nah, I think you just haven’t posted a picture that included the fixture in a while and I forgot what you had.Nope, same Maxspect I've had for quite some time. No filter on that last shot maybe?
OP
OP
- Joined
- Jan 9, 2020
- Messages
- 1,030
- Reaction score
- 1,768
HACH NI-11 Nitrate Test Kit first impressions
Late, but FedEx brought this by this evening - a test kit that I have extremely high expectations for, in terms of accuracy, ease of use, and perpetual refill-ability, the HACH NI-11. Comes is a very sturdy case that is probably good enough to stand up to use in the field. I doubt that this would be water proof if dropped in a lake or river, but it certainly would be good enough to keep it try in the rain. Nice quality.

Not much to see once you open it, so didn't bother taking a photo of that. A bag of small pillow reagents clearly labelled with the date, a viewer thingy with two holes in the top for the test sample and comparison blank and a hinge along one side to allow insertion of the color disc. Pretty neat system. The color disc goes into a thick, black plastic envelope when not in use to protect if from UV fading. Testing is outlined on the instructions included in easy to read language and pictographs and in a heavy duty clear plastic envelope.

Testing procedure could not be simpler, and I have to state this emphatically - these pillow pack reagents are not hobby-grade. These packs are manufactured under exacting industrial grade professional chemistry standards because these are used in analytical grade instruments. I paid this price because I wanted accuracy and precision. Procedure is to fill up each of 2 vials with 5ml of water. The first vial (the non-test sample) gets capped and put in the outer slot of the comparator. The comparator disc is then mounted on the spindle in the comparator box and closed.

One pillow pack is then added to the test sample, the cap put on and held firmly, and shaken vigorously for 1 minute. You let the color develop for 1 minute, then add the test sample to the inner slot in the comparator. Then, holding the device up to a light source, you just turn the disc until the colors match. I was pleasantly surprised that even at lower concentrations, the colors were quite easy to distinguish. I did a 5ppm standard, a 10ppm standard, and my tank sample. Results for both standards were spot-on.

My tank sample test. The NO3 in my tank is 8ppm. My most recent Salifert test was giving results of 25ppm about 4 or 5 days ago. I have changed 3 gallons of water since then. I think I will still use Salifert for total hardness, but I think I am going to slowly migrate to these HACH disc tests for PO4 at least. I test Ca and Mg so seldom, I can deal with Salifert there.
First impressions with just a couple of tests is that this thing is awesome. You don't have to worry with jumping from 10ppm to 25, this test has all of the gradations, just match the colors through the sample. The pillow packs are not cheap, but for lab-grade reagents, $45 bucks for 50 tests with a single reagent pack per test is a great deal as far as I am concerned.
Three thumbs up.
Edit: just realized I had the wrong pic for the last one. Updated. Also note, in that last image, I specifically left the disc edging toward 10ppm so everyone could see how easy it is to see the next color up the scale - it is that obvious thanks to samples being backlit.
Late, but FedEx brought this by this evening - a test kit that I have extremely high expectations for, in terms of accuracy, ease of use, and perpetual refill-ability, the HACH NI-11. Comes is a very sturdy case that is probably good enough to stand up to use in the field. I doubt that this would be water proof if dropped in a lake or river, but it certainly would be good enough to keep it try in the rain. Nice quality.
Not much to see once you open it, so didn't bother taking a photo of that. A bag of small pillow reagents clearly labelled with the date, a viewer thingy with two holes in the top for the test sample and comparison blank and a hinge along one side to allow insertion of the color disc. Pretty neat system. The color disc goes into a thick, black plastic envelope when not in use to protect if from UV fading. Testing is outlined on the instructions included in easy to read language and pictographs and in a heavy duty clear plastic envelope.
Testing procedure could not be simpler, and I have to state this emphatically - these pillow pack reagents are not hobby-grade. These packs are manufactured under exacting industrial grade professional chemistry standards because these are used in analytical grade instruments. I paid this price because I wanted accuracy and precision. Procedure is to fill up each of 2 vials with 5ml of water. The first vial (the non-test sample) gets capped and put in the outer slot of the comparator. The comparator disc is then mounted on the spindle in the comparator box and closed.
One pillow pack is then added to the test sample, the cap put on and held firmly, and shaken vigorously for 1 minute. You let the color develop for 1 minute, then add the test sample to the inner slot in the comparator. Then, holding the device up to a light source, you just turn the disc until the colors match. I was pleasantly surprised that even at lower concentrations, the colors were quite easy to distinguish. I did a 5ppm standard, a 10ppm standard, and my tank sample. Results for both standards were spot-on.
My tank sample test. The NO3 in my tank is 8ppm. My most recent Salifert test was giving results of 25ppm about 4 or 5 days ago. I have changed 3 gallons of water since then. I think I will still use Salifert for total hardness, but I think I am going to slowly migrate to these HACH disc tests for PO4 at least. I test Ca and Mg so seldom, I can deal with Salifert there.
First impressions with just a couple of tests is that this thing is awesome. You don't have to worry with jumping from 10ppm to 25, this test has all of the gradations, just match the colors through the sample. The pillow packs are not cheap, but for lab-grade reagents, $45 bucks for 50 tests with a single reagent pack per test is a great deal as far as I am concerned.
Three thumbs up.
Edit: just realized I had the wrong pic for the last one. Updated. Also note, in that last image, I specifically left the disc edging toward 10ppm so everyone could see how easy it is to see the next color up the scale - it is that obvious thanks to samples being backlit.
Last edited:
OP
OP
- Joined
- Jan 9, 2020
- Messages
- 1,030
- Reaction score
- 1,768
Little bit of an update.
The confusion on the NO3 thing (having essentially none and thinking there was 25ppm or more) has led to some dieback. I nearly lost my Valhalla acropora, and I had some STN on both my bubblegum digi and Anacropora pieces. Seems to be slowly coming under control now. All three pieces are starting to recover. Interestingly, I had no apparent change with the red plating Monti.
I like the new scape a lot, and even though I did essentially an entirely new aquascape, and entirely new sand, I had almost no ugly stage at all. I kept the old rock piled up in the corner for a week because I needed to get the structure in the other side to allow biofilm colonization on that side as well. So, I used three separate bacterial products to seed with some instant diversity, but I did it a bit differently (PLUS, I have a big bag of mature matrix in one corner). I seeded the entire tank with biospira, which has worked very well for me in the past - used a couple doses, 3 days apart. On the second day, I seeded the sandbed with Microbelift Special Blend (boy is that stuff STINKY!), and I used MB7 on the third day in the water column. Both UV and skimmer were off for the week. I seeded the sandbed after it was in the tank by drawing up some of the ML Special Blend in my coral feeding squirtey thing and directly injected it into the sand bed every 2" or so across the front and then wherever else I could reach.
I then watched and waited. On day three I started to grow a light brown film on the lower shelf on the right side. On day 4, there was a similar film on the left side shelf and the brown on the right was pretty grungy. I started to get some diatoms on the sandbed around day 4 as well. All of these increased on day 5, but then the decline began that same evening and by day 6 all algae on the rocks was nearly gone. By day 7 the sand bed was nearly clear as well. I did not alter any of my coral feeding or fish feeding regimen during that time. I target fed corals twice and the fish still got their normal ration.
I still need to trim the structure on the left a bit - it is too 'even' with the one on the right, but I really do like how it turned out, how quickly the algae went away using the adding diversity approach, and how pristine the sand bed is. I do have a different sort of algae on the glass right now - used to be a bit of coralline and some green film. Right now I have brown spot on the glass. UV and skimming are now back online for the past week or so. Here is how it looks as of a couple days ago (meant to post this update sooner, but Faculty Senate has been hell this week).

I think today I will trim a bit off of the structure on the left (hard to see from this angle with the corals where they currently are, but it is two shelves - a lower one that extends forward and an upper one that extends back). Need to trim the back a bit and the side a bit. Also will trim just a smidge off the structue on the right - that little knob all the way on the right side. The goal is a fairly wide, diagonal sand-bottom valley extending toward the left rear. Really happy with how it is shaping up, definitely a work in progress as most of the corals are just placed on the rock right now.
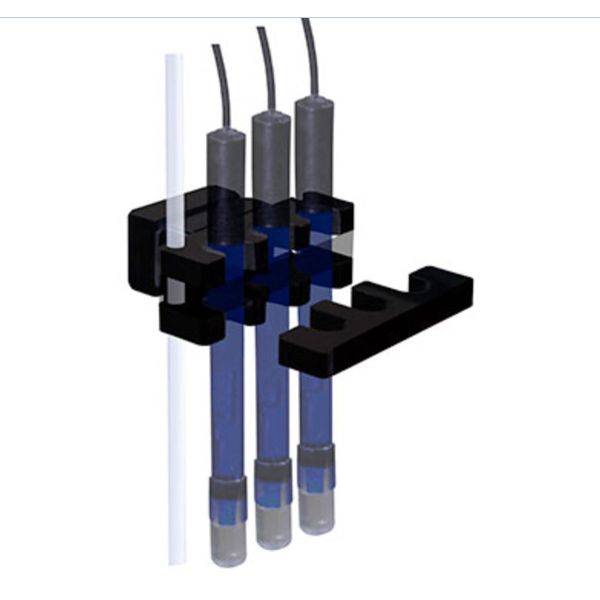
In other news, I ordered and installed several weeks ago the IM magnetic probe holder. It's a neat gadget that is entirely magnet-based. The holder body has a magnet that goes behind the glass of the tank wall, and the front piece also has magnets in it that are attracted to magnets in the main block. So you put your probes in, slip that front piece in and magnetic force hold the probes in place. Neat bit of engineering and super clean look. Really a nice investment. I have my temp and pH probes and my AFT dosing line that empties into a 5ml syringe body submerged in the water - stops precipitation of the AFR really nicely that way.
And that's not all the updates yet.
I like my little GHL Mini, but I feel like GHL has hobbled it because of the low price point, and the setup was frustratingly bad - it left an indelible stain on how I feel about GHL. But, the lack of parameter graphing is unforgivable, IMO. And I feel that GHL decided to limit that functionality because the cost of the device is 'only' 400 bucks. The current state of both the pH and temp probes is constantly sent to the web via the server. GHL chose to not collect those data and save them to the web as they do for their more expensive devices. So there is no long term data availabilty so that trends cannot be assessed. Shame on GHL for this, IMO. They have promised a firmware update that will add this functionality, and I thought I would wait for that before buying their KH or Ion monitoring devices. BUT, knowing what I know about ion-specific probes from the environmental monitoring work that I do with geochemistry, those probes are inherently problematic - they are easily interfered with by other ions, they drift, and they do not last very long at all. Some of the more expensive ones (~1000 bucks) have replaceable electrodes, and so I imagine that the ion selective probe in GHL's device will be costly to replace and will need replacement every year at maximum, but probably more like every 6 months. And then there is the setup. Do I want to go through that again? NO!
So I started looking around for someone with a Mastertronic in stock. They are out of stock pretty much everywhere, as are the slightly more inexpensive Alkatronic units. I was thinking about just the Alkatronic, because the AFR is a balanced additive of ALK, Ca, and Mg, but my Ca and Mg do drift over monthly time scales. So, I scoured the internet fish stores, and I found ONE alkatronic in stock at SaltyCritter. So that is on the way. I will be using it to test ALK, PO4, and Ca probably. I am SUPER happy with my HACH NO3 color disc test kit, so I probably won't add NO3 testing to the Mastertronic as that seems to be holding rock-steady right now around 9ppm, which is exactly where I want it, but my PO4 is being gradually consumed and I want to keep that around 0.1ppm, and I want my ALK as rock steady as I can possibly make it.
Will post a set-up and initial impressions post when I get the Mastertronic unit some time this coming week.
The confusion on the NO3 thing (having essentially none and thinking there was 25ppm or more) has led to some dieback. I nearly lost my Valhalla acropora, and I had some STN on both my bubblegum digi and Anacropora pieces. Seems to be slowly coming under control now. All three pieces are starting to recover. Interestingly, I had no apparent change with the red plating Monti.
I like the new scape a lot, and even though I did essentially an entirely new aquascape, and entirely new sand, I had almost no ugly stage at all. I kept the old rock piled up in the corner for a week because I needed to get the structure in the other side to allow biofilm colonization on that side as well. So, I used three separate bacterial products to seed with some instant diversity, but I did it a bit differently (PLUS, I have a big bag of mature matrix in one corner). I seeded the entire tank with biospira, which has worked very well for me in the past - used a couple doses, 3 days apart. On the second day, I seeded the sandbed with Microbelift Special Blend (boy is that stuff STINKY!), and I used MB7 on the third day in the water column. Both UV and skimmer were off for the week. I seeded the sandbed after it was in the tank by drawing up some of the ML Special Blend in my coral feeding squirtey thing and directly injected it into the sand bed every 2" or so across the front and then wherever else I could reach.
I then watched and waited. On day three I started to grow a light brown film on the lower shelf on the right side. On day 4, there was a similar film on the left side shelf and the brown on the right was pretty grungy. I started to get some diatoms on the sandbed around day 4 as well. All of these increased on day 5, but then the decline began that same evening and by day 6 all algae on the rocks was nearly gone. By day 7 the sand bed was nearly clear as well. I did not alter any of my coral feeding or fish feeding regimen during that time. I target fed corals twice and the fish still got their normal ration.
I still need to trim the structure on the left a bit - it is too 'even' with the one on the right, but I really do like how it turned out, how quickly the algae went away using the adding diversity approach, and how pristine the sand bed is. I do have a different sort of algae on the glass right now - used to be a bit of coralline and some green film. Right now I have brown spot on the glass. UV and skimming are now back online for the past week or so. Here is how it looks as of a couple days ago (meant to post this update sooner, but Faculty Senate has been hell this week).
I think today I will trim a bit off of the structure on the left (hard to see from this angle with the corals where they currently are, but it is two shelves - a lower one that extends forward and an upper one that extends back). Need to trim the back a bit and the side a bit. Also will trim just a smidge off the structue on the right - that little knob all the way on the right side. The goal is a fairly wide, diagonal sand-bottom valley extending toward the left rear. Really happy with how it is shaping up, definitely a work in progress as most of the corals are just placed on the rock right now.
In other news, I ordered and installed several weeks ago the IM magnetic probe holder. It's a neat gadget that is entirely magnet-based. The holder body has a magnet that goes behind the glass of the tank wall, and the front piece also has magnets in it that are attracted to magnets in the main block. So you put your probes in, slip that front piece in and magnetic force hold the probes in place. Neat bit of engineering and super clean look. Really a nice investment. I have my temp and pH probes and my AFT dosing line that empties into a 5ml syringe body submerged in the water - stops precipitation of the AFR really nicely that way.
And that's not all the updates yet.
I like my little GHL Mini, but I feel like GHL has hobbled it because of the low price point, and the setup was frustratingly bad - it left an indelible stain on how I feel about GHL. But, the lack of parameter graphing is unforgivable, IMO. And I feel that GHL decided to limit that functionality because the cost of the device is 'only' 400 bucks. The current state of both the pH and temp probes is constantly sent to the web via the server. GHL chose to not collect those data and save them to the web as they do for their more expensive devices. So there is no long term data availabilty so that trends cannot be assessed. Shame on GHL for this, IMO. They have promised a firmware update that will add this functionality, and I thought I would wait for that before buying their KH or Ion monitoring devices. BUT, knowing what I know about ion-specific probes from the environmental monitoring work that I do with geochemistry, those probes are inherently problematic - they are easily interfered with by other ions, they drift, and they do not last very long at all. Some of the more expensive ones (~1000 bucks) have replaceable electrodes, and so I imagine that the ion selective probe in GHL's device will be costly to replace and will need replacement every year at maximum, but probably more like every 6 months. And then there is the setup. Do I want to go through that again? NO!
So I started looking around for someone with a Mastertronic in stock. They are out of stock pretty much everywhere, as are the slightly more inexpensive Alkatronic units. I was thinking about just the Alkatronic, because the AFR is a balanced additive of ALK, Ca, and Mg, but my Ca and Mg do drift over monthly time scales. So, I scoured the internet fish stores, and I found ONE alkatronic in stock at SaltyCritter. So that is on the way. I will be using it to test ALK, PO4, and Ca probably. I am SUPER happy with my HACH NO3 color disc test kit, so I probably won't add NO3 testing to the Mastertronic as that seems to be holding rock-steady right now around 9ppm, which is exactly where I want it, but my PO4 is being gradually consumed and I want to keep that around 0.1ppm, and I want my ALK as rock steady as I can possibly make it.
Will post a set-up and initial impressions post when I get the Mastertronic unit some time this coming week.

Tank is looking great (Where’s the Starcki?) I enjoyed your previous scapes but this one is the best so far. The return of the sand makes it look better imo. I’m a sand guy though, bare bottom is just too sterile looking for me. I’ll be curious to learn your thoughts on the Mastertronic once it’s been set up and running for a while.Little bit of an update.
The confusion on the NO3 thing (having essentially none and thinking there was 25ppm or more) has led to some dieback. I nearly lost my Valhalla acropora, and I had some STN on both my bubblegum digi and Anacropora pieces. Seems to be slowly coming under control now. All three pieces are starting to recover. Interestingly, I had no apparent change with the red plating Monti.
I like the new scape a lot, and even though I did essentially an entirely new aquascape, and entirely new sand, I had almost no ugly stage at all. I kept the old rock piled up in the corner for a week because I needed to get the structure in the other side to allow biofilm colonization on that side as well. So, I used three separate bacterial products to seed with some instant diversity, but I did it a bit differently (PLUS, I have a big bag of mature matrix in one corner). I seeded the entire tank with biospira, which has worked very well for me in the past - used a couple doses, 3 days apart. On the second day, I seeded the sandbed with Microbelift Special Blend (boy is that stuff STINKY!), and I used MB7 on the third day in the water column. Both UV and skimmer were off for the week. I seeded the sandbed after it was in the tank by drawing up some of the ML Special Blend in my coral feeding squirtey thing and directly injected it into the sand bed every 2" or so across the front and then wherever else I could reach.
I then watched and waited. On day three I started to grow a light brown film on the lower shelf on the right side. On day 4, there was a similar film on the left side shelf and the brown on the right was pretty grungy. I started to get some diatoms on the sandbed around day 4 as well. All of these increased on day 5, but then the decline began that same evening and by day 6 all algae on the rocks was nearly gone. By day 7 the sand bed was nearly clear as well. I did not alter any of my coral feeding or fish feeding regimen during that time. I target fed corals twice and the fish still got their normal ration.
I still need to trim the structure on the left a bit - it is too 'even' with the one on the right, but I really do like how it turned out, how quickly the algae went away using the adding diversity approach, and how pristine the sand bed is. I do have a different sort of algae on the glass right now - used to be a bit of coralline and some green film. Right now I have brown spot on the glass. UV and skimming are now back online for the past week or so. Here is how it looks as of a couple days ago (meant to post this update sooner, but Faculty Senate has been hell this week).
I think today I will trim a bit off of the structure on the left (hard to see from this angle with the corals where they currently are, but it is two shelves - a lower one that extends forward and an upper one that extends back). Need to trim the back a bit and the side a bit. Also will trim just a smidge off the structue on the right - that little knob all the way on the right side. The goal is a fairly wide, diagonal sand-bottom valley extending toward the left rear. Really happy with how it is shaping up, definitely a work in progress as most of the corals are just placed on the rock right now.
In other news, I ordered and installed several weeks ago the IM magnetic probe holder. It's a neat gadget that is entirely magnet-based. The holder body has a magnet that goes behind the glass of the tank wall, and the front piece also has magnets in it that are attracted to magnets in the main block. So you put your probes in, slip that front piece in and magnetic force hold the probes in place. Neat bit of engineering and super clean look. Really a nice investment. I have my temp and pH probes and my AFT dosing line that empties into a 5ml syringe body submerged in the water - stops precipitation of the AFR really nicely that way.
And that's not all the updates yet.
I like my little GHL Mini, but I feel like GHL has hobbled it because of the low price point, and the setup was frustratingly bad - it left an indelible stain on how I feel about GHL. But, the lack of parameter graphing is unforgivable, IMO. And I feel that GHL decided to limit that functionality because the cost of the device is 'only' 400 bucks. The current state of both the pH and temp probes is constantly sent to the web via the server. GHL chose to not collect those data and save them to the web as they do for their more expensive devices. So there is no long term data availabilty so that trends cannot be assessed. Shame on GHL for this, IMO. They have promised a firmware update that will add this functionality, and I thought I would wait for that before buying their KH or Ion monitoring devices. BUT, knowing what I know about ion-specific probes from the environmental monitoring work that I do with geochemistry, those probes are inherently problematic - they are easily interfered with by other ions, they drift, and they do not last very long at all. Some of the more expensive ones (~1000 bucks) have replaceable electrodes, and so I imagine that the ion selective probe in GHL's device will be costly to replace and will need replacement every year at maximum, but probably more like every 6 months. And then there is the setup. Do I want to go through that again? NO!
So I started looking around for someone with a Mastertronic in stock. They are out of stock pretty much everywhere, as are the slightly more inexpensive Alkatronic units. I was thinking about just the Alkatronic, because the AFR is a balanced additive of ALK, Ca, and Mg, but my Ca and Mg do drift over monthly time scales. So, I scoured the internet fish stores, and I found ONE alkatronic in stock at SaltyCritter. So that is on the way. I will be using it to test ALK, PO4, and Ca probably. I am SUPER happy with my HACH NO3 color disc test kit, so I probably won't add NO3 testing to the Mastertronic as that seems to be holding rock-steady right now around 9ppm, which is exactly where I want it, but my PO4 is being gradually consumed and I want to keep that around 0.1ppm, and I want my ALK as rock steady as I can possibly make it.
Will post a set-up and initial impressions post when I get the Mastertronic unit some time this coming week.
OP
OP
- Joined
- Jan 9, 2020
- Messages
- 1,030
- Reaction score
- 1,768
Thanks - I like it too!
The starki is that blur on the left in front of the lower shelf. He did not hold still for his photo!
Will do on the letting folks know thing. I did decide on the tests that I will add. Nice thing about the Mastertronic is that you can add whatever parameter you want, and they are always adding additional test kits that are compatible (I think it's the kits that don't have dry reagents or dry indicators), and I believe they have their own ALK reagents that are fairly inexpensive. I just ordered Red Sea Pro refill kits for PO4 and Mg, ordered an API Ca, and another Salifert ALK. Will probably only test Mg and Ca once a week, PO4 once a day, and ALK a few times per day.
Can't wait! I think I might also buy a cheap dedicated tablet for the aquarium. I have so many apps now that it makes sense, and sometimes my phone is in the bedroom when the wife has already gone to bed. Have the app for the Maxspect razor, the app for the smart outlet, the app for the GHL, the app for the Kamoer doser, and soon the app for the Mastertronic. I think costco had a tablet for like 90 bucks not that long ago. I picked on up for my dedicated research UAV that I use for my GPS base station, autonomous control functions, and LiDAR set up last year for like a hundred bucks and it works flawlessly.
Seems like you have a well thought out plan, as usual. A cheap tablet makes sense. I have an iPad Pro I use for all my reef stuff and everything else I do and it’s overkill but I like it. Can’t beat a tablet for $90 though.Thanks - I like it too!
The starki is that blur on the left in front of the lower shelf. He did not hold still for his photo!
Will do on the letting folks know thing. I did decide on the tests that I will add. Nice thing about the Mastertronic is that you can add whatever parameter you want, and they are always adding additional test kits that are compatible (I think it's the kits that don't have dry reagents or dry indicators), and I believe they have their own ALK reagents that are fairly inexpensive. I just ordered Red Sea Pro refill kits for PO4 and Mg, ordered an API Ca, and another Salifert ALK. Will probably only test Mg and Ca once a week, PO4 once a day, and ALK a few times per day.
Can't wait! I think I might also buy a cheap dedicated tablet for the aquarium. I have so many apps now that it makes sense, and sometimes my phone is in the bedroom when the wife has already gone to bed. Have the app for the Maxspect razor, the app for the smart outlet, the app for the GHL, the app for the Kamoer doser, and soon the app for the Mastertronic. I think costco had a tablet for like 90 bucks not that long ago. I picked on up for my dedicated research UAV that I use for my GPS base station, autonomous control functions, and LiDAR set up last year for like a hundred bucks and it works flawlessly.
OP
OP
- Joined
- Jan 9, 2020
- Messages
- 1,030
- Reaction score
- 1,768
Been watching setup videos of the Mastertronic (MT), and seems to be pretty straightforward. It's in OH right now, should be here on Thursday. My test kits and refills will all be here by TH as well, and spring break is next week, so should have time to document things pretty well too.
OP
OP
- Joined
- Jan 9, 2020
- Messages
- 1,030
- Reaction score
- 1,768
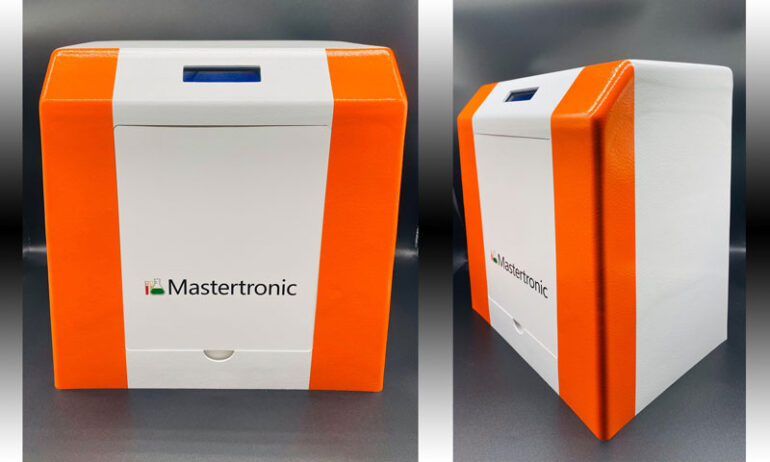
It's here!
What a nicely designed piece of equipment. The dosing heads could be better quality, but they are easy to replace if ever I need one and super cheap on ebay. I might pick up one or two just to have as backups. Weighty, nice build quality, well packaged. Nice bottles and stirrers.
Setup was pretty straightforward as well. I am glad I went with this unit and not another setup nightmare from GHL. I had the wireless up and running in maybe 20 minutes. I ran into a minor snag because I had two instances of the app running on both my phone and my aquarium tablet. Lesson learned. Turned off the wifi on my phone, pointed it to my home network, entered the password, and on it logged. Exactly the way a wireless setup should work GHL...
The setup isn't complicated, remove a shipping screw, three zip ties, insert a small magnetic stirrer into the test chamber, and then calibrate a total of three things. The first is calibrating the pumps that do the rinsing and sample water and wastewater moving. One pump takes RODI water from a reservoir and pumps it into the cleaning chamber, the other evacuates the cleaning chamber, and the third (I think) moves the sample to be measured. I did run into one strange issue while doing that calibration - the app would let me open the first calibration window, but then I could not push the buttons to start calibrating. Weird. So, I exited out of the app on my tablet, opened it on my phone and ran into no troubles there. Really weird. It calibrated up just fine after that though. I was getting repeatable 7ml sample charges. Then syringe calibration - and again, no problems. The last thing to calibrate was the 'stepper motor'
- the larger pump that handles the sampling from the tank. That one is NOISY! I think the pump body may have come loose from the housing during transit, and need to get in there tomorrow to take a look - but need to remove the needles to do that, so not for tonight. I did let the noisy calibration go, and the volume at the end was again another perfect 7ml.
Next was filling the vials and letting the software know which reagents were in which positions on the carousel. That took just a few minutes, but again, I ran into a weird issue. I would save the reagents and volume for each position, it would show them, but when I exited out of the parameters and went back in, they did not appear to be there. But, it appears that I just needed to be more patient. It seems that each time you go into each area, the machine communicates with the internet and then finally to your device - that can take several seconds, but eventually the vials did show back up as kH indicator and reagent. The indicator for the Salifert kit used by this device is only 10ml, so it fills the reagent burette only about half way - the silicone top burettes hold 20ml. I then filled two of the remaining 12 burettes with the kH reagent and saved it all.
Then I clicked the 'perform extra test' button - which means 'do a dang test now already!' and it started up. It does things in such a way to minimize error, contamination, and mineral deposits. First it draws the sample water into the pre-cleaned test chamber, then it rinses the needles and disposes of the rinse water (x2). It then draws up 0.2ml of KH indicator, and adds that to the test chamber and stirs for 5 seconds with the magnetic bar stirrer. It then rinses the needle again (x3, and empties the cleaning chamber after each rinse, refills, and repeats 3x). Then it goes to the kH reactant and draws up 6ml, and adds it one drop at a time into the test chamber while stirring the whole time. When the end point is achieved, it dumps the remaining reactant, evacuates the test chamber, rinses it multiple times, rinses the needle (3x), evacuates all of the waste water, clears the waste line of all fluid, clears the RODI line of all fluid, and then clears the sample line of all fluid. It appears that this was quite well thought out, and the procedure appears to quite nicely minimize any cross contamination between the reagents quite nicely.
My first test was ALK only - I did not manage to add the other reagents yet. But, I got 9.18 dKH for my first test, and of course, I went directly to my Salifert kit to confirm. I got 9.15 from my kit. That is super close, and pretty great in my book.
So, so far, so good. I am happy with the build quality, the care in sample handling, and I really like that there are multiple reagents available for many parameters and that the kits and refills are widely available and not manufacturer specific. Look what is going on with reagents for Neptune's auto tester (which incidentally tests only 3 parameters).
Just a quick one for tonight. But look for more over the weekend. I will try to get some video of it in action doing it's thing.
Last edited:
Similar threads
- Replies
- 1
- Views
- 136

- Replies
- 34
- Views
- 1,094
- Replies
- 4
- Views
- 161
- Replies
- 3
- Views
- 61


