Hello and welcome to my build thread.
Introduction:
I have done all kinds of aquariums over the years, starting with fresh water, I did Discus and live plants, well I did not start with them, but that is where I ended up when I decided to get into salt water.


Background:
I used to work for a division of the US Air Force that required me to be worldwide deployable and I usually had to move every 3-5 years. It makes keeping an aquarium of any kind a bit of a challenge especially when you have to move over seas. I was able to transfer into a non-deployable position in July of 2019 and recently decided to get back into reefing. I started with a Cardiff half round and then move into what I called the Hexahedron, a 50 gallon cube, I loved that shape and form, and will do one again.


I recently decided to look for a used tank to get back into reefing with and found a 45 tall salt set up for $200. Now this was a rescue of sorts.
Tim, the former owner had some very bad luck here in OKC with the ice storm of 2020, he lost power like so many did and lost his livestock, he was devastated. Because he has many other pets and works as a dog groomer and he shows dogs, he decided to sell his set up due to his travel and so on. I have to say it was a tuff decision for him, but I defiantly respect what he decided to do, and I was the very lucky person who will take his equipment and try and turn it into a beautiful reef. He was geared to sea horses, so I am having to try and figure out to make a workable reef in a 45 tall tank.
The Build:
And here we go.
My wife and I picked up the equipment on Nov 1st 2020, Tim had dismantled the tank and cleaned most of it, I spent several hours cleaning the thank up and removing the blue background he had and applying the black background. I used a can of rust-oleum peel coat gloss black to coat the back, but it did not work well, very opaque, so while it was still slightly tacky, I hit it with regular paint, that fixed it!


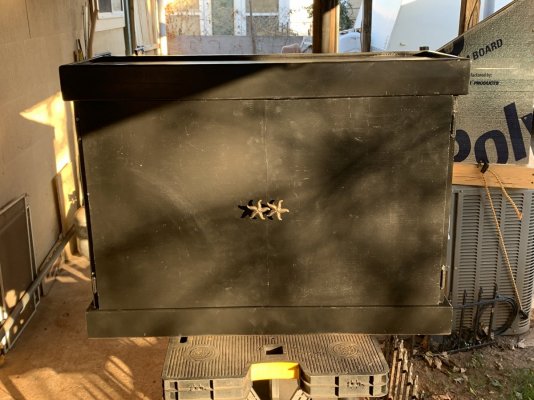
Then I move onto the stand, It needed to be painted.
It is made of particle board ( I hate particle board for a stand, if it gets wet it’s over!!) so I need to seal it completely so it will not fall apart.


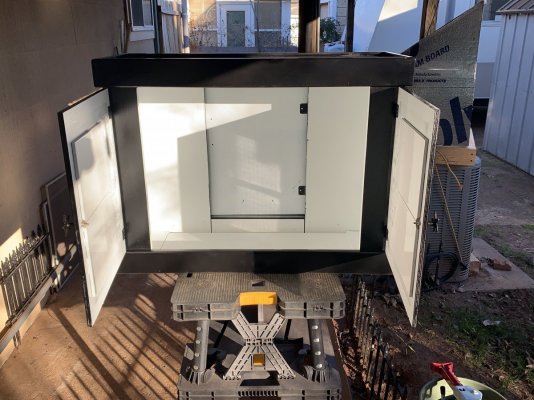
I spent several days looking at the stand and working to fix the dings, sanding it, and I decided to add a complete solid surface for the tank to sit on as well as deciding to use it backwards to give more access to the sump, which just barely fits!
I also used some of the scrap from making the top to add to the floor for additional strength there.


I made new doors out of 1/2” blond plywood, I glued two 8x16” tiles to each door to help keep them from warping.

It’s pretty much ready for final paint but I have to wait for the weather to be in my favor, it’s way to windy to paint right now. Finished it will be gloss white inside and gloss black outside.
So that’s where I am at as of today!
Introduction:
I have done all kinds of aquariums over the years, starting with fresh water, I did Discus and live plants, well I did not start with them, but that is where I ended up when I decided to get into salt water.
Background:
I used to work for a division of the US Air Force that required me to be worldwide deployable and I usually had to move every 3-5 years. It makes keeping an aquarium of any kind a bit of a challenge especially when you have to move over seas. I was able to transfer into a non-deployable position in July of 2019 and recently decided to get back into reefing. I started with a Cardiff half round and then move into what I called the Hexahedron, a 50 gallon cube, I loved that shape and form, and will do one again.
I recently decided to look for a used tank to get back into reefing with and found a 45 tall salt set up for $200. Now this was a rescue of sorts.
Tim, the former owner had some very bad luck here in OKC with the ice storm of 2020, he lost power like so many did and lost his livestock, he was devastated. Because he has many other pets and works as a dog groomer and he shows dogs, he decided to sell his set up due to his travel and so on. I have to say it was a tuff decision for him, but I defiantly respect what he decided to do, and I was the very lucky person who will take his equipment and try and turn it into a beautiful reef. He was geared to sea horses, so I am having to try and figure out to make a workable reef in a 45 tall tank.
The Build:
And here we go.
My wife and I picked up the equipment on Nov 1st 2020, Tim had dismantled the tank and cleaned most of it, I spent several hours cleaning the thank up and removing the blue background he had and applying the black background. I used a can of rust-oleum peel coat gloss black to coat the back, but it did not work well, very opaque, so while it was still slightly tacky, I hit it with regular paint, that fixed it!
Then I move onto the stand, It needed to be painted.
It is made of particle board ( I hate particle board for a stand, if it gets wet it’s over!!) so I need to seal it completely so it will not fall apart.
I spent several days looking at the stand and working to fix the dings, sanding it, and I decided to add a complete solid surface for the tank to sit on as well as deciding to use it backwards to give more access to the sump, which just barely fits!
I also used some of the scrap from making the top to add to the floor for additional strength there.
I made new doors out of 1/2” blond plywood, I glued two 8x16” tiles to each door to help keep them from warping.
It’s pretty much ready for final paint but I have to wait for the weather to be in my favor, it’s way to windy to paint right now. Finished it will be gloss white inside and gloss black outside.
So that’s where I am at as of today!
Last edited:


