NineAndAhalf's 75g build

OP
OP
N

NineAndAhalf

Community Member
View Badges
Joined
May 14, 2017
Messages
95
Reaction score
24
Rating - 0%
0   0   0
Sorry that I haven't been on in a few days, life caught up and it's been a crazy week. I also haven't had to chance to take any photos but I will have some to post tomorrow.

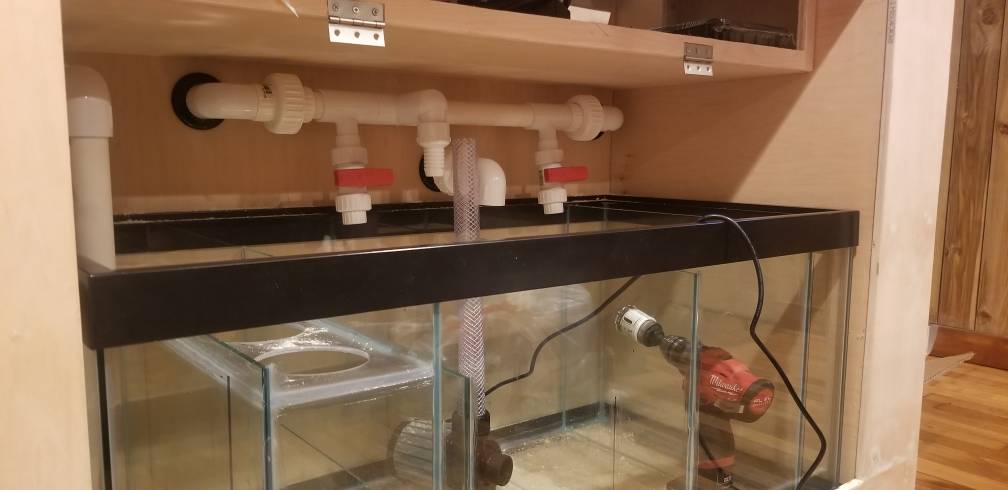
Anyway, real quick update.. The sump is "complete" minus some black acrylic needed to secure to the fuge baffles. I also decided to change the sump design slightly by adding in a freshwater holding area for ATO. From what the water calculator says, it should hold about 4.6 gallons which is about what a 5 gallon bucket holds unless it's filled to the brim. All this did was shrink the fuge up slightly.

I also received my 3/8" glass for doing a euro brace on the DT. Hopefully i'll have some time tomorrow to get working on removing the black tank trim and cleaning the silicone.


Cheers, will post some pictures tomorrow as well.
 
OP
OP
N

NineAndAhalf

Community Member
View Badges
Joined
May 14, 2017
Messages
95
Reaction score
24
Rating - 0%
0   0   0
I'm still here everyone! I apologies for the lack of updated here lately. I've had very little time to get much done, let alone post. That aside, i've got some big updates.

Lets start with the sump. The sump is about 80% done at this point. The baffles are complete and I even added an extra one that goes all the way to the top rim for storing my ATO water. I've decided I want to de-rim this 40 breeder sump simply because it will look cleaner and I know it can support it with all the baffles it has. I also need to cut a piece of glass that I plan to silicone over the main drain compartment so I can drill it and install bulkheads to support my plumbing. On my current tank I did not do this and my drains are just hanging. It is a huge PITA and I wish I took the extra steps to secure them this way.

624521-0d6614f045232027c1e682a01f015aa2.jpg


You can see the ATO section on the far right. From what multiple gallon calculators have told me it should hold 4.7 gallons, which is about what ends up in a 5 gallon bucket anyway unless you fill it to the brim. The filter sock piece is made out of acrylic and there's a boat load of silicone holding it in place. I think it should be fine simply because it's not supporting much weight, if any at all.


I also made my second diy ATO system. I currently run a diy ATO with a relay and an aqualifter pump. That system works just fine but I wanted to run 12v through and through. I did not want to have my 12v floats switching a relay to allow 120v to pass through. To me, this is a dumb idea and I should have never done it in the first place. I will certainly be changing this entire setup out in the future once I get a controller setup properly.

624526-e4d6aa30e05bdfc4f5293e1be82f9bec.jpg


624527-f77a3235301ccb9d22e7c20be0cea08f.jpg


As you can see, I used a jebao fountain pump and cut the wires and rewired to be operated with 2 float switches. If anyone is interest, I will make another and do a DIY thread on this topic. Cost was about $15 total if you already have basic electrical tools. If not, you can do this for right around $25.


I was able to get the DT de-rimmed and all of the silicone cleaned off today. It's a bit of a task but the hardest part is getting absolutely all of the silicone off. I made very easy work of this by using an orbital sander with 120 grit sand paper. If you've ever ordered glass with polished edges, this is exactly what glass companies do for smaller pieces of glass. However they use 400 grit and wd-40 on a belt sander. Different approach, same concept. Anyway, tomorrow I plan to get back out to the shed and silicone on the euro bracing that I have so it can begin to cure. I was going to wait until I drilled my tank but it looks like I don't have a drill bit for my 1.5" drains so i'll have to order that.

624532-e8c8a68d17b42bb0ee1e622bac3410f1.jpg


624533-9a25b24db2a45e62d6ff52f2bb75b127.jpg


I also spent a little time today prepping my stand for paint. I filled all of the cracks and screw holes with wood filler and then sanded the entire stand to smooth out any roughness of the wood. If you had to recommend any white paint to use for the inside of the stand where the sump goes, what would it be? I plan to use an interior/exterior latex roll on paint but I'd like to hear everyones input.

624539-3a7e408a422681cef00d6960437c957e.jpg


Last week or so, while scrolling through the sale thread, I came across a killer deal on a Radion xr15 Pro G4. That is the light I am currently using and planned to order another one once my tank was coming close to having water in it, but due to the great deal I went ahead and bought it. It will likely sit around and collect dust until the day comes that this tank gets wet but that's fine with me. I saved about $150 from buying brand new which will likely pay for my dry rock.

624541-b1e17fa8eb429ce5854ac20ac28b9f0c.jpg


Another great deal came my way in the form of an Neptune Apex. I did not plan on using a controller on this system because I didn't really see the need and they're extremely expensive. After a bit of research and finding the unit for over half off, I had to jump on it. It's on it's way and should be here early this week. I will likely set it up on my current tank, just to get used to using a controller and figuring everything out. I couldn't be more happy with my purchase and it's not even here yet lol.

However the purchase of the controller sort of throws and wrench in my plans for the stand and the toggle switch power bar. Also all of my pump controllers will be obsolete. I still have the option to change my stand or I can simply use that section for mounting my Apex equipment. What's everyone think?
 
OP
OP
N

NineAndAhalf

Community Member
View Badges
Joined
May 14, 2017
Messages
95
Reaction score
24
Rating - 0%
0   0   0
I know it's been a while since I've posted in my build. The work was put on hold for a brief period while I was renovating my new house. During the renovations, I actually plumbed the house (piping and electric) for this tank. Now that I'm moved in, the build continues. I just finished up the plumbing inside of the stand.

I've never seen anyone use bulkheads to pass through the stand so I figured, why not? I wanted to keep the back of the stand closed for viewing purposes yet clean and elegant. I feel like using bulkheads has done that for me. I will be adding vent fans in the top to vent out the moisture and humidity, so no worries there.

Anyone have any thoughts or concerns on how I built the manifold?
2cfb7dcb8478e0676e111a8ba61a593c.jpg
 

Creating a strong bulwark: Did you consider floor support for your reef tank?

  • I put a major focus on floor support.

    Votes: 57 40.1%
  • I put minimal focus on floor support.

    Votes: 31 21.8%
  • I put no focus on floor support.

    Votes: 49 34.5%
  • Other.

    Votes: 5 3.5%
Back
Top