
Acrylic aquarium panels are solvent welded creating a molecular level chemical bond which is usually stronger than the acrylic itself. Properly bonded acrylic panels cannot be taken apart. Attempting to do so will cause the acrylic to crack and break.
The emphasis is on the word "properly"
Building an acrylic aquarium with properly bonded bubble free seams requires experience and specialized equipment. Now, if you have all the time in the world and are pretty good with some commonly available hand tools, you probably can build your own acceptable quality acrylic tank that will come pretty close to one that is professionally manufactured. Pretty close but not as good.
Keeping things level, flat and square
These are the three main criteria in achieving good seams. Let's take a look at the first one. Although an acrylic sheet looks level, it really is not. If you were to take random thickness readings you would find considerable variations. Below is a table showing acceptable variations in different thickness acrylics.
| Sizes: Up to 51 x 100 | ||
| Nominal | Actual | Tolerance |
| Inch | Inch | Inch |
| 0.06 | 0.059 | 0.012 |
| 0.08 | 0.079 | 0.012 |
| 0.1 | 0.098 | 0.012 |
| 0.118 | 0.11 | 0.016 |
| 0.125 | 0.118 | 0.016 |
| 0.157 | 0.157 | 0.016 |
| 0.177 | 0.169 | 0.016 |
| 0.187 | 0.177 | 0.02 |
| 0.236 | 0.217 | 0.024 |
| 0.25 | 0.236 | 0.024 |
| 0.312 | 0.315 | 0.031 |
| 0.375 | 0.354 | 0.035 |
| 0.5 | 0.472 | 0.047 |
| 0.625 | 0.591 | 0.059 |
| 0.75 | 0.709 | 0.059 |
| 1 | 0.984 | 0.071 |
| 1.25 | 1.181 | 0.083 |
| 1.5 | 1.496 | 0.098 |
| 1.75 | 1.732 | 0.11 |
| 2 | 1.969 | 0.118 |
Often, DIY hobbyists believe thicker panels are easier to line up and hold in place and therefore the more likely they will achieve better seams. But the opposite is true. The thicker the acrylic, the MORE DIFFICULT it is to get a good seam. This is because the acceptable thickness tolerances for heavier gauges are greater than for thinner sheets. Compensating for this variability is where DIY builders often are disappointed with the end result.
Flatness
Flatness is the next variable we need to control. Not to be confused with level, flatness as we use the term here means maintaining the panel in a single plane. This can be horizontal, as in the bottom of the tank, or vertical, or somewhere in between. On small pieces maintaining is not too difficult. On larger thinner pieces, it becomes more challenging as it requires proper fixturing.and clamping. Again, this is why there is a tendency to want to use thicker acrylics.
Squareness
Most acrylic seams are 90 degree corners. A successful 90 degree corner requires square ends and edges. The edges also have to be level along the entire length of the panel. The most common tool used to size an acrylic panel is the common rotary or table saw. On smaller pieces these two can achieve acceptable squareness. But when it comes to larger, thicker panels, you will need to go up a few notches. Our preferred method of sizing larger pieces is the CNC panel saw like the one we use below.
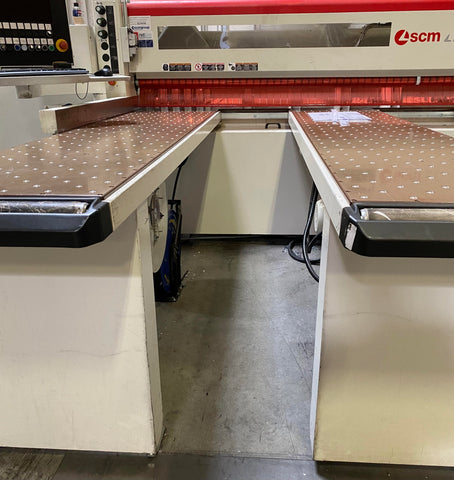
This CNC controlled saw will maintain cut tolerances of plus/minus 1/32 of an inch over a length of 12 feet all the while keeping the cut edge square with the panel face. A side point, big pieces of acrylic weigh a lot. Not nearly as much as glass, but still a considerable amount.
The solvent
Once the pieces are positioned properly, the solvent needs to be applied. The most common solvent brand is Weldon. Weldon is available in several blends and formulations suitable for different plastics. For DIY acrylic projects, the most popular is called Weldon 4. Number 4 is s slower setting formulation giving the fabricator plenty of time to position and work the pieces
At Tenecor, we don't use Weldon 4 so our knowledge as far its behavior is limited. Our aquariums are fabricated with a proprietary solvent blend which sets up much faster than commercially available products. This allows us to increase our throughput speed without compromising seam quality.
Summary
There are many additional factors in successful acrylic aquarium fabrication and future posts will address them. The above information is a starting point for the DIY hobbyist who wants to give it a try.
Last edited:


