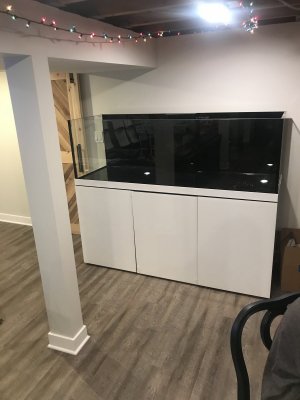
Pro Clear ProStar 220 Build... A first on R2R I think........

jmcdona6

Community Member
View Badges
Joined
Dec 30, 2019
Messages
36
Reaction score
38
Location
Grayson
Rating - 0%
0   0   0
Thanks for the information. Luckily my floor was pretty level but its a nice feature. What are they changing on the overflow? Interested to know what I need to look out for. The plumbing wasn't the best but I mentioned I wanted to do my own regardless of what system I purchased. The sump isn't bad but would like an adjustable weir at the end and I had to modify to fit 4" standard socks.

Did you end up ordering?

Thanks again.

No significant changes to it really. Like I said they are moving bottom intake off the floor to keep sand and other debris from draining in. Also, I think the rep said they are increasing its size incrementally with the larger 230 tank...they claim the tank holds 190G separate of the sump.

I ended up jumping on a 220 before they ran out of stock. Length is more important to me than width, especially once you get 24 inches or above. Actually where my tank is setup, width can actually be a problem as it will stick out too far into the room aesthetically and functionally. To get the same length on the new tanks it seems you will have to go with the larger 230 model which I think will end up running closer to $3000. A little more than I wanted to pay and encroaching on the same price range as some nice RS and WB models.

Also when I asked for a timeline for arrival of the new models I didn't get a warm and fuzzy. First arrivals around Feb 10, maybe Feb 15, but definitely no later than the end of Feb. Certainly by March. lol...I've played that game before. Plus I don't like being the first to buy anything...thanks for being the guinea pig btw!
 

jmcdona6

Community Member
View Badges
Joined
Dec 30, 2019
Messages
36
Reaction score
38
Location
Grayson
Rating - 0%
0   0   0
Thanks for the information. Luckily my floor was pretty level but its a nice feature. What are they changing on the overflow? Interested to know what I need to look out for. The plumbing wasn't the best but I mentioned I wanted to do my own regardless of what system I purchased. The sump isn't bad but would like an adjustable weir at the end and I had to modify to fit 4" standard socks.

Did you end up ordering?

Thanks again.

Oh and a question...how hard do you think it would be to remove the "glass" fronts on the doors? Not near-term but I am not in love with the way it looks...probably my least favorite part of the product. Would love to take them out at some point and replace them with matching millwork I have in my house.
 

SPS247

Active Member
View Badges
Joined
Aug 15, 2015
Messages
179
Reaction score
258
Rating - 0%
0   0   0
My tank finally came in on Dec 23. Came in a little rough but overall minor issues. Silencer baffles and over flow cover was taped to the outside of the box on top of the tank. Baffles where smashed to pieces. Filed a claim right away with FedEx and Live Aquaria. Customer Service for Live Aquaria has been great. New ones are on the way. One small magnet spring for the stand door was broken. Not going to bother reporting it. I’ll just grab one from the hardware store something better possibly. I haven’t leak tested just yet waiting on my conversion plumbing parts from BRS this week. I’m going to start a build thread too just waiting for my plumbing to be completed to share.

The sled trick totally worked down my stairs. bonus part was the factory shipped the tank with a 1/8” piece of play wood under the tank. So I kept the packing foam, card board and wood in tact and slide it down my stairs. 6 guys 4 pro suction cups, one 4 wheel furniture dolly with extended 2- 2x4 and two mover straps played a key roll.

4F59ED80-42FA-4538-A39B-61EEE5A9D3FC.jpeg
 
OP
OP
Big C

Big C

Well-Known Member
View Badges
Joined
Mar 9, 2018
Messages
544
Reaction score
943
Location
Northwest Indiana
Rating - 0%
0   0   0
Oh and a question...how hard do you think it would be to remove the "glass" fronts on the doors? Not near-term but I am not in love with the way it looks...probably my least favorite part of the product. Would love to take them out at some point and replace them with matching millwork I have in my house.
I think you would need to replace the entire door. Looks like the glass is adhered to the frame of the door. But I think it’s doable if you purchase new hinges or reuse the existing.

AC7B880D-ED06-46DF-91BA-E491B32D05D1.jpeg
C2455859-C4AB-48F2-9F95-8BC3FBA1D5CE.jpeg
1E5810C1-1302-4D65-9624-2D259FC68B4F.jpeg
 
OP
OP
Big C

Big C

Well-Known Member
View Badges
Joined
Mar 9, 2018
Messages
544
Reaction score
943
Location
Northwest Indiana
Rating - 0%
0   0   0
My tank finally came in on Dec 23. Came in a little rough but overall minor issues. Silencer baffles and over flow cover was taped to the outside of the box on top of the tank. Baffles where smashed to pieces. Filed a claim right away with FedEx and Live Aquaria. Customer Service for Live Aquaria has been great. New ones are on the way. One small magnet spring for the stand door was broken. Not going to bother reporting it. I’ll just grab one from the hardware store something better possibly. I haven’t leak tested just yet waiting on my conversion plumbing parts from BRS this week. I’m going to start a build thread too just waiting for my plumbing to be completed to share.

The sled trick totally worked down my stairs. bonus part was the factory shipped the tank with a 1/8” piece of play wood under the tank. So I kept the packing foam, card board and wood in tact and slide it down my stairs. 6 guys 4 pro suction cups, one 4 wheel furniture dolly with extended 2- 2x4 and two mover straps played a key roll.

4F59ED80-42FA-4538-A39B-61EEE5A9D3FC.jpeg
Mine were tapped inside. I can image if they were on the outside they would get smashed.
One suggestion, wait until AFTER you fill the tank to level the doors. I spent forever trying to adjust prior to filling and could never get it. After filling and releveling the stand the doors evened out and I had to make only minor adjustments.
Don’t forget to post a link to your build on here;)
 

jmcdona6

Community Member
View Badges
Joined
Dec 30, 2019
Messages
36
Reaction score
38
Location
Grayson
Rating - 0%
0   0   0
I think you would need to replace the entire door. Looks like the glass is adhered to the frame of the door. But I think it’s doable if you purchase new hinges or reuse the existing.

AC7B880D-ED06-46DF-91BA-E491B32D05D1.jpeg
C2455859-C4AB-48F2-9F95-8BC3FBA1D5CE.jpeg
1E5810C1-1302-4D65-9624-2D259FC68B4F.jpeg

I appreciate the detailed reply!

Good looking tank setup though, you have done a great job. I envy your plumbing skills and setup. I plan it like that but I am usually just happy to have a functioning system that mostly holds water.
 

Manose

Valuable Member
View Badges
Joined
Sep 19, 2018
Messages
1,645
Reaction score
4,341
Location
Johnson City, Tn
Rating - 0%
0   0   0
I missed out as they have none of the older models instock. I wanted the older model not because of price but I wanted the shorter stand and kinda liked the way the plumbing was as it made it easy to just throw a few adapters on and plumb it how you wanted it.
 

jmcdona6

Community Member
View Badges
Joined
Dec 30, 2019
Messages
36
Reaction score
38
Location
Grayson
Rating - 0%
0   0   0

SPS247

Active Member
View Badges
Joined
Aug 15, 2015
Messages
179
Reaction score
258
Rating - 0%
0   0   0
Mine were tapped inside. I can image if they were on the outside they would get smashed.
One suggestion, wait until AFTER you fill the tank to level the doors. I spent forever trying to adjust prior to filling and could never get it. After filling and releveling the stand the doors evened out and I had to make only minor adjustments.
Don’t forget to post a link to your build on here;)
LOL about the door adjustment wish I would have known that trick. I spent 3 different days on them each day I got a better alignment until I said Fudge it! Yeah it was a totally after thought for sure on my baffles it was a prayer by them that it would make it. You can tell they forgot to put them inside.
 

gammarho55

Community Member
View Badges
Joined
Apr 9, 2017
Messages
97
Reaction score
25
Rating - 0%
0   0   0
I'll be getting my 220 installed on Saturday. I came home from being away for Christmas, and noticed my Red Sea 425 had a 1/4" tear in the out silicone of the top/front panel. Kept my eye on it and after a couple hours noticed a second tear. Shut it down and drained the tank to half depth and the panel hasn't moved since. This will hopefully buy me enough time to get the new tank setup/cycled. Luckily I don't have a ton of fish/coral, so I can use the 425 as an expensive holding pen lol. Also glad I up-sized most of my equipment as all of it will transfer over for the time being.
Enjoying the thread so far... keep the photos coming as there doesn't seem to be a whole lot of info about these tanks.
 
OP
OP
Big C

Big C

Well-Known Member
View Badges
Joined
Mar 9, 2018
Messages
544
Reaction score
943
Location
Northwest Indiana
Rating - 0%
0   0   0
LOL about the door adjustment wish I would have known that trick. I spent 3 different days on them each day I got a better alignment until I said Fudge it! Yeah it was a totally after thought for sure on my baffles it was a prayer by them that it would make it. You can tell they forgot to put them inside.
Ha :D, I spent a week and called them a few times because it wasn’t leveled. Almost replaced the hinges!
 
OP
OP
Big C

Big C

Well-Known Member
View Badges
Joined
Mar 9, 2018
Messages
544
Reaction score
943
Location
Northwest Indiana
Rating - 0%
0   0   0
Decided short term to just modify the existing covers, Dremel was a good investment years ago... considering just short of 200 gallons of total water volume pretty sure this helps keep evaporation and splashing down. Next task is to install a divider between the sump and open space to protect all the electronics from splashes.
263C6ED7-3609-426A-AFE8-96AC4851EA26.jpeg

Also added some floss that quieted down the water running though them. Cheaper than the silencers but will need to replace once it’s stocked.
6E0E13CC-9F8E-4DA3-BABF-BB69C08B5EBD.jpeg
 

ScottB

7500 Club Member
View Badges
Joined
Mar 5, 2018
Messages
7,888
Reaction score
12,168
Location
Fairfield County, CT
Rating - 0%
0   0   0
I was thinking about replacing the sump but for my current setup I think I will stick with it as I just need it to hold equipment. The Pro Clear sump looks nice.

I was going to use a couple of Avast diaphragm pumps and Apex optical sensors for water change but with some extra Christmas money will be buying a DOS. @Manose Where do you take out and add for the AWC?? I just don't want to take out the water I just put in :)

To remove the sump I think you might need to remove the front left white support. As you probably know would want to do this with no weight on the stand. If you take that out you should be able to slide the sump out. I only slide it from side to side to access a few items i dropped behind the sump while installing the piping. Its held in place with a bracket and two screws on the top and bottom each.

IMG_5566.jpg

Any way you think you could accomodate an acrylic divider between the sump & controller/energy bar? Sorry if discussed already.

Great build. Thanks for posting.

Edit: I just got to your post from 30 mins ago. Good call.
 
Last edited:
OP
OP
Big C

Big C

Well-Known Member
View Badges
Joined
Mar 9, 2018
Messages
544
Reaction score
943
Location
Northwest Indiana
Rating - 0%
0   0   0
Any way you think you could accomodate an acrylic divider between the sump & controller/energy bar? Sorry if discussed already.

Great build. Thanks for posting.

Edit: I just got to your post from 30 mins ago. Good call.
I was going to go a bit cheaper. Found this black plastic ABS at Menards in a 48"x36" sheet. I was going to use some L brackets to mount. The plant was to leave 1/2" around the wall to accommodate tubing and electrical, pretty much install it flush with the sump to separate the two compartments. I don't mind that it is black as I have plenty of lighting. The rest of the ABS sheet I was going to make a tighter fit on the sump cover.

The red square is where I was placing it using the brackets and bolts/nuts to make it removable. Plan on extending it about 3" below the top of the sump.

ABS Wall for Sump.jpg


Example of abs sheet
Stainless L brackets
 

SPS247

Active Member
View Badges
Joined
Aug 15, 2015
Messages
179
Reaction score
258
Rating - 0%
0   0   0
Ha :D, I spent a week and called them a few times because it wasn’t leveled. Almost replaced the hinges!
Man to think I almost drilled new holes for hinges swearing up and down. It’s a good thing I walked away when I did especially after a few IPA’s. Reefing and drinking do not mix very well. lol!
 

SPS247

Active Member
View Badges
Joined
Aug 15, 2015
Messages
179
Reaction score
258
Rating - 0%
0   0   0
I was going to go a bit cheaper. Found this black plastic ABS at Menards in a 48"x36" sheet. I was going to use some L brackets to mount. The plant was to leave 1/2" around the wall to accommodate tubing and electrical, pretty much install it flush with the sump to separate the two compartments. I don't mind that it is black as I have plenty of lighting. The rest of the ABS sheet I was going to make a tighter fit on the sump cover.

The red square is where I was placing it using the brackets and bolts/nuts to make it removable. Plan on extending it about 3" below the top of the sump.

ABS Wall for Sump.jpg


Example of abs sheet
Stainless L brackets
The divider is a great Idea!
 
OP
OP
Big C

Big C

Well-Known Member
View Badges
Joined
Mar 9, 2018
Messages
544
Reaction score
943
Location
Northwest Indiana
Rating - 0%
0   0   0
Man to think I almost drilled new holes for hinges swearing up and down. It’s a good thing I walked away when I did especially after a few IPA’s. Reefing and drinking do not mix very well. lol!
Favorite IPA???

I live near a brewery 3 Floyd’s. Usually enjoy a few IPAs during the build after any work requiring a level or electricity :)
 

SPS247

Active Member
View Badges
Joined
Aug 15, 2015
Messages
179
Reaction score
258
Rating - 0%
0   0   0
Favorite IPA???

I live near a brewery 3 Floyd’s. Usually enjoy a few IPAs during the build after any work requiring a level or electricity :)
NiceGumball Head off the Tap Amazing. Zombie dust is another good one.
Lagunitas Little Sumpin. Is my go to.
but Ninja vs Unicorn by Pipeworks killer!
 
OP
OP
Big C

Big C

Well-Known Member
View Badges
Joined
Mar 9, 2018
Messages
544
Reaction score
943
Location
Northwest Indiana
Rating - 0%
0   0   0
Finally got it installed, call it a "splash guard". I did see a few drops of salt on the Neptune Apex so glad I put this on. Should prevent splashes from the sump but still allow me to see in the sump at the heaters easily. Also very light and very removable. Gap around it for electrical/tubing and some air movement.


IMG_5581.jpg
 

SPS247

Active Member
View Badges
Joined
Aug 15, 2015
Messages
179
Reaction score
258
Rating - 0%
0   0   0
Quick question: How is everybody lining up the front of the tank (bottom white trim)to the top of the three doors. Are you guys keeping it flush or pushed back slightly? I only ask because I had somebody insist it should be pushed back a little and my stance was it was designed to be flush with the doors to give it that seamless look.
 

Keeping it clean: Have you used a filter roller?

  • I currently use a filter roller.

    Votes: 61 33.7%
  • I don’t currently use a filter roller, but I have in the past.

    Votes: 6 3.3%
  • I have never used a filter roller, but I plan to in the future.

    Votes: 48 26.5%
  • I have never used a filter roller and have no plans to in the future.

    Votes: 58 32.0%
  • Other.

    Votes: 8 4.4%
Back
Top