Red Sea Reefer 525 XL Build

OP
OP
mjlash22

mjlash22

Well-Known Member
View Badges
Joined
Jan 13, 2016
Messages
643
Reaction score
432
Location
Michigan
Rating - 0%
0   0   0
I love how everyone is getting these reefers! Great tanks and your set up is sweet. I like the red PVC, wish I had done something similar but meh I'm not taking it apart now lol
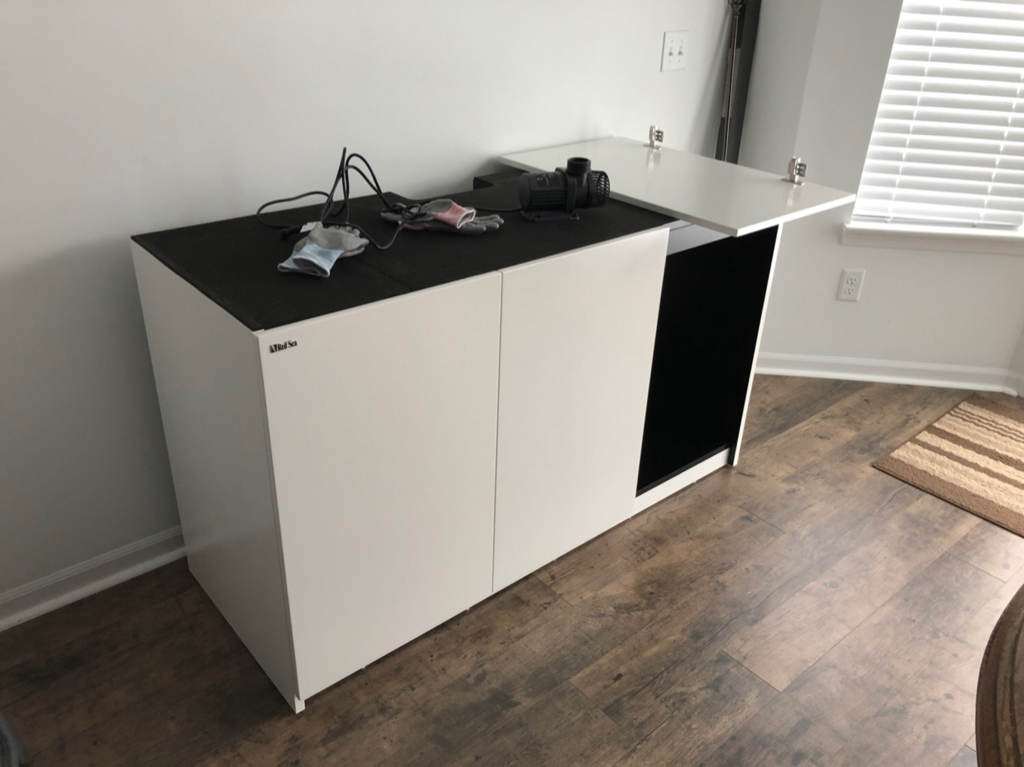
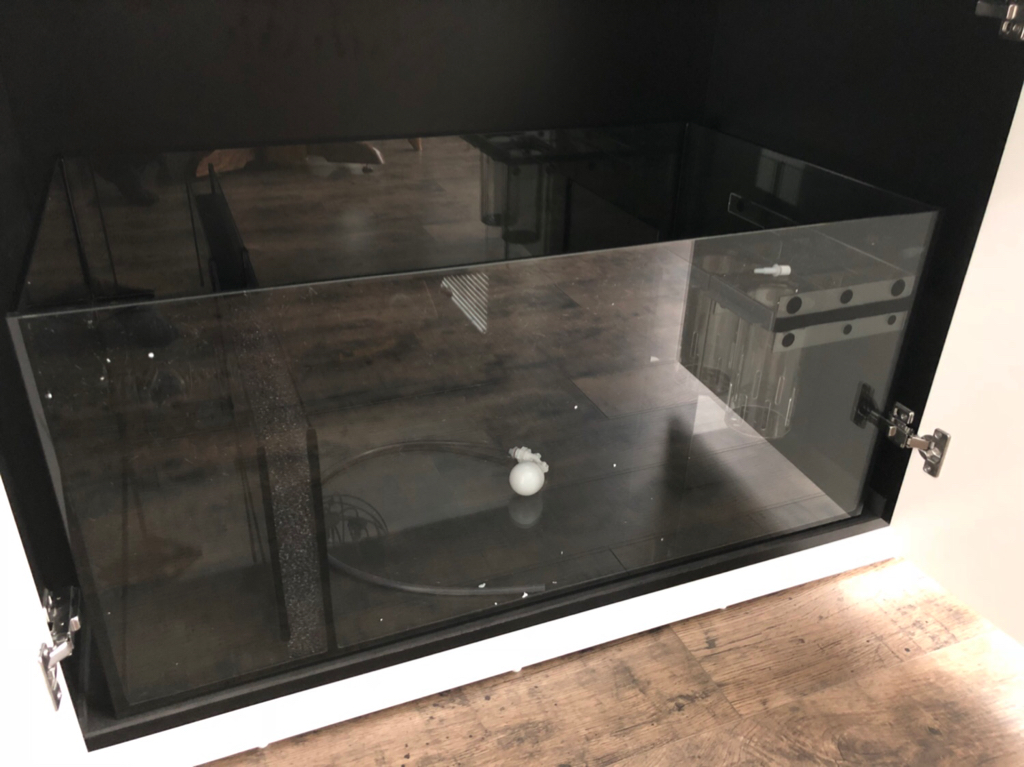
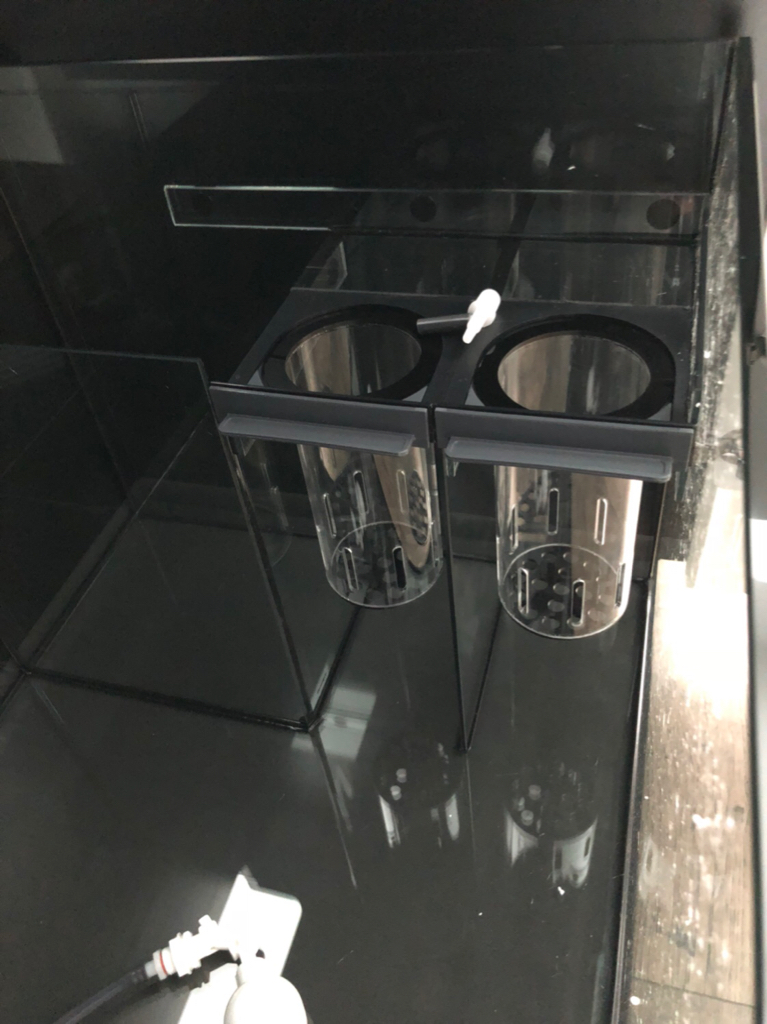
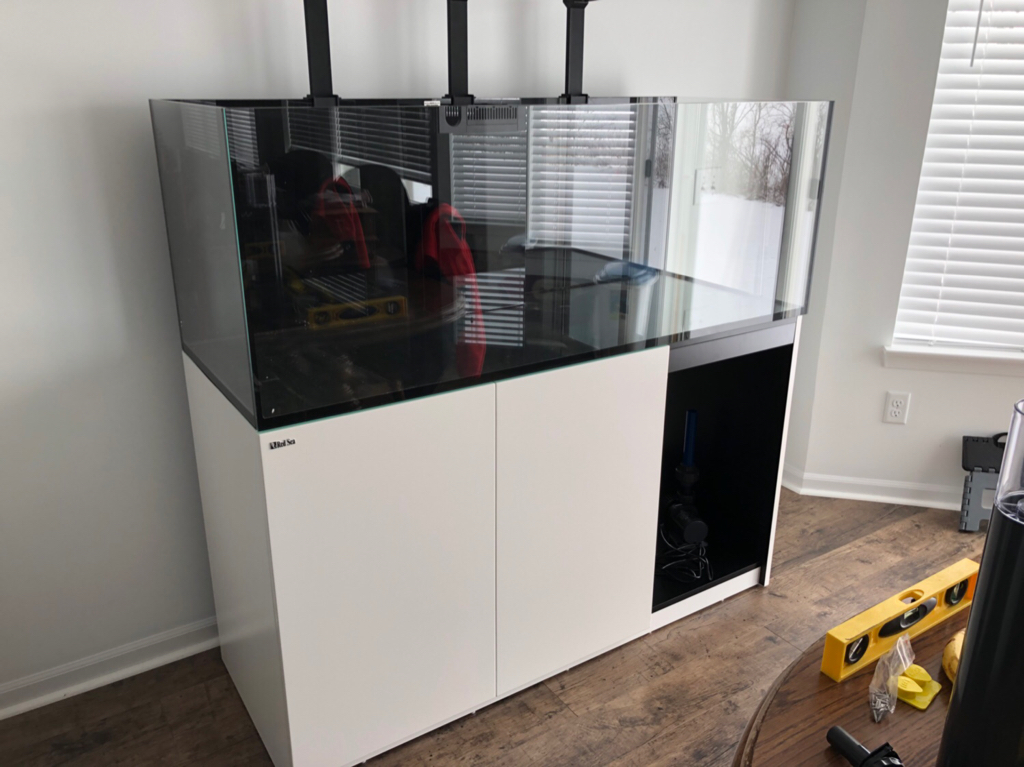
The pictures above of the red PVC plumbed sump are not my tank! He was helping me with some plumbing suggestions, appreciate the support though! I will have blue PVC!
 
OP
OP
mjlash22

mjlash22

Well-Known Member
View Badges
Joined
Jan 13, 2016
Messages
643
Reaction score
432
Location
Michigan
Rating - 0%
0   0   0
Cabinet is in its home. Checked the leveling and everything checks out. Next step will be supporting the floor from the basement before putting the tank on the cabinet. After a lot of consideration, I’ve decided to purchase two floor jacks to support the joists downstairs. I am going to use 2 married 2x4’s per jack to run along 2 of the joists the tank will be over. Jack will go in between the two joists. I may have been able to get away without doing this, but for about $120 in material costs, it’s a relatively cheap safe guard.

0173ac7a3e04048e1e2fe95711a93157.jpg


Anyone who has swapped the stock return barn for a 3/4” male adapter, I need your help! I wrapped the threads with tape about 10-12 revolutions. As you can see from the picture below, it did not go in flush. Did I strip the threads when taking out the stock barb? Is this still ok?
b9265ef178c99aa52177166c759ceb93.jpg
 

kswan

Active Member
View Badges
Joined
Mar 24, 2017
Messages
430
Reaction score
339
Location
Minneapolis
Rating - 0%
0   0   0
I would just unthread and try it again. I did the same thing on my xl 425. It isn't a perfect fit but works fine once it is lined up. There isn't much pressure at that point in the return.
 
OP
OP
mjlash22

mjlash22

Well-Known Member
View Badges
Joined
Jan 13, 2016
Messages
643
Reaction score
432
Location
Michigan
Rating - 0%
0   0   0
I would just unthread and try it again. I did the same thing on my xl 425. It isn't a perfect fit but works fine once it is lined up. There isn't much pressure at that point in the return.

That is after about the third or fourth time. I’m going to leave it as is and see how it goes. I don’t think it’s off too much as to where it would affect the plumbing.
 

Daltrey

Valuable Member
View Badges
Joined
Sep 17, 2017
Messages
1,296
Reaction score
1,537
Location
Guntown, Mississippi
Rating - 0%
0   0   0
Yes, Red Sea should have made the inside white also. Some of their previous models were all white so unless it was about cutting costs they really messed up on that one. I was going to paint mine white but in the end I just left it. I still may go back and redo it some day.

I did my plumbing in blue and have to say it turned out pretty nice.

20180116_201140.jpg
 
OP
OP
mjlash22

mjlash22

Well-Known Member
View Badges
Joined
Jan 13, 2016
Messages
643
Reaction score
432
Location
Michigan
Rating - 0%
0   0   0
Yes, Red Sea should have made the inside white also. Some of their previous models were all white so unless it was about cutting costs they really messed up on that one. I was going to paint mine white but in the end I just left it. I still may go back and redo it some day.

I did my plumbing in blue and have to say it turned out pretty nice.

20180116_201140.jpg

I noticed your build and like how you plumbed yours, I’m still debating if I just say screw it and do the same thing.
 

Daltrey

Valuable Member
View Badges
Joined
Sep 17, 2017
Messages
1,296
Reaction score
1,537
Location
Guntown, Mississippi
Rating - 0%
0   0   0
I noticed your build and like how you plumbed yours, I’m still debating if I just say screw it and do the same thing.

If you do then make sure you use abs pvc glue and not regular pvc glue to join the pvc to the overflow tubes. I had to dremel around the end of the pvc pipe to fit into the red sea overflow tubes but it is rock solid.

The only downside is it is permanent and if for some reason I ever had to take out the overflow tubes I would have to cut the pvc pipe and redo. So I made sure to lube the orings when I installed it and filled the overflow with water to test for leaks before gluing it to the schedule 40 pvc valve unions.

If I was to do it again though I would still do it the same way. There is zero chance of a leak at those connections. Even when I dry fitted them I almost couldn't get them back apart.

I'm also running my vectra m1 at 100% and couldn't take the chance of a failed connection.
 
Last edited:
OP
OP
mjlash22

mjlash22

Well-Known Member
View Badges
Joined
Jan 13, 2016
Messages
643
Reaction score
432
Location
Michigan
Rating - 0%
0   0   0
If you do then make sure you use abs pvc glue and not regular pvc glue to join the pvc to the overflow tubes. I had to dremel around the end of the pvc pipe to fit into the red sea overflow tubes but it is rock solid.

The only downside is it is permanent and if for some reason I ever had to take out the overflow tubes I would have to cut the pvc pipe and redo. So I made sure to lube the orings when I installed it and filled the overflow with water to test for leaks before gluing it to the schedule 40 pvc valve unions.

If I was to do it again though I would still do it the same way. There is zero chance of a leak at those connections. Even when I dry fitted them I almost couldn't get them back apart.

I'm also running my vectra m1 at 100% and couldn't take the chance of a failed connection.
I appreciate the information, great advice if I choose to go that route!

That is one reason I have not fully committed to that way yet though, the fact it will be permanent. I have a good idea of what I want to do for the manifold, but if plans change now or in the future, like you said, I would have to cut it out and redo, which would not be optimal once up and running.
 
OP
OP
mjlash22

mjlash22

Well-Known Member
View Badges
Joined
Jan 13, 2016
Messages
643
Reaction score
432
Location
Michigan
Rating - 0%
0   0   0
Not much to update over the last day. Played around with the light mounts that came with this deluxe version, and I have to say I’m impressed. Specifically for a couple reasons.

First and foremost, they are a rigid, fixed height mount. No messing around with goosenecks trying to get the correct height, and your limited to one height. Some people may disagree with my opinion of this, but let’s be honest. This is Red Sea we’re talking about. They’ve done the research to find out what height is optimal for the lights to hang above water height.

Second, the build quality is second to none, and it was a super easy install.

Third, Red Sea finally got the hint and stopped drilling the tanks. I remember seeing posts of people getting their tanks, just to be disappointed when they came drilled or plugged, no matter if they got the deluxe version or not. I’m not sure if this was only limited to certain sized tanks or not, but it appears they redesigned the mounts to function without holes drilled into the tank.

Last, I love how the mounts can be pivoted upwards for water changes/DT maintenance.

Things I don’t like:

I purchased the white cabinet. I wish they made a silver/white mount and gave you the white hydras to match the cabinet.

They did an ok attempt to hide the wiring through the mount, but instead of it going all the way through and out the back, it just comes out the top and spills over the back of the mount.

512b82d1c1967ff7e7352def4993e382.jpg

ee3e8278b70e7409b105ad8234a9744c.jpg
 
OP
OP
mjlash22

mjlash22

Well-Known Member
View Badges
Joined
Jan 13, 2016
Messages
643
Reaction score
432
Location
Michigan
Rating - 0%
0   0   0
Today’s update.

Got the two cabinet doors on for the sump compartment. My OCD kicked in so that took about an hour to get them as close to perfect as possible. I’m happy with the results, tiny difference in the gap from top to bottom of the two doors, but hardly noticeable.
633ccf0823ad013c9fe288ddaa804418.jpg


Got the sump into its compartment. This may seem like common sense but I’m going to share it anyways. You have to install the doors before putting the sump in! You won’t be able to screw in the brackets once the sump is put in. Also included a pic of the acrylic filter socks. Huge shoutout to Anything Acrylic for these filter cups. Hit them up on Facebook if you want some for yourself!
a033bfc683955b170d978f5c1c2c22f6.jpg

9ecf34c1e9c779f7e85f097e70d85ba3.jpg


Last project for today was installing the floor jacks in the basement. Those that have been following along know that I’ve been debating on whether or not I thought this was necessary or not. In the end, for about $150 in materials, I decided it was a cheap safe guard and went ahead with it. Did my best to measure it out so that each stand is 40” apart which leaves 10” of tank weight left and right. Based on how far is sticked out from the wall upstairs, I only needed to support 2 joists. Cut 2x4’s 20” long and married them together, two per stand. Stand is centered between the two posts. Happy with the results and loved these stands. Easy setup and also liked the fact that these came with a tightening rod vs other models where you have to use a wrench to tighten.
5b3345cb861b49d7d6218a07218752a6.jpg
 
OP
OP
mjlash22

mjlash22

Well-Known Member
View Badges
Joined
Jan 13, 2016
Messages
643
Reaction score
432
Location
Michigan
Rating - 0%
0   0   0
Slow but steady progress. Got the tank on the stand and leveled! 255lbs isn’t as light as I thought!
195a32a8e9e410b2ef63dc1174cf728d.jpg


Plans for the upcoming days.
- install lights and test functionality
- hard plumb the sump/return
- wire/power strip management plans
- install Tunze Osmolator
- start aquascaping tank

Stay tuned for more pics/updates!
 

grassy_noel

Active Member
View Badges
Joined
Oct 26, 2017
Messages
278
Reaction score
246
Location
Evanston, Illinois
Rating - 0%
0   0   0
Today’s update.

Got the two cabinet doors on for the sump compartment. My OCD kicked in so that took about an hour to get them as close to perfect as possible. I’m happy with the results, tiny difference in the gap from top to bottom of the two doors, but hardly noticeable.
633ccf0823ad013c9fe288ddaa804418.jpg


Got the sump into its compartment. This may seem like common sense but I’m going to share it anyways. You have to install the doors before putting the sump in! You won’t be able to screw in the brackets once the sump is put in. Also included a pic of the acrylic filter socks. Huge shoutout to Anything Acrylic for these filter cups. Hit them up on Facebook if you want some for yourself!
a033bfc683955b170d978f5c1c2c22f6.jpg

9ecf34c1e9c779f7e85f097e70d85ba3.jpg


Last project for today was installing the floor jacks in the basement. Those that have been following along know that I’ve been debating on whether or not I thought this was necessary or not. In the end, for about $150 in materials, I decided it was a cheap safe guard and went ahead with it. Did my best to measure it out so that each stand is 40” apart which leaves 10” of tank weight left and right. Based on how far is sticked out from the wall upstairs, I only needed to support 2 joists. Cut 2x4’s 20” long and married them together, two per stand. Stand is centered between the two posts. Happy with the results and loved these stands. Easy setup and also liked the fact that these came with a tightening rod vs other models where you have to use a wrench to tighten.
5b3345cb861b49d7d6218a07218752a6.jpg
Looks beautiful! And I think that's a great idea to reinforce the joists below. You'll have over 1,000 lbs sitting mid-span on those two joists. Much better to be safe than sorry.

As a bystander whose done some structural framing work, I would recommend bracing the two joists laterally. At this point, the likely failure mode would be the torsion of the two joists as they try to twist themselves out of being sandwiched between the weight of the tank above and the upward force of the lolly-columns, below. If you cut two pieces of 2x12 to the dimension of the spacing between the two joists (probably 14 1/2") and put them above your 2x4 spanning blocks and secured them to the top and bottom chords of your joists, it would keep the joists from twisting under the load. At that point I think you'd have every imaginable scenario covered.

Of course you'll probably never need this...
 
OP
OP
mjlash22

mjlash22

Well-Known Member
View Badges
Joined
Jan 13, 2016
Messages
643
Reaction score
432
Location
Michigan
Rating - 0%
0   0   0
Looks beautiful! And I think that's a great idea to reinforce the joists below. You'll have over 1,000 lbs sitting mid-span on those two joists. Much better to be safe than sorry.

As a bystander whose done some structural framing work, I would recommend bracing the two joists laterally. At this point, the likely failure mode would be the torsion of the two joists as they try to twist themselves out of being sandwiched between the weight of the tank above and the upward force of the lolly-columns, below. If you cut two pieces of 2x12 to the dimension of the spacing between the two joists (probably 14 1/2") and put them above your 2x4 spanning blocks and secured them to the top and bottom chords of your joists, it would keep the joists from twisting under the load. At that point I think you'd have every imaginable scenario covered.

Of course you'll probably never need this...

Excellent advice! Something I will definitely look into. I estimated the weight at about 2000lbs after all is said and done.
 

ksfulk

Working back towards clean
View Badges
Joined
Jun 21, 2014
Messages
1,936
Reaction score
1,979
Location
Grand Rapids, Michigan
Rating - 0%
0   0   0
Not much to update over the last day. Played around with the light mounts that came with this deluxe version, and I have to say I’m impressed. Specifically for a couple reasons.

First and foremost, they are a rigid, fixed height mount. No messing around with goosenecks trying to get the correct height, and your limited to one height. Some people may disagree with my opinion of this, but let’s be honest. This is Red Sea we’re talking about. They’ve done the research to find out what height is optimal for the lights to hang above water height.

Second, the build quality is second to none, and it was a super easy install.

Third, Red Sea finally got the hint and stopped drilling the tanks. I remember seeing posts of people getting their tanks, just to be disappointed when they came drilled or plugged, no matter if they got the deluxe version or not. I’m not sure if this was only limited to certain sized tanks or not, but it appears they redesigned the mounts to function without holes drilled into the tank.

Last, I love how the mounts can be pivoted upwards for water changes/DT maintenance.

Things I don’t like:

I purchased the white cabinet. I wish they made a silver/white mount and gave you the white hydras to match the cabinet.

They did an ok attempt to hide the wiring through the mount, but instead of it going all the way through and out the back, it just comes out the top and spills over the back of the mount.

512b82d1c1967ff7e7352def4993e382.jpg

ee3e8278b70e7409b105ad8234a9744c.jpg

Not sure if its that big of an irritation, but you could always tape off the mounting brackets (that go over the glass) and spray the light brackets with some Krylon White spray paint. Since I dont have the same mounts, Im not sure if they are plastic or aluminum, but you could easily spray them the color you like and then it would match. When I setup my sump, I hated that the inside of the cabinet was black instead of white, but since the sump was already in and the tank already had water in it, I let that go, but I did end up painting the return plumbing so that it matched my white/red theme. Just a thought :D Its looking good so far! Im lucky that I put my tank in the basement on the concrete floor, though I did have to spend some time leveling the tile floor that it sits on. Glad I didnt need to setup floor jacks in the finished basement!
 

Oberst Oswald

Active Member
View Badges
Joined
Jan 31, 2016
Messages
417
Reaction score
523
Location
New Jersey
Rating - 0%
0   0   0
How many guys did you have to move the tank to the stand? Did the suction cups allow a two hand grip? Your return with the 3/4" adapter is not threaded properly. It should be straight and is most likely cross threaded. It probably won't leak with all the Teflon tape you used (2 wraps would of been fine) but with it being off like that will be about a 1/2"+ cocked at the end of your run. Smart move on installing the jacks. Just a thought... before you put water in the tank, and it still can be moved, I would replace the 2 outlet duplex with a 4 gang GFI outlet. Plugs and power supplies really add up in a hurry.
 
OP
OP
mjlash22

mjlash22

Well-Known Member
View Badges
Joined
Jan 13, 2016
Messages
643
Reaction score
432
Location
Michigan
Rating - 0%
0   0   0
Not sure if its that big of an irritation, but you could always tape off the mounting brackets (that go over the glass) and spray the light brackets with some Krylon White spray paint. Since I dont have the same mounts, Im not sure if they are plastic or aluminum, but you could easily spray them the color you like and then it would match. When I setup my sump, I hated that the inside of the cabinet was black instead of white, but since the sump was already in and the tank already had water in it, I let that go, but I did end up painting the return plumbing so that it matched my white/red theme. Just a thought :D Its looking good so far! Im lucky that I put my tank in the basement on the concrete floor, though I did have to spend some time leveling the tile floor that it sits on. Glad I didnt need to setup floor jacks in the finished basement!
I actually debated doing this. They are aluminum mounts. My roadblock was the Hydra's. Didnt think I could get them painted to look anywhat near as clean as they should look. My thing is, with technology booming in this hobby, there's sure to be new lights out that I'll probably want to get/test within the next year or so, and at that time I will get everything in white/silver.
 
OP
OP
mjlash22

mjlash22

Well-Known Member
View Badges
Joined
Jan 13, 2016
Messages
643
Reaction score
432
Location
Michigan
Rating - 0%
0   0   0
How many guys did you have to move the tank to the stand? Did the suction cups allow a two hand grip? Your return with the 3/4" adapter is not threaded properly. It should be straight and is most likely cross threaded. It probably won't leak with all the Teflon tape you used (2 wraps would of been fine) but with it being off like that will be about a 1/2"+ cocked at the end of your run. Smart move on installing the jacks. Just a thought... before you put water in the tank, and it still can be moved, I would replace the 2 outlet duplex with a 4 gang GFI outlet. Plugs and power supplies really add up in a hurry.
I only had my self and one other person help me move the tank inside and on top of the stand. The suction grips were awesome and they do allow a 2 handed grip, but there is not much room. If I were to do it again, I would have ordered 2 more and have 2 on each side vertical instead of the one horizontal. I think that would have made the move/lift less awkward and easier to accomplish.

I went away with the threaded adapter approach and put back on the stock barb fitting. I am going to do a soft plumb from the end of the manifold to the return pipe of the tank. This will probably help out with vibrations anyway.

Solid advice on the GFI outlet, I will look into getting that quick fix done before my eagerness hits!
 

Reefing threads: Do you wear gear from reef brands?

  • I wear reef gear everywhere.

    Votes: 17 14.7%
  • I wear reef gear primarily at fish events and my LFS.

    Votes: 7 6.0%
  • I wear reef gear primarily for water changes and tank maintenance.

    Votes: 0 0.0%
  • I wear reef gear primarily to relax where I live.

    Votes: 18 15.5%
  • I don’t wear gear from reef brands.

    Votes: 66 56.9%
  • Other.

    Votes: 8 6.9%
Back
Top