Navigation
Install the app
How to install the app on iOS
Follow along with the video below to see how to install our site as a web app on your home screen.
Note: This feature may not be available in some browsers.
More options
You are using an out of date browser. It may not display this or other websites correctly.
You should upgrade or use an alternative browser.
You should upgrade or use an alternative browser.
The Supreme Guide To Setting Up A Saltwater Reef Aquarium
- Thread starter revhtree
- Start date
- Tagged users None


- Joined
- Feb 29, 2020
- Messages
- 82
- Reaction score
- 253
What a gem!The Supreme Guide To Setting Up A Saltwater Reef Aquarium
Introduction
The marine environment is one of the most complex systems on the planet. The aquarium you are about to set up is only a tiny sliver of the vast ocean, but it is nowhere near simple. This task is going to take patience, a ton of reading, and a ton of patience. It takes the whole household to have the perfect setup, so if you live with people make sure to tell them things that you learn that apply to them. If you or your housemates like to spray air freshener or light candles, try to keep them as far away from the tank as possible. This is the number one cause for Cyanobacteria in my area, and causes many people to give up when they could have just moved their candles in another room! Make sure you and your housemates can handle the occasional ocean smells that may occur. Some of us enjoy the smell of the ocean, so having a tank can be like a giant air freshener to some.
Due to the hobby’s unique and ever changing systems it is best to prepare for future upgrades and keep an open mind to others' opinions. Nobody in the world has a system that functions the same as someone else. Even in a group of 300 Biocube owners, none of them will have the same look, chemistry, or livestock. When researching advanced techniques make sure to get multiple views on your subject. In high school and college, we research and find one source for our facts and that is enough because those sources are either scientific research or facts that have been previously proven and are given by sources of which you cannot question. There are tons of facts proven in our hobby, but the majority of methods of most aspects of the hobby will vary from person to person and even tank to tank. Even research facilities like GARF can only really base their data from observation, which is no more than we do as hobbyists.
Optimism is a very important thing to have during this. When something goes wrong do not get mad and quit. Look at it like a learning experience, a way to make your tank better. We all mess up or equipment fails, it is nearly impossible to never have some kind of problem. When problems occur and you correct them correctly, you often do not run into that problem again and if you do you know exactly what to do. Things will always clear up, as long as you us the right methods. Of course, prevention is key. Nearly every issue that can happen has a fail safe with the right setup. A great reason to invest in or ask Santa for an aquarium controller.
An aquarium controller is a very good option, but not a requirement. You can achieve the same results without them, but they are highly recommended by just about everyone that has used one. Extreme stability can be hard for some who are not often available to constantly monitor their tanks. The thing that got me was the cost after buying all the power strips, timers, wave makers, and water tests, the idea of a few hundred bucks into a reef computer was not so scary, and in fact has made my life much easier with the endless possibilities.
This is a guide that will help you gather all the knowledge you need. It will help you ask the right questions. This is not an instruction for a specific setup, but a general idea of the reef tank and all that is involved, well, not all of it. There is new stuff happening every day! Use the wisdom you are about to receive to prevent all the mistakes that you would make had you not been guided.
The Walkthrough: Your First Reef
Section 1: The Plan

Tank Placement:
First and foremost: you must know where you will be putting your tank. Seventy-five gallons is quite heavy. If you have a cement slab foundation then you won’t have an issue holding up an aquarium. For a crawlspace or basement you will need to inspect it and possibly have an actual inspector come and verify the strength of said floor. Floor Jack’s can solve any weakness, as long as it is not water or termite damage causing the flex. Even if it looks strong enough now, in 15 years you may have a slightly angled aquarium. Prevention is always best.
Try to avoid windows that allow sunlight into the room. Try to put the tank in a low traffic area for the fish’s sake. Corals do not have good vision, actually they do not have any vision. If you have no intentions of fish then the traffic is not so much of an issue, just try not to put it near the road. Where ever your tank ends up is where it will stay for a very long time. It is good to place it in a way that allows you to clean all around the stand and behind the tank. If you have cats or dogs, there will no doubt be a large hair ball that will accumulate over the years behind the stand. This could be a potential fire hazard should something spark near it. As long as you can get the vacuum hose behind it you will be safe.
The outlet you will be plugging into will be very important. It should always be a GFCI outlet to prevent electric shock or fires. If setting up a large system you will want to set up a designated breaker ran only to the outlets associated with your system. At the very least, a GFCI surge suppressor should be used if a GFCI outlet is out of the question if you are renting and cannot alter your outlets.
Overall Design:
The Exterior
The stand will be the main attraction, not including the marvelous reef that will one day reside behind the glass. What looks good at the store may not match your home. Sometimes you may have to modify the stand to accommodate your interior or even build your own. Building your own has the benefit of fitting a larger sump. If you cannot build your own just look for a stand that can fit the largest sump, you can always paint it if the color is not right for you. You can also use a cast Iron double stand and have 2 of the same size aquariums for your display tank and sump. The possibilities are quite extensive, but the basic concept is to make it not look out of place. After all, there is no sea in Iowa.
Canopies range from slim to massive. In a room with tall ceilings a giant canopy could look very nice. The small canopy would be more suited for a shorter ceiling, as it keeps an appealing proportion. Treat shopping for the stand and canopy like you would an entertainment center and the aquarium is the television. Beyond looks, structural integrity is important. Particle board is not the strongest material, so try to go with a solid wood or metal.
No canopy is another option. As long as you have means to hold lighting and a way to keep fish from jumping it may actually benefit you to not use a canopy. More fresh air causes more oxygen in the water. It also allows the lighting to radiate heat up and away from the water rather than bake the air around them in the confines of the canopy. Fans can of course help with that as well.
In-wall setups are another stunning way to present your reef. This basically allows you to have an entire area or room dedicated to the aquarium. This gives you room for more equipment, a place to store more supplies, and a good place to hide when you need that alone time. You can use this room to have more tanks for propagating corals or breeding fish (secretly of course).
No matter the stand, the principals are all the same, even if your tank is on the floor and you have a sump in your basement. The concept is simply to get the big tank to be above the little tank by what ever means necessary.
The Interior:

Let us start at the bottom. Sand is a tricky one, as there is no right or wrong way to do it. You can ask any group of reefers the same questions, “How deep is your sand and how fine is the grain?” The answers will literally all be different. Since this is for a Display Aquarium, you will want to consider the look of a deep sand bed compared to a shallow sand bed. People use depths of one half to eight inches of sand of all grades and each have their own success, mostly fairly equal.
The animals are more of a reason to consider certain sand than anything. If you plan on tunneling type fish a less sharp fine grade would be more appropriate. The coarse stuff can potentially trap more detritus, so consider extra maintenance with that route. Live sand is not required at all. Dry sand is cheaper and will become live over time. Another benefit of dry sand comes when setting up your rocks, which you should also start dry.
Bare Bottom is also a common option as well. The benefit of this is that you can place pumps nearly in any direction, which prevents detritus buildup. The bottom will eventually be hidden by Coraline algae and corals, so it definitely has its own appeal.
Live rock is the most important part of your whole system. It is the foundation of your corals homes, it creates habitats for many life forms, and it makes your aquarium go from a glass box to an amazing display of biology at its finest. Live rock has many shapes, sizes, and colors. Some have corals already growing on them. The one thing all live rock has in common is that it carries hitchhikers, or stowaways more like. Hitchhiker would imply they got permission to live in the rock. Live rock can potentially come with reef destruction monsters that will quickly end your fun. A Mantis shrimp could easily be hiding in a new rock and shatter your aquarium with one strike.
If you do choose to use living rock, make sure you have the means to inspect it and possibly remove animals that can cause harm. Anemones, worms, and other types of parasites can be hard to find. This is why using dry rock is so much safer. If dry rock is not available but you still want to use that option you can simply kill the rock and start over. During the planning stages of your reef you can cook and or cure your dry or live rock. This is basically either leaving it in a container with flow and proper temperature for a few months until it basically doesn’t smell rotten. That is by far the easiest way to tell if a rock is ready. You do not need a light, but sometimes the rocks will develop a buildup of detritus from what ever life forms are present. Rinsing them in saltwater before use would be beneficial.
To set up the rock in an appealing manner you should check the web for pictures of the natural reefs of the sea. Imitating nature creates the most natural reefs. With your idea in mind, you can begin to shop for the perfect rocks. You will want roughly one pound per gallon of water. A 75 gallon aquarium with a 55 gallon sump would use anywhere from 75-130 pounds of rock, but usually the lower end of the range is plenty. The important thing is to maximize the area of the rock and try to get as much surface lit. This will allow you more room for corals than a wall type of structure, and look more natural.
The ocean creates an amazing variety of rock formations. The kind you should be looking for is extremely porous, has small caves and holes, and can easily be stacked to form a solid structure. A mixed look can sometimes look out of place, but with creativity and some trial and error you can make quite the interesting structure. Keep water flow in mind, you won’t want dead spots where detritus can collect and form algae or cyanobacteria.
The easiest way is with dry rock. Lay out the rock on a table and put some newspaper down in an area the size of your tank. Situate the rock until it looks like you want it. Imagine yourself as a snail or a fish living in the rock. Is there access for the clean up crew to get to all the caves? Are the caves viewable by you? Fish do like places you can not get to, but it is good to be able to view your rock from all angles. Plan the structure for emergencies and easier capture of fish. Although the goal is to only have to capture fish that die of old age, sometimes we get a fish we regret. Individual fish can vary in temperament, even peaceful fish.

If your rock is not staying how you like it, glue and pvc pipes can assist in holding your structure together. Some tanks are very large and the rocks must be bonded together with reef putty or superglue gel. Another easy way to hold rocks together is with a ziptie. The plastic is reef safe and eventually becomes encrusted with coral or coraline algae. You can hide almost anything in a reef tank if it has been there long enough.
The rock arrangement will be the hardest part. Countless nights have been spent by reefers around the world rearranging their rocks, sometimes causing rock slides. This can damage coral or livestock and possibly shatter your tank if it is a heavy enough rock. Reinforcement is key. Large fish, snails, urchins, and even waves can move rocks when we least expect it. Test the structure as you build it and use gravity to your advantage. In the ocean, the rocks have been sloshed around until they fell into the sturdy position they end up in. Placing the rocks as though they have naturally been put there will be your best direction. Above all, if it looks good to you and stays put, you are ready to place it in its permanent spot. Take pictures of it if you arranged it outside the tank so you can put it back as closely as possible. If you are doing dry you can add the sand after you place the rocks, this will help keep the rocks in place while adding a nice cushion just in case something does fall.
You can make one large structure or a series of little ones that vary in size, creating a multitude of environments that can be home to completely different lifeforms. Peninsula tanks are really cool because you get the extra dimension of both sides of the tank. Check all the views of your tank as you are building. It may look cool from the front, but the side could end up a flat wall if not payed attention to. Use negative space as well as the shape of the rock. You will have corals that may grow large one day, so they will need a spot to flourish.
Keep equipment in mind as well. Your powerheads will need to be placed where they will benefit the tank. If the rocks block all the access points for flow, you will have problems. Putting small ones behind the rock is a good way to keep the water moving. Remember, equipment does go bad, make sure you put something where it can be retrieved. This is all important to consider before buying any rock.
Livestock goal:
Reefs are so diverse that the options of livestock is beyond extreme. The decision you make with your livestock will dictate the type of system you have and in short, the cost. A tank full full of softies will not need the requirements of a Small Polyp Stony Reef that devours calcium and requires constant monitoring and stability. Light requirements are also dictated by the corals you may want. As for fish choices, they are dictated by your tank size. If the whole reason you decided to get into the hobby was a fish that grows three feet long than you better just be prepared to bite the bullet and make the ultimate home for that fish.
A good idea when planning your system is to take a trip to the Fish Store and jot down any animals that pique your interest. Take those notes home and research each animal. You may just have a list of animals that are all designed to eat each other, which would not be a good day for you had you not researched. Narrow down a reasonable list of critters for the tank you plan on making. Make changes to your systems design as your idea becomes more clear. The biggest mistake reefers make is buying on impulse.
The Filtration System:
Your tank will rely on a means of nutrient export. Protein skimmers can be noisy, and sumps can sometimes be loud as well. An open stand may not be a good idea near your bed if you do not like noise. It can even drown out the television, which would be devastating. Planning your filtration system not only to work for your fish, but to work for you is very important. The best possible place to put a sump when possible is your basement, or a room external from the tank. This will hide your noises, equipment, and allow for ease of access and modifications. In the first stages of your tank you will not need much filtration since you won’t have any live stock. The rock is plenty of filtration to get by as you develop your plan for filtration. Some things to research are Protein Skimmers, Algae Turf Scrubbers, and refugiums. You may like the idea of natural nutrient removal or you may go for an all tech sump. The best approach is as needed. If you buy a certain animal that has good luck using certain filtration than try that approach.
Putting your plan to work:

The next sections will explain in detail how to put your idea to work, and do it right. This can be applied to any size aquarium simply by up-sizing or downsizing any examples to your needs. No matter where you plan to place your stuff, the principles transfer across each and every idea. Using drawings and notes will help your ideas become plans. The things you will need to know before buying anything are:
This concludes the vague beginnings of what will soon be an amazing creation. You will have much success when planning in comparison to going at it all at once the wrong way. Go around to other reefers tanks, or look online and see what kind of systems these people have, and if they are working for them. You may find a system that is just right for you that way. Once your plan is solid, it is time to start the process of gathering your supplies.
- Tank Size – This dictates the rest of your equipment, and livestock choices. A huge tank will be more stable, but initial setup may be quite a large fee. A tiny tank will be cheap a cheap setup, but could lead to constant maintenance.
- Stand size – This is what you will base the size of your sump on. It is what holds your beautiful box of glass or acrylic. Pick your stand appropriately.
- Sump Size – This will be where your equipment restrictions will be. If you want supreme filtration go large. You can fit larger skimmers, a larger refugium, and even grow more corals in your sump if it is large enough and designed properly.
- Sump To Tank Path -This is the path your plumbing will go, is it a straight shot? Do you have to drill a hole in your wall or floor and run plumbing down to your basement? Each situation is different. This will be the factor for your plumbing cost and design.
- Coral choices -This is where your lighting options come in to play. Pick your corals before you get the light, otherwise you may buy a light that is far to dim or far to bright. Either way would waste your money or result in a change of plan.
- Livestock – this dictates whether or not you can have certain animals, some eat corals. If you like Puffers, prepare to not have corals or shrimp. If you like shrimp, prepare to not have puffers. Very important at this point to know what you are shooting for.
Section 2: Gathering the Materials
With your plan set in stone, be prepared to still make changes as you progress. Unforeseen circumstances can arise that will force you to alter your plan when the time comes. At this point, you should have a general size in mind, a style of stand, and a general idea of what corals and or fish you want. Availability may change by the time you get around to buying most equipment. In order to run a mixed reef tank you will need the following items. SAVE THE RECEIPTS TO EVERYTHING, AS YOUR PLAN MAY CHANGE ALONG THE WAY.
Section 3: Preparation
- Aquarium stand – Stand of choice that is designed for your chosen tank.
- Aquarium – A Reef Ready aquarium is always better than a non drilled aquarium with an overflow box. There is more chance of a flood with an overflow box. A reef ready tank is simply a tank with an internal wall that water overflows into and goes down a pipe through the glass via Bulkhead fitting and plumbed to your sump. Some tanks come with the return line plumbed through them as well. This makes for a sleek design. A good size tank for your first reef is 75 gallons due to its shape. It has more depth than a 29 or 55 gallon, which makes it easier to arrange the rock without making it look like a wall along with adding more stability. The bigger you can get the better. Fish like having a square environment, it gives them more of a habitat than the bunk bed environment a rectangle can create. Most importantly it has to fit your area.
- Sump – Go as large as possible while still leaving space to get in it. You may require lighting and fans, so account for that. Also, your electrical equipment may be in your stand. Make sure you have a place in your stand that is not likely to result in getting wet from splashing around in your sump. It is easy to splash water when learning how to use your skimmer for the first time.
- Return Pump – 10-50 times Total Turnover Rate including powerheads. The ratio of return flow rate and the flow rate of your powerheads can vary. Ideally you would want your return rate to be equal to the protein skimmer, or faster. The return pump is usually 10x turnover, leaving 10-40X turnover rate for the power heads to make up for.
- Protein Skimmer – Oversized is recommended. At least double the advertised volume is a good starting point. Protein skimmers come in tons of designs. The factors to consider with Purchasing a skimmer are the space in the sump, the height in the stand, and the ease of removal for maintenance. Always check reviews on Protein skimmers. There are so many types it is hard to rely on guessing. One could look like the better skimmer, but the cheaper looking one may be more efficient. It is a great idea to learn about protein skimmers in detail. Improperly using one can result in a flooded floor.
- Powerheads – 10-50X Total Turnover Rate including Return Pump. Using ones that can be controlled will benefit your corals. Some have controllers made just for power heads or if you use an aquarium controller, that can act as your wave maker. Wave boxes, or any other type of surge device can be used in a more advanced setup. Those who wish to go for the advanced setups can easily do so with some research.
- Rock – 1 to 1.5 LBS/Gallon- Base rock is dense, so it weighs much more per square inch, however it is much cheaper. If you are building a large structure, the base rock may be a good idea to use for the foundation of your reef, placing the show rocks on the top to hide them. If you can find larger rocks that look like you want, spend the extra money for it. A solid rock is much more sturdy than a stack of smaller ones.
- *Sand – 8LBS/1sqft per desired depth in inches, (8A)D A=Area in sqft D=Depth of sand
- Quarantine tank – This will be your bullet proof vest as far as parasites and disease goes. Prevention is key and all new life forms will need to be inspected before adding to their permanent home. Some times a coral gets damaged or a fish gets picked on. The best thing to have is a place to help those animals get well rather than risk losing them.
- Buckets – waste water, clean water, salt water, medicated water..each bucket for its own use is best. Avoid Cross contamination at all cost. A good tip is to get containers that stack or can store within each other. A few buckets can fit in a tote, and a tote can fit in a can. Having more than you need is not a bad thing, especially if you need to drain your aquarium for some reason or move it.
- Fish nets – these come in handy when rinsing food and of course, catching animals.
- Aquarium tools – like grabbers, scrubbers, pokers. There is a tool for everything from cleaning the glass to shoveling sand. Your hands can cause irritation to corals, and corals can irritate your hands. The rock is sharp and covered in bacteria. There are worms crawling in places you cannot see just waiting for you to brush against them and take a nice burst of spines to the finger. Gloves are an amazing investment and will save you from a slew of problems.
- Rock support – Zip ties, glue, Reef putty, or any other means to hold the rock together.
- Test kits – During the cycle you wont need the works, just pH, Nitrate, Nitrite, and Ammonia. After the cycle you will need more specific ones like Calcium. Any chemical you add to the tank should have a corresponding test kit, do not add things without knowing how much it needs, if any.
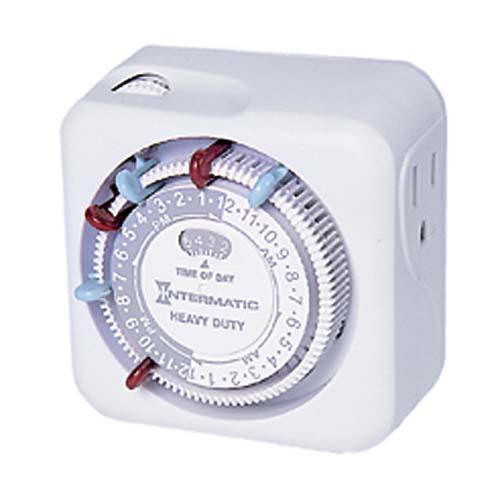
- *Timers – The ocean is on a schedule, and so should your tank. Keeping a rhythm makes for happy corals and the fish will not be confused when you forget to turn off the light one night. They also help with the electric bill. If you have two channels than use two timers to achieve dusk/dawn effect. You can find multi-timers or power strips that have timers on one side and regular outlets on the other.
- *Aquarium Controller – To keep your whole system stable and under complete control.
- Lighting – See Light requirements per species to calculate what is right for your size. Lights come in a huge variety of quality and color, buying what is available may not be as wise as researching what is good, then ordering it. Often it is best to contact the manufacturer of the lighting you are considering. They will guide you to exactly what you need. LEDs work just as well as T5HO lighting, given they are both quality and not cheap knock offs. Use Tank size and Corals you plan as your factors. Nothing else. Water flow does not effect lighting, and neither does temperature. A very deep tank will need stronger light than a shallow one. A stony coral will always need more light than a softy. Well not always. There are exceptions to quite a few things in the reef, and life in general. The lights can be purchased later on, as you fine tune your future stock list. Adding the lights will induce the 4th stage of the cycle, which will be explained later on. The lights are required to finish the complete tank cycling process.
- Reverse Osmosis System – This is your supply of freshwater. You will need access to large quantities, especially during the setup. Do not rely on the types that come with the storage tank. You will be waiting for days to fill your aquarium. 75 gallons per day or more is a good production rate. There are many good brands. The choice is all yours.
- TDS Meter – These test the particulate matter in the reverse osmosis water. Some RO units have a built in TDS meter, but some do not, in which you will need a test pen to ensure your filters are working properly.
- Salinity Readers – Hydrometers are the cheapest route. Refractometers are very accurate when calibrated. Digital salinity readers are the supreme tool to monitor salt. These can be attached to an aquarium controller as well.
- Climate control – Some rooms are the perfect temperature at all times, and do not require the tank to be heated or chilled. If you have a hot room or plan to use heavy lighting than a chiller may be necessary.
- Towels – water will get dripped on something at least once, you will be glad you had a towel handy when that something was your wife’s bright red high heels or your husband’s important work documents.
- Salt – You can’t have seashells without salt! The options vary locally, so see what brands you have access to and check out their reviews online. Some have their flaws, so be careful.
- *ATO – Whether you choose gravity fed or pump fed, an Auto Top off unit is one of the best additions you can have in your system. They allow for extremely stable salt levels. They are not required, just highly recommended. If using an ATO, make sure to plan the space in your sump wisely.
- *Moonlighting – Moon light is not necessary for much beyond seeing the tank at night. Lunar simulators have more of a purpose, imitating the natural phases of the moon. This induces spawning in certain animals, but that is not always a good thing in a small aquarium.
- Journal – Either hand write, start a build thread, or get some type of program or app that can assist you with keeping track of all your tanks changes and test results. Even something as simple as a calender in your stand that you can mark important dates like when you bought or need to replace equipment or keep you on a schedule with water changes. They can even help you remember your fish’s birthday!
- Reef Buddies – Not everyone has friends with a reef tank, so you should be prepared to open up to a few new faces to share your experiences. The easiest place is at the pet store, but going online or joining reef clubs will definitely be great places as well.
- Good Camera – when sharing pictures of things you are trying so seek knowledge about, a pixellated cell phone picture may prevent an answer. It also helps when your corals get so big you have to sell frags of them. You will get more hits with a high quality photograph.
Begin this phase with a fresh mind. This is a very long term project. The cycle alone can take up to 6 months, and “establishing” could be a couple year journey depending on the system. Take it slow, the tortoise always wins the race. Making sure everything has a place to go before hand ensures you are not stuck with a system that simply won’t fit together. Speaking of fitting together, this section is all about preparing. We have to see if these clothes fit before we wear them out in public right? No gluing, no cutting, just positioning and fine tuning your blueprint.
Prepping the Stand and Sump:

Now that you have your stand, set it where you want it to go. Using a Level, make sure the stand is not crooked. Use shims to adjust it as needed. Another consideration is the floor. If your tank is going to be in a room with wood floors you may consider replacing the floor in that area or getting a water proof mat for around the stand. Carpet can be deceiving when leveling a stand with no tank on it. You may need to actually use the tank as a level by placing it on the stand and filling it with about 2 inches of water. Measure the water level at each corner to find if it is level. They should all be the exact same depth. Now that your stand is level and the floor is water resistant you can remove your aquarium and put it in a safe place for now.
This is when you can start to put the sump together and fasten any equipment or wires to the stand. The sump will have either a non drilled design, or a drilled design. If the sump is drilled on the return end, this will require an external return pump, which normally will need to be screwed to the base of the stand for support. The intake on the pump is recommended to have hose inline as a shock absorber. You will want the pumps intake in a straight line to the sump to prevent any unnecessary friction. Use plastic hose clamps to hold the hoses onto the fittings. If the return side is not drilled you can use a submersible pump and not worry about that section of plumbing.
On the drain end you may have bulkheads that route your drain line through the side or top of the sump. These will be one of the flow restrictions to factor into your maximum flow rate, as well as the overflow drain in the aquarium. Bigger drains are never a bad idea when possible. If you can make a larger hole there is no reason not to have that much extra room of safety.
If your sump has any sponges, take them out and keep them in a safe place while you set up the tank. They wont be necessary until you get some salt in the water. Keep all of your media somewhere during this time. At this point you should be just setting your main points of equipment into position so you can draw out your plumbing plan. Set the pump where you want it, the skimmer where it will go, plan a place for your heaters or any other instruments you will want to use. Make sure all the plugs can reach their power sources and if you plan to light a refugium there has to be room for light without burning down your neighborhood. An extra cross bar to attach hooks for hanging things is a great way to keep your stand organized.
If you are installing your sump in your basement or other room, mark where the holes will need to be for the plumbing. The stand may need modified as well. If you are using an aquarium controller, you have about 100-120 feet of distance between modules, so you could keep a system connected at quite long distances.
Sump To Tank Prep:
With your equipment situated where it will go, you can now set your tank on the stand. You will need to route your tank’s drain line into the sump. This is where you will draw out the design for your plumbing. Flexible PVC hose is best, as it has no sharp bends and can form around your design. It also fits perfectly into PVC fittings. If you are going with a hard plumb, make sure to make your right angles with two 45* elbows and not a 90*. There is much less friction this way, and will allow maximum flow rate. If possible, use unions so you can remove the plumbing for cleaning some day. You may get snails or fish stuck in there. When you have your idea drawn out here, move on to the return pump.
The return pump will most often have to have an adapter of some type to fit your plumbing. The intake on a submersible pump should have no plumbing on it besides the cover itself to prevent large objects from entering the pump. The output of the pump has to be equal to or smaller than the size of the intake or you risk losing flow or damaging the pump at a much earlier stage in its operating life. The external pumps will practice the same idea, but with the addition of a connection to the sump.
Valves are your best friend in this area. Having control over the flow is extremely important. When you draw out the return line, add a T before the tank. This will allow a multitude of possibilities. If you have to restrict flow to your tank you can divert the excess through the T rather than putting extra pressure on your pump. You can use this as a place for a water change hose to quickly drain the sump with ease. The extra output can also be used to power devices like Reactors, Skimmers, and even churn your refugium! Some route this line to a frag tank or even a 2nddisplay tank, though it is not advisable to combine systems due to risk of contamination. Again, use minimal angles, and shortest distances possible while still maintaining space within the stand. Some plumbing can be a good spot to mount things like thermometer displays or other things, but there is a risk of getting electrical wet in the event of a leak.
If you have a reef ready tank, you will only need to make it to the bottom of the tank where the bulkhead fitting is. If your tank is not drilled for a return line you can make your own U-tube to make it over the tank or buy one. Loc-Line makes a very large arrangement of return lines and fittings, so take a look at one of their suppliers as you are drawing out your plan. Longer tanks will benefit from 2 return lines on either side of the tank. This can be achieved with another T and a valve to each end to help level out the flow. An SCWD, which is a device that connects where a T would go. The water goes in one end and within the unit spins a cylinder that opens and closes the two outputs, creating an alternating current. These get clogged very fast, but DIY versions have been known to work very well.
There are many options for the end of the return line. Most just have a standard outlet, but you can make a spray bar or even what I call the Sprinkler System. This is when you make a rectangle of PVC that rests on top of the tank and has outlets that T off around it. This allows for a maximum spread of new water rather than a single stream that may not make it to the dirty corner of your tank before diluting too much with the water already in the tank.
The things to worry about are fairly simple to avoid. Power outages cause the pump to shut off. Gravity will suck water back down through the return line as if you were siphoning water for a water change. This can potentially flood your sump, stand, and floor. To prevent this, the outlet of the return line should be placed near the surface of the water. If you want your outlet to go beneath the waterline a good distance than you will need to drill a small hole, about 1/8th of an inch, somewhere on the return line just under the running water level. Make sure to point the hole towards the open water and not facing the rear glass, since it can splash all over when you first power it on. Pointing the hole the same direction as the direction of the outlet is what most people do. Make a not of the direction you want your hole.
Canopy and/or Lighting Prep
Now that you have the water path planned, you can plan your powerhead placement. At this point you can imagine your rocks where they will be. Place your powerheads where they will be accessible, yet hidden. The top of the tank is a common place to put them. If you have a controller for your powerheads you should consider the wave motion when placing them. You want the surface of the tank to be agitated for supreme gas exchange. It will also add a natural sparkle to your water, especially with Halide or LED.
If you have a canopy, the lighting will be mounted within the hood. Make sure your canopy has the means to hold the light. Some LEDS can be hung with small eye hooks, but heavier lighting may need bolted to the canopy itself. If you contact the manufacturer of your light they can assist you with an idea. Forums are a good place for advice as well. Open top tanks have many more options. If you have a light with feet, you pretty much just set it on the tank and you are done. Hanging fixtures can be mounted with chain or wire from an arm or even the ceiling. With some ingenuity you can make quite an epic light fixture. Pool Table lighting is a good option for hiding a DIY light system. If you have some type of pulley system in mind to raise and lower your lighting, a curtain could be a good option to hide your contraption. Having flexibility in your light height can mean the difference between light shocking new corals or having an amazing tank.
Some lighting gets very hot, especially metal halides. If you have a canopy then fans are a must. An improperly ventilated canopy can warp, cause condensation, or damage equipment and even cause a fire. Open tops may not need a fan if the light is high enough off the water level, but a cooling system can still benefit the bulbs and extend their life. Some lighting is intentionally over driven, which can cause excess heat. These fans can work with your controller if you have them as well. Too much wind and you may loose heat from your water! Also keep dust in mind. Fans are very good at collecting dust and we would not like to have a massive glob of who knows what getting blown into our tanks or collecting in the electrical system. Computer fans work great for DIY cooling systems. You can even use an Xbox Intercooler for you gamers out there if you know how to work with wiring.
Prepping the Prep Area:
You will need a space to mix and store water and equipment. The stand will most likely be maxed out on space by the time you have all the items you need. Reverse Osmosis systems are fairly compact and easily mount on the wall. If you have the Water station near an existing water line, you can easily put a Y connecter on the supply and split it off from there. RO systems require a certain pressure so you will need to know what PSI your water line is at. A booster pump can be added before the RO unit to up the pressure to more efficient levels. You will want the RO unit to have easy access for replacing the filters. It will also need to be accessible to make water.
Plan your water area to be as low maintenance as possible. Setting reservoirs higher up allows the use of gravity rather than pumps to transfer water. You will need a container to store both RO and SALTWATER. The saltwater will need aerated, so a pump or air bubble will help to preserve the water while in storage. This area will be a good place to store all your portable water containers as well. Add shelves or cabinets to accommodate your area. You will want to be able to easily get water from this are to your tank. This can be done the old fashioned way with buckets or you can get the job done with a pump that is strong enough to get to your system. Use the same concept to plumb this as a return pump from your sump to your display.
Set up and monitoring systems you may want, or at least have a place to do water tests on your storage water. Even RO units can go bad and pump out 50 gallons of contaminated water. Having a controller can help with this as they can send an alarm when the parameters are out of whack, preventing you from doing a potentially toxic water change. Having a dedicated desk, small table, or shelf will really make this easier for you.
This room can be a good place to hide your quarantine tank as well. Make sure that the room has a GFCI outlet installed, since this will be nearly full of water. An earthquake or Tornado could cause the whole system to collapse and flood your house, so preventing a fire on top of the already devastating event would be nice. You could purchase a large walk in shower and install all of this in the shower casing, with the drain ran into your homes sewage. This would prevent any damage from spills, but could be costly to do.
For smaller tanks you can get away with buying all of your water, just make sure you have a good place to keep it without contaminating it. It is still a good idea to test the water you buy as well. Wal-Mart may have neglected their water machine and could potentially be selling tap water. This could lead to a massive algae outbreak or kill your inverts. Premixed Saltwater may have been made by the new guy and could be the wrong salinity for your system. Even the stuff made in a “factory” could have been contaminated or messed up in the production process. Human error is not avoidable. Preparation and a backup plan are always beneficial.
At this point you should have an idea for how you will attack this necessity of water production. Go and do some research on RO units. Consider how much water you need to fill your tank and how much you will need for water changes. 75 Gallons per day could be a lot for a small tank, but also not be enough for a large system. Get your area drawn up to easily plan this room. You would not expect it, but placement is key with this for supreme access.
Acclimation Chamber:
You will need to acclimate your livestock to your new water. Most people use air hose with a knot or valve to allow various speeds of drip siphoning from your existing system. A TV dinner stand works great for holding your jar or bucket up while acclimating. These are also easy to hide when not in use. Make sure to plan on having something like this, which can be stored in your water station area. More on acclimation will be touched later on.
Finalization:
With your prep work done, you will have most likely had to make changes to your initial idea. Make sure at this point you have a revised blueprint and notes. Your plan has to be solid before you go out and buy the rest of the needed items. Organize your plan into sections to easily accomplish your setup in phases. This allows you to focus on one thing at a time. With your new and revised plan you are ready to start the actual build process! You should already have a Build Thread Started by now, so make sure to keep updating it as you develop your ideas. In a few years you can look back and see how your system evolved from a simple idea, which is one of the coolest parts of the hobby.
Section 4: Assembly
When building anything, it is easiest to start from the ground up. There are things that will be very hard to access once the setup is complete. Making sure they are done right the first time will make or break your passion for this hobby. It is quite a bummer when you have a tank for 6 months and all of the sudden the outlet bursts into flames.
***If you are not familiar with electricity, leave this part to a professional***

Replacing Your Outlets:
The first thing you will want to do is figure out which breaker this particular outlet is wired to. If you have a friend with you, plug in a lamp to the outlet and than make your way to the breaker box. Flip the breakers on and off until the lamp turns off. When it turns off you found your breaker. Leave it off and mark it for future reference. You may need to move your stand out of the way to do replace your outlet or outlets.
Go to the outlet with the lamp and use a multimeter to check to see if it is not putting out any voltage. If it is not live, you can proceed. Unscrew the cover to expose the outlet. There should be two screws that mount the outlet to the box. Remove those and gently wiggle the outlet out of the box being careful not to damage the wiring. Unscrew the 3 wires from the outlet. You should have a black, white, and Green or Bare wire. If your wire is not color coded you will need to use the mulitmeter to find the hot wire. The 3 wires are very important to install correctly. The Black wire is the Hot, Live, or Positive (+) wire. The White wire is the Neutral or Negative (-) wire. The green or bare is the Ground or GND wire. Make sure you have a ¼ inch strip of wire exposed to insert into the receptacle.
The Ground wire connects to the Green screw labeled ground. Insert the wire into the plate and screw it down securely. Insert the Black wire into the slot labeled HOT, which should also say Black next to it. There is usually a hole that the wire slides into with screws on the side. The white wire goes into the Neutral slot and again, tighten the screw corresponding to the slot. Your new receptacle should be securely fastened to the wire.
The next step is to make sure you have the correct breaker. A 15-20 amp breaker and outlet is recommended to prevent tripping when using high voltage equipment. If you have a 10 amp breaker you will need to upgrade it to match your GFCI outlet.
Simply prepare for a power outage. You will need to turn the main power off to your breaker box to remove the old breaker. These are labeled just like a GFCI receptacle. Simply follow the color coding and put it right back where you got it. If you are having trouble call an electrician. This is a very important step in setting up your aquarium, even if it is just a freshwater tank. Safety is the number one concern.
With your stand out of the way, this is a good time to mount any power strips or control modules you have to the wall or stand. Placing them higher than water level and out of the moisture will ensure longer lasting equipment. Always add a Drip Line. This is simply a loop in the power cable before the outlet, which channels any spilled water down onto the floor rather than into an outlet.
This is also a good time to drill any holes you may need if running lines or plumbing into different rooms. Make sure to check for wires or support joists when cutting through your home. Stud finders are a life saver.
Plumbing

Now that your all wired, move your stand back and prepare to show some butt crack. It is time to start the plumbing process, but first here is a quick refresher on plumbing.
How to Glue: Always glue in a well ventilated area. You will need PVC PRIMER, PVC CEMENT, and PVC CUTTER. Cut your pieces to be glued to their desired lengths. Each fitting and pipe will need a thin coat of primer. Once the primer is dry put a coat of PVC cement on the primed surface of both pieces and fasten them together in a turning motion to evenly seal the bond. Hold the pieces together for 20-50 seconds or until solid. Practice on some scraps to fine tune your gluing skills, as it is very easy to over glue. Glue takes 24-48 hours to fully cure, so hold off on the water test until then.
How to Screw: Threaded fittings will need a good amount of white Teflon tape to ensure a tight seal. Simply wrap the tape around your male threaded fitting opposite of the direction of the threads. This allows you to screw the pieces together without the tape coming loose. Hand tightening will be sufficient. You want enough tape to make the threads look more like humps with a thickness of 1/8th of an inch or more. You can use glue, but you will never be able to unscrew it.
Taming the Hose: Hoses under pressure can fly off the fitting and spray everywhere. We cannot have that. Using Barbed fittings rather than trying to squeeze a hose over a smooth pipe is always recommended. Plastic hose clamps should be used over metal ones that can rust. Slide the hose over the fitting and tighten the clamp. Done! Just pay attention to the size of your barbed fitting and the INNER DIAMETER of your hose.
Cutting Pipe: PVC cutters are the easiest route when cutting pipe. You can use a hack saw or even a power saw to cut it as well. Make sure to sand the area you cut, as it will often leave a flare at the end and could reduce the integrity of the seal in the fitting. PVC work by using a combination of leverage and a sharp metal blade. Tighten the cutter so the blade is where your mark is and squeeze it enough to puncture the pipe. You can then rotate the pipe or cutter while keeping force on the handle. This will make a fairly straight cut with very little actual energy. This can be used to cut thick hose as well.
Fastening Bulkheads: Bulkheads compose of three parts. The main fitting, the rubber gasket, and the nut. The Gasket goes on the main fitting. Slide the fitting through the hole to be mounted so the side with the gasket is in the water. Once in place you will slide the nut onto the main fitting and hand tighten it as much as possible. Take a monkey wrench or homemade bulkhead wrench and give it one last small turn to seal the deal.
Plumbing:

Now that you are a Mario Brother level plumber it is time to knock out this whole plumbing phase. This should not take more than a day with most systems. Some can take as little as 5 minutes with proper planning.
WATER TEST
- Position the pump to its final location. You will need a threaded fitting to attach your pump to the sump. If your bulkhead has a barbed fitting you can just use a threaded barb fitting to attach the pump straight to that. You may need to use adapters to go from a threaded or Slip style bulkhead. Use as little restricting fittings as possible on the intake to the pump. You want to come as close to the diameter of the pumps opening as possible and as close to the water source as you can.
- The Return line is now going to be installed. Put your desired adapter on your pumps return end and route your hose or PVC to its designated location. When adding valves inline make sure they are accessible. Using a hose inline here is also recommended as a shock absorber. Running hard plumbing into a glass tank would result in a catastrophe.
- Now for the Drain lines. Run these out of the way, but with little harsh turns. Again, a large diameter hose is good for handling extra flow when needed. Make sure you use some type of support for the plumbing as well. There are strips of plastic that can help support the plumbing. A 1.5 inch pipe full of water is pretty heavy, and often full of turbulence. It must be secure.
- Install your Standpipe if you have a Reef Ready System to a level lower than the overflow wall, but not so low it creates a loud splashing. If you have an overflow box this is where your drain lines are plumbed from. Place this in an area close to the center of the tank for better surface skimming. You can use more than one box, as long as they are at the same level. If you have one that requires an aqualifter, install that now. You can get a hanging mount for the pump, which connects to the overflow with airline tubing. If you have a regular U-tube style box just place the U-tube like the instruction manual shows. Adjust the box that is in the tank so that it is where you want the water level in your aquarium.
- Wait for the glue to dry, if you did not need to glue, move on. This is a good time to stand back and make sure you still want to proceed. At this point your system is almost capable of holding water, which means you will be able to prepare for the water test. Gather your containers and prepare to fill your tank up for the first time.
- After the glue is dry you can begin to fill your tank. If you have access to enough RO water, go ahead and use it. If not you can use tap water for the test as long as you clean everything out after which can be hard to do in cases where you are hard plumbed. If you do use tap water for your test you MUST NOT HAVE SAND OR ROCK IN YOUR TANK DURING THE TESTING.
At this point your tank is running, your rocks and sand are in place, your powerheads are positioned, and your filtration has been fine tuned. This is the part that is most important to the well being of your tank. You cannot skip this step or your aquarium will never stop cycling. This can take up to 6 months before you can add any corals. Don’t fret. There is still plenty to do and see! The cycle is a very interesting thing to watch.
- Fill your overflow (or external part of your overflow box) with a few inches of water to check for any leakage. If it leaks, tighten the bulkhead(s) until it stops.
- Fill the overflow to the top until it starts to make it into the drain. During this time you can inspect the drain for any leaking. Pour in some more water and check all the fittings. If that looks good empty the water in the overflow by removing the stand pipe.
- Fill the main aquarium. Do this slowly and inspect the stand as the weight increases. Listen for any strange cracking sounds. Check the overflow to see if water is seeping in through the seal. If it is, drain the tank and throw some sealant over the seam to let it dry. Small pinholes can be super glued. This just prevents the water from getting sucked in where you don’t want it.
- Once your tank is full, start to let it spill into your overflow. Make sure the water is being skimmed evenly and adjust if necessary. Allow the overflow box to fill to the point of draining and stop.
- Start to fill the sump. If your return section has its own section, fill that first to check the bulkhead for the external pump. For submersible pumps skip this step. Fill the rest of the sump from the drain end. This will give you an idea of the path your water will flow and allow for good equipment placement. Fill this to the maximum level you want and stop.
- Make sure to close all the valves that do not run to your tank. If using an overflow box you will need to prime it at this point per manufactures instruction. Open the valve going to your tank and plug in your pump. The very first thing to do now is stand up and watch the overflow box. If the tank is not flooding you have set up your stuff correctly up to here. If the flow rate is too high either close the valve until it is at a safe rate or you can open another valve that leads to your sump to divert the extra GPH.
- With your water moving, it is now time to test out your powerheads. This is a great time to set your wave timers and play around with flow. You want the surface to have ripples and you want the water column to have no dead spots while keeping the sand bed from stirring up.
- Measure your Volume. Use a volume calculator to measure the water capacity of your tank with no rock or sand. Include the sump in this calculation. This will later be used to measure how much water is displaced when adding the good stuff.
- If you used RO water and you have the flow you want you can now dump in the salt. Use your instrument of choice to measure the salinity. The salt has instructions on the package. Each brand is different, so be sure to read their recommendation. The level of salt is also up to you. Some people prefer lower level while others have success with higher salt levels.
- It is easier to build the rock with no water, so either drain the tank into storage containers during this process or use submersible means like zipties or reef putty. Get your structure nice and sound. Once it looks good you can dump the sand in the tank and fill it back up with water. You can run you powerheads continually to speed the process up.
- Wait again! You will have a nice milky water at this point. It could last from 6-48 hours depending on the grain of sand you choose. Do not be alarmed. A cloudy tank will become crystal clear all of the sudden while you are gone. Go socialize, you have been working for quite a while now.
- Once the water is clear you will probably have buildup in the sump of sand particles. This is when you want to clean that out, along with your powerheads if they are at all dusty from the cloudiness.
- Once you have a clean sump you can start to put your equipment in it. Heater, Skimmer, ATO, or what ever else you have in mind. Probes from your aquarium controller will need a place to mount, so leave a spot for them if you use any.
- Fine tune your Skimmer. You will want a good equilibrium of air and water in your skimmer. The less air flow allowed into the pump the more water. Some skimmers have valves, others require certain water levels within the sump. Refer to your skimmer’s manual for help with fine tuning your particular model. Your water is clean, so do not expect very much from it just yet. Some do not even add a skimmer until they cycle is complete. This step can be put aside for now if desired but will not hurt to include it.
- Lighting is not necessary at this point, but you can still put it where you want it. If your light fixture does not have a controller you will need to use timers. A power strip with a timer built in works great for these. Some have muli-timers for a dusk/dawn effect. Your lights will not be important until you are about to start your algae cycle.
- Start the cycle: DO NOT ADD LIVE ANIMALS. All you need is a pinch of fish food or an uncooked table shrimp. The table shrimp works because you can monitor its progress as it rots.
Section 5: The Cycle

image via @rusticgirls
In a freshwater aquarium you can add some flake food, wait a couple weeks, and then you can add fish. In the ocean there is much more involved than mechanical filtration. In fact, 70% of your aquariums filtration relies on the maturity of the live rock. A combination of bacteria, algae, and various invertebrates compose the “live” part of the rock. It takes quite a while to establish an ecosystem, even on a microscopic level. Without a proper understanding of the Marine Cycle, you will be in for a long term battle with parameters and algae. There are six main stages to a properly cycled tank. Follow this guide and you cannot mess up. You will need your basic test kit to test the progress.
Stage 1: Ammonia Cycle
Ammonia is the first thing that forms when something rots. It is a waste product in nearly all creatures as well. Instead of using a fish to start the cycle just use some food. Anything that is all natural and uncooked works just fine. Table shrimp that is uncooked works great. Drop it on the sand so it is in view. The shrimp should begin to rot within a couple hours or more. Let this shrimp rot until it is completely gone. If you are curious what your ammonia levels are, go ahead and take some tests. Keep track of the results as the shrimp rots. The smaller the food gets the more ammonia should be present in your water column and pretty soon should be off the charts. This will stay high for a while, but then start to drop. As soon as the ammonia starts to drop you will see a rise in Nitrite, you are now on the next stage.
Stage 2: Nitrite Cycle
Ammonia when broken down by bacteria becomes Nitrite, which is still a toxin. As your Nitrites rise your Ammonia will drop, drop, and keep dropping as long as you haven’t added any animals. Keep up with testing to observe your progress. Eventually your Ammonia will be very low and your nitrites will peak out until it starts feeding a different type of bacteria that turns it into Nitrates. Once your first signs of Nitrates are seen you are on the next stage.
Stage 3: Nitrate Cycle
Nitrates are removed within the live rock deep inside in all of the deep pours. This hidden bacteria consumes the nitrate and creates nitrogen gas as a byproduct. The nitrogen gas rises in the water column and escapes into the air. When one gas leave, another enters. Oxygen is then infused into the water. After the Nitrates start to dissipate your oxygen will increase and you will be ready for the intermission:
Intermission:
You are not done yet! You may have cultivated a nice crop of groovy bacteria and your water may be clean as can be, but, there are still 3 more stages to the cycle process before you can start your stocking. Take this time to consume all of which you have already done. The next 3 stages often put fear into the eyes of many newcomers. These are perfectly natural and are partially a representation of how the earth became an oxygen rich planet. Before there was any oxygen breathing organisms, there was the evolution of Cyanobacteria. This is a photosynthetic bacteria that creates Oxygen as a byproduct. There are several colors, but the commonality is that it is like a slime. The Cyanobacteria spread over a vast area and the atmosphere became oxygen rich like we breath today, without the smog. Cyanobacteria is responsible for life as we know it. The same applies to the reef. Now that your mind has been blown you may move on to the next stage of the cycle.
Pre-Algae Cycle:
If your lights have not been setup yet do so now. Set your timers as you would for a reef tank. Anywhere from 6-12 hours is a good amount of time. Set the photoperiod to be on during the hours you will be viewing the tank most. If you work 2nd shift it is OK to have the lights come on after you get home from work or when you wake up in the morning. As long as there is not a supply of sunlight near the tank you wont have a long term battle with algae.
Stage 4: Diatoms
Diatoms are a brown dusty life form that consumes silicates. There is no avoiding Diatoms during their initial bloom. Leave it be. Let it go crazy. Before you know it, the brown stuff will soon start to change colors. Generally red, this is the start of the next stage!
Stage 5: Cyanobacteria
Cyanobacteria will now begin its course. Again you will let the slime just do its thing. This will be the nastiest of the stages. Cyanobacteria can gross some people out, especially if they catch a whiff of it. It is best to leave it be. It will start to clear up eventually. The clearing of the slime makes way for yet another stage.
Stage 6: Green/Brown algae
If you have made it this far, give yourself a round of applause. This is the final “battle” of the cycle process. When the slime is gone you will see your first signs of plant life, algae! Green Hair algae is usually the type that you see, but some other types have been known to occur. This stuff will grow like mad. At this point you are ready to move on to the next phase.
The cycle is a long process in terms of hobbies. Find yourself a good rhythm for testing. Get yourself in the habit of staring for long periods of time. Practice observation by watching as life forms start taking foot in the aquarium. You will see things from dust sized particles to worms that reach a foot long. There really is no telling what could form in your tank. This is a great time to prepare for the animals you will get. Knowing how to describe things and being able to correctly test the water will help you get the information you need. Your parameters are perfect now. You are now ready to move on to the next section. You should actually study the next section during your cycle, since you will have quite a bit of time on your hands with all that waiting.
Cycles can be artificially induced, but it is always preferred to use as little foreign liquids as possible. Another thing you can do during the cycle is preparing your clean up crew and first fish, but be prepared to keep them quarantined for a prolonged time since the cycle is unpredictable.
Section 6: Live Stock
A few holidays have passed, you have gone through a few types of hairstyles, and the seasons have changed dramatically. Your aquarium has gone from an idea in your head to a flowing ecosystem of algae and rock. You need to get some critters in there! But where do you begin? There are more bad combinations of marine animals than flavors of ice cream. Luckily, there are Compatibility charts that do the vague guessing for you. Locate these charts to help you get a picture of what does and does not mix. Some fish are obvious. Mixing a shark and a seahorse are not a good idea. When you get into the fish of the reef there are some unexpected no-no’s. A huge tang could fall victim to even a small blenny bullying or nipping at him. Stocking will be more research than anything. It is improbable the part time employee at your LFS has a mental encyclopedia of everything they sell. Always check for yourself anyways. If you plan on having predator fish you can skip the clean up crew and corals since they will either get eaten or destroyed. Every animal you buy WILL NEED QUARANTINED.
Quarantine and Acclimation:

image via Advanced Aquarist
Quarantine tanks can be as simple as a bucket or you can setup a larger system if you plan to have larger fish. All the tank needs is flow, observation worthy light, and some hiding spots. You will want to use proven methods and avoid the herbal approaches like garlic.
Invertebrates (excluding corals) cannot be medicated. The can be carriers of parasites like ich that feed off fish. To prevent Ich from being transferred into your tank they will need to reside in a tank by themselves for 8 weeks. Keep the water aerated, give them some food now and then, and do periodic water changed to keep it fresh. It takes 8 weeks to starve the parasite. After that time period you can acclimate them into the aquarium.
Fish almost always have to be treated. Ich is present in most systems that deal with selling livestock. It is more cost efficient for them to leave the medicating up to you. There are a few trusted techniques for quarantine. Hyposalinity and copper treatment are the two most sure ways to kill anything that is not a fish.
Corals have their own predators as well. The first thing a lot of people do is dip their corals in a Lugol’s Solution, or Iodine. This disinfects them and often kills or irritates anything on them enough to jump off. Keeping them in quarantine until you are sure you rid any pests is very important or you risk growing these predators in your main system. Aptasia are another common hitch hiker. These can be injected with hot vinegar or lemon juice. What ever the problem, there is a solution. This is where your photography skills will first come into play when you are trying to identify problems. There are many methods of quarantine. Research the techniques and find one that is right for you. There will never be a perfect method for all. Ask your reef buddies how they approach certain problems. If you skip quarantine you may one day have to remove every animal in your tank later.
Acclimating livestock varies in time, but is the same as far as methods. It come in handy to have a large jar so you can view your animal. Simply siphon water from your display tank into the jar. You want to have an air valve or a knot so that the water drips into the container. To determine the acclimation time for your animal you can just look it up online, which you should know before purchasing.
CHOICE GUIDE:
Clean-up Crew:
These guys do all the dirty work. They eat algae, detritus, dead animals, and whatever else makes its way into their grasp. Crabs, stars, snails, conchs, nudibranch, urchins, cowries, pods, and worms are only a small number of the available types of animals you can find. A variety of them is always best since they are each designed for their own reasons. Every breed of invertebrate has its exceptions. There are starfish that eat other animals you may want to keep. Some crabs grow into coral eating monsters. Some urchins can grow as large as soccer balls.
Snails are easy to pick. They rarely sell dangerous snails. Turbo, astrea, nerite, and cortez snails are good beginner species. I add one of each and observe them. Which species cleans the most, the fastest, or gets the hidden areas the best? Judge what areas need more attention and stock more snails that work that area well. Snails will clean parts of the glass, but you will always need to manually clean it. Do not rely on them for a clean window.
Hermits are not completely necessary, and can be known to steal a snails shell here and there. They are amazing creatures that work their claw off at all times. Some grow huge, but some stay small. Blue and red legged hermits are the lesser aggressive species that stays small.
Serpent stars and Brittle stars are good for a reef tank. They will be unseen for days until you feed and they come running on all fives, immediately cleaning the sand bed. They are quite impressive to watch scurry about. Sand sifters are good if you are not relying on a live sand bed. They stir the sand, but they eat all the good critters that live there. Urchins can be good, but they are very closely related to starfish and can also be predatory. Research the urchin you are looking at buying, it may be a crab hunter.
For more advanced inverts like shrimp and nudibranch it is best to learn about the species. Every nudibranch eats something different. Some can even eat coral. There is a ton of information out there and if you find an animal with no helpful info it is best to avoid it all together.
Fish:
There are a ton of fish out there. Some are cheap and some cost more than the tank they will live in. There is no better way to come up with a stock list than going out and looking at the fish in person. Write a list of all that interest you and look them up. Do they seem like they are the right size? Are they compatible with each other? With Inverts? With Corals? Do tons of research. This is your first tank. You can go for the advanced creatures on your next round. Starting with peaceful hardy fish makes life a lot easier. Fish are not required, there are beautiful tanks with no fish.
A good way to organize your wish list is take a note of all the fish that tickle your fancy and then go home and investigate. Sometimes it is just easier to post your list online and take peoples input. People are dying to prevent you from making mistakes. Please let them help you. If you ask a question that has been answered they will point you the right way to get your reef in order. There are too many varieties to have a perfect formula. The animals diet is the single most important thing to consider. Some fish love corals, others love ornamental shrimp. Learn not only what the species does in the aquarium, but in the wild as well. They may spend their lives hunting animals you may want to mix with them.
Corals:
There are 4 major coral types. SPS, LPS, Softies, and NPS. Each type has its own requirements, and each coral within each category has its own even more specific needs. The type of corals you choose will be the sole factor behind your final flow rate, style, and your lighting and filtration. Some corals will even need to be fed in various manners. Not knowing what each coral you want needs is like buying a turtle and trying to feed it steak.
SPS
Small Polyp Stony corals, or SPS, are the most demanding as far as quality of light and water. These corals consume high levels of Calcium and the Alkalinity will also need constant upkeep. These corals often require more stable water and will need more attention to parameters. Adding Kalkwasser to your topoff water can be a great way to keep these corals growing. Some SPS include Acropora, Montipora, and Hydnophora. These are constructed of a calcium based skeleton with a flesh that coveres them. The pours on the skeleton have tiny polyps that come out and feed from the water column. Each polyp is an individual animal, though connected by a similar flesh and structure.
LPS
Large Polyp Stony corals are less demanding. They do well in medium to lower lighting and medium flow. These also have a calcified skeleton, but the polyps are much larger. Chalice coral, Brain corals, Duncan corals, Candy Canes, and Acans are just a few. These are more hands on. You can actually feed the mouths of each polyp and it will eat like a venus fly trap, some large enough to eat entire krill in one gulp! These also require a source of calcium. The water quality can be a little less attended, but they will thrive in clean, stable water.
Softies
These are generally the easiest corals. Kenya tree, mushrooms, Zoas, Xenia, Star polyps. Anything that does not have a skeleton falls in this category. They can live in low light and low flow for the most part. Some softies can live in any level of lighting, and some grow Too fast. These are the easiest to grow, but so are dandelions. Weeds are not only in your yard. Some corals can take off in your tank to the point of insanity. Make sure you research ways to maintain plague corals or you could have your own unintentional Pulsing Xenia farm.
NPS
Non-Photosynthetic corals are the hardest to keep. They require constant food and superb water quality. They are best kept for the professional as they require very unique methods of upkeep. These corals are known to rapidly deteriorate, if you do attempt one you must research its needs and be ready to remove it if it starts to rot. Sun coral, Gorgonians, and Sponges are a few examples of NPS corals.
After quarantine you will be ready to start adding the corals to your tank. For the first week or two they will be loose, and need a close watch. Critters can knock them over or even take them. Every coral you get is best started on the sand bed and worked towards the spot you want them in over the course of a couple weeks to acclimate them to the lighting and flow. When you have them in the spot they shall reside you can use Super Glue Gel or Reef Putty to bond the corals to the rock. Take the coral out of the water and put a large glob of glue on the rock or plug it is attached to and stick it in place under water. In a few minutes the glue will be completely dry. By the time the superglue comes apart the coral will have already grown onto the rock. There are many other ways to bond corals so check around for how others have done theirs if you have something that you are having trouble attaching to something.
Plants:
You may have a refugium or want a decorative algae in your display tank. There are a ton of cool plants out there that can be beneficial to your system. Some are best in the confinement of your sump where they cannot take root in your tank while others are fairly maintainable. Mangroves are not a realistic form of filtration but can make a great habitat and can look quite snazzy if you Bonsai it. You could choose to do an all plant aquarium, but that is another monster in itself.
General Advice:
Always research twice and buy once. Quarantine everything. Acclimate, don’t dump. No matter what they tell you at the store, don’t buy anything without checking it out first. Look up other people’s experiences with these particular life forms. What did they mix theirs with? How large of a tang did they have in their 75 gallon? The fish trade has been around for quite a while, it is very likely someone has had the same taste as you and most often the question you have has been answered numerous times. There is no sure thing with this hobby and there is always the chance that a peppermint shrimp can live in peace with a Panther Grouper, it is just highly unlikely. Be wise, go with the majority vote. Don’t try anything that has risk until you are well experienced with this hobby. You will have much more fun succeeding with compatible fish than trying to catch or save incompatible ones. The same goes with corals and inverts.
Section 7: Maintenance and Upgrading
You will need to clean your equipment every once in a while, some more often than others. As long as you followed the guide while planning your system you should have an easy time cleaning it. Open access is key to a clean sump. Union fittings or hoses make for quick plumbing maintenance. Powerheads, skimmers, and sometimes your external equipment may need a good once over. White vinegar is the best cleaning agent for reef equipment. It dissolves calcium buildup fairly quickly. Sometimes running your pumps in a vinegar bath can make them look brand new and get the algae growth off of them.
Inspect the electrical wires for any possible exposed wires, some power cables get damaged by animals that bite into the wiring. LEDs wont need replaced for a few years but metal halides or florescent lights will need replaced every 4-10 months depending on the type and usage. A bad bulb can grow algae fast. Cleaning dust in and around the stand is important as well. Having a house spider in your stand is actually beneficial, as they kill flies that may be attracted to your protein skimmer’s lovely odor.
If you have any forms of mechanical filtration, like filter socks or sponges, make sure to clean them regularly, some even swap out their socks daily. While you’re at it you might want to change your underwear if this hobby has consumed you to the point you forgot about life outside the ocean box. RO systems need maintenance. They will need replacement filters every 6 months depending on usage and size.
After 6-12 months of running, some of your equipment may be going out. An 8 bulb T5 unit can be expensive to replace all at once, at this point you may consider upgrading altogether to accommodate more light demanding corals or you want more sparkle. You may have started out using linear flow powerheads and want to replace them with controllable ones. Your corals could be consuming too much calcium or dropping your Alkalinity level so fast you cannot keep up and a controlled doser is needed. All of these approaches will be unique to your system and most often will evolve as you and the technology grow more and more advanced. Upgrades are fun and a sign of commitment. You don’t drop money into things you don’t want, right?
After a year you should check your floor for any weight damage or sinking. Sometimes you may need to add extra support or even jack up your floor if it is a huge tank. Check around the tank and floor for any signs of moisture damage or mold. Carpet can hide some serious damage if you were too careless with cleanup after spills over a long period of time. At the very least it will hold an odor that is pretty hard to remove while the tank is set up. Treat your equipment like you (should) treat your vehicle. Always check the fluids, check for equipment recalls, replace things as they get old, and keep everything as clean as you can.
End Note:
This is a general idea of what kind of adventure you can partake in. There are all levels of setups in all shapes and sizes. Ultimately the design is up to you. You should only attempt things you are comfortable with and can afford. This hobby can be for any budget with proper advice and husbandry (or wifestry for the ladies). Setup can be reduced in price with DIY in some applications, but others may end up costing more after all the experimenting. Experiments are another fun aspect. Some people have a natural skill to make things do stuff! If you are innovative, you could invent the next level of reef hardware. This is just an all around fun hobby with a little something for everyone’s taste. The more money you have, the larger the system and pricier the livestock can be. A 500 gallon freshwater tank is dirt cheap in comparison to a decked out 75 gallon reef full of rare corals and fish. For the most part, cost means quality. There are plenty of cheap alternatives to things, so go out and get others’ opinions. Have fun! This is going to absorb you in the best way possible.
If you have a good time with the corals and have fun playing with the fish, you may be interested in expanding this hobby into a part time job, even if it makes enough to break even. Frag tanks are much simpler than a regular reef tank. You can use your own corals to start up your frag tank and swap corals until you have a large diversity to grow out and propagate. Eventually you will have so many corals you won’t know what to do with them! Trade them to people for just about anything! People are always looking for a way to keep Uncle Sam from getting his cut. You can also take advantage of other people with too many corals. Some people just give away their extra stuff because they just want it out of their tank.
Entire setups can often be found on local classifieds or clubs. Unless you are sure the setup is as perfect as you think it can be I would always recommend starting over, set it up of course when you buy it to keep any livestock alive. Either relocate, sell, or trade the livestock for any upgrades in equipment you may want to change. Lights and powerheads are the usual changes, along with the filtration. Make sure they are honest with you about why they are selling it. Take someone with you who knows about reef tanks to inspect the potential. Some tanks are gorgeous and the person is moving, which is already hard on them. Other tanks are full of problems, if the person already has the entire tank packed down to go before you get there the odds are he is hiding some pests. This also may make you feel obligated to go through with the deal. How mad would they be if you said no and they had to put it all back?
This guide is a general guideline for you to use as you research on your own as well. There are many techniques and alternatives that are just as good. Use this as a starting point and add and subtract equipment to suit you. The beauty of this hobby is its flexibility. It opens our minds to creative concepts and enlightens us to the world deep beneath the sea. It is not a hard hobby, but one that does require attention and the capability to maintain it. This can be for the whole family, or an escape from the world around you. Reef tanks are very therapeutic and can help you relax after a long day at the office. Have fun! Start a thread to showcase your awesomely guided plan and you could have the next tank of the month!

image via reef2reef member @Nuocmam
This article was sponsored by @MarineDepot at www.marinedepot.com.
- Love Kait

No, definitely not. 1.024 - 1.026 - shoot for 1.025. Once you get close, make small additions of salt and wait 30-45 mins and then take a reading. If you overshoot then you will have to remove water and add clean RODI water or water you get from your lfs - it’s a waste off product, time and money so ease up on your number slowly once you get close.I have just got my first saltwater aquarium.
I have added the salt, and i Measures 0.018 in salt. Is this enough ?

Thank you. Very much!The Supreme Guide To Setting Up A Saltwater Reef Aquarium
Introduction
The marine environment is one of the most complex systems on the planet. The aquarium you are about to set up is only a tiny sliver of the vast ocean, but it is nowhere near simple. This task is going to take patience, a ton of reading, and a ton of patience. It takes the whole household to have the perfect setup, so if you live with people make sure to tell them things that you learn that apply to them. If you or your housemates like to spray air freshener or light candles, try to keep them as far away from the tank as possible. This is the number one cause for Cyanobacteria in my area, and causes many people to give up when they could have just moved their candles in another room! Make sure you and your housemates can handle the occasional ocean smells that may occur. Some of us enjoy the smell of the ocean, so having a tank can be like a giant air freshener to some.
Due to the hobby’s unique and ever changing systems it is best to prepare for future upgrades and keep an open mind to others' opinions. Nobody in the world has a system that functions the same as someone else. Even in a group of 300 Biocube owners, none of them will have the same look, chemistry, or livestock. When researching advanced techniques make sure to get multiple views on your subject. In high school and college, we research and find one source for our facts and that is enough because those sources are either scientific research or facts that have been previously proven and are given by sources of which you cannot question. There are tons of facts proven in our hobby, but the majority of methods of most aspects of the hobby will vary from person to person and even tank to tank. Even research facilities like GARF can only really base their data from observation, which is no more than we do as hobbyists.
Optimism is a very important thing to have during this. When something goes wrong do not get mad and quit. Look at it like a learning experience, a way to make your tank better. We all mess up or equipment fails, it is nearly impossible to never have some kind of problem. When problems occur and you correct them correctly, you often do not run into that problem again and if you do you know exactly what to do. Things will always clear up, as long as you us the right methods. Of course, prevention is key. Nearly every issue that can happen has a fail safe with the right setup. A great reason to invest in or ask Santa for an aquarium controller.
An aquarium controller is a very good option, but not a requirement. You can achieve the same results without them, but they are highly recommended by just about everyone that has used one. Extreme stability can be hard for some who are not often available to constantly monitor their tanks. The thing that got me was the cost after buying all the power strips, timers, wave makers, and water tests, the idea of a few hundred bucks into a reef computer was not so scary, and in fact has made my life much easier with the endless possibilities.
This is a guide that will help you gather all the knowledge you need. It will help you ask the right questions. This is not an instruction for a specific setup, but a general idea of the reef tank and all that is involved, well, not all of it. There is new stuff happening every day! Use the wisdom you are about to receive to prevent all the mistakes that you would make had you not been guided.
The Walkthrough: Your First Reef
Section 1: The Plan
Tank Placement:
First and foremost: you must know where you will be putting your tank. Seventy-five gallons is quite heavy. If you have a cement slab foundation then you won’t have an issue holding up an aquarium. For a crawlspace or basement you will need to inspect it and possibly have an actual inspector come and verify the strength of said floor. Floor Jack’s can solve any weakness, as long as it is not water or termite damage causing the flex. Even if it looks strong enough now, in 15 years you may have a slightly angled aquarium. Prevention is always best.
Try to avoid windows that allow sunlight into the room. Try to put the tank in a low traffic area for the fish’s sake. Corals do not have good vision, actually they do not have any vision. If you have no intentions of fish then the traffic is not so much of an issue, just try not to put it near the road. Where ever your tank ends up is where it will stay for a very long time. It is good to place it in a way that allows you to clean all around the stand and behind the tank. If you have cats or dogs, there will no doubt be a large hair ball that will accumulate over the years behind the stand. This could be a potential fire hazard should something spark near it. As long as you can get the vacuum hose behind it you will be safe.
The outlet you will be plugging into will be very important. It should always be a GFCI outlet to prevent electric shock or fires. If setting up a large system you will want to set up a designated breaker ran only to the outlets associated with your system. At the very least, a GFCI surge suppressor should be used if a GFCI outlet is out of the question if you are renting and cannot alter your outlets.
Overall Design:
The Exterior
The stand will be the main attraction, not including the marvelous reef that will one day reside behind the glass. What looks good at the store may not match your home. Sometimes you may have to modify the stand to accommodate your interior or even build your own. Building your own has the benefit of fitting a larger sump. If you cannot build your own just look for a stand that can fit the largest sump, you can always paint it if the color is not right for you. You can also use a cast Iron double stand and have 2 of the same size aquariums for your display tank and sump. The possibilities are quite extensive, but the basic concept is to make it not look out of place. After all, there is no sea in Iowa.
Canopies range from slim to massive. In a room with tall ceilings a giant canopy could look very nice. The small canopy would be more suited for a shorter ceiling, as it keeps an appealing proportion. Treat shopping for the stand and canopy like you would an entertainment center and the aquarium is the television. Beyond looks, structural integrity is important. Particle board is not the strongest material, so try to go with a solid wood or metal.
No canopy is another option. As long as you have means to hold lighting and a way to keep fish from jumping it may actually benefit you to not use a canopy. More fresh air causes more oxygen in the water. It also allows the lighting to radiate heat up and away from the water rather than bake the air around them in the confines of the canopy. Fans can of course help with that as well.
In-wall setups are another stunning way to present your reef. This basically allows you to have an entire area or room dedicated to the aquarium. This gives you room for more equipment, a place to store more supplies, and a good place to hide when you need that alone time. You can use this room to have more tanks for propagating corals or breeding fish (secretly of course).
No matter the stand, the principals are all the same, even if your tank is on the floor and you have a sump in your basement. The concept is simply to get the big tank to be above the little tank by what ever means necessary.
The Interior:
Let us start at the bottom. Sand is a tricky one, as there is no right or wrong way to do it. You can ask any group of reefers the same questions, “How deep is your sand and how fine is the grain?” The answers will literally all be different. Since this is for a Display Aquarium, you will want to consider the look of a deep sand bed compared to a shallow sand bed. People use depths of one half to eight inches of sand of all grades and each have their own success, mostly fairly equal.
The animals are more of a reason to consider certain sand than anything. If you plan on tunneling type fish a less sharp fine grade would be more appropriate. The coarse stuff can potentially trap more detritus, so consider extra maintenance with that route. Live sand is not required at all. Dry sand is cheaper and will become live over time. Another benefit of dry sand comes when setting up your rocks, which you should also start dry.
Bare Bottom is also a common option as well. The benefit of this is that you can place pumps nearly in any direction, which prevents detritus buildup. The bottom will eventually be hidden by Coraline algae and corals, so it definitely has its own appeal.
Live rock is the most important part of your whole system. It is the foundation of your corals homes, it creates habitats for many life forms, and it makes your aquarium go from a glass box to an amazing display of biology at its finest. Live rock has many shapes, sizes, and colors. Some have corals already growing on them. The one thing all live rock has in common is that it carries hitchhikers, or stowaways more like. Hitchhiker would imply they got permission to live in the rock. Live rock can potentially come with reef destruction monsters that will quickly end your fun. A Mantis shrimp could easily be hiding in a new rock and shatter your aquarium with one strike.
If you do choose to use living rock, make sure you have the means to inspect it and possibly remove animals that can cause harm. Anemones, worms, and other types of parasites can be hard to find. This is why using dry rock is so much safer. If dry rock is not available but you still want to use that option you can simply kill the rock and start over. During the planning stages of your reef you can cook and or cure your dry or live rock. This is basically either leaving it in a container with flow and proper temperature for a few months until it basically doesn’t smell rotten. That is by far the easiest way to tell if a rock is ready. You do not need a light, but sometimes the rocks will develop a buildup of detritus from what ever life forms are present. Rinsing them in saltwater before use would be beneficial.
To set up the rock in an appealing manner you should check the web for pictures of the natural reefs of the sea. Imitating nature creates the most natural reefs. With your idea in mind, you can begin to shop for the perfect rocks. You will want roughly one pound per gallon of water. A 75 gallon aquarium with a 55 gallon sump would use anywhere from 75-130 pounds of rock, but usually the lower end of the range is plenty. The important thing is to maximize the area of the rock and try to get as much surface lit. This will allow you more room for corals than a wall type of structure, and look more natural.
The ocean creates an amazing variety of rock formations. The kind you should be looking for is extremely porous, has small caves and holes, and can easily be stacked to form a solid structure. A mixed look can sometimes look out of place, but with creativity and some trial and error you can make quite the interesting structure. Keep water flow in mind, you won’t want dead spots where detritus can collect and form algae or cyanobacteria.
The easiest way is with dry rock. Lay out the rock on a table and put some newspaper down in an area the size of your tank. Situate the rock until it looks like you want it. Imagine yourself as a snail or a fish living in the rock. Is there access for the clean up crew to get to all the caves? Are the caves viewable by you? Fish do like places you can not get to, but it is good to be able to view your rock from all angles. Plan the structure for emergencies and easier capture of fish. Although the goal is to only have to capture fish that die of old age, sometimes we get a fish we regret. Individual fish can vary in temperament, even peaceful fish.
If your rock is not staying how you like it, glue and pvc pipes can assist in holding your structure together. Some tanks are very large and the rocks must be bonded together with reef putty or superglue gel. Another easy way to hold rocks together is with a ziptie. The plastic is reef safe and eventually becomes encrusted with coral or coraline algae. You can hide almost anything in a reef tank if it has been there long enough.
The rock arrangement will be the hardest part. Countless nights have been spent by reefers around the world rearranging their rocks, sometimes causing rock slides. This can damage coral or livestock and possibly shatter your tank if it is a heavy enough rock. Reinforcement is key. Large fish, snails, urchins, and even waves can move rocks when we least expect it. Test the structure as you build it and use gravity to your advantage. In the ocean, the rocks have been sloshed around until they fell into the sturdy position they end up in. Placing the rocks as though they have naturally been put there will be your best direction. Above all, if it looks good to you and stays put, you are ready to place it in its permanent spot. Take pictures of it if you arranged it outside the tank so you can put it back as closely as possible. If you are doing dry you can add the sand after you place the rocks, this will help keep the rocks in place while adding a nice cushion just in case something does fall.
You can make one large structure or a series of little ones that vary in size, creating a multitude of environments that can be home to completely different lifeforms. Peninsula tanks are really cool because you get the extra dimension of both sides of the tank. Check all the views of your tank as you are building. It may look cool from the front, but the side could end up a flat wall if not payed attention to. Use negative space as well as the shape of the rock. You will have corals that may grow large one day, so they will need a spot to flourish.
Keep equipment in mind as well. Your powerheads will need to be placed where they will benefit the tank. If the rocks block all the access points for flow, you will have problems. Putting small ones behind the rock is a good way to keep the water moving. Remember, equipment does go bad, make sure you put something where it can be retrieved. This is all important to consider before buying any rock.
Livestock goal:
Reefs are so diverse that the options of livestock is beyond extreme. The decision you make with your livestock will dictate the type of system you have and in short, the cost. A tank full full of softies will not need the requirements of a Small Polyp Stony Reef that devours calcium and requires constant monitoring and stability. Light requirements are also dictated by the corals you may want. As for fish choices, they are dictated by your tank size. If the whole reason you decided to get into the hobby was a fish that grows three feet long than you better just be prepared to bite the bullet and make the ultimate home for that fish.
A good idea when planning your system is to take a trip to the Fish Store and jot down any animals that pique your interest. Take those notes home and research each animal. You may just have a list of animals that are all designed to eat each other, which would not be a good day for you had you not researched. Narrow down a reasonable list of critters for the tank you plan on making. Make changes to your systems design as your idea becomes more clear. The biggest mistake reefers make is buying on impulse.
The Filtration System:
Your tank will rely on a means of nutrient export. Protein skimmers can be noisy, and sumps can sometimes be loud as well. An open stand may not be a good idea near your bed if you do not like noise. It can even drown out the television, which would be devastating. Planning your filtration system not only to work for your fish, but to work for you is very important. The best possible place to put a sump when possible is your basement, or a room external from the tank. This will hide your noises, equipment, and allow for ease of access and modifications. In the first stages of your tank you will not need much filtration since you won’t have any live stock. The rock is plenty of filtration to get by as you develop your plan for filtration. Some things to research are Protein Skimmers, Algae Turf Scrubbers, and refugiums. You may like the idea of natural nutrient removal or you may go for an all tech sump. The best approach is as needed. If you buy a certain animal that has good luck using certain filtration than try that approach.
Putting your plan to work:
The next sections will explain in detail how to put your idea to work, and do it right. This can be applied to any size aquarium simply by up-sizing or downsizing any examples to your needs. No matter where you plan to place your stuff, the principles transfer across each and every idea. Using drawings and notes will help your ideas become plans. The things you will need to know before buying anything are:
This concludes the vague beginnings of what will soon be an amazing creation. You will have much success when planning in comparison to going at it all at once the wrong way. Go around to other reefers tanks, or look online and see what kind of systems these people have, and if they are working for them. You may find a system that is just right for you that way. Once your plan is solid, it is time to start the process of gathering your supplies.
- Tank Size – This dictates the rest of your equipment, and livestock choices. A huge tank will be more stable, but initial setup may be quite a large fee. A tiny tank will be cheap a cheap setup, but could lead to constant maintenance.
- Stand size – This is what you will base the size of your sump on. It is what holds your beautiful box of glass or acrylic. Pick your stand appropriately.
- Sump Size – This will be where your equipment restrictions will be. If you want supreme filtration go large. You can fit larger skimmers, a larger refugium, and even grow more corals in your sump if it is large enough and designed properly.
- Sump To Tank Path -This is the path your plumbing will go, is it a straight shot? Do you have to drill a hole in your wall or floor and run plumbing down to your basement? Each situation is different. This will be the factor for your plumbing cost and design.
- Coral choices -This is where your lighting options come in to play. Pick your corals before you get the light, otherwise you may buy a light that is far to dim or far to bright. Either way would waste your money or result in a change of plan.
- Livestock – this dictates whether or not you can have certain animals, some eat corals. If you like Puffers, prepare to not have corals or shrimp. If you like shrimp, prepare to not have puffers. Very important at this point to know what you are shooting for.
Section 2: Gathering the Materials
With your plan set in stone, be prepared to still make changes as you progress. Unforeseen circumstances can arise that will force you to alter your plan when the time comes. At this point, you should have a general size in mind, a style of stand, and a general idea of what corals and or fish you want. Availability may change by the time you get around to buying most equipment. In order to run a mixed reef tank you will need the following items. SAVE THE RECEIPTS TO EVERYTHING, AS YOUR PLAN MAY CHANGE ALONG THE WAY.
Section 3: Preparation
- Aquarium stand – Stand of choice that is designed for your chosen tank.
- Aquarium – A Reef Ready aquarium is always better than a non drilled aquarium with an overflow box. There is more chance of a flood with an overflow box. A reef ready tank is simply a tank with an internal wall that water overflows into and goes down a pipe through the glass via Bulkhead fitting and plumbed to your sump. Some tanks come with the return line plumbed through them as well. This makes for a sleek design. A good size tank for your first reef is 75 gallons due to its shape. It has more depth than a 29 or 55 gallon, which makes it easier to arrange the rock without making it look like a wall along with adding more stability. The bigger you can get the better. Fish like having a square environment, it gives them more of a habitat than the bunk bed environment a rectangle can create. Most importantly it has to fit your area.
- Sump – Go as large as possible while still leaving space to get in it. You may require lighting and fans, so account for that. Also, your electrical equipment may be in your stand. Make sure you have a place in your stand that is not likely to result in getting wet from splashing around in your sump. It is easy to splash water when learning how to use your skimmer for the first time.
- Return Pump – 10-50 times Total Turnover Rate including powerheads. The ratio of return flow rate and the flow rate of your powerheads can vary. Ideally you would want your return rate to be equal to the protein skimmer, or faster. The return pump is usually 10x turnover, leaving 10-40X turnover rate for the power heads to make up for.
- Protein Skimmer – Oversized is recommended. At least double the advertised volume is a good starting point. Protein skimmers come in tons of designs. The factors to consider with Purchasing a skimmer are the space in the sump, the height in the stand, and the ease of removal for maintenance. Always check reviews on Protein skimmers. There are so many types it is hard to rely on guessing. One could look like the better skimmer, but the cheaper looking one may be more efficient. It is a great idea to learn about protein skimmers in detail. Improperly using one can result in a flooded floor.
- Powerheads – 10-50X Total Turnover Rate including Return Pump. Using ones that can be controlled will benefit your corals. Some have controllers made just for power heads or if you use an aquarium controller, that can act as your wave maker. Wave boxes, or any other type of surge device can be used in a more advanced setup. Those who wish to go for the advanced setups can easily do so with some research.
- Rock – 1 to 1.5 LBS/Gallon- Base rock is dense, so it weighs much more per square inch, however it is much cheaper. If you are building a large structure, the base rock may be a good idea to use for the foundation of your reef, placing the show rocks on the top to hide them. If you can find larger rocks that look like you want, spend the extra money for it. A solid rock is much more sturdy than a stack of smaller ones.
- *Sand – 8LBS/1sqft per desired depth in inches, (8A)D A=Area in sqft D=Depth of sand
- Quarantine tank – This will be your bullet proof vest as far as parasites and disease goes. Prevention is key and all new life forms will need to be inspected before adding to their permanent home. Some times a coral gets damaged or a fish gets picked on. The best thing to have is a place to help those animals get well rather than risk losing them.
- Buckets – waste water, clean water, salt water, medicated water..each bucket for its own use is best. Avoid Cross contamination at all cost. A good tip is to get containers that stack or can store within each other. A few buckets can fit in a tote, and a tote can fit in a can. Having more than you need is not a bad thing, especially if you need to drain your aquarium for some reason or move it.
- Fish nets – these come in handy when rinsing food and of course, catching animals.
- Aquarium tools – like grabbers, scrubbers, pokers. There is a tool for everything from cleaning the glass to shoveling sand. Your hands can cause irritation to corals, and corals can irritate your hands. The rock is sharp and covered in bacteria. There are worms crawling in places you cannot see just waiting for you to brush against them and take a nice burst of spines to the finger. Gloves are an amazing investment and will save you from a slew of problems.
- Rock support – Zip ties, glue, Reef putty, or any other means to hold the rock together.
- Test kits – During the cycle you wont need the works, just pH, Nitrate, Nitrite, and Ammonia. After the cycle you will need more specific ones like Calcium. Any chemical you add to the tank should have a corresponding test kit, do not add things without knowing how much it needs, if any.
- *Timers – The ocean is on a schedule, and so should your tank. Keeping a rhythm makes for happy corals and the fish will not be confused when you forget to turn off the light one night. They also help with the electric bill. If you have two channels than use two timers to achieve dusk/dawn effect. You can find multi-timers or power strips that have timers on one side and regular outlets on the other.
- *Aquarium Controller – To keep your whole system stable and under complete control.
- Lighting – See Light requirements per species to calculate what is right for your size. Lights come in a huge variety of quality and color, buying what is available may not be as wise as researching what is good, then ordering it. Often it is best to contact the manufacturer of the lighting you are considering. They will guide you to exactly what you need. LEDs work just as well as T5HO lighting, given they are both quality and not cheap knock offs. Use Tank size and Corals you plan as your factors. Nothing else. Water flow does not effect lighting, and neither does temperature. A very deep tank will need stronger light than a shallow one. A stony coral will always need more light than a softy. Well not always. There are exceptions to quite a few things in the reef, and life in general. The lights can be purchased later on, as you fine tune your future stock list. Adding the lights will induce the 4th stage of the cycle, which will be explained later on. The lights are required to finish the complete tank cycling process.
- Reverse Osmosis System – This is your supply of freshwater. You will need access to large quantities, especially during the setup. Do not rely on the types that come with the storage tank. You will be waiting for days to fill your aquarium. 75 gallons per day or more is a good production rate. There are many good brands. The choice is all yours.
- TDS Meter – These test the particulate matter in the reverse osmosis water. Some RO units have a built in TDS meter, but some do not, in which you will need a test pen to ensure your filters are working properly.
- Salinity Readers – Hydrometers are the cheapest route. Refractometers are very accurate when calibrated. Digital salinity readers are the supreme tool to monitor salt. These can be attached to an aquarium controller as well.
- Climate control – Some rooms are the perfect temperature at all times, and do not require the tank to be heated or chilled. If you have a hot room or plan to use heavy lighting than a chiller may be necessary.
- Towels – water will get dripped on something at least once, you will be glad you had a towel handy when that something was your wife’s bright red high heels or your husband’s important work documents.
- Salt – You can’t have seashells without salt! The options vary locally, so see what brands you have access to and check out their reviews online. Some have their flaws, so be careful.
- *ATO – Whether you choose gravity fed or pump fed, an Auto Top off unit is one of the best additions you can have in your system. They allow for extremely stable salt levels. They are not required, just highly recommended. If using an ATO, make sure to plan the space in your sump wisely.
- *Moonlighting – Moon light is not necessary for much beyond seeing the tank at night. Lunar simulators have more of a purpose, imitating the natural phases of the moon. This induces spawning in certain animals, but that is not always a good thing in a small aquarium.
- Journal – Either hand write, start a build thread, or get some type of program or app that can assist you with keeping track of all your tanks changes and test results. Even something as simple as a calender in your stand that you can mark important dates like when you bought or need to replace equipment or keep you on a schedule with water changes. They can even help you remember your fish’s birthday!
- Reef Buddies – Not everyone has friends with a reef tank, so you should be prepared to open up to a few new faces to share your experiences. The easiest place is at the pet store, but going online or joining reef clubs will definitely be great places as well.
- Good Camera – when sharing pictures of things you are trying so seek knowledge about, a pixellated cell phone picture may prevent an answer. It also helps when your corals get so big you have to sell frags of them. You will get more hits with a high quality photograph.
Begin this phase with a fresh mind. This is a very long term project. The cycle alone can take up to 6 months, and “establishing” could be a couple year journey depending on the system. Take it slow, the tortoise always wins the race. Making sure everything has a place to go before hand ensures you are not stuck with a system that simply won’t fit together. Speaking of fitting together, this section is all about preparing. We have to see if these clothes fit before we wear them out in public right? No gluing, no cutting, just positioning and fine tuning your blueprint.
Prepping the Stand and Sump:
Now that you have your stand, set it where you want it to go. Using a Level, make sure the stand is not crooked. Use shims to adjust it as needed. Another consideration is the floor. If your tank is going to be in a room with wood floors you may consider replacing the floor in that area or getting a water proof mat for around the stand. Carpet can be deceiving when leveling a stand with no tank on it. You may need to actually use the tank as a level by placing it on the stand and filling it with about 2 inches of water. Measure the water level at each corner to find if it is level. They should all be the exact same depth. Now that your stand is level and the floor is water resistant you can remove your aquarium and put it in a safe place for now.
This is when you can start to put the sump together and fasten any equipment or wires to the stand. The sump will have either a non drilled design, or a drilled design. If the sump is drilled on the return end, this will require an external return pump, which normally will need to be screwed to the base of the stand for support. The intake on the pump is recommended to have hose inline as a shock absorber. You will want the pumps intake in a straight line to the sump to prevent any unnecessary friction. Use plastic hose clamps to hold the hoses onto the fittings. If the return side is not drilled you can use a submersible pump and not worry about that section of plumbing.
On the drain end you may have bulkheads that route your drain line through the side or top of the sump. These will be one of the flow restrictions to factor into your maximum flow rate, as well as the overflow drain in the aquarium. Bigger drains are never a bad idea when possible. If you can make a larger hole there is no reason not to have that much extra room of safety.
If your sump has any sponges, take them out and keep them in a safe place while you set up the tank. They wont be necessary until you get some salt in the water. Keep all of your media somewhere during this time. At this point you should be just setting your main points of equipment into position so you can draw out your plumbing plan. Set the pump where you want it, the skimmer where it will go, plan a place for your heaters or any other instruments you will want to use. Make sure all the plugs can reach their power sources and if you plan to light a refugium there has to be room for light without burning down your neighborhood. An extra cross bar to attach hooks for hanging things is a great way to keep your stand organized.
If you are installing your sump in your basement or other room, mark where the holes will need to be for the plumbing. The stand may need modified as well. If you are using an aquarium controller, you have about 100-120 feet of distance between modules, so you could keep a system connected at quite long distances.
Sump To Tank Prep:
With your equipment situated where it will go, you can now set your tank on the stand. You will need to route your tank’s drain line into the sump. This is where you will draw out the design for your plumbing. Flexible PVC hose is best, as it has no sharp bends and can form around your design. It also fits perfectly into PVC fittings. If you are going with a hard plumb, make sure to make your right angles with two 45* elbows and not a 90*. There is much less friction this way, and will allow maximum flow rate. If possible, use unions so you can remove the plumbing for cleaning some day. You may get snails or fish stuck in there. When you have your idea drawn out here, move on to the return pump.
The return pump will most often have to have an adapter of some type to fit your plumbing. The intake on a submersible pump should have no plumbing on it besides the cover itself to prevent large objects from entering the pump. The output of the pump has to be equal to or smaller than the size of the intake or you risk losing flow or damaging the pump at a much earlier stage in its operating life. The external pumps will practice the same idea, but with the addition of a connection to the sump.
Valves are your best friend in this area. Having control over the flow is extremely important. When you draw out the return line, add a T before the tank. This will allow a multitude of possibilities. If you have to restrict flow to your tank you can divert the excess through the T rather than putting extra pressure on your pump. You can use this as a place for a water change hose to quickly drain the sump with ease. The extra output can also be used to power devices like Reactors, Skimmers, and even churn your refugium! Some route this line to a frag tank or even a 2nddisplay tank, though it is not advisable to combine systems due to risk of contamination. Again, use minimal angles, and shortest distances possible while still maintaining space within the stand. Some plumbing can be a good spot to mount things like thermometer displays or other things, but there is a risk of getting electrical wet in the event of a leak.
If you have a reef ready tank, you will only need to make it to the bottom of the tank where the bulkhead fitting is. If your tank is not drilled for a return line you can make your own U-tube to make it over the tank or buy one. Loc-Line makes a very large arrangement of return lines and fittings, so take a look at one of their suppliers as you are drawing out your plan. Longer tanks will benefit from 2 return lines on either side of the tank. This can be achieved with another T and a valve to each end to help level out the flow. An SCWD, which is a device that connects where a T would go. The water goes in one end and within the unit spins a cylinder that opens and closes the two outputs, creating an alternating current. These get clogged very fast, but DIY versions have been known to work very well.
There are many options for the end of the return line. Most just have a standard outlet, but you can make a spray bar or even what I call the Sprinkler System. This is when you make a rectangle of PVC that rests on top of the tank and has outlets that T off around it. This allows for a maximum spread of new water rather than a single stream that may not make it to the dirty corner of your tank before diluting too much with the water already in the tank.
The things to worry about are fairly simple to avoid. Power outages cause the pump to shut off. Gravity will suck water back down through the return line as if you were siphoning water for a water change. This can potentially flood your sump, stand, and floor. To prevent this, the outlet of the return line should be placed near the surface of the water. If you want your outlet to go beneath the waterline a good distance than you will need to drill a small hole, about 1/8th of an inch, somewhere on the return line just under the running water level. Make sure to point the hole towards the open water and not facing the rear glass, since it can splash all over when you first power it on. Pointing the hole the same direction as the direction of the outlet is what most people do. Make a not of the direction you want your hole.
Canopy and/or Lighting Prep
Now that you have the water path planned, you can plan your powerhead placement. At this point you can imagine your rocks where they will be. Place your powerheads where they will be accessible, yet hidden. The top of the tank is a common place to put them. If you have a controller for your powerheads you should consider the wave motion when placing them. You want the surface of the tank to be agitated for supreme gas exchange. It will also add a natural sparkle to your water, especially with Halide or LED.
If you have a canopy, the lighting will be mounted within the hood. Make sure your canopy has the means to hold the light. Some LEDS can be hung with small eye hooks, but heavier lighting may need bolted to the canopy itself. If you contact the manufacturer of your light they can assist you with an idea. Forums are a good place for advice as well. Open top tanks have many more options. If you have a light with feet, you pretty much just set it on the tank and you are done. Hanging fixtures can be mounted with chain or wire from an arm or even the ceiling. With some ingenuity you can make quite an epic light fixture. Pool Table lighting is a good option for hiding a DIY light system. If you have some type of pulley system in mind to raise and lower your lighting, a curtain could be a good option to hide your contraption. Having flexibility in your light height can mean the difference between light shocking new corals or having an amazing tank.
Some lighting gets very hot, especially metal halides. If you have a canopy then fans are a must. An improperly ventilated canopy can warp, cause condensation, or damage equipment and even cause a fire. Open tops may not need a fan if the light is high enough off the water level, but a cooling system can still benefit the bulbs and extend their life. Some lighting is intentionally over driven, which can cause excess heat. These fans can work with your controller if you have them as well. Too much wind and you may loose heat from your water! Also keep dust in mind. Fans are very good at collecting dust and we would not like to have a massive glob of who knows what getting blown into our tanks or collecting in the electrical system. Computer fans work great for DIY cooling systems. You can even use an Xbox Intercooler for you gamers out there if you know how to work with wiring.
Prepping the Prep Area:
You will need a space to mix and store water and equipment. The stand will most likely be maxed out on space by the time you have all the items you need. Reverse Osmosis systems are fairly compact and easily mount on the wall. If you have the Water station near an existing water line, you can easily put a Y connecter on the supply and split it off from there. RO systems require a certain pressure so you will need to know what PSI your water line is at. A booster pump can be added before the RO unit to up the pressure to more efficient levels. You will want the RO unit to have easy access for replacing the filters. It will also need to be accessible to make water.
Plan your water area to be as low maintenance as possible. Setting reservoirs higher up allows the use of gravity rather than pumps to transfer water. You will need a container to store both RO and SALTWATER. The saltwater will need aerated, so a pump or air bubble will help to preserve the water while in storage. This area will be a good place to store all your portable water containers as well. Add shelves or cabinets to accommodate your area. You will want to be able to easily get water from this are to your tank. This can be done the old fashioned way with buckets or you can get the job done with a pump that is strong enough to get to your system. Use the same concept to plumb this as a return pump from your sump to your display.
Set up and monitoring systems you may want, or at least have a place to do water tests on your storage water. Even RO units can go bad and pump out 50 gallons of contaminated water. Having a controller can help with this as they can send an alarm when the parameters are out of whack, preventing you from doing a potentially toxic water change. Having a dedicated desk, small table, or shelf will really make this easier for you.
This room can be a good place to hide your quarantine tank as well. Make sure that the room has a GFCI outlet installed, since this will be nearly full of water. An earthquake or Tornado could cause the whole system to collapse and flood your house, so preventing a fire on top of the already devastating event would be nice. You could purchase a large walk in shower and install all of this in the shower casing, with the drain ran into your homes sewage. This would prevent any damage from spills, but could be costly to do.
For smaller tanks you can get away with buying all of your water, just make sure you have a good place to keep it without contaminating it. It is still a good idea to test the water you buy as well. Wal-Mart may have neglected their water machine and could potentially be selling tap water. This could lead to a massive algae outbreak or kill your inverts. Premixed Saltwater may have been made by the new guy and could be the wrong salinity for your system. Even the stuff made in a “factory” could have been contaminated or messed up in the production process. Human error is not avoidable. Preparation and a backup plan are always beneficial.
At this point you should have an idea for how you will attack this necessity of water production. Go and do some research on RO units. Consider how much water you need to fill your tank and how much you will need for water changes. 75 Gallons per day could be a lot for a small tank, but also not be enough for a large system. Get your area drawn up to easily plan this room. You would not expect it, but placement is key with this for supreme access.
Acclimation Chamber:
You will need to acclimate your livestock to your new water. Most people use air hose with a knot or valve to allow various speeds of drip siphoning from your existing system. A TV dinner stand works great for holding your jar or bucket up while acclimating. These are also easy to hide when not in use. Make sure to plan on having something like this, which can be stored in your water station area. More on acclimation will be touched later on.
Finalization:
With your prep work done, you will have most likely had to make changes to your initial idea. Make sure at this point you have a revised blueprint and notes. Your plan has to be solid before you go out and buy the rest of the needed items. Organize your plan into sections to easily accomplish your setup in phases. This allows you to focus on one thing at a time. With your new and revised plan you are ready to start the actual build process! You should already have a Build Thread Started by now, so make sure to keep updating it as you develop your ideas. In a few years you can look back and see how your system evolved from a simple idea, which is one of the coolest parts of the hobby.
Section 4: Assembly
When building anything, it is easiest to start from the ground up. There are things that will be very hard to access once the setup is complete. Making sure they are done right the first time will make or break your passion for this hobby. It is quite a bummer when you have a tank for 6 months and all of the sudden the outlet bursts into flames.
***If you are not familiar with electricity, leave this part to a professional***
Replacing Your Outlets:
The first thing you will want to do is figure out which breaker this particular outlet is wired to. If you have a friend with you, plug in a lamp to the outlet and than make your way to the breaker box. Flip the breakers on and off until the lamp turns off. When it turns off you found your breaker. Leave it off and mark it for future reference. You may need to move your stand out of the way to do replace your outlet or outlets.
Go to the outlet with the lamp and use a multimeter to check to see if it is not putting out any voltage. If it is not live, you can proceed. Unscrew the cover to expose the outlet. There should be two screws that mount the outlet to the box. Remove those and gently wiggle the outlet out of the box being careful not to damage the wiring. Unscrew the 3 wires from the outlet. You should have a black, white, and Green or Bare wire. If your wire is not color coded you will need to use the mulitmeter to find the hot wire. The 3 wires are very important to install correctly. The Black wire is the Hot, Live, or Positive (+) wire. The White wire is the Neutral or Negative (-) wire. The green or bare is the Ground or GND wire. Make sure you have a ¼ inch strip of wire exposed to insert into the receptacle.
The Ground wire connects to the Green screw labeled ground. Insert the wire into the plate and screw it down securely. Insert the Black wire into the slot labeled HOT, which should also say Black next to it. There is usually a hole that the wire slides into with screws on the side. The white wire goes into the Neutral slot and again, tighten the screw corresponding to the slot. Your new receptacle should be securely fastened to the wire.
The next step is to make sure you have the correct breaker. A 15-20 amp breaker and outlet is recommended to prevent tripping when using high voltage equipment. If you have a 10 amp breaker you will need to upgrade it to match your GFCI outlet.
Simply prepare for a power outage. You will need to turn the main power off to your breaker box to remove the old breaker. These are labeled just like a GFCI receptacle. Simply follow the color coding and put it right back where you got it. If you are having trouble call an electrician. This is a very important step in setting up your aquarium, even if it is just a freshwater tank. Safety is the number one concern.
With your stand out of the way, this is a good time to mount any power strips or control modules you have to the wall or stand. Placing them higher than water level and out of the moisture will ensure longer lasting equipment. Always add a Drip Line. This is simply a loop in the power cable before the outlet, which channels any spilled water down onto the floor rather than into an outlet.
This is also a good time to drill any holes you may need if running lines or plumbing into different rooms. Make sure to check for wires or support joists when cutting through your home. Stud finders are a life saver.
Plumbing
Now that your all wired, move your stand back and prepare to show some butt crack. It is time to start the plumbing process, but first here is a quick refresher on plumbing.
How to Glue: Always glue in a well ventilated area. You will need PVC PRIMER, PVC CEMENT, and PVC CUTTER. Cut your pieces to be glued to their desired lengths. Each fitting and pipe will need a thin coat of primer. Once the primer is dry put a coat of PVC cement on the primed surface of both pieces and fasten them together in a turning motion to evenly seal the bond. Hold the pieces together for 20-50 seconds or until solid. Practice on some scraps to fine tune your gluing skills, as it is very easy to over glue. Glue takes 24-48 hours to fully cure, so hold off on the water test until then.
How to Screw: Threaded fittings will need a good amount of white Teflon tape to ensure a tight seal. Simply wrap the tape around your male threaded fitting opposite of the direction of the threads. This allows you to screw the pieces together without the tape coming loose. Hand tightening will be sufficient. You want enough tape to make the threads look more like humps with a thickness of 1/8th of an inch or more. You can use glue, but you will never be able to unscrew it.
Taming the Hose: Hoses under pressure can fly off the fitting and spray everywhere. We cannot have that. Using Barbed fittings rather than trying to squeeze a hose over a smooth pipe is always recommended. Plastic hose clamps should be used over metal ones that can rust. Slide the hose over the fitting and tighten the clamp. Done! Just pay attention to the size of your barbed fitting and the INNER DIAMETER of your hose.
Cutting Pipe: PVC cutters are the easiest route when cutting pipe. You can use a hack saw or even a power saw to cut it as well. Make sure to sand the area you cut, as it will often leave a flare at the end and could reduce the integrity of the seal in the fitting. PVC work by using a combination of leverage and a sharp metal blade. Tighten the cutter so the blade is where your mark is and squeeze it enough to puncture the pipe. You can then rotate the pipe or cutter while keeping force on the handle. This will make a fairly straight cut with very little actual energy. This can be used to cut thick hose as well.
Fastening Bulkheads: Bulkheads compose of three parts. The main fitting, the rubber gasket, and the nut. The Gasket goes on the main fitting. Slide the fitting through the hole to be mounted so the side with the gasket is in the water. Once in place you will slide the nut onto the main fitting and hand tighten it as much as possible. Take a monkey wrench or homemade bulkhead wrench and give it one last small turn to seal the deal.
Plumbing:
Now that you are a Mario Brother level plumber it is time to knock out this whole plumbing phase. This should not take more than a day with most systems. Some can take as little as 5 minutes with proper planning.
WATER TEST
- Position the pump to its final location. You will need a threaded fitting to attach your pump to the sump. If your bulkhead has a barbed fitting you can just use a threaded barb fitting to attach the pump straight to that. You may need to use adapters to go from a threaded or Slip style bulkhead. Use as little restricting fittings as possible on the intake to the pump. You want to come as close to the diameter of the pumps opening as possible and as close to the water source as you can.
- The Return line is now going to be installed. Put your desired adapter on your pumps return end and route your hose or PVC to its designated location. When adding valves inline make sure they are accessible. Using a hose inline here is also recommended as a shock absorber. Running hard plumbing into a glass tank would result in a catastrophe.
- Now for the Drain lines. Run these out of the way, but with little harsh turns. Again, a large diameter hose is good for handling extra flow when needed. Make sure you use some type of support for the plumbing as well. There are strips of plastic that can help support the plumbing. A 1.5 inch pipe full of water is pretty heavy, and often full of turbulence. It must be secure.
- Install your Standpipe if you have a Reef Ready System to a level lower than the overflow wall, but not so low it creates a loud splashing. If you have an overflow box this is where your drain lines are plumbed from. Place this in an area close to the center of the tank for better surface skimming. You can use more than one box, as long as they are at the same level. If you have one that requires an aqualifter, install that now. You can get a hanging mount for the pump, which connects to the overflow with airline tubing. If you have a regular U-tube style box just place the U-tube like the instruction manual shows. Adjust the box that is in the tank so that it is where you want the water level in your aquarium.
- Wait for the glue to dry, if you did not need to glue, move on. This is a good time to stand back and make sure you still want to proceed. At this point your system is almost capable of holding water, which means you will be able to prepare for the water test. Gather your containers and prepare to fill your tank up for the first time.
- After the glue is dry you can begin to fill your tank. If you have access to enough RO water, go ahead and use it. If not you can use tap water for the test as long as you clean everything out after which can be hard to do in cases where you are hard plumbed. If you do use tap water for your test you MUST NOT HAVE SAND OR ROCK IN YOUR TANK DURING THE TESTING.
At this point your tank is running, your rocks and sand are in place, your powerheads are positioned, and your filtration has been fine tuned. This is the part that is most important to the well being of your tank. You cannot skip this step or your aquarium will never stop cycling. This can take up to 6 months before you can add any corals. Don’t fret. There is still plenty to do and see! The cycle is a very interesting thing to watch.
- Fill your overflow (or external part of your overflow box) with a few inches of water to check for any leakage. If it leaks, tighten the bulkhead(s) until it stops.
- Fill the overflow to the top until it starts to make it into the drain. During this time you can inspect the drain for any leaking. Pour in some more water and check all the fittings. If that looks good empty the water in the overflow by removing the stand pipe.
- Fill the main aquarium. Do this slowly and inspect the stand as the weight increases. Listen for any strange cracking sounds. Check the overflow to see if water is seeping in through the seal. If it is, drain the tank and throw some sealant over the seam to let it dry. Small pinholes can be super glued. This just prevents the water from getting sucked in where you don’t want it.
- Once your tank is full, start to let it spill into your overflow. Make sure the water is being skimmed evenly and adjust if necessary. Allow the overflow box to fill to the point of draining and stop.
- Start to fill the sump. If your return section has its own section, fill that first to check the bulkhead for the external pump. For submersible pumps skip this step. Fill the rest of the sump from the drain end. This will give you an idea of the path your water will flow and allow for good equipment placement. Fill this to the maximum level you want and stop.
- Make sure to close all the valves that do not run to your tank. If using an overflow box you will need to prime it at this point per manufactures instruction. Open the valve going to your tank and plug in your pump. The very first thing to do now is stand up and watch the overflow box. If the tank is not flooding you have set up your stuff correctly up to here. If the flow rate is too high either close the valve until it is at a safe rate or you can open another valve that leads to your sump to divert the extra GPH.
- With your water moving, it is now time to test out your powerheads. This is a great time to set your wave timers and play around with flow. You want the surface to have ripples and you want the water column to have no dead spots while keeping the sand bed from stirring up.
- Measure your Volume. Use a volume calculator to measure the water capacity of your tank with no rock or sand. Include the sump in this calculation. This will later be used to measure how much water is displaced when adding the good stuff.
- If you used RO water and you have the flow you want you can now dump in the salt. Use your instrument of choice to measure the salinity. The salt has instructions on the package. Each brand is different, so be sure to read their recommendation. The level of salt is also up to you. Some people prefer lower level while others have success with higher salt levels.
- It is easier to build the rock with no water, so either drain the tank into storage containers during this process or use submersible means like zipties or reef putty. Get your structure nice and sound. Once it looks good you can dump the sand in the tank and fill it back up with water. You can run you powerheads continually to speed the process up.
- Wait again! You will have a nice milky water at this point. It could last from 6-48 hours depending on the grain of sand you choose. Do not be alarmed. A cloudy tank will become crystal clear all of the sudden while you are gone. Go socialize, you have been working for quite a while now.
- Once the water is clear you will probably have buildup in the sump of sand particles. This is when you want to clean that out, along with your powerheads if they are at all dusty from the cloudiness.
- Once you have a clean sump you can start to put your equipment in it. Heater, Skimmer, ATO, or what ever else you have in mind. Probes from your aquarium controller will need a place to mount, so leave a spot for them if you use any.
- Fine tune your Skimmer. You will want a good equilibrium of air and water in your skimmer. The less air flow allowed into the pump the more water. Some skimmers have valves, others require certain water levels within the sump. Refer to your skimmer’s manual for help with fine tuning your particular model. Your water is clean, so do not expect very much from it just yet. Some do not even add a skimmer until they cycle is complete. This step can be put aside for now if desired but will not hurt to include it.
- Lighting is not necessary at this point, but you can still put it where you want it. If your light fixture does not have a controller you will need to use timers. A power strip with a timer built in works great for these. Some have muli-timers for a dusk/dawn effect. Your lights will not be important until you are about to start your algae cycle.
- Start the cycle: DO NOT ADD LIVE ANIMALS. All you need is a pinch of fish food or an uncooked table shrimp. The table shrimp works because you can monitor its progress as it rots.
Section 5: The Cycle
image via @rusticgirls
In a freshwater aquarium you can add some flake food, wait a couple weeks, and then you can add fish. In the ocean there is much more involved than mechanical filtration. In fact, 70% of your aquariums filtration relies on the maturity of the live rock. A combination of bacteria, algae, and various invertebrates compose the “live” part of the rock. It takes quite a while to establish an ecosystem, even on a microscopic level. Without a proper understanding of the Marine Cycle, you will be in for a long term battle with parameters and algae. There are six main stages to a properly cycled tank. Follow this guide and you cannot mess up. You will need your basic test kit to test the progress.
Stage 1: Ammonia Cycle
Ammonia is the first thing that forms when something rots. It is a waste product in nearly all creatures as well. Instead of using a fish to start the cycle just use some food. Anything that is all natural and uncooked works just fine. Table shrimp that is uncooked works great. Drop it on the sand so it is in view. The shrimp should begin to rot within a couple hours or more. Let this shrimp rot until it is completely gone. If you are curious what your ammonia levels are, go ahead and take some tests. Keep track of the results as the shrimp rots. The smaller the food gets the more ammonia should be present in your water column and pretty soon should be off the charts. This will stay high for a while, but then start to drop. As soon as the ammonia starts to drop you will see a rise in Nitrite, you are now on the next stage.
Stage 2: Nitrite Cycle
Ammonia when broken down by bacteria becomes Nitrite, which is still a toxin. As your Nitrites rise your Ammonia will drop, drop, and keep dropping as long as you haven’t added any animals. Keep up with testing to observe your progress. Eventually your Ammonia will be very low and your nitrites will peak out until it starts feeding a different type of bacteria that turns it into Nitrates. Once your first signs of Nitrates are seen you are on the next stage.
Stage 3: Nitrate Cycle
Nitrates are removed within the live rock deep inside in all of the deep pours. This hidden bacteria consumes the nitrate and creates nitrogen gas as a byproduct. The nitrogen gas rises in the water column and escapes into the air. When one gas leave, another enters. Oxygen is then infused into the water. After the Nitrates start to dissipate your oxygen will increase and you will be ready for the intermission:
Intermission:
You are not done yet! You may have cultivated a nice crop of groovy bacteria and your water may be clean as can be, but, there are still 3 more stages to the cycle process before you can start your stocking. Take this time to consume all of which you have already done. The next 3 stages often put fear into the eyes of many newcomers. These are perfectly natural and are partially a representation of how the earth became an oxygen rich planet. Before there was any oxygen breathing organisms, there was the evolution of Cyanobacteria. This is a photosynthetic bacteria that creates Oxygen as a byproduct. There are several colors, but the commonality is that it is like a slime. The Cyanobacteria spread over a vast area and the atmosphere became oxygen rich like we breath today, without the smog. Cyanobacteria is responsible for life as we know it. The same applies to the reef. Now that your mind has been blown you may move on to the next stage of the cycle.
Pre-Algae Cycle:
If your lights have not been setup yet do so now. Set your timers as you would for a reef tank. Anywhere from 6-12 hours is a good amount of time. Set the photoperiod to be on during the hours you will be viewing the tank most. If you work 2nd shift it is OK to have the lights come on after you get home from work or when you wake up in the morning. As long as there is not a supply of sunlight near the tank you wont have a long term battle with algae.
Stage 4: Diatoms
Diatoms are a brown dusty life form that consumes silicates. There is no avoiding Diatoms during their initial bloom. Leave it be. Let it go crazy. Before you know it, the brown stuff will soon start to change colors. Generally red, this is the start of the next stage!
Stage 5: Cyanobacteria
Cyanobacteria will now begin its course. Again you will let the slime just do its thing. This will be the nastiest of the stages. Cyanobacteria can gross some people out, especially if they catch a whiff of it. It is best to leave it be. It will start to clear up eventually. The clearing of the slime makes way for yet another stage.
Stage 6: Green/Brown algae
If you have made it this far, give yourself a round of applause. This is the final “battle” of the cycle process. When the slime is gone you will see your first signs of plant life, algae! Green Hair algae is usually the type that you see, but some other types have been known to occur. This stuff will grow like mad. At this point you are ready to move on to the next phase.
The cycle is a long process in terms of hobbies. Find yourself a good rhythm for testing. Get yourself in the habit of staring for long periods of time. Practice observation by watching as life forms start taking foot in the aquarium. You will see things from dust sized particles to worms that reach a foot long. There really is no telling what could form in your tank. This is a great time to prepare for the animals you will get. Knowing how to describe things and being able to correctly test the water will help you get the information you need. Your parameters are perfect now. You are now ready to move on to the next section. You should actually study the next section during your cycle, since you will have quite a bit of time on your hands with all that waiting.
Cycles can be artificially induced, but it is always preferred to use as little foreign liquids as possible. Another thing you can do during the cycle is preparing your clean up crew and first fish, but be prepared to keep them quarantined for a prolonged time since the cycle is unpredictable.
Section 6: Live Stock
A few holidays have passed, you have gone through a few types of hairstyles, and the seasons have changed dramatically. Your aquarium has gone from an idea in your head to a flowing ecosystem of algae and rock. You need to get some critters in there! But where do you begin? There are more bad combinations of marine animals than flavors of ice cream. Luckily, there are Compatibility charts that do the vague guessing for you. Locate these charts to help you get a picture of what does and does not mix. Some fish are obvious. Mixing a shark and a seahorse are not a good idea. When you get into the fish of the reef there are some unexpected no-no’s. A huge tang could fall victim to even a small blenny bullying or nipping at him. Stocking will be more research than anything. It is improbable the part time employee at your LFS has a mental encyclopedia of everything they sell. Always check for yourself anyways. If you plan on having predator fish you can skip the clean up crew and corals since they will either get eaten or destroyed. Every animal you buy WILL NEED QUARANTINED.
Quarantine and Acclimation:
image via Advanced Aquarist
Quarantine tanks can be as simple as a bucket or you can setup a larger system if you plan to have larger fish. All the tank needs is flow, observation worthy light, and some hiding spots. You will want to use proven methods and avoid the herbal approaches like garlic.
Invertebrates (excluding corals) cannot be medicated. The can be carriers of parasites like ich that feed off fish. To prevent Ich from being transferred into your tank they will need to reside in a tank by themselves for 8 weeks. Keep the water aerated, give them some food now and then, and do periodic water changed to keep it fresh. It takes 8 weeks to starve the parasite. After that time period you can acclimate them into the aquarium.
Fish almost always have to be treated. Ich is present in most systems that deal with selling livestock. It is more cost efficient for them to leave the medicating up to you. There are a few trusted techniques for quarantine. Hyposalinity and copper treatment are the two most sure ways to kill anything that is not a fish.
Corals have their own predators as well. The first thing a lot of people do is dip their corals in a Lugol’s Solution, or Iodine. This disinfects them and often kills or irritates anything on them enough to jump off. Keeping them in quarantine until you are sure you rid any pests is very important or you risk growing these predators in your main system. Aptasia are another common hitch hiker. These can be injected with hot vinegar or lemon juice. What ever the problem, there is a solution. This is where your photography skills will first come into play when you are trying to identify problems. There are many methods of quarantine. Research the techniques and find one that is right for you. There will never be a perfect method for all. Ask your reef buddies how they approach certain problems. If you skip quarantine you may one day have to remove every animal in your tank later.
Acclimating livestock varies in time, but is the same as far as methods. It come in handy to have a large jar so you can view your animal. Simply siphon water from your display tank into the jar. You want to have an air valve or a knot so that the water drips into the container. To determine the acclimation time for your animal you can just look it up online, which you should know before purchasing.
CHOICE GUIDE:
Clean-up Crew:
These guys do all the dirty work. They eat algae, detritus, dead animals, and whatever else makes its way into their grasp. Crabs, stars, snails, conchs, nudibranch, urchins, cowries, pods, and worms are only a small number of the available types of animals you can find. A variety of them is always best since they are each designed for their own reasons. Every breed of invertebrate has its exceptions. There are starfish that eat other animals you may want to keep. Some crabs grow into coral eating monsters. Some urchins can grow as large as soccer balls.
Snails are easy to pick. They rarely sell dangerous snails. Turbo, astrea, nerite, and cortez snails are good beginner species. I add one of each and observe them. Which species cleans the most, the fastest, or gets the hidden areas the best? Judge what areas need more attention and stock more snails that work that area well. Snails will clean parts of the glass, but you will always need to manually clean it. Do not rely on them for a clean window.
Hermits are not completely necessary, and can be known to steal a snails shell here and there. They are amazing creatures that work their claw off at all times. Some grow huge, but some stay small. Blue and red legged hermits are the lesser aggressive species that stays small.
Serpent stars and Brittle stars are good for a reef tank. They will be unseen for days until you feed and they come running on all fives, immediately cleaning the sand bed. They are quite impressive to watch scurry about. Sand sifters are good if you are not relying on a live sand bed. They stir the sand, but they eat all the good critters that live there. Urchins can be good, but they are very closely related to starfish and can also be predatory. Research the urchin you are looking at buying, it may be a crab hunter.
For more advanced inverts like shrimp and nudibranch it is best to learn about the species. Every nudibranch eats something different. Some can even eat coral. There is a ton of information out there and if you find an animal with no helpful info it is best to avoid it all together.
Fish:
There are a ton of fish out there. Some are cheap and some cost more than the tank they will live in. There is no better way to come up with a stock list than going out and looking at the fish in person. Write a list of all that interest you and look them up. Do they seem like they are the right size? Are they compatible with each other? With Inverts? With Corals? Do tons of research. This is your first tank. You can go for the advanced creatures on your next round. Starting with peaceful hardy fish makes life a lot easier. Fish are not required, there are beautiful tanks with no fish.
A good way to organize your wish list is take a note of all the fish that tickle your fancy and then go home and investigate. Sometimes it is just easier to post your list online and take peoples input. People are dying to prevent you from making mistakes. Please let them help you. If you ask a question that has been answered they will point you the right way to get your reef in order. There are too many varieties to have a perfect formula. The animals diet is the single most important thing to consider. Some fish love corals, others love ornamental shrimp. Learn not only what the species does in the aquarium, but in the wild as well. They may spend their lives hunting animals you may want to mix with them.
Corals:
There are 4 major coral types. SPS, LPS, Softies, and NPS. Each type has its own requirements, and each coral within each category has its own even more specific needs. The type of corals you choose will be the sole factor behind your final flow rate, style, and your lighting and filtration. Some corals will even need to be fed in various manners. Not knowing what each coral you want needs is like buying a turtle and trying to feed it steak.
SPS
Small Polyp Stony corals, or SPS, are the most demanding as far as quality of light and water. These corals consume high levels of Calcium and the Alkalinity will also need constant upkeep. These corals often require more stable water and will need more attention to parameters. Adding Kalkwasser to your topoff water can be a great way to keep these corals growing. Some SPS include Acropora, Montipora, and Hydnophora. These are constructed of a calcium based skeleton with a flesh that coveres them. The pours on the skeleton have tiny polyps that come out and feed from the water column. Each polyp is an individual animal, though connected by a similar flesh and structure.
LPS
Large Polyp Stony corals are less demanding. They do well in medium to lower lighting and medium flow. These also have a calcified skeleton, but the polyps are much larger. Chalice coral, Brain corals, Duncan corals, Candy Canes, and Acans are just a few. These are more hands on. You can actually feed the mouths of each polyp and it will eat like a venus fly trap, some large enough to eat entire krill in one gulp! These also require a source of calcium. The water quality can be a little less attended, but they will thrive in clean, stable water.
Softies
These are generally the easiest corals. Kenya tree, mushrooms, Zoas, Xenia, Star polyps. Anything that does not have a skeleton falls in this category. They can live in low light and low flow for the most part. Some softies can live in any level of lighting, and some grow Too fast. These are the easiest to grow, but so are dandelions. Weeds are not only in your yard. Some corals can take off in your tank to the point of insanity. Make sure you research ways to maintain plague corals or you could have your own unintentional Pulsing Xenia farm.
NPS
Non-Photosynthetic corals are the hardest to keep. They require constant food and superb water quality. They are best kept for the professional as they require very unique methods of upkeep. These corals are known to rapidly deteriorate, if you do attempt one you must research its needs and be ready to remove it if it starts to rot. Sun coral, Gorgonians, and Sponges are a few examples of NPS corals.
After quarantine you will be ready to start adding the corals to your tank. For the first week or two they will be loose, and need a close watch. Critters can knock them over or even take them. Every coral you get is best started on the sand bed and worked towards the spot you want them in over the course of a couple weeks to acclimate them to the lighting and flow. When you have them in the spot they shall reside you can use Super Glue Gel or Reef Putty to bond the corals to the rock. Take the coral out of the water and put a large glob of glue on the rock or plug it is attached to and stick it in place under water. In a few minutes the glue will be completely dry. By the time the superglue comes apart the coral will have already grown onto the rock. There are many other ways to bond corals so check around for how others have done theirs if you have something that you are having trouble attaching to something.
Plants:
You may have a refugium or want a decorative algae in your display tank. There are a ton of cool plants out there that can be beneficial to your system. Some are best in the confinement of your sump where they cannot take root in your tank while others are fairly maintainable. Mangroves are not a realistic form of filtration but can make a great habitat and can look quite snazzy if you Bonsai it. You could choose to do an all plant aquarium, but that is another monster in itself.
General Advice:
Always research twice and buy once. Quarantine everything. Acclimate, don’t dump. No matter what they tell you at the store, don’t buy anything without checking it out first. Look up other people’s experiences with these particular life forms. What did they mix theirs with? How large of a tang did they have in their 75 gallon? The fish trade has been around for quite a while, it is very likely someone has had the same taste as you and most often the question you have has been answered numerous times. There is no sure thing with this hobby and there is always the chance that a peppermint shrimp can live in peace with a Panther Grouper, it is just highly unlikely. Be wise, go with the majority vote. Don’t try anything that has risk until you are well experienced with this hobby. You will have much more fun succeeding with compatible fish than trying to catch or save incompatible ones. The same goes with corals and inverts.
Section 7: Maintenance and Upgrading
You will need to clean your equipment every once in a while, some more often than others. As long as you followed the guide while planning your system you should have an easy time cleaning it. Open access is key to a clean sump. Union fittings or hoses make for quick plumbing maintenance. Powerheads, skimmers, and sometimes your external equipment may need a good once over. White vinegar is the best cleaning agent for reef equipment. It dissolves calcium buildup fairly quickly. Sometimes running your pumps in a vinegar bath can make them look brand new and get the algae growth off of them.
Inspect the electrical wires for any possible exposed wires, some power cables get damaged by animals that bite into the wiring. LEDs wont need replaced for a few years but metal halides or florescent lights will need replaced every 4-10 months depending on the type and usage. A bad bulb can grow algae fast. Cleaning dust in and around the stand is important as well. Having a house spider in your stand is actually beneficial, as they kill flies that may be attracted to your protein skimmer’s lovely odor.
If you have any forms of mechanical filtration, like filter socks or sponges, make sure to clean them regularly, some even swap out their socks daily. While you’re at it you might want to change your underwear if this hobby has consumed you to the point you forgot about life outside the ocean box. RO systems need maintenance. They will need replacement filters every 6 months depending on usage and size.
After 6-12 months of running, some of your equipment may be going out. An 8 bulb T5 unit can be expensive to replace all at once, at this point you may consider upgrading altogether to accommodate more light demanding corals or you want more sparkle. You may have started out using linear flow powerheads and want to replace them with controllable ones. Your corals could be consuming too much calcium or dropping your Alkalinity level so fast you cannot keep up and a controlled doser is needed. All of these approaches will be unique to your system and most often will evolve as you and the technology grow more and more advanced. Upgrades are fun and a sign of commitment. You don’t drop money into things you don’t want, right?
After a year you should check your floor for any weight damage or sinking. Sometimes you may need to add extra support or even jack up your floor if it is a huge tank. Check around the tank and floor for any signs of moisture damage or mold. Carpet can hide some serious damage if you were too careless with cleanup after spills over a long period of time. At the very least it will hold an odor that is pretty hard to remove while the tank is set up. Treat your equipment like you (should) treat your vehicle. Always check the fluids, check for equipment recalls, replace things as they get old, and keep everything as clean as you can.
End Note:
This is a general idea of what kind of adventure you can partake in. There are all levels of setups in all shapes and sizes. Ultimately the design is up to you. You should only attempt things you are comfortable with and can afford. This hobby can be for any budget with proper advice and husbandry (or wifestry for the ladies). Setup can be reduced in price with DIY in some applications, but others may end up costing more after all the experimenting. Experiments are another fun aspect. Some people have a natural skill to make things do stuff! If you are innovative, you could invent the next level of reef hardware. This is just an all around fun hobby with a little something for everyone’s taste. The more money you have, the larger the system and pricier the livestock can be. A 500 gallon freshwater tank is dirt cheap in comparison to a decked out 75 gallon reef full of rare corals and fish. For the most part, cost means quality. There are plenty of cheap alternatives to things, so go out and get others’ opinions. Have fun! This is going to absorb you in the best way possible.
If you have a good time with the corals and have fun playing with the fish, you may be interested in expanding this hobby into a part time job, even if it makes enough to break even. Frag tanks are much simpler than a regular reef tank. You can use your own corals to start up your frag tank and swap corals until you have a large diversity to grow out and propagate. Eventually you will have so many corals you won’t know what to do with them! Trade them to people for just about anything! People are always looking for a way to keep Uncle Sam from getting his cut. You can also take advantage of other people with too many corals. Some people just give away their extra stuff because they just want it out of their tank.
Entire setups can often be found on local classifieds or clubs. Unless you are sure the setup is as perfect as you think it can be I would always recommend starting over, set it up of course when you buy it to keep any livestock alive. Either relocate, sell, or trade the livestock for any upgrades in equipment you may want to change. Lights and powerheads are the usual changes, along with the filtration. Make sure they are honest with you about why they are selling it. Take someone with you who knows about reef tanks to inspect the potential. Some tanks are gorgeous and the person is moving, which is already hard on them. Other tanks are full of problems, if the person already has the entire tank packed down to go before you get there the odds are he is hiding some pests. This also may make you feel obligated to go through with the deal. How mad would they be if you said no and they had to put it all back?
This guide is a general guideline for you to use as you research on your own as well. There are many techniques and alternatives that are just as good. Use this as a starting point and add and subtract equipment to suit you. The beauty of this hobby is its flexibility. It opens our minds to creative concepts and enlightens us to the world deep beneath the sea. It is not a hard hobby, but one that does require attention and the capability to maintain it. This can be for the whole family, or an escape from the world around you. Reef tanks are very therapeutic and can help you relax after a long day at the office. Have fun! Start a thread to showcase your awesomely guided plan and you could have the next tank of the month!
image via reef2reef member @Nuocmam
This article was sponsored by @MarineDepot at www.marinedepot.com.
16 years later and this is still amazingly informative. I've been attempting this hobby, on and off, for 20 years and learn something new with every post I read. Thank whomever for keeping it updated!Supreme!
A few other posters have asked similar questions to the one I'm going to ask, but no one really responded.
As I understand it, the cycling advice in the article is to add no livestock to the tank until the algae stage is reached. Am I understanding that correctly? During that period, are you still adding an ammonia source periodically? Do you do any water changes? Or you literally just do absolutely nothing to the tank (except top-off) until you're past diatoms and cyano and into algae? And then start with a cleanup crew?
That is a quite a bit longer process that the typical "add fish as soon as your ammonia and nitrites are zero" recipe one mostly finds. Do many folks follow this longer timeline? If there's a real benefit, I'm happy to be patient. Just curious because I almost never see anyone advising this longer approach. I've battled the ugly phase with fish in the tank before, and neither the fish nor I seemed to enjoy it. So I'm happy to just sit back and watch the uglies come and go if that's the best guidance.

This was so helpful! I was wondering about the bioload of my 55g. I already have 2x clowns, 5x green chromis and wanted to add 2x yellow watchman golbies, 1x 6 lined wrasse. For the clean up crew, I have 10x hermits, 10x astrea snails, 2x trochus snails. I will add 1x turbo snail 1x shrimp 1x fighting conche.
I plan to keep soft corals but am waiting to start until the tank is older so I am not sure which kinds I will get yet. Does this sound like too many?
I plan to keep soft corals but am waiting to start until the tank is older so I am not sure which kinds I will get yet. Does this sound like too many?

Similar threads

- Replies
- 18
- Views
- 206
- Replies
- 1
- Views
- 56
- Replies
- 1
- Views
- 65
- Replies
- 2
- Views
- 95
New Posts
-

-
 CK Auctions | OG Bounce Mushroom, Strat Zoa, Holy Grail Torch, and More!
- Latest: calikidcorals
-
 Magnesium Nitrate - Greenhouse Grade
- Latest: Randy Holmes-Farley


