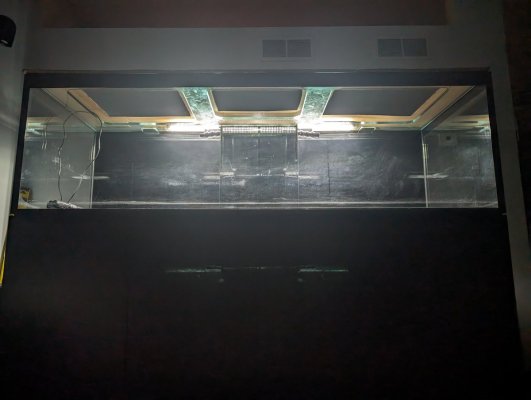
This is it. My last build thread

OP
OP
exnisstech

exnisstech

7500 Club Member
View Badges
Joined
Feb 11, 2019
Messages
8,123
Reaction score
10,706
Location
Ashland Ohio
Rating - 0%
0   0   0
Well the tank has been running full of tap water few days now. Had some plumbing issues. WB has a gate valve on the secondary drain and a ball valve on the main drain. I've only used single drain hob overflows so this is all new. I was having trouble getting the overflow quite. I ended up disassembly the plumbing (had a leak to fix anyway more on that later). I swapped the drains inside the overflow box so the main / short drain is now controlled with the gate valve. Now it's very quite. So quiet the only thing I can hear is the noisy hobs on the 180 still running.
Plumbing leak is fixed. It was a very small leak at the return pipe. Just a single drop every few minutes. I disassembled and reassembled a couple of times with no luck. The last time I was wiping the flange off next to the oring groove and I felt a burr. There was a burr that looked to be left over from the manufacturing process. It was right next to the oring and just large enough to prevent the oring from being fully compressed. Finding it was pure luck.
Note to self, from now on inspect all flanges before assembling. This is all it takes to create a leak .
PXL_20240302_162237789~2.jpg


I have heaters and controller set up and that's all I want to do untill it's full of saltwater so I will drain the tank today and await the arrival of my t slot light mount parts. Reefer rebooted was kind enough to design the mount for me. I Just tagged him in a another thread so I don't want to spam him ;)
This should be very fun. Like a big boy jig saw puzzle. I'm excited. This is going to look so nice compared to all my diy solutions in the past.
This is a drawing of the light mount. It will be black t slot to match the stand and attached to the back of the stand. They are hinged so I can swing them up out of the way when I need to work on the tank.
Rev 1.jpg


@Waboss is 3d printing shades for the lights, power supply holder's for lights and power heads,mp40s dry side holder's and working on designing a flow director for the mp40s wet sides. The flow director is still in the design phase.
I'm still working on the rockscape.
That's it for now.
 
OP
OP
exnisstech

exnisstech

7500 Club Member
View Badges
Joined
Feb 11, 2019
Messages
8,123
Reaction score
10,706
Location
Ashland Ohio
Rating - 0%
0   0   0
I have decided I'm going to have to build my scape inside the tank. The few times I have actually made scapes and cemented the rocks together I have never really liked the results. I'm going to go back to the good ol pile the rocks together method that has worked in the past for me. I think I lack creativity. This is what I have in the shop and I like it. Space for coral and plenty of caves and swim throughs for the fish. But I can't bond it together or if I do I can only do small sections at a time or it won't fit through the euro brace openings. I'll never be able to recreate this in the tank once I disassemble it.
PXL_20240304_233123672.jpg

PXL_20240304_233132840.jpg
PXL_20240304_233117480.jpg


Climbing up a down a step ladder sucks for me physically and carrying rock up and down makes it even worse. So I bought a scaffold. It felt like the right thing to do and my family now thinks I have officially gone bonkers. Win win :rolling-on-the-floor-laughing:
PXL_20240305_201700451.jpg


3/6
I decided to add a strip of 3inch vinyl tape to hide the water line. I think it looks much better. Non permanent, easy and cheap. I may do the tank in the dining room today.
PXL_20240306_164738525.jpg


I can't wait to get the materials to start building the light mount.
 
Last edited:
OP
OP
exnisstech

exnisstech

7500 Club Member
View Badges
Joined
Feb 11, 2019
Messages
8,123
Reaction score
10,706
Location
Ashland Ohio
Rating - 0%
0   0   0
3/7/24

Rockscape ver 1.0 The rest will be all live rock and corals.
PXL_20240307_231401042.jpg


PXL_20240307_234733203.jpg


My helper
PXL_20240307_233304561.jpg


And so it begins.
PXL_20240308_001830553.jpg


Added a big live rock thats been soaking for a few years. Power heads are running so we have flow and I added a heater. Also added 20ml microbactor 7. Total volume at this point is 90 gallons. Making more water now. Till next time
PXL_20240308_034557311.jpg
 
Last edited:
OP
OP
exnisstech

exnisstech

7500 Club Member
View Badges
Joined
Feb 11, 2019
Messages
8,123
Reaction score
10,706
Location
Ashland Ohio
Rating - 0%
0   0   0
3/9/24

Materials for the light mounts arrived yesterday so today was assembly day. It wasn't too bad untill I went to attach the verticals and found out the 80 20 used for the stand has smaller slots so I didn't have hardware to attach them. I really hate not being able to finish something like this once I start. I know patience is key to successful reefing but dang am I lacking in that dept.
Hmm what to do now :thinking-face:
I look at the stand and think "I can borrow some fasteners from the gussets on the stand, finish this light mount and replace them later. Sounds like a good plan to me so that's what I did. If anyone knows where I can find studs like the ones on the left let me know.
PXL_20240310_002817247~2.jpg


On to the Good stuff.
PXL_20240310_000309823.jpg


The hinges are going to make working on the tank soon much easier.
PXL_20240310_000151466.jpg


PXL_20240310_000036384.jpg

PXL_20240310_004338682.jpg

My Gal told me the other day she didn't care if I kept the 180g up and running for another 6 months before transferring everything over. I'm like, well thats cool. I'll get all this dry rock seeded in the new tank and run with no lights for a while. The plan is to bring the 6 noopsyche k7s over but I have three gen4 xr15s in the basement and may hang them temporarily.

I'm greatful to @Reefer Reboot for designing this light mount for me. I could not have done it without him. I would have ended up with a cobbled up mess.
c2d49036fca8a07be7cb791acfd56710.gif
 

Reefer Reboot

F.V.P.!
View Badges
Joined
Jan 31, 2018
Messages
2,647
Reaction score
3,813
Location
Irvine, Ca.
Rating - 0%
0   0   0
I'm so glad this worked out for you.
You can find the t-slot studs here
and probably on Amazon or eBay.
Did you use washers on the bolts for the hinges to limit how far down the arms swing? If so, may I ask for a close up of the hinges from the side showing the washers for others to see.
Thanks.
 
OP
OP
exnisstech

exnisstech

7500 Club Member
View Badges
Joined
Feb 11, 2019
Messages
8,123
Reaction score
10,706
Location
Ashland Ohio
Rating - 0%
0   0   0

CO2TLEY

Saltaholic
View Badges
Joined
May 24, 2022
Messages
1,012
Reaction score
9,016
Location
Virginia
Rating - 0%
0   0   0
Looking good nice touch for the light mounting
 
OP
OP
exnisstech

exnisstech

7500 Club Member
View Badges
Joined
Feb 11, 2019
Messages
8,123
Reaction score
10,706
Location
Ashland Ohio
Rating - 0%
0   0   0
@Reefer Reboot here are the images you requested. I got the M6 washers at homedepot. I picked up flat and lock washers and glad I did. I used a combination of 2 flat washers on one bolt and 1 lock washer on the opposite bolt. The lock washers are a little thicker than a single flat but thinner than 2 flats and got me a perfect 90 degree angle. I picked up longer bolts as well. I think 20mm. All they had were Philips pan head in black. The heads are larger than the t slot bolts but in this application I think that is a plus.
PXL_20240311_172928352.jpg

PXL_20240311_172808712.jpg


I ended up tapping the center hole on the extrusion to 5/16-18 and used 3/4” long bolts to attach the corners braces that the light brackets will attach to. I drilled the hole in the corner brace to 5/16 plus a side to side wobble of the drill to allow for the larger bolts

PXL_20240311_171021779.jpg

PXL_20240311_171125091.jpg


EDIT: I want to update this in case anyone checks this design out for reference. @Reefer Reboot brought it to my attention that I had the brackets attaching the vertical supports to the stand on wrong which could allow them to possibly contact the tank with the weight of the lights. Sure enough with the lights on they were resting on the tank. Probably wouldn't have caused any damage or problems but why chance it.

This is how I had the brackets installed.
PXL_20240407_194621074.jpg


This is the correct way.
PXL_20240410_225412944.jpg


Nice amount of clearance now.
PXL_20240410_231101416.jpg
 
Last edited:
OP
OP
exnisstech

exnisstech

7500 Club Member
View Badges
Joined
Feb 11, 2019
Messages
8,123
Reaction score
10,706
Location
Ashland Ohio
Rating - 0%
0   0   0
Gonna be a killer tank!
Man I hope so. It's been kind of a dream tank for years and I'm not getting any younger.

Fun journey — I love new builds. That’s a huge setup and I think you’ve got the biggest part covered: your significant other’s support! Once you have that, you can build many wonderful things! lol

Having her support sure does make things more pleasurable. I don't think I'll have her cleaning glass any time soon but she is awesome at letting me know if she sees something out of place in one of the tanks. Sometimes she sees something I missed. Makes me think I may be talking things for granted :thinking-face:

Really like your light mount. Looks clean but very effective

Thanks. All of the credit for that goes to reefer reboot.
 
OP
OP
exnisstech

exnisstech

7500 Club Member
View Badges
Joined
Feb 11, 2019
Messages
8,123
Reaction score
10,706
Location
Ashland Ohio
Rating - 0%
0   0   0
If things go well this will be the first fish in. Powder Brown tang.
PXL_20240311_181231834.jpg


I have always wanted a powder blue but then decided the browns are actually prettier to me. They are more colorful. However I have never seen able to keep one. I either loose them in QT or shortly after adding them to the DT so I stopped trying a few years ago. I picked this one up a week ago. It was actively grazing on the rock and looked healthy so I pulled the trigger. I went to look for rock so I guess you could say it was an impulse buy :face-with-hand-over-mouth: But it's not like I don't have place for it so all is good. I have him in a 100g stock tank with a bunch of old live rock. He is already eating nori off of a mesh bag on a clip. He is also swimming to the top when I walk over so I think I'm being noticed as the food God which is much better than it hiding.
I will only be observing and adding no medication. It's a choice I've made after loosing too many fish in QT. Maybe I QTed wrong but I don't think so. I'm only mentioning it so people know and if things go bad they'd can come back and rub it in ;) I've been through velvet so I understand the risks. I think this is a prefect place for a new addition to start adjusting. He is all over the tank. I never see fish active like this in a tank with PVC pipe.
I'm not starting a medicate in QT vs not. It's about personal choice with no right or wrong IMO
This home for now
PXL_20240311_181256458.jpg
 
OP
OP
exnisstech

exnisstech

7500 Club Member
View Badges
Joined
Feb 11, 2019
Messages
8,123
Reaction score
10,706
Location
Ashland Ohio
Rating - 0%
0   0   0
My powder brown had ich 3 times. I was going to rehome him after the last copper treatment but hey — third time a charm! He’s been clean for 2 months. Good luck with yours.

This is what I'm trying to avoid. My last one I ran through 30 day QT using copper power testing daily etc. A few days into the display covered in ich and ended up succumbing to it. Other fish in the tank fine. A couple of my tangs have been with me for close to 7 years and others multiples years. I'm going to try the method of fattening this guy up, give him a big pool to call his own for a while then bring the gang over and see how it goes. If it fails powder tangs will be added to the list of things I can not keep in my tanks and I'll stop trying.
This is the gang that will be coming over. I'll probably bring them over one or two at a time. There really is no aggression amongst them so hopefully the new guy will fit right in, we'll see.
 
OP
OP
exnisstech

exnisstech

7500 Club Member
View Badges
Joined
Feb 11, 2019
Messages
8,123
Reaction score
10,706
Location
Ashland Ohio
Rating - 0%
0   0   0
3/12/24 It's filled and running. SG is 1.024 so I'll let that creep up a little from evaporation. I like to keep mine at 1.025 - 1.026.
PXL_20240313_002259505.jpg


The low rock on the right is live rock and all the rock in the sump is live. It's been in other tanks of mine for years. The rock in the sump has quite a bit of life on it including sponges so it should give me good start.
PXL_20240312_214713316.jpg


Just going to let it do it's thing for a while now.
 

Reefing threads: Do you wear gear from reef brands?

  • I wear reef gear everywhere.

    Votes: 20 13.7%
  • I wear reef gear primarily at fish events and my LFS.

    Votes: 10 6.8%
  • I wear reef gear primarily for water changes and tank maintenance.

    Votes: 1 0.7%
  • I wear reef gear primarily to relax where I live.

    Votes: 22 15.1%
  • I don’t wear gear from reef brands.

    Votes: 83 56.8%
  • Other.

    Votes: 10 6.8%
Back
Top