
Navigation
Install the app
How to install the app on iOS
Follow along with the video below to see how to install our site as a web app on your home screen.
Note: This feature may not be available in some browsers.
More options
You are using an out of date browser. It may not display this or other websites correctly.
You should upgrade or use an alternative browser.
You should upgrade or use an alternative browser.
Tim's 800 Gallon Phoenix Reef
- Monster Build
- Thread starter garbled
- Start date
- Tagged users None


OP
OP
- Joined
- Nov 10, 2018
- Messages
- 772
- Reaction score
- 1,045
Day 4/5, the fun must go on!
During the week, my replacement Apex and all the bits arrived. The previous one was the subject of some unwanted corrosion and rust, from poor placement. I actually disassembled it, and carefully cleaned it with Q-tips and isopropyl alcohol, but not much luck was had. The unit works, and the ethernet works, but every other port on the device is dead. I actually have enough extra bits that I could have just gotten it working, but I decided that if it was partially dead, it was on it's way to being fully dead, and nobody needs that at 3am. I may actually install it on my 125, because that one doesn't need much in the way of control, just measurement and run the LED's. I wonder if I went PWM or 0-10v on those....
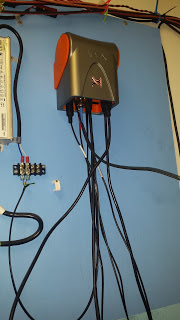

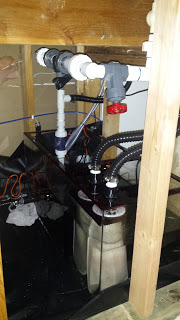
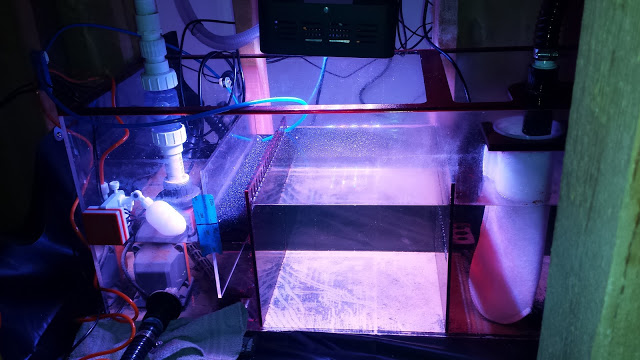
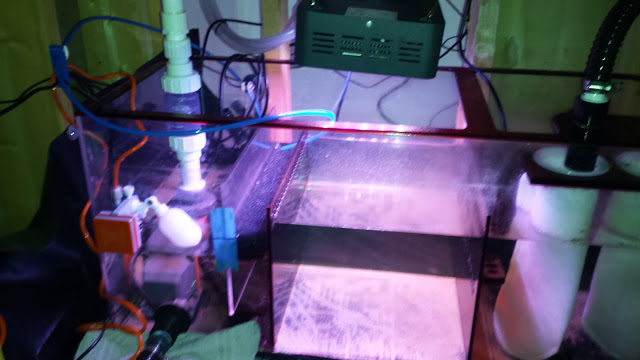
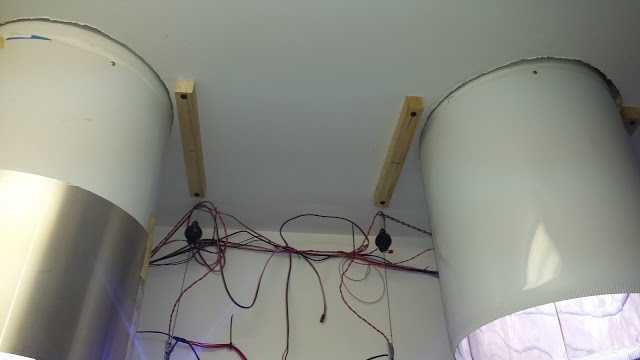
So the Apex and the EB832's were mounted. I mounted the Apex super high up, to avoid any more splashes of doom. The Energy Bars were mounted as high as I could, without having to make everything an extension cord. The modules just kind of went where they made sense more or less.

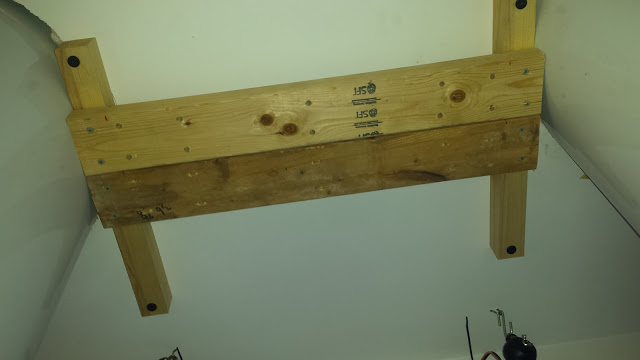
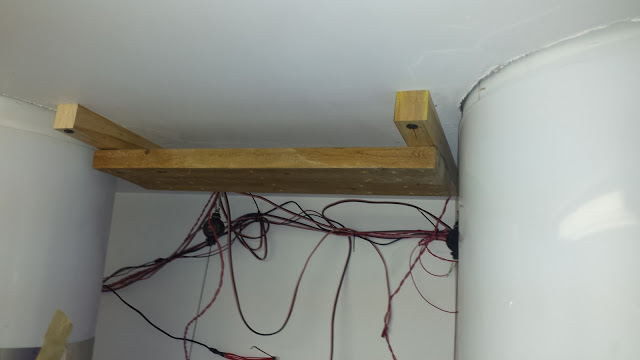
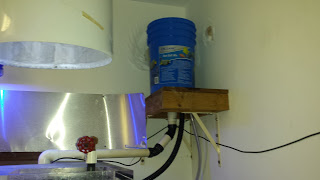
I also decided to re-route the water line for the RO, that feeds to the ATO reservoir. While doing so, I decided to change out the DI resin. Originally, I used some heavy duty drywall anchors to mount the DI canister on the wall. Turns out, bad idea. When I tried to turn the body to unscrew it, I could feel the anchors ripping the wall apart. So down it came, put in a header board, back up it went.
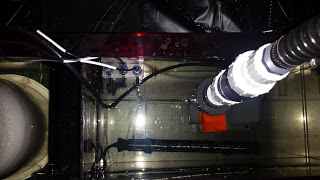
I also tore some of the return pump plumbing apart, and wired in the FM-100 flow monitors. I don't actually care how much flow I have in those return pipes. What I do care about however, is if it is flowing or not. I want multiple levels of redundancy here, so the plan is to put an optical level sensor on each sump, and the flow meters, so I can tell if one pump stops, slows down significantly, explodes, whatever. This would cause the level on one of the two sumps to rise a bit, and unbalance them, meaning I need to compensate by slowing down the other pump.
Speaking of unbalanced sumps, I was thinking up failure scenarios, and I realized I had made a boo-boo. There are two sumps. Each sump has a return, and a drain feeding into it. Now in the scenario where one pump stops, and the other runs, the problem is, that the water will come down the drains equally on both sides, but on the running side, it pumps it back up, where half of it goes to the dead side. This continues until the working pump overflows the non-working sump.
To fix this, I watched a few Youtube videos on drilling acrylic sumps until I had enough courage to take a drill to a $400 sump, and went at it. Two holes later, near the bottom of the pump housing, I had some bulkheads installed, and ran a pipe between the two sumps. I then filled the system up, and simulated the failure scenario, and while they didn't remain the same height, the down sump remained well below the top, meaning that my evil plan worked.
Finally, with everything wired up, I set upon the programming a bit. I've only finished about half of it at this point, and will post it all once I've got it all debugged. Mostly I put in a bunch of code to deal with pump failure scenarios, because paranoia.
And then, finally, I got to turn the returns on. Woo, very slowly I ramped both of them up to 100%. It's interesting how much less power I have than with the old Dolphins. The drains have absolutely no problem keeping up, I don't even have to tune the siphons on them. Which admittedly is kind of nice, it just works and I don't have to mess with it. In the end I'm ok with this,.
While testing, I found another critical error. I installed a check valve on each pump. However on one pump, I placed a tee above the check valve that runs to the GFO/Carbon filters. This meant that when the pump was stopped, it decided to siphon the tank down through the reactors, and then into the sump. Sigh. For now I adjusted one of the returns to be right at the top of the water level. This doesn't actually present a problem, as I didn't like where that line was anyhow. But I don't fully trust it, so.. I'll probably have to special order a tee from FlexPVC and redo that side.
Next was the ATO and Neptune ATK kit. Ok, easy, install the PMUP, install the little float valve thing, run the wires over to the FMM, plug them in, and, hey, the 1Link cable isn't long enough. Argh. Well, guess I need to order an extension cable. Sigh, now I have to manually run the RO in there to keep the system stable until UPS blesses me again.
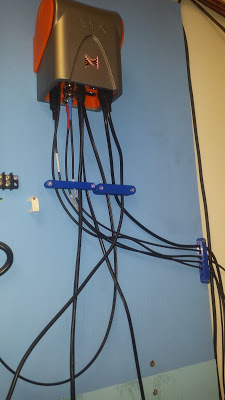
I ended up getting alot accomplished this weekend, and got myself some little side projects that need doing now. For example, I've re-created a rats nest of wiring with the electrics and the Apex. I also need to install some surge suppressors in the main outlets, to avoid any damage to the expensive bits. The heaters are in, and are slowing bringing the tank back up to a reasonable temperature. I hacked together a spare Tunze->Apex cable with the remains of the one from the old system, so I need to wire that in and setup the Tunze's to run. UPS also blessed me with my MightyMagnet F5, so now I have some incentive to hit the front with a scraper and start being able to view the tank.
Next on my list, is a whole bunch of 3D printed parts. I need to make a ton of little brackets to hold float switches, manage cords coming out of the sumps, manage cords on the wall, etc etc. That ought to keep me busy for awhile. Of course anything I design I'll put up on thingiverse.
Day 5 over, exhausted, I go to bed.
During the week, my replacement Apex and all the bits arrived. The previous one was the subject of some unwanted corrosion and rust, from poor placement. I actually disassembled it, and carefully cleaned it with Q-tips and isopropyl alcohol, but not much luck was had. The unit works, and the ethernet works, but every other port on the device is dead. I actually have enough extra bits that I could have just gotten it working, but I decided that if it was partially dead, it was on it's way to being fully dead, and nobody needs that at 3am. I may actually install it on my 125, because that one doesn't need much in the way of control, just measurement and run the LED's. I wonder if I went PWM or 0-10v on those....


So the Apex and the EB832's were mounted. I mounted the Apex super high up, to avoid any more splashes of doom. The Energy Bars were mounted as high as I could, without having to make everything an extension cord. The modules just kind of went where they made sense more or less.


I also decided to re-route the water line for the RO, that feeds to the ATO reservoir. While doing so, I decided to change out the DI resin. Originally, I used some heavy duty drywall anchors to mount the DI canister on the wall. Turns out, bad idea. When I tried to turn the body to unscrew it, I could feel the anchors ripping the wall apart. So down it came, put in a header board, back up it went.

I also tore some of the return pump plumbing apart, and wired in the FM-100 flow monitors. I don't actually care how much flow I have in those return pipes. What I do care about however, is if it is flowing or not. I want multiple levels of redundancy here, so the plan is to put an optical level sensor on each sump, and the flow meters, so I can tell if one pump stops, slows down significantly, explodes, whatever. This would cause the level on one of the two sumps to rise a bit, and unbalance them, meaning I need to compensate by slowing down the other pump.


Speaking of unbalanced sumps, I was thinking up failure scenarios, and I realized I had made a boo-boo. There are two sumps. Each sump has a return, and a drain feeding into it. Now in the scenario where one pump stops, and the other runs, the problem is, that the water will come down the drains equally on both sides, but on the running side, it pumps it back up, where half of it goes to the dead side. This continues until the working pump overflows the non-working sump.
To fix this, I watched a few Youtube videos on drilling acrylic sumps until I had enough courage to take a drill to a $400 sump, and went at it. Two holes later, near the bottom of the pump housing, I had some bulkheads installed, and ran a pipe between the two sumps. I then filled the system up, and simulated the failure scenario, and while they didn't remain the same height, the down sump remained well below the top, meaning that my evil plan worked.

Finally, with everything wired up, I set upon the programming a bit. I've only finished about half of it at this point, and will post it all once I've got it all debugged. Mostly I put in a bunch of code to deal with pump failure scenarios, because paranoia.
And then, finally, I got to turn the returns on. Woo, very slowly I ramped both of them up to 100%. It's interesting how much less power I have than with the old Dolphins. The drains have absolutely no problem keeping up, I don't even have to tune the siphons on them. Which admittedly is kind of nice, it just works and I don't have to mess with it. In the end I'm ok with this,.
While testing, I found another critical error. I installed a check valve on each pump. However on one pump, I placed a tee above the check valve that runs to the GFO/Carbon filters. This meant that when the pump was stopped, it decided to siphon the tank down through the reactors, and then into the sump. Sigh. For now I adjusted one of the returns to be right at the top of the water level. This doesn't actually present a problem, as I didn't like where that line was anyhow. But I don't fully trust it, so.. I'll probably have to special order a tee from FlexPVC and redo that side.
Next was the ATO and Neptune ATK kit. Ok, easy, install the PMUP, install the little float valve thing, run the wires over to the FMM, plug them in, and, hey, the 1Link cable isn't long enough. Argh. Well, guess I need to order an extension cable. Sigh, now I have to manually run the RO in there to keep the system stable until UPS blesses me again.
I ended up getting alot accomplished this weekend, and got myself some little side projects that need doing now. For example, I've re-created a rats nest of wiring with the electrics and the Apex. I also need to install some surge suppressors in the main outlets, to avoid any damage to the expensive bits. The heaters are in, and are slowing bringing the tank back up to a reasonable temperature. I hacked together a spare Tunze->Apex cable with the remains of the one from the old system, so I need to wire that in and setup the Tunze's to run. UPS also blessed me with my MightyMagnet F5, so now I have some incentive to hit the front with a scraper and start being able to view the tank.
Next on my list, is a whole bunch of 3D printed parts. I need to make a ton of little brackets to hold float switches, manage cords coming out of the sumps, manage cords on the wall, etc etc. That ought to keep me busy for awhile. Of course anything I design I'll put up on thingiverse.
Day 5 over, exhausted, I go to bed.
Thank you for documenting and sharing your experience! I appreciate when people share their shortcomings in reef keeping! Its the most honest way to connect to others because I think we rarely have someone that hasn't struggled and made mistakes along the way.

OP
OP
- Joined
- Nov 10, 2018
- Messages
- 772
- Reaction score
- 1,045
Day 6/7, Rat taming by moonlight
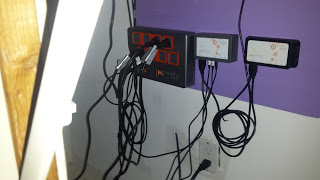
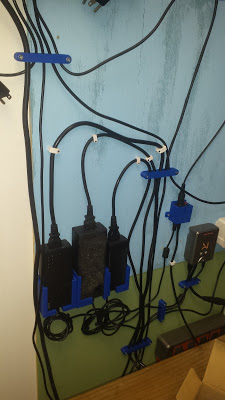
The 3d printer worked a bit of overtime during the week, and churned out about 30 different wire management clips and brackets for me. The new Apex was all wired in, but as is the case with such things, just running wires every which way ends up making a lovely nest for a rodent.
Brackets in hand, I went about tidying up the left side of the tank. The right side needs alot more love actually, but I still have work to do over there, so I'll leave it for now.
For the curious, the brackets are off thingiverse, (not my designs):
https://www.thingiverse.com/thing:122600
https://www.thingiverse.com/thing:1543201
Having sorted that mess out, I moved on to the dreaded lights. The lights suffered some serious setbacks between the flood, and the dust ruining the fans. My original build is actually documented on another aquarium site, but as I rework it, I will continue to document it here. Taking inventory of what I have, it looks like 3 of the 4 main lights have blown LED's, though it's often hard to tell just by looking. I have ordered some new chips, so those are on the way. In the meantime, the moonlights looked more or less OK, so I thought, well, lets find out.

So I very carefully checked all the connections. Turns out the VDM cable I made is full of corrosion. Ok, well, we can make a new one. Looking at the old Tunze stream cable, one side is completely corroded, but the other wire looks as good as new. The RJ45 end is done for though. Snip, snip, crimp, and I now have an RJ45 -> Tunze Stream and 2 fork connects. Fork connects hook up to the ballast, Tunze plugs into the little box, and we are off to the races. I carefully verify which VDM outlet is attached to which wire, edit the programing for that VDM to be "Set 15". Just enough to power it up, but not enough to run them at full blast. Plug in the wire, flip the outlet on and...
Woo. I can has moonlight! This is good. This saves me so much work not having to reinvent this particular wheel. The moonlighting was by far the more complex of the two lighting setups, so to be able to just plug it in and go is such a win. More on that later...
So now that the Tunze's have VDM outlets wired into them, they need some programming, and a bit of love on the wire management side as well. First, I made a pair of these:
Then I did some simple programming in the Apex for the streams, and got a decent setup going:
A few minutes of testing, and I was very pleased with the result. Neither side turns off fully, which is good for my size of tank. Mind you, filling out the giant form on the Apex to do this, and get them right, well that took forever. Basically I have them run for 45 minutes at full power, then a 45 minute slowdown, and a 45 minute low power (30%). They are on alternating schedules, so they really move the water around in different ways. I've probably fiddled alot with the placement of them, but I'm still not 100% pleased with it yet. Time will tell.
One last (HA!) bracket needed to be designed, so back into Tinkercad I went, and spat out this bracket:
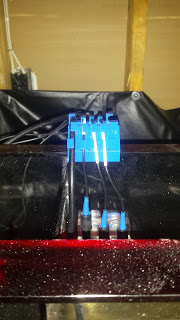
Now my probe wires are all nice and tidy. One thing to note about these. The Trigger system Ruby sumps come with some very nice premade probe holders. I was pretty excited about these, and was looking forward to ditching my magnet mounts. No luck. They are awful. They are too low in the sump, so the tops of the probes were underwater. They don't have little screws, so the probes just kinda dangle in the holes and move around, and finally, they are in the area reserved for the skimmer. Between the drains and the skimmer, that area is full of bubbles, and this was ruining the readings on all the probes! Nope, back to the magnets for me.
Ok, Tunzes taken care of. Check. Moonlights work, check. Wires managed.. mostly check. Time to do some programming..
The 3d printer worked a bit of overtime during the week, and churned out about 30 different wire management clips and brackets for me. The new Apex was all wired in, but as is the case with such things, just running wires every which way ends up making a lovely nest for a rodent.
Brackets in hand, I went about tidying up the left side of the tank. The right side needs alot more love actually, but I still have work to do over there, so I'll leave it for now.


For the curious, the brackets are off thingiverse, (not my designs):
https://www.thingiverse.com/thing:122600
https://www.thingiverse.com/thing:1543201
Having sorted that mess out, I moved on to the dreaded lights. The lights suffered some serious setbacks between the flood, and the dust ruining the fans. My original build is actually documented on another aquarium site, but as I rework it, I will continue to document it here. Taking inventory of what I have, it looks like 3 of the 4 main lights have blown LED's, though it's often hard to tell just by looking. I have ordered some new chips, so those are on the way. In the meantime, the moonlights looked more or less OK, so I thought, well, lets find out.

So I very carefully checked all the connections. Turns out the VDM cable I made is full of corrosion. Ok, well, we can make a new one. Looking at the old Tunze stream cable, one side is completely corroded, but the other wire looks as good as new. The RJ45 end is done for though. Snip, snip, crimp, and I now have an RJ45 -> Tunze Stream and 2 fork connects. Fork connects hook up to the ballast, Tunze plugs into the little box, and we are off to the races. I carefully verify which VDM outlet is attached to which wire, edit the programing for that VDM to be "Set 15". Just enough to power it up, but not enough to run them at full blast. Plug in the wire, flip the outlet on and...


Woo. I can has moonlight! This is good. This saves me so much work not having to reinvent this particular wheel. The moonlighting was by far the more complex of the two lighting setups, so to be able to just plug it in and go is such a win. More on that later...
So now that the Tunze's have VDM outlets wired into them, they need some programming, and a bit of love on the wire management side as well. First, I made a pair of these:

Then I did some simple programming in the Apex for the streams, and got a decent setup going:

A few minutes of testing, and I was very pleased with the result. Neither side turns off fully, which is good for my size of tank. Mind you, filling out the giant form on the Apex to do this, and get them right, well that took forever. Basically I have them run for 45 minutes at full power, then a 45 minute slowdown, and a 45 minute low power (30%). They are on alternating schedules, so they really move the water around in different ways. I've probably fiddled alot with the placement of them, but I'm still not 100% pleased with it yet. Time will tell.
One last (HA!) bracket needed to be designed, so back into Tinkercad I went, and spat out this bracket:

Now my probe wires are all nice and tidy. One thing to note about these. The Trigger system Ruby sumps come with some very nice premade probe holders. I was pretty excited about these, and was looking forward to ditching my magnet mounts. No luck. They are awful. They are too low in the sump, so the tops of the probes were underwater. They don't have little screws, so the probes just kinda dangle in the holes and move around, and finally, they are in the area reserved for the skimmer. Between the drains and the skimmer, that area is full of bubbles, and this was ruining the readings on all the probes! Nope, back to the magnets for me.
Ok, Tunzes taken care of. Check. Moonlights work, check. Wires managed.. mostly check. Time to do some programming..
OP
OP
- Joined
- Nov 10, 2018
- Messages
- 772
- Reaction score
- 1,045
Day 7, and then there was light, and heat.
So two things need to be programmed for the aquarium. The heaters, and the moonlights. We will start with the heaters, because that's the easier of the two.
I have 3 Finnex 300W heaters. I located my temperature probe up in the top of the tank, in one of the overflows. I wanted it pretty far from the heaters, so the readings would be stable, and unaffected by the heater, and anything else down in the sump. I also don't want all the heaters turning on and off constantly, trying to keep the temperature in check and vastly overdoing it. I'd prefer to not run 900 watts of power all at once, as that gets expensive.
So there was a pretty good thread on the Neptune forums about a multiple heater setup that pretty much did what I wanted. So I hacked it up, and we have the following:
Heater1Left
Heater2Right
These three heaters have a pretty slick setup IMHO. The right/left ones are split, so for 12 hours, one is primary, and then for the next 12 hours the other one is primary. There is a virtual outlet for each, that triggers when the heater has been running for 30 minutes. When this happens, the second heater kicks in, and helps out, even though it's outside of it's timeframe. When the temp is far too low, we also have the backup heater, so in theory all three can be running at once, but only if things are getting a bit chilly. Finally the When statement at the bottom of each, is a failsafe. If any of the main heaters run for an hour straight, they shut off. But not just off, they flip off Auto in the Apex, so they have to be manually reset. You can use this to generate an email alarm with the If Error statement.
So now I'm pretty happy with that, lets move on to the moonlight. In my previous setup, because the Apex is still broken after all these years and won't let you access the moon intensity values, I had to kinda hack up a lunar phase. In my case, it's simple, I follow the moonrise/set times, but the intensity is on a 1 week schedule. Low intensity on Sunday, highest on Wed, coming back down to Saturday with no moonlight at all. However, I don't just want the moon to flicker on into existence, I want it to very slowly fade in and out, like a rise. This required some very overcomplex programming. I don't actually recommend anyone do this. It's slightly insane, and required so many virtual outlets it was absolutely absurd. It might be possible to tighten this code up a bit too, but anyhow, here it is. Quick note, I have my moonlight offset by 2 hours, so that is why you see the 120/120 statements. If you don't offset, you would use slightly different code there.
Outlet: LED_Moon
Then you need to setup a bunch of profiles. By a bunch, I mean 12. They all follow a similar setup to this:
First, three for the moon state.
VMoonOn
Then 12 more, like this, numbered 1-4:
VMoon1Rise
The rise outlet picks the day. This means if moonrise is before 11:59pm, it will base the day of week on the day the moon rises. We then have to chain the On to that particular rise. If we use the day of week statement again, in the case where moonrise was at 11:59pm, we would rise to say 7%, but then it would be Monday, and Monday has a 14% moon, so that would then cause a sudden jump when we get to the On state. Therefore the VMoon1On statement looks to see which state was on, and then selects which one to chain based on that.
Finally, the Set does the same thing as the On. It chains off the previous On, so we get the same starting point for the Ramp profile as we had on the On state.
All of this madness gives us a 7 day lunar cycle, where even if the moon rise/set spans across midnight, we still get the proper ramp settings to follow the moon. And all of this follows the seasonal Moon table, so it varies day to day automatically. The whole reason you can't use something like the Wizard to do this, is you want the whole thing to shift by the seasonal lunar rise/set, and when the times are longer/shorter you want the right thing to automagically happen. This does that, at the expense of say, 5 hours of programming, and some sanity you weren't using anyhow.
Do I recommend this? No. It's so super fiddly. It does 100% work though, and maybe staring at it will solve a different problem you have. I wouldn't even dream of this on a Classic Apex, as it would probably cause the CPU to give up and tell you it hates you. But it works, and it is super slick to witness. If only I could do a full 30 day cycle. Sigh. Neptune..
Day 7 comes to an end, and I drift off to sleep slightly less sane than on day 6...
So two things need to be programmed for the aquarium. The heaters, and the moonlights. We will start with the heaters, because that's the easier of the two.
I have 3 Finnex 300W heaters. I located my temperature probe up in the top of the tank, in one of the overflows. I wanted it pretty far from the heaters, so the readings would be stable, and unaffected by the heater, and anything else down in the sump. I also don't want all the heaters turning on and off constantly, trying to keep the temperature in check and vastly overdoing it. I'd prefer to not run 900 watts of power all at once, as that gets expensive.
So there was a pretty good thread on the Neptune forums about a multiple heater setup that pretty much did what I wanted. So I hacked it up, and we have the following:
Heater1Left
Fallback OFF
If Tmp < RT+0.0 Then ON
Defer 001:15 Then ON
If Tmp > RT+0.1 Then OFF
If Time 16:00 to 03:59 Then OFF
If Tmp < RT+-0.1 Then ON
If Output Heater2On030 = ON Then ON
If Tmp > 80.0 Then OFF
If Tmp < 70.1 Then OFF
If Output LeftReturn = OFF Then OFF
If Output LeakDetected = ON Then OFF
When On > 060:00 Then OFF
Heater2Right
Fallback OFF
If Tmp < RT+0.0 Then ON
Defer 001:15 Then ON
If Tmp > RT+0.1 Then OFF
If Time 04:00 to 15:59 Then OFF
If Tmp < RT+-0.1 Then ON
If Output Heater1On030 = ON Then ON
If Tmp > 80.0 Then OFF
If Tmp < 70.1 Then OFF
If Output RightReturn = OFF Then OFF
If Output LeakDetected = ON Then OFF
When On > 060:00 Then OFF
BkupHeaterRIf Tmp < RT+0.0 Then ON
Defer 001:15 Then ON
If Tmp > RT+0.1 Then OFF
If Time 04:00 to 15:59 Then OFF
If Tmp < RT+-0.1 Then ON
If Output Heater1On030 = ON Then ON
If Tmp > 80.0 Then OFF
If Tmp < 70.1 Then OFF
If Output RightReturn = OFF Then OFF
If Output LeakDetected = ON Then OFF
When On > 060:00 Then OFF
Fallback OFF
If Tmp < RT+-0.2 Then ON
Defer 003:00 Then ON
If Output RightReturn = OFF Then OFF
If Output LeakDetected = ON Then OFF
If Tmp > 80.0 Then OFF
If Tmp < 70.1 Then OFF
If Tmp > RT+0.1 Then OFF
When On > 045:00 Then OFF
Heater1On030 and Heater2On030If Tmp < RT+-0.2 Then ON
Defer 003:00 Then ON
If Output RightReturn = OFF Then OFF
If Output LeakDetected = ON Then OFF
If Tmp > 80.0 Then OFF
If Tmp < 70.1 Then OFF
If Tmp > RT+0.1 Then OFF
When On > 045:00 Then OFF
Set OFF
If Output Heater1Left = ON Then ON
Defer 030:00 Then ON
If Output Heater1Left = ON Then ON
Defer 030:00 Then ON
These three heaters have a pretty slick setup IMHO. The right/left ones are split, so for 12 hours, one is primary, and then for the next 12 hours the other one is primary. There is a virtual outlet for each, that triggers when the heater has been running for 30 minutes. When this happens, the second heater kicks in, and helps out, even though it's outside of it's timeframe. When the temp is far too low, we also have the backup heater, so in theory all three can be running at once, but only if things are getting a bit chilly. Finally the When statement at the bottom of each, is a failsafe. If any of the main heaters run for an hour straight, they shut off. But not just off, they flip off Auto in the Apex, so they have to be manually reset. You can use this to generate an email alarm with the If Error statement.
So now I'm pretty happy with that, lets move on to the moonlight. In my previous setup, because the Apex is still broken after all these years and won't let you access the moon intensity values, I had to kinda hack up a lunar phase. In my case, it's simple, I follow the moonrise/set times, but the intensity is on a 1 week schedule. Low intensity on Sunday, highest on Wed, coming back down to Saturday with no moonlight at all. However, I don't just want the moon to flicker on into existence, I want it to very slowly fade in and out, like a rise. This required some very overcomplex programming. I don't actually recommend anyone do this. It's slightly insane, and required so many virtual outlets it was absolutely absurd. It might be possible to tighten this code up a bit too, but anyhow, here it is. Quick note, I have my moonlight offset by 2 hours, so that is why you see the 120/120 statements. If you don't offset, you would use slightly different code there.
Outlet: LED_Moon
Fallback OFF
Set OFF
If Moon 120/120 Then ON
If Tmp > 82.0 Then OFF
VDM: Var_LEDMoonSet OFF
If Moon 120/120 Then ON
If Tmp > 82.0 Then OFF
Set OFF
Fallback OFF
If Output VMoon1Rise = ON Then PMoon1_Rise
If Output VMoon1Set = ON Then PMoon1_Set
If Output VMoon1On = ON Then PMoon1_On
If Output VMoon2Rise = ON Then PMoon2_Rise
If Output VMoon2Set = ON Then PMoon2_Set
If Output VMoon2On = ON Then PMoon2_On
If Output VMoon3Rise = ON Then PMoon3_Rise
If Output VMoon3Set = ON Then PMoon3_Set
If Output VMoon3On = ON Then PMoon3_On
If Output VMoon4Rise = ON Then PMoon4_Rise
If Output VMoon4Set = ON Then PMoon4_Set
If Output VMoon4On = ON Then PMoon4_On
If Output LED_Moon = OFF Then OFF
Then you need to setup a bunch of profiles. By a bunch, I mean 12. They all follow a similar setup to this:
PMoon1_On
Ramp
1 minutes
7%
7%
PMoon1_Set
Ramp
60 minutes
7%
0%
PMoon1_Rise
Ramp
60 minutes
0%
7%
Then, if that's not enough programming for you, you need 15 virtual outlets..Ramp
1 minutes
7%
7%
PMoon1_Set
Ramp
60 minutes
7%
0%
PMoon1_Rise
Ramp
60 minutes
0%
7%
First, three for the moon state.
VMoonOn
Set OFF
If Moon 180/060 Then ON
VMoonRiseIf Moon 180/060 Then ON
Set OFF
If Moon 120/-360 Then ON
If Output VMoonOn = ON Then OFF
VMoonSetIf Moon 120/-360 Then ON
If Output VMoonOn = ON Then OFF
Set OFF
If Moon 360/120 Then ON
If Moon 360/120 Then ON
Then 12 more, like this, numbered 1-4:
VMoon1Rise
Set OFF
Fallback OFF
If DoW S------ Then ON
If Output VMoonRise = OFF Then OFF
VMoon1SetFallback OFF
If DoW S------ Then ON
If Output VMoonRise = OFF Then OFF
Set OFF
If Output VMoonSet = ON Then ON
If Output VMoon2On = ON Then OFF
If Output VMoon3On = ON Then OFF
If Output VMoon4On = ON Then OFF
If Output VMoon2Set = ON Then OFF
If Output VMoon3Set = ON Then OFF
If Output VMoon4Set = ON Then OFF
VMoon1OnIf Output VMoonSet = ON Then ON
If Output VMoon2On = ON Then OFF
If Output VMoon3On = ON Then OFF
If Output VMoon4On = ON Then OFF
If Output VMoon2Set = ON Then OFF
If Output VMoon3Set = ON Then OFF
If Output VMoon4Set = ON Then OFF
Set OFF
If Output VMoonOn = ON Then ON
If Output VMoon2Rise = ON Then OFF
If Output VMoon3Rise = ON Then OFF
If Output VMoon4Rise = ON Then OFF
If Output VMoon2On = ON Then OFF
If Output VMoon3On = ON Then OFF
If Output VMoon4On = ON Then OFF
VMoon2On (as an example)If Output VMoonOn = ON Then ON
If Output VMoon2Rise = ON Then OFF
If Output VMoon3Rise = ON Then OFF
If Output VMoon4Rise = ON Then OFF
If Output VMoon2On = ON Then OFF
If Output VMoon3On = ON Then OFF
If Output VMoon4On = ON Then OFF
Set OFF
If Output VMoonOn = ON Then ON
If Output VMoon1Rise = ON Then OFF
If Output VMoon3Rise = ON Then OFF
If Output VMoon4Rise = ON Then OFF
If Output VMoon1On = ON Then OFF
If Output VMoon3On = ON Then OFF
If Output VMoon4On = ON Then OFF
So how does this nightmare of programming all work, and why do you need so many virtual outlets and complex statements? Well.. its "easy". First off, VMoonOn/Set/Rise tell us what state we are in, are we rising, setting, or full-on. Then we need to figure out if we are on bright today, or dim, or whatever. Which of the 4 phases of the moon we have. Thats where the VMoon1On, VMoon2On, etc all come in.If Output VMoonOn = ON Then ON
If Output VMoon1Rise = ON Then OFF
If Output VMoon3Rise = ON Then OFF
If Output VMoon4Rise = ON Then OFF
If Output VMoon1On = ON Then OFF
If Output VMoon3On = ON Then OFF
If Output VMoon4On = ON Then OFF
The rise outlet picks the day. This means if moonrise is before 11:59pm, it will base the day of week on the day the moon rises. We then have to chain the On to that particular rise. If we use the day of week statement again, in the case where moonrise was at 11:59pm, we would rise to say 7%, but then it would be Monday, and Monday has a 14% moon, so that would then cause a sudden jump when we get to the On state. Therefore the VMoon1On statement looks to see which state was on, and then selects which one to chain based on that.
Finally, the Set does the same thing as the On. It chains off the previous On, so we get the same starting point for the Ramp profile as we had on the On state.
All of this madness gives us a 7 day lunar cycle, where even if the moon rise/set spans across midnight, we still get the proper ramp settings to follow the moon. And all of this follows the seasonal Moon table, so it varies day to day automatically. The whole reason you can't use something like the Wizard to do this, is you want the whole thing to shift by the seasonal lunar rise/set, and when the times are longer/shorter you want the right thing to automagically happen. This does that, at the expense of say, 5 hours of programming, and some sanity you weren't using anyhow.
Do I recommend this? No. It's so super fiddly. It does 100% work though, and maybe staring at it will solve a different problem you have. I wouldn't even dream of this on a Classic Apex, as it would probably cause the CPU to give up and tell you it hates you. But it works, and it is super slick to witness. If only I could do a full 30 day cycle. Sigh. Neptune..
Day 7 comes to an end, and I drift off to sleep slightly less sane than on day 6...
Wow, great detail here! Thanks for sharing!

I like the thread, great job on it. I am starting up a 200 gal in Phoenix myself and some of your issues you have shared with salt water are helpful, and backing my decision I am making with my tank build. I put a huge time and money dent on the tank build with going with a different stand that had come with the tank purchase. But the new stand will be water and rust proof, just taking two months get it stinks. Interestingly enough today I found a box of some of my equipment of a 50 gal I had and I had forgotten about all the salt creep and the "dust" you were explaining that goes on with a salt water tank. I do have a question about your heaters though, I bought 3 finnex 300w heaters for my tank, figure two will run, one for redundancy, but if three of those will heat your tank do I need three for mine? I saw the heater for my 50 gal and I never had an issue with the temperature of the old tank. Side note I might run an apex but will not be a purchase in the next year. Also whos your go to store for a LFS?
OP
OP
- Joined
- Nov 10, 2018
- Messages
- 772
- Reaction score
- 1,045
I don't like running big superpowered heaters. I feel like anything that can move the temp fast, can do so in a fail-on, and then you have soup. It takes the heaters a little while to move the temp up a bit, but all we really want to do is hold it in place. I think in retrospect, perhaps I should have gone with 500's, as these end up running slightly longer than they should have. I feel like 3x300 for a 50 is in the territory of dangerous, but for a 200, you are probably in the right zone. I might have gone a little smaller, but it should work well. My sizing goal for heaters is usually, if it fails ON for an entire day, will it raise the temp more than about 1.5 degrees?
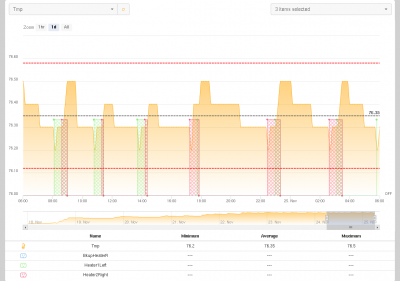
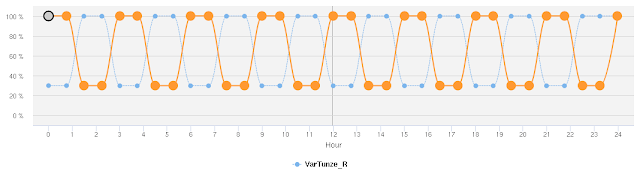
Here you can see my heaters. In the graph, the black line is the target temp. Based on this, I might actually be adjusting my 30 minute setup slightly, but just minor tweaks. I feel like a 500 might have been able to make that tiny move in under 30 minutes, which is probably closer to ideal.
For your tank, I feel one is slightly more than I would run, and definitely not two at once. You would want a setup like mine where one runs and the other two are redundant. Or maybe you just want to run 2 total. 900W is a scary amount of heat.

Here you can see the power of a few heaters on at once, pushing the temp up as I was resurrecting the tank. Imagine that on solid for 24 hours, or worse, at 1/4 the total water volume. My constant thought process here is "how can this fail?"
I would absolutely run an Apex for anything in the 200g range, just my opinion. In saltwater, we are taught that it gets easier as you increase volume, because stability. And this is true, an 80 is easily twice as stable as a 40, and I feel less work even. This completely breaks down around the 200-300 mark, and it becomes so much more difficult because of the whole scale of everything. My posts have mostly gone over the "nifty tricks" I've done with the Apex, because the other stuff is kinda just basic "it does that part automatically so no sense describing it". But that whole does it automatically thing is what makes an 800 even slightly feasible.
As for LFS, I'm actually kind of stumped on that one. I have always used Aquatouch, but it appears they went out of business! I recently visited the store on Greenway and 29th St., and it looked like a nice store, but I have no experience with them other than the staff were very helpful and kind. The fish looked good, but I didn't see a huge selection really. It's something I need to figure out, but I feel like I'm a bit away from that problem still.")
Good luck on your build. And waiting 2 months for a part that makes it work properly is absolutely worth it. The whole "argh I want this now so I'll just bodge this connector here" thing is what gets us all into trouble 2 years from now when it explodes. Good job on making the smart but painful choice to wait.

Here you can see my heaters. In the graph, the black line is the target temp. Based on this, I might actually be adjusting my 30 minute setup slightly, but just minor tweaks. I feel like a 500 might have been able to make that tiny move in under 30 minutes, which is probably closer to ideal.
For your tank, I feel one is slightly more than I would run, and definitely not two at once. You would want a setup like mine where one runs and the other two are redundant. Or maybe you just want to run 2 total. 900W is a scary amount of heat.
Here you can see the power of a few heaters on at once, pushing the temp up as I was resurrecting the tank. Imagine that on solid for 24 hours, or worse, at 1/4 the total water volume. My constant thought process here is "how can this fail?"
I would absolutely run an Apex for anything in the 200g range, just my opinion. In saltwater, we are taught that it gets easier as you increase volume, because stability. And this is true, an 80 is easily twice as stable as a 40, and I feel less work even. This completely breaks down around the 200-300 mark, and it becomes so much more difficult because of the whole scale of everything. My posts have mostly gone over the "nifty tricks" I've done with the Apex, because the other stuff is kinda just basic "it does that part automatically so no sense describing it". But that whole does it automatically thing is what makes an 800 even slightly feasible.
As for LFS, I'm actually kind of stumped on that one. I have always used Aquatouch, but it appears they went out of business! I recently visited the store on Greenway and 29th St., and it looked like a nice store, but I have no experience with them other than the staff were very helpful and kind. The fish looked good, but I didn't see a huge selection really. It's something I need to figure out, but I feel like I'm a bit away from that problem still.
Good luck on your build. And waiting 2 months for a part that makes it work properly is absolutely worth it. The whole "argh I want this now so I'll just bodge this connector here" thing is what gets us all into trouble 2 years from now when it explodes. Good job on making the smart but painful choice to wait.

Thanks for the graph and input, I think I will start off with two 300w heaters and see where it takes me, as you said earlier the apex cant stop the damage from pipes breaking but I think having a heater on some control, apex or other would be good redundancy in the long run. Also I used to go to Aqua Touch and was bummed to see they closed their B&M I think they still will consult and build tanks but us DIYers don't pay someone to set up our stuff, but I stopped into Kona Reef on greenway and 29th street and got the same reception, helpful staff and good looking live stock.
OP
OP
- Joined
- Nov 10, 2018
- Messages
- 772
- Reaction score
- 1,045
Day 8, Of manifolds and refugiums.
One of the things I purchased, and now regret, is this little 9w refugium LED. It looked like a decent little light. An Aquagadget ChaetoMAX. When it arrived I was rather surprised at just how tiny it really was. Just to play around, I hooked it up to an EB832, and turned it on. It's not bad, it does provide light. But hey, the EB832 says it's only drawing 6 watts. Hmm. Not very impressive.
So I needed to actually do something to light the Ruby Elite. In retrospect, the Elite, despite having a larger-by-volume refugium, is not really well suited for growing Chaeto. The problem lies in the fact that it's a long narrow section, which makes it hard to actually light. I can't just throw a giant nuke lamp on it, because that will light up the whole sump, not just the refugium area. No good. Instead, I found 3 little 15w LED grow lamps, and a nice little 3-bulb hanging light kit. Funny thing about these, 1/8th the price, and they actually draw 15 watts each off the EB832.
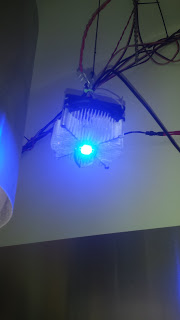
That's just one of them lighting up the night. A few notes about this photo. First, originally, I wondered, would the drain have enough oopmh to push water down that side pipe into the refugium area. Answer: No. The COR-20's are a bit too anemic to keep those drains at siphon, so they don't actually blast water down like they used to. So that's basically a dry pipe. I might try raising it a bit out of the water to see if relieving the static pressure helps though. So to tide things over, I installed a PMUP in there, and have it pushing water into the refugium.
Then I was a bit worried about sending light over into the pump zone, and growing tons of algae in there. So to solve that, I purchased a big sheet of white plastic off Amazon, and some small epoxy coated magnets. Attached it to the inside of the refugium, and now there is a bit of a reflector in there and the pump area stays nice and dark. Oh, and that little 9w disappointment? Well, it actually runs pretty cool, so I stuck it on the side near the bottom, and it side-lights the area. I think this will actually help just a bit.
A small bit of Chaeto arrived from Algae Barn, and in it went. Lets hope it likes it's new home.
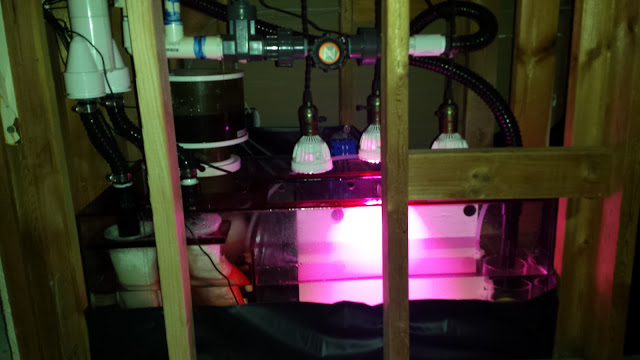
Now on the other side, we have a bit more room. So off to ebay I went, in search of the smallest high-power grow LED I could find. Yeah, I said the smallest, because when you start looking for grow LED's on ebay, you find all of these 1200w monstrosities that could melt your tank down. Finally, I found a little 150w (the ratings on these are pure nonsense, I think it actually pulls like 130w) light, and today it arrived. Into the sump it went! I wanted one with a dimmer, because I was a bit afraid it would be too powerful right off the bat.
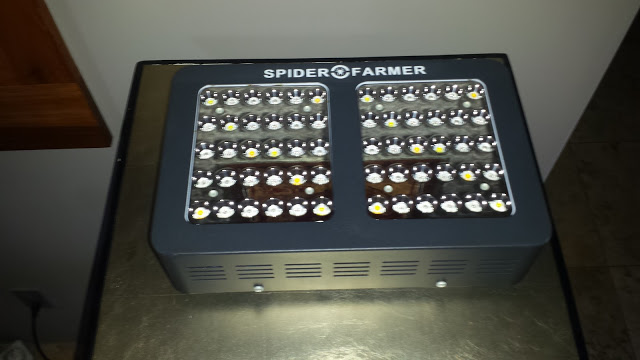
I don't know why one would want to farm spiders. That seems awful.
Here it is at lowest power. Pretty bright actually. A little more blue than I expected, but I think it won't be an issue.
And at full power. That is bright. This thing is a beast. I have it suspended off some of the cross braces of the stand. I'm pretty happy with it, but time will tell if it really works. I need some chaeto to feed into this, hopefully I'll get my hands on some soon.
One might also notice the Neptune ATK in there, all plumbed up and ready to go. No, not really. The cords on the PMUP's are super short. I need another 6-8 feet at least just to get it to the plug. So I ordered a 1Link extension cable for it. Yes, you read that right. I ordered the wrong cable for it. So now I'm waiting for the right cable, and just doing topoff by hand until then.
However, this gave me time to work on a different problem. My Neptune salinity probe has been driving me nuts. Keeps saying the salinity is 24, when the refractometer says 39. Neither is a good number, so I've got to fix that mess. Recalibrate the probe. 24. Do it again. 24. Argh. Get the refractometer out, check that, 39. Argh, recalibrate the refractometer, no, it's right, add the special fluid to it, read 1.035.... wait.. I'm supposed to read 35, not 1.035. Oops. Grumble, fix that. Oh. yeah. So my water is actually 24. How about that?
So while I patiently wait for the right cable to arrive, I'm doing topoff with saltwater to fix the salinity. Good thing the only things in the tank are some worms, pods, and one amazing Nassarius snail that seems to have survived the entire ordeal. Wow. (I mean the entire, 3 year shutdown ordeal, not just the past few weeks of me fiddling around)
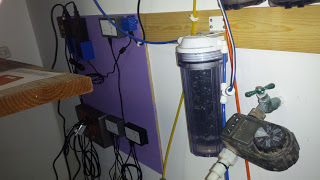
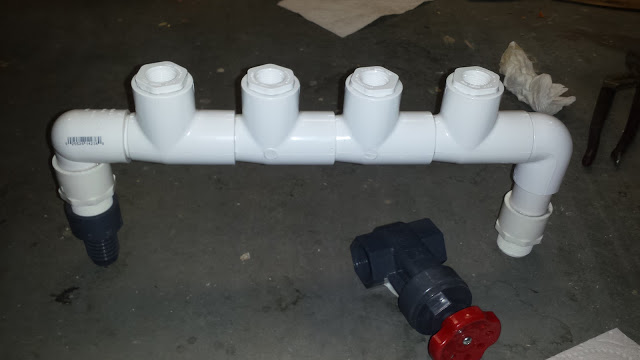
So now I'm off to fix another mistake. Previously, I plumbed the side output off the right sump, in that special way that invalidates the check valve, and makes it siphon the tank down through the reactors during a power loss to the pump. Rather than try to fix this, I decided I would redo the entire idea.
The COR-20 just isn't powerful enough to be a return, and run those reactors. But they make this nice little COR-15, that is enough to run the reactors, and a few other ideas I have. So I get one of those. Bonus, it doesn't need a plug, it hooks right into the EB832 with a 1link cable. So I disconnect the side output, screw a plug into it, and now my anti-drainback works just fine. Also, bonus, I got to test out my fixes for having one pump "die". I unplugged the COR-20, and just like I planned the sumps balanced via the pipe connecting them in the back. Everything worked perfectly.
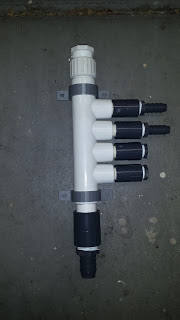
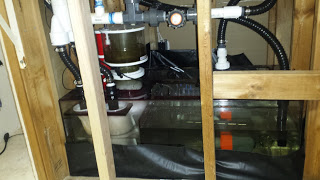
So first I make the world's most complex drain system. This manifold will let me connect a variety of drains from reactors, and god knows what else, and feed them all back into the sump. The COR-15 is plumbed into the other manifold, that has a bunch of outputs that feed reactors, and other mysterious ideas I might have floating around for future enhancements.
Now I fire it up, and boom, I have reactors. Fill them up with carbon, and everything works like a charm, with the COR-15 at only 50%, I'm super happy.
Now all the basic support equipment is wired in, things are running, tank is stabilizing. It's finally getting there. I have a few weeks until the lights show up for the top, and a few other side projects to work on. But other than the lack of chaeto for the right sump, things are mostly working, and it just needs to run for awhile. That's fine, I have lots of little ideas for tweaks to make while it's stabilizing.
Day 8 comes to an end, and I head to bed, completely... drained...
One of the things I purchased, and now regret, is this little 9w refugium LED. It looked like a decent little light. An Aquagadget ChaetoMAX. When it arrived I was rather surprised at just how tiny it really was. Just to play around, I hooked it up to an EB832, and turned it on. It's not bad, it does provide light. But hey, the EB832 says it's only drawing 6 watts. Hmm. Not very impressive.
So I needed to actually do something to light the Ruby Elite. In retrospect, the Elite, despite having a larger-by-volume refugium, is not really well suited for growing Chaeto. The problem lies in the fact that it's a long narrow section, which makes it hard to actually light. I can't just throw a giant nuke lamp on it, because that will light up the whole sump, not just the refugium area. No good. Instead, I found 3 little 15w LED grow lamps, and a nice little 3-bulb hanging light kit. Funny thing about these, 1/8th the price, and they actually draw 15 watts each off the EB832.

That's just one of them lighting up the night. A few notes about this photo. First, originally, I wondered, would the drain have enough oopmh to push water down that side pipe into the refugium area. Answer: No. The COR-20's are a bit too anemic to keep those drains at siphon, so they don't actually blast water down like they used to. So that's basically a dry pipe. I might try raising it a bit out of the water to see if relieving the static pressure helps though. So to tide things over, I installed a PMUP in there, and have it pushing water into the refugium.
Then I was a bit worried about sending light over into the pump zone, and growing tons of algae in there. So to solve that, I purchased a big sheet of white plastic off Amazon, and some small epoxy coated magnets. Attached it to the inside of the refugium, and now there is a bit of a reflector in there and the pump area stays nice and dark. Oh, and that little 9w disappointment? Well, it actually runs pretty cool, so I stuck it on the side near the bottom, and it side-lights the area. I think this will actually help just a bit.
A small bit of Chaeto arrived from Algae Barn, and in it went. Lets hope it likes it's new home.
Now on the other side, we have a bit more room. So off to ebay I went, in search of the smallest high-power grow LED I could find. Yeah, I said the smallest, because when you start looking for grow LED's on ebay, you find all of these 1200w monstrosities that could melt your tank down. Finally, I found a little 150w (the ratings on these are pure nonsense, I think it actually pulls like 130w) light, and today it arrived. Into the sump it went! I wanted one with a dimmer, because I was a bit afraid it would be too powerful right off the bat.

I don't know why one would want to farm spiders. That seems awful.

Here it is at lowest power. Pretty bright actually. A little more blue than I expected, but I think it won't be an issue.

And at full power. That is bright. This thing is a beast. I have it suspended off some of the cross braces of the stand. I'm pretty happy with it, but time will tell if it really works. I need some chaeto to feed into this, hopefully I'll get my hands on some soon.
One might also notice the Neptune ATK in there, all plumbed up and ready to go. No, not really. The cords on the PMUP's are super short. I need another 6-8 feet at least just to get it to the plug. So I ordered a 1Link extension cable for it. Yes, you read that right. I ordered the wrong cable for it. So now I'm waiting for the right cable, and just doing topoff by hand until then.
However, this gave me time to work on a different problem. My Neptune salinity probe has been driving me nuts. Keeps saying the salinity is 24, when the refractometer says 39. Neither is a good number, so I've got to fix that mess. Recalibrate the probe. 24. Do it again. 24. Argh. Get the refractometer out, check that, 39. Argh, recalibrate the refractometer, no, it's right, add the special fluid to it, read 1.035.... wait.. I'm supposed to read 35, not 1.035. Oops. Grumble, fix that. Oh. yeah. So my water is actually 24. How about that?
So while I patiently wait for the right cable to arrive, I'm doing topoff with saltwater to fix the salinity. Good thing the only things in the tank are some worms, pods, and one amazing Nassarius snail that seems to have survived the entire ordeal. Wow. (I mean the entire, 3 year shutdown ordeal, not just the past few weeks of me fiddling around)
So now I'm off to fix another mistake. Previously, I plumbed the side output off the right sump, in that special way that invalidates the check valve, and makes it siphon the tank down through the reactors during a power loss to the pump. Rather than try to fix this, I decided I would redo the entire idea.
The COR-20 just isn't powerful enough to be a return, and run those reactors. But they make this nice little COR-15, that is enough to run the reactors, and a few other ideas I have. So I get one of those. Bonus, it doesn't need a plug, it hooks right into the EB832 with a 1link cable. So I disconnect the side output, screw a plug into it, and now my anti-drainback works just fine. Also, bonus, I got to test out my fixes for having one pump "die". I unplugged the COR-20, and just like I planned the sumps balanced via the pipe connecting them in the back. Everything worked perfectly.

So first I make the world's most complex drain system. This manifold will let me connect a variety of drains from reactors, and god knows what else, and feed them all back into the sump. The COR-15 is plumbed into the other manifold, that has a bunch of outputs that feed reactors, and other mysterious ideas I might have floating around for future enhancements.
Now I fire it up, and boom, I have reactors. Fill them up with carbon, and everything works like a charm, with the COR-15 at only 50%, I'm super happy.

Now all the basic support equipment is wired in, things are running, tank is stabilizing. It's finally getting there. I have a few weeks until the lights show up for the top, and a few other side projects to work on. But other than the lack of chaeto for the right sump, things are mostly working, and it just needs to run for awhile. That's fine, I have lots of little ideas for tweaks to make while it's stabilizing.
Day 8 comes to an end, and I head to bed, completely... drained...

Sounds like a busy day! I appreciate the amount of information you share, and the great way in which you are able to put it to words. Looking forward to day 9!
OP
OP
- Joined
- Nov 10, 2018
- Messages
- 772
- Reaction score
- 1,045
Day 9, The good, The bad, and the Obnoxious
Lots of little projects today, as I wait for the Chaeto to start growing and fix all my problems with algae magic.
First, I finally got ahold of some small RJ11 female-female couplers, and was able to extend the cables on my Neptune leak detectors. I have 4 of the solid floor style, and placed one in each section under the stand, and one over near the R/O system (the one that flooded my house, yes, that one)
I finally got my shipping notification on the massive passive heatsinks for the LED's. They will ship on the 12th, so, when I will actually get them is probably debatable, but hopefully in the next few weeks. Because this is suddenly impending, I needed to get to work on the lights, so when the sinks arrive, I can just bolt them up and make with the glowy.
First step is I need a way to hang them. Now the old lights were little CPU heat sinks that weighed maybe a pound each. A simple screw-in hook was more than enough for those. These heat sinks though, they are 4.5kg each. And I need to hang 4 from the ceiling. That is going to require a bit more beef than a 1/8" steel hook.
So first things first, I got some nice 1 3/4" square board, and bolted it to the ceiling with 4.5" lag bolts into the rafters. These will give me a solid base to mount my lights to, and are strong enough to hold me on the ceiling, in case I ever go insane.
Next, I pre-drilled a bunch of different holes in some 2x4's, and screwed them into the square board. This will give me a variety of mounting locations for each light. The idea is to mount a 5/16" eye bolt into the holes, and then hang the monster from that. They can easily hold me up off the ground, so I'm confident they can hold 25 lbs of light forever.
The square board gives me a bit of room so I can get in there with a wrench and put the nut and washer on the other side, and be able to move them to different holes at will. I also went ahead and purchased some 50lb rope hangers, with adjustments, so I can easily raise and lower the lights to dial them into that perfect spot. So excited to get them going again.
I also recently got my Mighty Magnet in the mail. Previously I had an FF4 from them, and loved it. Over the years it kinda lost it's strength however, and was always a little weak for the 7/8" acrylic. So I got myself an F5. I've been slowly scraping away at the coraline on the front of the tank the last few weeks, but this thing is so great. The F5 holds much better, and I was able to make some real progress on the front glass.
One problem with an in-wall like this, is you cannot see the glass at all, so you are kind of scraping blind from the inside of the tank. I figured out a little trick to this the other day. What I did was get a big LED shop light, and place it in the front room, aimed right at the front of the tank. Then I went into the fish room, and turned all the lights off. Now with the light shining into the dark tank, I could see the algae on the front of the tank! Eureka! I could finally scrape the right part of the tank. I've made some major progress here now on this, but there is alot of work left to do there. A little bit every day after work helps.
Next on the checklist, is a Carlson surge bucket. The original build had a Borneman surge, and I absolutely loved it, but it had some serious issues. The Borneman devices are loud. Stupid loud, and they sound like a toilet. A toilet that flushes in your foyer every 10 minutes for the rest of your life. And they splash. Oh lord do they splash. Ruined the drywall in the corner where it was mounted. But that isn't the worst part, no, the worst part is the toilet flapper. The rubber used in these things probably isn't designed for saltwater, because very slowly over the course of 6 months, it dissolves. And when it finally breaks down, your surge stops working, and you have to get a new flapper. The new flapper never works the way the old one did, so you spend a week re-tuning the chain and float to get the stupid thing to work again. Every week or two the chain gets stuck or something and the thing sticks open. It's a mess. (And I ran one for 5 years, so this is not based on a brief encounter)
So I built a big Carlson surge in a bucket. The main benefit of this is that it gives me an amazing way to feed my fish. Food goes in the bucket, surge goes off, fish dance happily in the tank, guests are wowed, and none of the food goes into the overflow. Win all around. So after the requisite forever to tune the bucket, up it went!
I still need to get an autofeeder to mount on it, and a bunch of other tweaks for it, but that will come later. For now, it's operating. Or is it?
You see, right as I was about to get into my car and drive to work, I get a text from the Apex. LEAKDETECTED = ON. Oh, that's no good. I was just in the fishroom like 30 seconds ago and didn't see anything. It must be broke. Maybe I spilled something.
Go back into the room to check, look all around, and wouldn't you know it, there is some water over by the R/O system. A quick look around, and it's coming from the very manifold I plumbed in last week for the carbon filters. I fiddled around for a few minutes, and couldn't find anything obviously loose, just saw water dripping out of the manifold. Luckily it wasn't much. Well, that's on the new COR15, so I held the button down for 3 seconds, water shut off, the reactors and the bucket both emptied out through the COR15 into the sump, and the leak stopped. Definitely the right choice not to put a check valve on that feed pump. Threw a towel on the floor, sopped up some stupid, and off to work.
When I got home, I investigated the manifold. I figured maybe I did a bad job putting in one of the little adapters. Nope. One of the little adapters split right in half. Boom. Fail. Argh. So now I'm waiting for a new manifold and little bits to fix this from FlexPVC. Hopefully next week I can get the carbon running again.
Overall though, I'm happy with the result. I know the Apex did the right thing, it told me there was a problem, and stopped a major disaster. I went ahead and added some code to the COR15 so if that leak probe ever goes off, it shuts down. Now the problem will be self healing in the future. That, right there, is worth the price of entry into the Apex. It just saved me probably $1000 in repairs if that pipe had kept leaking all day.
Day 9 over, damp, I go to bed.
Lots of little projects today, as I wait for the Chaeto to start growing and fix all my problems with algae magic.
First, I finally got ahold of some small RJ11 female-female couplers, and was able to extend the cables on my Neptune leak detectors. I have 4 of the solid floor style, and placed one in each section under the stand, and one over near the R/O system (the one that flooded my house, yes, that one)
I finally got my shipping notification on the massive passive heatsinks for the LED's. They will ship on the 12th, so, when I will actually get them is probably debatable, but hopefully in the next few weeks. Because this is suddenly impending, I needed to get to work on the lights, so when the sinks arrive, I can just bolt them up and make with the glowy.
First step is I need a way to hang them. Now the old lights were little CPU heat sinks that weighed maybe a pound each. A simple screw-in hook was more than enough for those. These heat sinks though, they are 4.5kg each. And I need to hang 4 from the ceiling. That is going to require a bit more beef than a 1/8" steel hook.

So first things first, I got some nice 1 3/4" square board, and bolted it to the ceiling with 4.5" lag bolts into the rafters. These will give me a solid base to mount my lights to, and are strong enough to hold me on the ceiling, in case I ever go insane.

Next, I pre-drilled a bunch of different holes in some 2x4's, and screwed them into the square board. This will give me a variety of mounting locations for each light. The idea is to mount a 5/16" eye bolt into the holes, and then hang the monster from that. They can easily hold me up off the ground, so I'm confident they can hold 25 lbs of light forever.

The square board gives me a bit of room so I can get in there with a wrench and put the nut and washer on the other side, and be able to move them to different holes at will. I also went ahead and purchased some 50lb rope hangers, with adjustments, so I can easily raise and lower the lights to dial them into that perfect spot. So excited to get them going again.
I also recently got my Mighty Magnet in the mail. Previously I had an FF4 from them, and loved it. Over the years it kinda lost it's strength however, and was always a little weak for the 7/8" acrylic. So I got myself an F5. I've been slowly scraping away at the coraline on the front of the tank the last few weeks, but this thing is so great. The F5 holds much better, and I was able to make some real progress on the front glass.
One problem with an in-wall like this, is you cannot see the glass at all, so you are kind of scraping blind from the inside of the tank. I figured out a little trick to this the other day. What I did was get a big LED shop light, and place it in the front room, aimed right at the front of the tank. Then I went into the fish room, and turned all the lights off. Now with the light shining into the dark tank, I could see the algae on the front of the tank! Eureka! I could finally scrape the right part of the tank. I've made some major progress here now on this, but there is alot of work left to do there. A little bit every day after work helps.
Next on the checklist, is a Carlson surge bucket. The original build had a Borneman surge, and I absolutely loved it, but it had some serious issues. The Borneman devices are loud. Stupid loud, and they sound like a toilet. A toilet that flushes in your foyer every 10 minutes for the rest of your life. And they splash. Oh lord do they splash. Ruined the drywall in the corner where it was mounted. But that isn't the worst part, no, the worst part is the toilet flapper. The rubber used in these things probably isn't designed for saltwater, because very slowly over the course of 6 months, it dissolves. And when it finally breaks down, your surge stops working, and you have to get a new flapper. The new flapper never works the way the old one did, so you spend a week re-tuning the chain and float to get the stupid thing to work again. Every week or two the chain gets stuck or something and the thing sticks open. It's a mess. (And I ran one for 5 years, so this is not based on a brief encounter)
So I built a big Carlson surge in a bucket. The main benefit of this is that it gives me an amazing way to feed my fish. Food goes in the bucket, surge goes off, fish dance happily in the tank, guests are wowed, and none of the food goes into the overflow. Win all around. So after the requisite forever to tune the bucket, up it went!

I still need to get an autofeeder to mount on it, and a bunch of other tweaks for it, but that will come later. For now, it's operating. Or is it?
You see, right as I was about to get into my car and drive to work, I get a text from the Apex. LEAKDETECTED = ON. Oh, that's no good. I was just in the fishroom like 30 seconds ago and didn't see anything. It must be broke. Maybe I spilled something.
Go back into the room to check, look all around, and wouldn't you know it, there is some water over by the R/O system. A quick look around, and it's coming from the very manifold I plumbed in last week for the carbon filters. I fiddled around for a few minutes, and couldn't find anything obviously loose, just saw water dripping out of the manifold. Luckily it wasn't much. Well, that's on the new COR15, so I held the button down for 3 seconds, water shut off, the reactors and the bucket both emptied out through the COR15 into the sump, and the leak stopped. Definitely the right choice not to put a check valve on that feed pump. Threw a towel on the floor, sopped up some stupid, and off to work.
When I got home, I investigated the manifold. I figured maybe I did a bad job putting in one of the little adapters. Nope. One of the little adapters split right in half. Boom. Fail. Argh. So now I'm waiting for a new manifold and little bits to fix this from FlexPVC. Hopefully next week I can get the carbon running again.
Overall though, I'm happy with the result. I know the Apex did the right thing, it told me there was a problem, and stopped a major disaster. I went ahead and added some code to the COR15 so if that leak probe ever goes off, it shuts down. Now the problem will be self healing in the future. That, right there, is worth the price of entry into the Apex. It just saved me probably $1000 in repairs if that pipe had kept leaking all day.
Day 9 over, damp, I go to bed.

Love your thread. Following along. I, too envy you your solar tubes. I tried but couldn't make them work in the basement!
OP
OP
- Joined
- Nov 10, 2018
- Messages
- 772
- Reaction score
- 1,045
Thanks for the support!
Yeah.. the solar tubes are a mixed bag. Some days I love them, some days they drive me nuts.
Roof-wise, they aren't in the best spot, so during nov-jan, they don't do a whole heck of a lot. In mid-summer though, wow, they are amazing. They are absolutely huge, and hang down, and kinda get in my way alot when I'm doing maintenance, or trying to hang other lights. They also pretty much define your lighting schedule, work hours be danged. So I kinda have a love-hate with them.
They are the biggest ones they sold at the time though. 3x 24" diameter tubes straight runs, about 6' long including the part you see in the pictures. I was probably one of the earlier reefers to try this seriously, I think I put them in around 2002. I think I thought that I could light the tank with them and nothing else. Maybe if I had placed them a bit better...
What they do provide though, is on very sunny days, they just light the tank up in ways you would not believe. It's kind of a rare treat when the angles are all just right. Everything looks spectacular. The rest of the time they provide a nice color to the light, that varies alot day to day, so I think it gives it a very natural feel.
Speaking of light, just got word my heatsinks are shipping this week.. maybe the UPS man will bless me with huge chunks of aluminum before the weekend and I can play with electricity all day! (Though disturbingly 2 of my COB chips have yet to arrive... so.. hrmm..)
OP
OP
- Joined
- Nov 10, 2018
- Messages
- 772
- Reaction score
- 1,045
Day 10, Progress slows
I have like, maybe 10 different parts of this whole thing going at once, so sometimes I don't make as much actual progress on it as I would like. Some of the stuff that is in-process:
First, the ATO. Primarily due to my own inability to order the proper parts, my fancy Apex ATK has been offline since day 1. I actually got all the parts a week or so ago, but my low salinity issues have caused me to fill the makeup water with saltwater, rather than R/O.
It occurred to me last night, that instead, I can just start dumping salt in the ATO reservoir, and let it do all the work for me. So I dug through my bucket of ancient powerheads, found one that worked, plugged it in, dropped it in the reservoir, and dumped some salt in. Problem eventually solved!
This leads up to last week's leak. Yes, the brand new surge bucket was all running nicely, and then a fitting split, and stupid got all over the floor. Initially, I wanted to get another one of those really nice manifolds from FlexPVC, but apparently they don't sell them anymore! Sad acros! Instead, I purchased a ton of different fittings, and made this abomination:
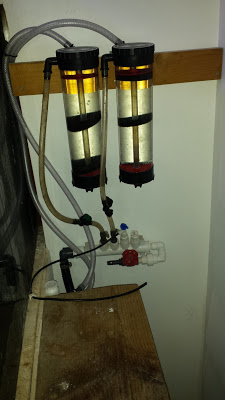
This gives me my 4 1/2" outputs, and my single R/O tubing output. The idea of the manifold, is that it runs off the COR-15 in the sump, and feeds the two reactors (both running carbon right now), the surge bucket, and eventually it will feed both the extra fuge, and the cryptic bucket. After a day or so of letting the glue dry, I plumbed it back in, and fired it up.
Sadly, only for a few minutes, as immediately it sucked the sump dry, and the main return started spitting out bubbles. Luckily, this looks like a job for an ATO! The ATO was running, but the problem is, when I fire up the COR-15, the levels all change immediately, which does activate the ATO, but it can't keep up with a COR-15. So instead, I had to move the ATO limit switch up in the sump, to raise the water level, and then slowly bring it back down once the bucket was running again.
The fun part of this, is the Neptune ATK is really smart, and designed to keep a water level stable, and not flood your house. This is a good thing. It also meant I needed to defeat that, and instead, got paged all day by Fusion because the PMUP keeps running past the 5 minute mark and goes into shutdown. I have no intention of defeating this, so I just suffered all day and reset it alot.
Finally, I got enough water into the system that it was stable with the COR-15 running at 80%, (alot of water loads up into that manifold and reactors, it's non-trivial). And finally, the bucket was fired up again! Joy!
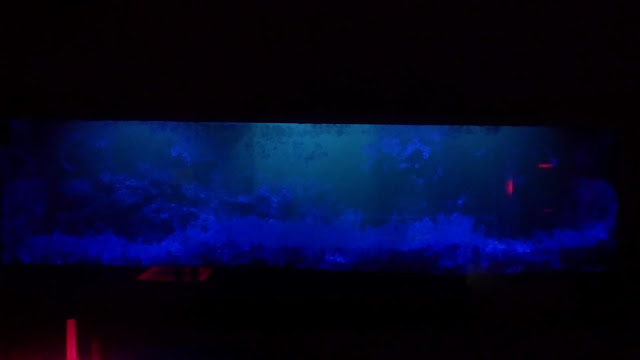
Some of you have expressed interest in my solar tubes. It's a cloudy day today, so around 11am, I took this photo. This shows a few things:

Speaking of lights, some of my parts arrived Friday. I ordered 4 massive passive heatsinks from ledcdi. The sinks are made by Mechatronix, and are called CoolBay Tera's. They are monsters. I kinda went overkill, and could have gone down to the Giga models, but, meh, I am uninterested in saving $20 and risking having to do this again.
So the state of my lights is this. I have the sinks. I have the lenses. I have 2 brand new COB chips sitting around somewhere. 2 other brand new ones are en-route from China, and should have been here by now. I also have 1 COB that looks like it's not burnt out, so I should play with it and find out.
First, lets discuss the old lights... Here, you can see 3 of the heatsinks and light setups that were pulled down off the tank. Like I said ages ago, they worked great, but when the fans died, poof.
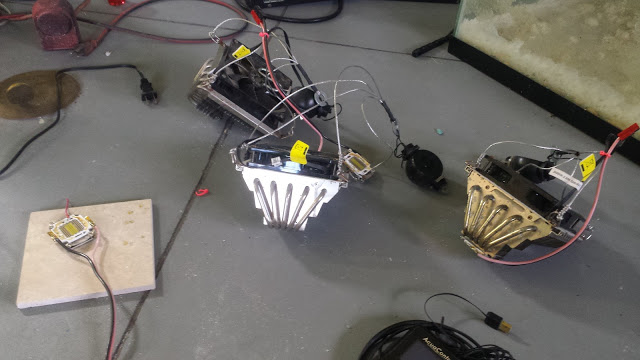
So how much heat does an LED on thermal runaway produce? Well, enough to melt the solder clear off the heatsink and disconnect the sink from the heat tubes! You can also see the joys of salt here, and how it got into the fins and caused ruin of the airflow.
Finally, a side by side of two LED's. The one on the left is clearly blown. The one on the right is hopeful. (The little red wire was me using the blown one to practice soldering to the inside of the chip, rather than the outer connectors.)

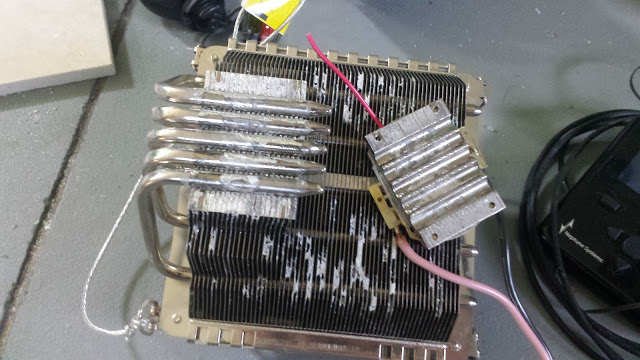
So lying about the house, somewhere I knew I had a spare MeanWell HLG-150H-B sitting around, which is really close to what I run on the actual tank. It's been so long since I fiddled with this, I had to go look at the manual again. One of the great things about this driver, is that it's dimmable, in so many ways. You can use a resistor, 0-10v PWM, or 0-10v (Apex VDM). This is super handy, as I can just throw a resistor on it, and then use it to test LED's without having to use my welding mask.
So I got the old, suspect LED, and wired it up to the driver.

No go. It exhibits really odd behavior. When you plug it in, nothing happens. When you unplug it, you get a brief lightup of the diodes. I suspect it's melted some traces somewhere. Sad acros.
So instead, lets get one of the new ones out of the old box, wire that up, and see what we can make happen!
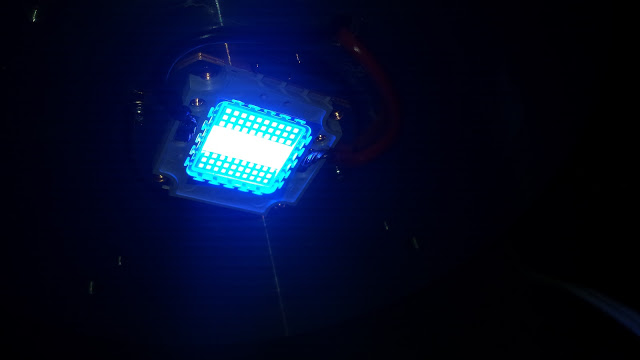
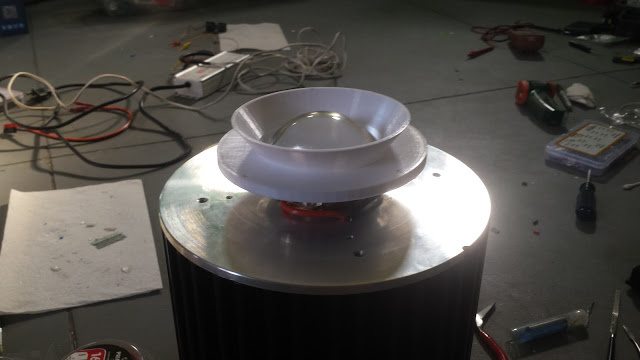
Let there be light!

Boom. That looks *amazing*. The old ones I have, are 60% blue, 40% 15K daylight. They make for amazing lights. And here you get your first glimpse at the absurdity of my heatsink. Yes. That's a 12lb heatsink. All aluminum, coated in some kind of magical stuff that sinks heat away quicker, nice hole through the middle for the wires to run, and a massive internal heat pipe that wicks heat away from the center to dissipate it down the length of the sink. Well worth $100 a pop.
Now that I know I can make this work, I needed to start dealing with the lenses. The lenses are solid glass, and pretty heavy. The old solution of "lets glue it to the LED and pray" didn't work. They all fell off. New solution, 3D printer + PETG:

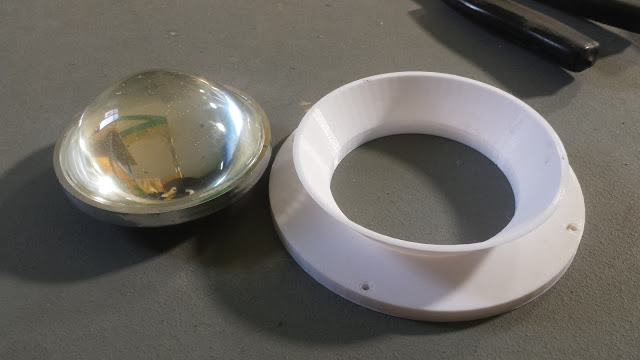
You can see in the final picture, the little holes on the sink (113mm centers) that will be used to attach the lens. All I need are some 30-40mm M3 screws, and I can secure the lenses nicely. I printed these in opaque white PETG, with an absurd number of top and side layers, as well as 50% infill. They are stupid strong. The little V at the top should provide a little more light focus, to prevent room spillover a bit more. We will see. For those of you wanting to try this at home, but without a 3d printer, it would be just as easy to do with a 120mm diameter Aluminum plate and a drill.
The parts came out almost perfect, but the hole for the lens was about 1mm too small, and the holes for the screws were a bit tight too, so I edited the model, and am currently re-printing it. Once I have it all fixed up, I'll post it on thingiverse.
So next steps there are pretty much wait for a few more parts to arrive to do the actual hanging of the lights, wait for the rest of the LED's to show up, and then wire the whole lot and hang em high!
Hopeful for LED's in the mail, I wander off to bed..
I have like, maybe 10 different parts of this whole thing going at once, so sometimes I don't make as much actual progress on it as I would like. Some of the stuff that is in-process:
- Setup a QT tank, and fill it with rock from the older systems that needs to be cycled. - 10% done.
- Drill a 25 high to be a dedicated Chaeto farm. - I bought a drill bit!
- ATO system - See below
- Lights - See below
- The ongoing salinity issue - slowly getting there, added salt to the ATO reservoir
- The surge bucket plumbing leak - See below
- Scrape the glass - Ugh, slow
- Clean out the Calcium reactor and prep for use - I've given it a stern look.
- Grow actual Chaeto - Success! Magic impending.
- Tyree cryptic bucket - 80% done, need actual rock. (see #1)
First, the ATO. Primarily due to my own inability to order the proper parts, my fancy Apex ATK has been offline since day 1. I actually got all the parts a week or so ago, but my low salinity issues have caused me to fill the makeup water with saltwater, rather than R/O.
It occurred to me last night, that instead, I can just start dumping salt in the ATO reservoir, and let it do all the work for me. So I dug through my bucket of ancient powerheads, found one that worked, plugged it in, dropped it in the reservoir, and dumped some salt in. Problem eventually solved!
This leads up to last week's leak. Yes, the brand new surge bucket was all running nicely, and then a fitting split, and stupid got all over the floor. Initially, I wanted to get another one of those really nice manifolds from FlexPVC, but apparently they don't sell them anymore! Sad acros! Instead, I purchased a ton of different fittings, and made this abomination:

This gives me my 4 1/2" outputs, and my single R/O tubing output. The idea of the manifold, is that it runs off the COR-15 in the sump, and feeds the two reactors (both running carbon right now), the surge bucket, and eventually it will feed both the extra fuge, and the cryptic bucket. After a day or so of letting the glue dry, I plumbed it back in, and fired it up.
Sadly, only for a few minutes, as immediately it sucked the sump dry, and the main return started spitting out bubbles. Luckily, this looks like a job for an ATO! The ATO was running, but the problem is, when I fire up the COR-15, the levels all change immediately, which does activate the ATO, but it can't keep up with a COR-15. So instead, I had to move the ATO limit switch up in the sump, to raise the water level, and then slowly bring it back down once the bucket was running again.
The fun part of this, is the Neptune ATK is really smart, and designed to keep a water level stable, and not flood your house. This is a good thing. It also meant I needed to defeat that, and instead, got paged all day by Fusion because the PMUP keeps running past the 5 minute mark and goes into shutdown. I have no intention of defeating this, so I just suffered all day and reset it alot.
Finally, I got enough water into the system that it was stable with the COR-15 running at 80%, (alot of water loads up into that manifold and reactors, it's non-trivial). And finally, the bucket was fired up again! Joy!
Some of you have expressed interest in my solar tubes. It's a cloudy day today, so around 11am, I took this photo. This shows a few things:
- I still fail at the scraping.
- I still need more rocks
- I have some algae that needs ganking, and some apistaisa.
- Light levels on a cloudy day. (no LED's yet, so purely the tubes)

Speaking of lights, some of my parts arrived Friday. I ordered 4 massive passive heatsinks from ledcdi. The sinks are made by Mechatronix, and are called CoolBay Tera's. They are monsters. I kinda went overkill, and could have gone down to the Giga models, but, meh, I am uninterested in saving $20 and risking having to do this again.
So the state of my lights is this. I have the sinks. I have the lenses. I have 2 brand new COB chips sitting around somewhere. 2 other brand new ones are en-route from China, and should have been here by now. I also have 1 COB that looks like it's not burnt out, so I should play with it and find out.
First, lets discuss the old lights... Here, you can see 3 of the heatsinks and light setups that were pulled down off the tank. Like I said ages ago, they worked great, but when the fans died, poof.

So how much heat does an LED on thermal runaway produce? Well, enough to melt the solder clear off the heatsink and disconnect the sink from the heat tubes! You can also see the joys of salt here, and how it got into the fins and caused ruin of the airflow.

Finally, a side by side of two LED's. The one on the left is clearly blown. The one on the right is hopeful. (The little red wire was me using the blown one to practice soldering to the inside of the chip, rather than the outer connectors.)

So lying about the house, somewhere I knew I had a spare MeanWell HLG-150H-B sitting around, which is really close to what I run on the actual tank. It's been so long since I fiddled with this, I had to go look at the manual again. One of the great things about this driver, is that it's dimmable, in so many ways. You can use a resistor, 0-10v PWM, or 0-10v (Apex VDM). This is super handy, as I can just throw a resistor on it, and then use it to test LED's without having to use my welding mask.
So I got the old, suspect LED, and wired it up to the driver.

No go. It exhibits really odd behavior. When you plug it in, nothing happens. When you unplug it, you get a brief lightup of the diodes. I suspect it's melted some traces somewhere. Sad acros.
So instead, lets get one of the new ones out of the old box, wire that up, and see what we can make happen!

Let there be light!

Boom. That looks *amazing*. The old ones I have, are 60% blue, 40% 15K daylight. They make for amazing lights. And here you get your first glimpse at the absurdity of my heatsink. Yes. That's a 12lb heatsink. All aluminum, coated in some kind of magical stuff that sinks heat away quicker, nice hole through the middle for the wires to run, and a massive internal heat pipe that wicks heat away from the center to dissipate it down the length of the sink. Well worth $100 a pop.
Now that I know I can make this work, I needed to start dealing with the lenses. The lenses are solid glass, and pretty heavy. The old solution of "lets glue it to the LED and pray" didn't work. They all fell off. New solution, 3D printer + PETG:


You can see in the final picture, the little holes on the sink (113mm centers) that will be used to attach the lens. All I need are some 30-40mm M3 screws, and I can secure the lenses nicely. I printed these in opaque white PETG, with an absurd number of top and side layers, as well as 50% infill. They are stupid strong. The little V at the top should provide a little more light focus, to prevent room spillover a bit more. We will see. For those of you wanting to try this at home, but without a 3d printer, it would be just as easy to do with a 120mm diameter Aluminum plate and a drill.
The parts came out almost perfect, but the hole for the lens was about 1mm too small, and the holes for the screws were a bit tight too, so I edited the model, and am currently re-printing it. Once I have it all fixed up, I'll post it on thingiverse.
So next steps there are pretty much wait for a few more parts to arrive to do the actual hanging of the lights, wait for the rest of the LED's to show up, and then wire the whole lot and hang em high!
Hopeful for LED's in the mail, I wander off to bed..

Very cool!
Can't wait to see the thingiverse files.
Can't wait to see the thingiverse files.
"I gave it a stern look" lol! Great update, looking forward to the next! Curious to see how warm your heat sinks get now once this is running.
Similar threads
- Replies
- 117
- Views
- 3,261
- Replies
- 0
- Views
- 104
- Replies
- 38
- Views
- 2,252
- Replies
- 5
- Views
- 103


