
Navigation
Install the app
How to install the app on iOS
Follow along with the video below to see how to install our site as a web app on your home screen.
Note: This feature may not be available in some browsers.
More options
You are using an out of date browser. It may not display this or other websites correctly.
You should upgrade or use an alternative browser.
You should upgrade or use an alternative browser.
Tim's 800 Gallon Phoenix Reef
- Monster Build
- Thread starter garbled
- Start date
- Tagged users None


I'm in the Phoenix area and have never been there. Thanks for the recommendation. Thumbs up!Have you been to Artistic Aquariums in Chandler? I thought it looked nice when I was out there over Thanksgiving.
")
So I've just read through most of this -- Wow! What fun you are having (so-to-speak). This was fun to read up to this point. Thanks!

OP
OP
- Joined
- Nov 10, 2018
- Messages
- 772
- Reaction score
- 1,045
Not my most productive week really, as everyone I know had a birthday party this week, so I got very little done of actual consequence. In addition, New Years messed up all my shipping, so everything arrived too late for me to do anything with it. However, a few small things:
1) Lots of dry dead rocks showed up from Amazon. They are actually pretty decent looking, 40 lb box, about $40 shipped, first box had 3 large rocks. Went to order 5 more boxes, and Amazon tells me "yeah, no limit of 3 per customer". Sigh. So 2 more just showed up, but I haven't unboxed yet. Will take pics once I unbox them and blast them wit the hose. It was horribly cold out this week, and rainy today, so that didn't get done.
2) Decided to recalibrate the salinity probe, because the solution showed up, and it was "quick". No actually it wasn't. So in an earlier post, I mentioned that I was convinced it was wrong, and recalibrated it over and over until it almost agreed with my stupid. Well since then, it's been spouting nonsense for weeks. So today it got the recalibration treatment.
First, dry the probe, check. Do the calibration, nope, never goes into "good range". OK.. lets do manual calibration (which you need to do for temperature compensation anyhow). Run the calibration, it reads 766 dry. As a matter of fact, it reads 766 wet, in RO and in salt. OK, that's definitely broken. Unplug it a few times, plug it back in, nothing seems to make it better.
So on a lark, I reboot the Apex. Boom, instantly reads 69. Well thats not 766, so, it's something. Lets google this.
https://forum.neptunesystems.com/sh...salinity-probe&p=122920&viewfull=1#post122920
According to this article, a good manual number dry is 0-90, and 200-900 in the solution. OK, got it, cool, progress here. Now I calibrate, and get 69 dry, and 683 in the packet. So a reboot made it happy. Who knew? Now the number is close enough to the refractometer that I can believe either of them, so, I'm happy with that.
3) I usually have a small supply of Raspberry PI's sitting around the house at any given time, just waiting for something silly to do. (What? You don't?) A cool idea popped into my head awhile back, and I ordered a PICam for it, and over this week, I've been goofing off with it, and set it up.
My idea was simple. I want a timelapse of the tank. I want a picture taken every day at 15:00, from now until eternity, that shows the tank progress. I want to literally watch corals grow.
So I started by just writing a quick little 5 line script to take a picture every 5 minutes, and then another 30-50 line script that takes all the jpg's, and converts them into an AVI movie. It does this every night, automatically for me, so I don't have to think about it ever again.
As a test, I set it on a table across from the tank, and let it run for a few days. The result was pretty cool. So now that that was working, I printed a case for the PI, a mount for the camera, bolted it to the wall, and
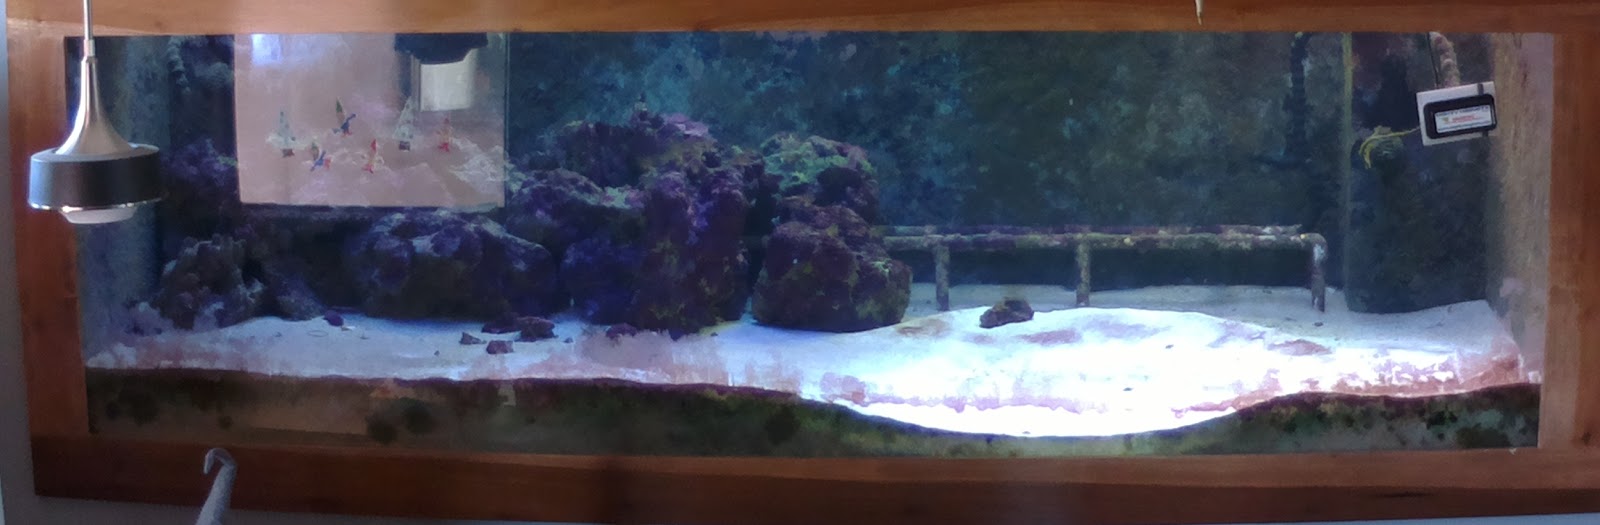
boom, I have full tank shots 24/7. Here is one from 14:00 today!

Now it will make me videos all day every day of all kinds of progress, just because it's cool. $50 bux and 10 hours of work. (anyone is welcome to the scripts, but I will warn you, they work by rsyncing the photos to one of my large Unix servers that spits it through mencoder, so, if you have that setup, you are welcome to them, but if you don't understand what you just read there, you probably want nothing to do with them)
So on my lack of real progress day, I leave you with the test video made from the camera sitting on the table. Enjoy 4 days of a tank doing not a whole lot. (it's kinda a cool video to be honest, I'll post a better one from the mounted vantage point in a week or so when I have some footage.)
I trundle off to bed, glad that birthday week is over...
1) Lots of dry dead rocks showed up from Amazon. They are actually pretty decent looking, 40 lb box, about $40 shipped, first box had 3 large rocks. Went to order 5 more boxes, and Amazon tells me "yeah, no limit of 3 per customer". Sigh. So 2 more just showed up, but I haven't unboxed yet. Will take pics once I unbox them and blast them wit the hose. It was horribly cold out this week, and rainy today, so that didn't get done.
2) Decided to recalibrate the salinity probe, because the solution showed up, and it was "quick". No actually it wasn't. So in an earlier post, I mentioned that I was convinced it was wrong, and recalibrated it over and over until it almost agreed with my stupid. Well since then, it's been spouting nonsense for weeks. So today it got the recalibration treatment.
First, dry the probe, check. Do the calibration, nope, never goes into "good range". OK.. lets do manual calibration (which you need to do for temperature compensation anyhow). Run the calibration, it reads 766 dry. As a matter of fact, it reads 766 wet, in RO and in salt. OK, that's definitely broken. Unplug it a few times, plug it back in, nothing seems to make it better.
So on a lark, I reboot the Apex. Boom, instantly reads 69. Well thats not 766, so, it's something. Lets google this.
https://forum.neptunesystems.com/sh...salinity-probe&p=122920&viewfull=1#post122920
According to this article, a good manual number dry is 0-90, and 200-900 in the solution. OK, got it, cool, progress here. Now I calibrate, and get 69 dry, and 683 in the packet. So a reboot made it happy. Who knew? Now the number is close enough to the refractometer that I can believe either of them, so, I'm happy with that.
3) I usually have a small supply of Raspberry PI's sitting around the house at any given time, just waiting for something silly to do. (What? You don't?) A cool idea popped into my head awhile back, and I ordered a PICam for it, and over this week, I've been goofing off with it, and set it up.
My idea was simple. I want a timelapse of the tank. I want a picture taken every day at 15:00, from now until eternity, that shows the tank progress. I want to literally watch corals grow.
So I started by just writing a quick little 5 line script to take a picture every 5 minutes, and then another 30-50 line script that takes all the jpg's, and converts them into an AVI movie. It does this every night, automatically for me, so I don't have to think about it ever again.
As a test, I set it on a table across from the tank, and let it run for a few days. The result was pretty cool. So now that that was working, I printed a case for the PI, a mount for the camera, bolted it to the wall, and
boom, I have full tank shots 24/7. Here is one from 14:00 today!
Now it will make me videos all day every day of all kinds of progress, just because it's cool. $50 bux and 10 hours of work. (anyone is welcome to the scripts, but I will warn you, they work by rsyncing the photos to one of my large Unix servers that spits it through mencoder, so, if you have that setup, you are welcome to them, but if you don't understand what you just read there, you probably want nothing to do with them)
So on my lack of real progress day, I leave you with the test video made from the camera sitting on the table. Enjoy 4 days of a tank doing not a whole lot.
(it's kinda a cool video to be honest, I'll post a better one from the mounted vantage point in a week or so when I have some footage.)I trundle off to bed, glad that birthday week is over...
- Joined
- Mar 19, 2018
- Messages
- 1,500
- Reaction score
- 1,021
Great thread. That’s a massive undertaking! I have a 525 that I plumbed into my basement. It runs to its original sump (40 g) to a Rubbermaid 150g. Realistic total system volume with contents and water levels is probably around 250 gallons plus or minus 20 or so. I love the stability it’s afforded me, I, like you, did not anticipate the extra work or DIY or system size related problems. I also now live in fear of the 150 plus gallons in my basement somehow getting dumped upstairs (the hose or fitting falling out or breaking, the drains somehow both clogging, who knows). How much water flooded your house? How bad/expensive was it to fix?
I am getting mold in the sump room on the board behind the electrical panel. I’ve resorted to leaving the doors open and fecklessly running a dehumidifier in the room (lol at myself). The copper water pipes still drip condensate in the room in the winter, I don’t know how to handle the moldy board, and I’m afraid the joists above the sump might be next. Have you had issues with humidity? What should I do!
Lastly, why in the world is amazon limiting rock orders? Ha
OP
OP
- Joined
- Nov 10, 2018
- Messages
- 772
- Reaction score
- 1,045
I do have some humidity issues, but usually not too bad. One of the things I did to mitigate them, was install a in-wall fan that blows air in from the hallway, at floor level. I then cut a vent at the top of the wall, so the air could push back out through there. The humidity is still a bit higher in that room than I would like, so my plan is to install one of these: https://www.amazon.com/Durablow-Fou...=1546837127&sr=8-3&keywords=humidity+vent+fan
Luckily in Arizona you have to screw up pretty badly to get mold.
The flood was luckily covered by insurance, because it was the high side of the RO, so, considered plumbing. I don't know how much water, but about 2 hours of full blast pipe pressure coming out an RO tube.. so.. alot.. I think the total bill was around $5k, but I also lost some fish equipment and other things in there, so probably around 7k. It wasn't good.
I've been trying to build in multiple levels of redundancy. For example, I can set the Apex up to detect a leak and shut down stuff in that area of the sensor. But what if the Apex went insane and caused it? In that case, I try to do things like set the pumps in a way that they can only draw so much water from a spot, so it limits the total amount of water they can pump into the floor. I figure if I have a mechanical backup to a technological backup, hopefully one of the two will stop the stupid before it gets out of hand.
For example, on your big sump, maybe if the pump input was higher in the sump, it would run dry early rather than pumping all 150 gallons upstairs? 20 gallons is far more manageable than 150.

- Joined
- Mar 19, 2018
- Messages
- 1,500
- Reaction score
- 1,021
I do have some humidity issues, but usually not too bad. One of the things I did to mitigate them, was install a in-wall fan that blows air in from the hallway, at floor level. I then cut a vent at the top of the wall, so the air could push back out through there. The humidity is still a bit higher in that room than I would like, so my plan is to install one of these: https://www.amazon.com/Durablow-Fou...=1546837127&sr=8-3&keywords=humidity+vent+fan
Luckily in Arizona you have to screw up pretty badly to get mold.
The flood was luckily covered by insurance, because it was the high side of the RO, so, considered plumbing. I don't know how much water, but about 2 hours of full blast pipe pressure coming out an RO tube.. so.. alot.. I think the total bill was around $5k, but I also lost some fish equipment and other things in there, so probably around 7k. It wasn't good.
I've been trying to build in multiple levels of redundancy. For example, I can set the Apex up to detect a leak and shut down stuff in that area of the sensor. But what if the Apex went insane and caused it? In that case, I try to do things like set the pumps in a way that they can only draw so much water from a spot, so it limits the total amount of water they can pump into the floor. I figure if I have a mechanical backup to a technological backup, hopefully one of the two will stop the stupid before it gets out of hand.
For example, on your big sump, maybe if the pump input was higher in the sump, it would run dry early rather than pumping all 150 gallons upstairs? 20 gallons is far more manageable than 150.
That’s actually simple but great advice that I will follow my friend. That could take maybe 80 or so gallons out of the mix. Half the potential catastrophe I have now. Thanks.
Great read... Thanks for sharing your experience.. Always great when someone can be honest about their mistakes. I think your tank is going be a show stopper!
I only have about 200 gallons of total water in my house and last winter trapped all the humidity in. It was the first winter I didn’t have anyone living upstairs so I had the windows shut up there and no air flow. I sprout mold EVERYWHERE. Some mold was so advanced it started condensating and dripping water. I had a spare matteress collect so much moisture it molded up. I even had a carpet spot pool up water. This was due to humidity and not a leaking roof. This all happened to what I think was high 70s possibly 80 percent humidity and no ventilation. Now we track the humidity and leave upstairs windows partially open with one side of the house pumping air out with a fan

OP
OP
- Joined
- Nov 10, 2018
- Messages
- 772
- Reaction score
- 1,045
Mine isn't anywhere near that bad, but I live in Arizona, where the humidity outdoors some days is below 10%. (did you know that electronic humidity sensors (cheaper than $2000) cannot detect below 10%, and that if you subject them to that for a long period of time they break? I do!) Because of this, the outrageous humidity from the tank is offset by the outrageous lack of it in the air, and it averages out to like.. 25%...
The tank room itself is pretty high, usually in the 50% range, but the rest of the house is practically unaffected.
Also, I'm not dead, I was just super sick last week, and got roughly nothing done on the tank. Right now I'm fiddling with some dosing pumps, and waiting for a few rocks to show up before I begin the big re-aquascape project. Luckily I have the timelapse camera going 24/7, so when I do the re-aquascape, hopefully I can post a video of that. Might be fun! (or might be absurd, we will see...)
Is ocean floor still open? I used to love that place.I actually haven't, and I've been looking for a new LFS, since mine closed.
OP
OP
- Joined
- Nov 10, 2018
- Messages
- 772
- Reaction score
- 1,045
Day 13, Water Water Everywhere, but not a drop to drink.
So I realize I haven't done a real update in awhile. Mostly this is due to the end of the holidays, a billion birthday parties, and being horribly sick for a week. No excuses though, time to catch up on the progress.
But first, Pic of the day from the automated camera!

(yeah, kinda lame still, and that window reflection is annoying)
There are three main projects I've been working on since the last major post. The first is the water itself.
Now some people might not know this about me, but I'm one of those no-water-change nutters. I don't believe in water changes unless its absolutely critical. When I started this reboot however, I did have concerns. It sat semi-fallow for so long, and well, there was that electrical fire, and I did pull a shattered heater out, so, it's entirely possible the water was full of death. So I've been running various tests, and trying to fix things, while also being aware that I might just have to suck it up and do an 800g water change...
The first issue is nitrates and phosphates. A while back, I got a Red Sea kit, and did some tests. The Phosphates were something like .34, so, that's bad. The nitrates were off the scale, so probably in the 80's. My solution for this was chaeto. I dumped a bunch of Chaeto into the tank, and it's taken off. I've now harvested about 3 gallons of it (terrible measure, but, umm, you get it). So this is working pretty well, but the nitrates just weren't moving.
So I decided what the heck, there is nothing big in the tank yet, lets try vinegar. I had tried vodka years ago, but I really didn't have any dosing charts, so I just wung it, and added way too much, and whited out the tank. But now there are nice little charts, so, I decided to follow one. So I started dosing about 46ml of vinegar a day to the tank, and slowly ramped up to 52ml. I also decided to turn the skimmer up just a little bit, to help out.
So day 1, of course the skimmer overflows. That was fun. But easy to fix, and I let the experiment run for a few weeks, and did another pair of tests on the N and P. Phosphates didn't move at all.. still 0.34. But nitrates were now down to 8ppm (from 80!). Wow. That was really fast. I don't actually believe that number. Re-tested. (yes, I actually re-tested a good result!). Nope.. Still 8. huh. ok. Well there are a few possibilities here..
1) The vinegar worked!
2) The chaeto worked!
3) My testing procedure is suspect.
You see, I was using the high range on the nitrate/phosphate test. So to do so, you add 15ml of RO water to 1ml of sample, and test that. On all my previous tests, I was kinda lazy, and took RO water from the kitchen RO, but on these, I took RO/DI from the tank feed. It's possible that I have high nitrates in the kitchen RO water. I need to actually test that to find out, but it's not a priority just yet.. so.. for now, I'll take the good nitrate reading, and just leave the vinegar dose as-is.
This of course, leaves the main issue, which is, what if the general composition of the water is death? Luckily, we now have these *amazing* Trition ICP tests, where I can find out if that is the case or not. So obviously I sent one of those in, and just got the results back a few days ago. I was kinda terrified to look at them, expecting to find like 7000ppt of lead or something. Nope. Almost everything is perfect. Wow. Basically the test had the following to say:
1) Salinity is low. Check. yeah. knew that.
2) Calcium is low. Yep. Hanna said 288, ICP said 302. Check.
3) Phosphates are high. Yep. Check.
4) Lithium is a little high. Umm. Ok.. Whatever.
5) Zero Iodine in the tank. Ok, fixable.
6) Everything else is pretty much perfect. Like, all the baddies are zeros perfect. Wow.
So the solution at this point is pretty simple. Step 1, dump one of the carbon filters out, and replaced it with GFO. I'll just strip all the P out of the tank, and let it go wild, so if the sandbed is buffering any, it will strip that too. I'll fix the phosphates later by feeding the tank. So right now I've got about 2lbs of GFO running on the tank. Should be fine.
Step 2, fix the Calcium. So, oddly, my Alkalinity is kinda perfect, so I suspect the coralline algae has just been sucking calcium at a higher rate. Long term the plan is kalk and CaRx, but I don't have any real uptake right now, so those aren't viable solutions yet. Easy answer, I'll just dump a bunch of CaCl2 in the tank and spot fix it, then maintain with kalk later.
Step 3, stay the course in fixing the salinity. I have been unwilling to just hard spike it back up with salt, so I've been slowly raising it by using saltwater for the ATO. It's gone from about 24 to 31 in the last 2 months, so I'm almost at the goal post now.
So I feel like the water itself is in hand now, and I can start worrying about other problems. One of those problems is dosing. I am already sick to death of doing 52ml of vinegar a day, and it was a miracle I kept it up while sick. So I had to do something to fix this. I took a multi-pronged approach.
First, I dug around on Amazon, and found that Kamoer makes a 24v peristaltic pump. Hey, guess what 24v means? It means I can run it directly off the Apex 24v ports! So 20 dollars later, I have myself a little pump, and a box of Molex micro v3 connectors (the very ones used on the Apex cords).

So step one was to cram some batteries together, and test this little pump. I had some 12v batteries lying about, so I managed to cobble together a cheap 24v supply, hooked it to the pump, and it immediately went to work. A few tests later, and I figured out it does 83ml a minute. and pretty reliably at that. So this is not really ideal for vinegar, because it means I would have to run it for 37 seconds a day. Thats too obnoxious to program into the Apex. But I still feel like this is a useful device, so I'll keep going.
So I find a bit of wire that's long enough, and crimp on the molex pins. Now right here, is where I tell you, don't do this. Just buy the Apex cable. I have a ton of various crimpers and tools for this kind of work, but nowhere among them is a crimper that is designed for pins this tiny. These pins are microscopic. It was a nightmare to crimp them onto actual wires. So either buy the $20 cable, or buy an 80-100$ molex crimp tool. Either way, about an hour or so later, I had a molex connector attached to my little pump. Next step was a way to mount it.

I very quickly hacked up a mount in tinkercad and printed it. I'm not actually very happy with it, but it does the job. It's basically a hole, with some more holes so you can bolt it on. It's very grotty, but holds the pump in place.

I gave it a quick test on the Apex, and yes, it works. Works perfectly, and delivers 83ml a minute, just as advertised. This is less useful than I was hoping though. I think I'm going to set it aside, and use it down the road to run the kalk reactor.
Ok, so now we still have a dosing problem. Lets check the interwebs. Looks like I can 3D print a doser for a Nema 17 stepper motor pretty easily. Problem is, then I have to control a Nema 17. In order to do that, I'm going to need an Arduino, and a few other parts. Quick calculation from Amazon says, I can get all the parts to build a multi-head dosing pump, for about $30 a head, so, $120 for a 4-head doser run via arduinos. 2 days to print, probably another day to solder it up, and a day or two to write the code to run the whole thing. Ok, 4 days of work and $120. Sounds like a plan.
Nope. Screw that. Turns out a little Jebao 4 head dosing pump is available on Amazon prime for $60. For the price it would have cost me to make my own, I can just have two of these (one as a backup!). And less labor. So guess what I did?

In other realms of ridiculous, I also thought, well, lets go to the container store, and get some little plastic containers to use as dosing containers. They don't need to be magical aquarium containers, I can attach R/O tubing to anything. Price for 3 decent looking containers from the container store? About $60-80. Then add on the fittings, and the labor. Let's check Amazon. Yep. 3 x 1.5L dosing reservoir, $55. Amazon beats DIY again.
So plug the new doser in. Fill the reservoir with vinegar, run it a few times to calibrate. Done. Kinda... I put the output line for the doser in the sump, right after the skimmer, before the return pump. So 4 times a day, I put 13ml of vinegar into the water. And 4 times a day, my Apex pages me the pH is too low, because the probes are right next to that dose input. Argh. Going to have to figure out a fix for that eventually..
So this leaves project number 3.. The sponge bucket!
I've been slowly working on this one for awhile now, and this weekend I finally finished it up.
First, the idea: I'm a big fan of Steve Tyree's books, and I even have signed copies of them. Total nerd. Anyhow, one of my beliefs has always been that sponges are what makes tanks long term stable. Over time, sponges grow in all the little crevices in your rocks, and they all filter the water, and this is why I can get away with not doing water changes for 8 years. One of Steve's books, talks about setting up an "Environmental Gradient" in a tank. Now I love the theory of this, but if you look at his diagrams and pictures, the whole thing just looks absurd. He has shelves and racks of corals sitting over piles of rock in the dark, and curtains, and this is no way to run a giant display tank. But I still like the idea...
So my modification to this, is a remote bucket, filled with small live rock rubble, and very slow bottom to top flow of water. The bucket will be completely dark, so no algae to compete with the little sponges, and they can proliferate to their valve's content in there, and make my water all sparkly.
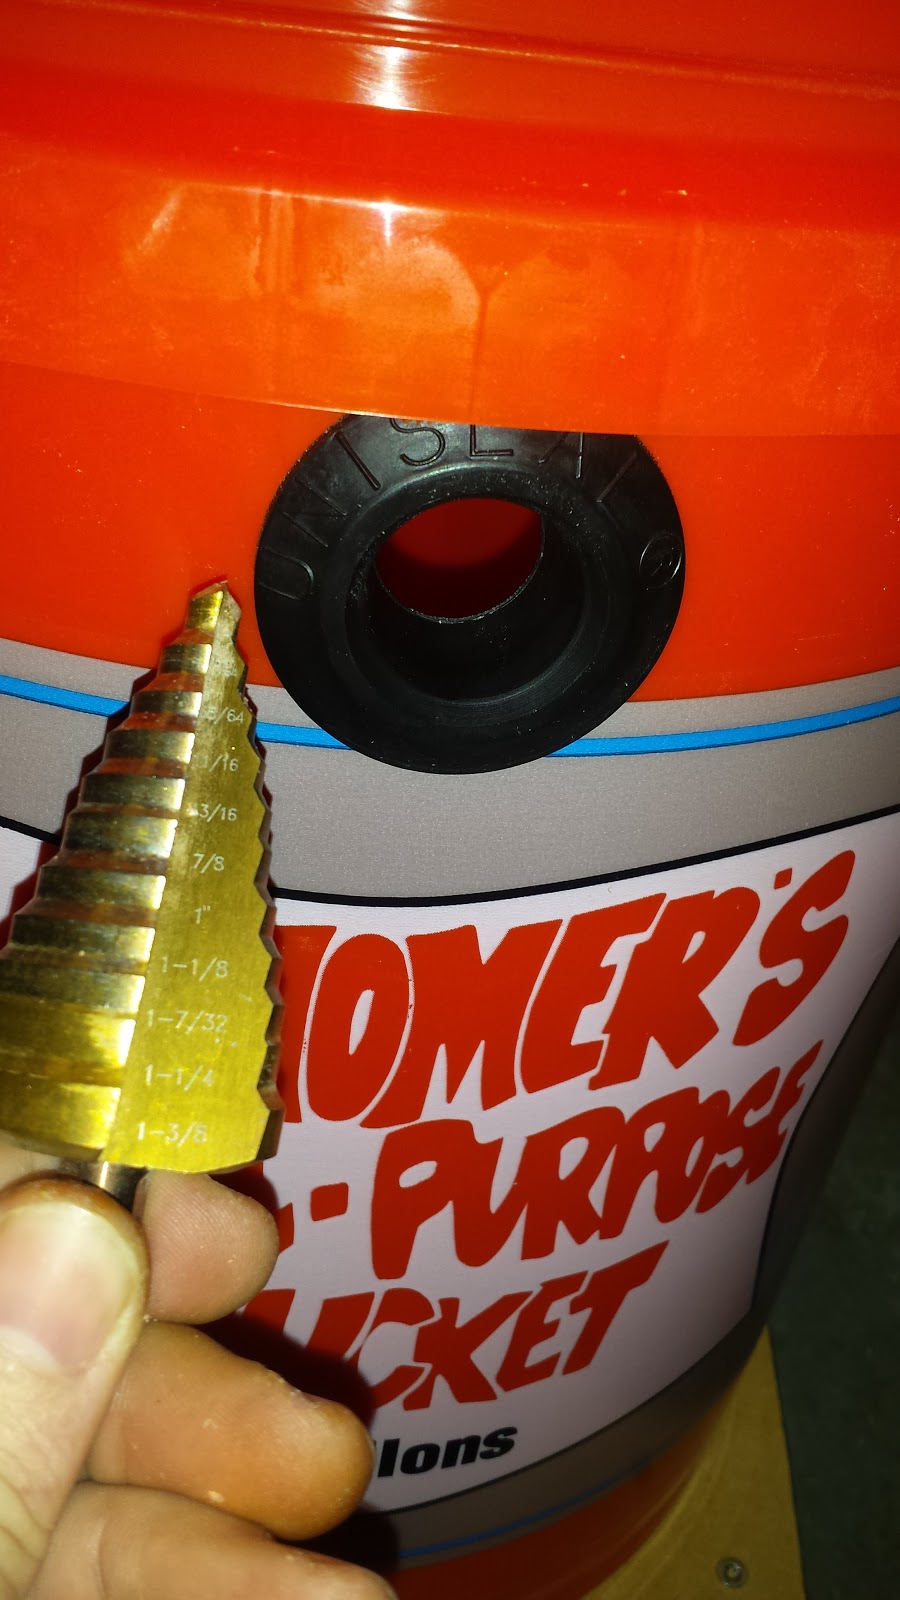
So step 1. Get a bucket and a 3/4" uniseal. Measure the height of the sump, and the highest place on the bucket I can place the uniseal. Build a little wooden box to raise the bucket enough to have the drain at the right height. Easy.

Step 2. Drill a hole for a uniseal. Drilling holes in plastic is a bit of a pain really. So rather than doing the hole-saw nightmare, I decided, lets try a unibit for a uniseal! Turns out unibits are these magical devices that are PERFECT for drilling holes in plastic. It made this perfect, beautiful hole. No marring, no catching, dead perfect edges, drilled through like butter. I will always use one of these from now on.

Ok, that part was easy. Now the plan is to pump water through a fitting in the lid of the bucket, down to the bottom. So all I need to do is run a tube from the lid down to the bottom. Except, the bucket will be full of rocks, and sponges, and other fun stuff. If I ever want to take the lid off, I won't be able to get the tube back in.
Solution, build a little pipe that creates a channel for the tube! I got a 4-way PVC fitting, and drilled a hole the diameter of 1/2" PVC right through the top of it. I then assembled the fitting with some short pieces of pipe, and little elbows to stand it up off the bottom of the bucket. Now I have a little sleeve for my tubing to fit into, making it super easy to remvoe the lid.


Quick test, and oops, the whole thing floats. Because the pipe is sealed, and the air can't get out from the little elbows. Easy fix, drill a hole in the 4-way to let the air out.

Now I need to make a little shelf for the rock to sit on. I get a piece of eggcrate, and slice it up, put a hole in the middle, and perfect. A nice little rock shelf. Test fit the whole thing, and everything is wonderful.

Next the lid. Drill a hole (with a unibit!) in the middle of the lid, and put on a 1/2" bulkhead. Top of the lid gets an R/O fitting, bottom gets a random fitting I had that happens to be the same diameter as some tubing I have lying about. Insert a length of tubing, and we have a lid.


Now all that was left, was to run some 3/4" pipe out the uniseal, and back into the sump, and then hook up water from the manifold into the top, and give it a test run. For the test run, I put some tape on the side of the bucket, and ran a stopwatch as the bucket filled. I marked the tape as it filled at 1 minute intervals. Lets see how it did:

3.5 cm per minute. I feel like this is pretty close to perfect. Not slow enough to be anaerobic, not fast enough to blast the sponges.
 I filled the bucket with some rocks I had been cycling in my QT tank for a month or so, and a few small rubble rocks from the display tank that had some sponges growing on them. I figure in a few months these will spread, and eventually I'll have a bucket full of sponges and filter feeders. Hooked everything up, checked for leaks, and poof. Done!

I checked on the bucket this morning, and noticed that the light over the fuge was shining onto it, and it was getting a little too much light. I'll probably end up wrapping it in some thick cloth, just to keep the light out. Seems like a simple enough solution.
I solved alot of water related problems today, so I'm pretty happy. Now that I know the water in the tank is safe, and the nitrates are down, it means I can start stocking and turning the lights on. That means the next step is to re-aquascape the tank, and finish filling it with rock. I'm going to just use dead rock for the rest of the tank, which I have been slowly collecting. The last shipment should arrive monday. Now I utterly suck at aquascaping. Not my thing. But the wife seems interested in it, and she is more artistic than me, so the plan is for her to draw up some ideas today, and some time next week, we will give it a go. Once that is done, I can start turning the main lights on, and get the ugly phase going, and throw some CUC in there!

I'm so close to having real life in there I can almost touch it. Excited about moving rocks around, I shimmy off to bed...
So I realize I haven't done a real update in awhile. Mostly this is due to the end of the holidays, a billion birthday parties, and being horribly sick for a week. No excuses though, time to catch up on the progress.
But first, Pic of the day from the automated camera!
(yeah, kinda lame still, and that window reflection is annoying)
There are three main projects I've been working on since the last major post. The first is the water itself.
Now some people might not know this about me, but I'm one of those no-water-change nutters. I don't believe in water changes unless its absolutely critical. When I started this reboot however, I did have concerns. It sat semi-fallow for so long, and well, there was that electrical fire, and I did pull a shattered heater out, so, it's entirely possible the water was full of death. So I've been running various tests, and trying to fix things, while also being aware that I might just have to suck it up and do an 800g water change...
The first issue is nitrates and phosphates. A while back, I got a Red Sea kit, and did some tests. The Phosphates were something like .34, so, that's bad. The nitrates were off the scale, so probably in the 80's. My solution for this was chaeto. I dumped a bunch of Chaeto into the tank, and it's taken off. I've now harvested about 3 gallons of it (terrible measure, but, umm, you get it). So this is working pretty well, but the nitrates just weren't moving.
So I decided what the heck, there is nothing big in the tank yet, lets try vinegar. I had tried vodka years ago, but I really didn't have any dosing charts, so I just wung it, and added way too much, and whited out the tank. But now there are nice little charts, so, I decided to follow one. So I started dosing about 46ml of vinegar a day to the tank, and slowly ramped up to 52ml. I also decided to turn the skimmer up just a little bit, to help out.
So day 1, of course the skimmer overflows. That was fun. But easy to fix, and I let the experiment run for a few weeks, and did another pair of tests on the N and P. Phosphates didn't move at all.. still 0.34. But nitrates were now down to 8ppm (from 80!). Wow. That was really fast. I don't actually believe that number. Re-tested. (yes, I actually re-tested a good result!). Nope.. Still 8. huh. ok. Well there are a few possibilities here..
1) The vinegar worked!
2) The chaeto worked!
3) My testing procedure is suspect.
You see, I was using the high range on the nitrate/phosphate test. So to do so, you add 15ml of RO water to 1ml of sample, and test that. On all my previous tests, I was kinda lazy, and took RO water from the kitchen RO, but on these, I took RO/DI from the tank feed. It's possible that I have high nitrates in the kitchen RO water. I need to actually test that to find out, but it's not a priority just yet.. so.. for now, I'll take the good nitrate reading, and just leave the vinegar dose as-is.
This of course, leaves the main issue, which is, what if the general composition of the water is death? Luckily, we now have these *amazing* Trition ICP tests, where I can find out if that is the case or not. So obviously I sent one of those in, and just got the results back a few days ago. I was kinda terrified to look at them, expecting to find like 7000ppt of lead or something. Nope. Almost everything is perfect. Wow. Basically the test had the following to say:
1) Salinity is low. Check. yeah. knew that.
2) Calcium is low. Yep. Hanna said 288, ICP said 302. Check.
3) Phosphates are high. Yep. Check.
4) Lithium is a little high. Umm. Ok.. Whatever.
5) Zero Iodine in the tank. Ok, fixable.
6) Everything else is pretty much perfect. Like, all the baddies are zeros perfect. Wow.
So the solution at this point is pretty simple. Step 1, dump one of the carbon filters out, and replaced it with GFO. I'll just strip all the P out of the tank, and let it go wild, so if the sandbed is buffering any, it will strip that too. I'll fix the phosphates later by feeding the tank. So right now I've got about 2lbs of GFO running on the tank. Should be fine.
Step 2, fix the Calcium. So, oddly, my Alkalinity is kinda perfect, so I suspect the coralline algae has just been sucking calcium at a higher rate. Long term the plan is kalk and CaRx, but I don't have any real uptake right now, so those aren't viable solutions yet. Easy answer, I'll just dump a bunch of CaCl2 in the tank and spot fix it, then maintain with kalk later.
Step 3, stay the course in fixing the salinity. I have been unwilling to just hard spike it back up with salt, so I've been slowly raising it by using saltwater for the ATO. It's gone from about 24 to 31 in the last 2 months, so I'm almost at the goal post now.
So I feel like the water itself is in hand now, and I can start worrying about other problems. One of those problems is dosing. I am already sick to death of doing 52ml of vinegar a day, and it was a miracle I kept it up while sick. So I had to do something to fix this. I took a multi-pronged approach.
First, I dug around on Amazon, and found that Kamoer makes a 24v peristaltic pump. Hey, guess what 24v means? It means I can run it directly off the Apex 24v ports! So 20 dollars later, I have myself a little pump, and a box of Molex micro v3 connectors (the very ones used on the Apex cords).

So step one was to cram some batteries together, and test this little pump. I had some 12v batteries lying about, so I managed to cobble together a cheap 24v supply, hooked it to the pump, and it immediately went to work. A few tests later, and I figured out it does 83ml a minute. and pretty reliably at that. So this is not really ideal for vinegar, because it means I would have to run it for 37 seconds a day. Thats too obnoxious to program into the Apex. But I still feel like this is a useful device, so I'll keep going.
So I find a bit of wire that's long enough, and crimp on the molex pins. Now right here, is where I tell you, don't do this. Just buy the Apex cable. I have a ton of various crimpers and tools for this kind of work, but nowhere among them is a crimper that is designed for pins this tiny. These pins are microscopic. It was a nightmare to crimp them onto actual wires. So either buy the $20 cable, or buy an 80-100$ molex crimp tool. Either way, about an hour or so later, I had a molex connector attached to my little pump. Next step was a way to mount it.

I very quickly hacked up a mount in tinkercad and printed it. I'm not actually very happy with it, but it does the job. It's basically a hole, with some more holes so you can bolt it on. It's very grotty, but holds the pump in place.

I gave it a quick test on the Apex, and yes, it works. Works perfectly, and delivers 83ml a minute, just as advertised. This is less useful than I was hoping though. I think I'm going to set it aside, and use it down the road to run the kalk reactor.
Ok, so now we still have a dosing problem. Lets check the interwebs. Looks like I can 3D print a doser for a Nema 17 stepper motor pretty easily. Problem is, then I have to control a Nema 17. In order to do that, I'm going to need an Arduino, and a few other parts. Quick calculation from Amazon says, I can get all the parts to build a multi-head dosing pump, for about $30 a head, so, $120 for a 4-head doser run via arduinos. 2 days to print, probably another day to solder it up, and a day or two to write the code to run the whole thing. Ok, 4 days of work and $120. Sounds like a plan.
Nope. Screw that. Turns out a little Jebao 4 head dosing pump is available on Amazon prime for $60. For the price it would have cost me to make my own, I can just have two of these (one as a backup!). And less labor. So guess what I did?

In other realms of ridiculous, I also thought, well, lets go to the container store, and get some little plastic containers to use as dosing containers. They don't need to be magical aquarium containers, I can attach R/O tubing to anything. Price for 3 decent looking containers from the container store? About $60-80. Then add on the fittings, and the labor. Let's check Amazon. Yep. 3 x 1.5L dosing reservoir, $55. Amazon beats DIY again.
So plug the new doser in. Fill the reservoir with vinegar, run it a few times to calibrate. Done. Kinda... I put the output line for the doser in the sump, right after the skimmer, before the return pump. So 4 times a day, I put 13ml of vinegar into the water. And 4 times a day, my Apex pages me the pH is too low, because the probes are right next to that dose input. Argh. Going to have to figure out a fix for that eventually..
So this leaves project number 3.. The sponge bucket!
I've been slowly working on this one for awhile now, and this weekend I finally finished it up.
First, the idea: I'm a big fan of Steve Tyree's books, and I even have signed copies of them. Total nerd. Anyhow, one of my beliefs has always been that sponges are what makes tanks long term stable. Over time, sponges grow in all the little crevices in your rocks, and they all filter the water, and this is why I can get away with not doing water changes for 8 years. One of Steve's books, talks about setting up an "Environmental Gradient" in a tank. Now I love the theory of this, but if you look at his diagrams and pictures, the whole thing just looks absurd. He has shelves and racks of corals sitting over piles of rock in the dark, and curtains, and this is no way to run a giant display tank. But I still like the idea...
So my modification to this, is a remote bucket, filled with small live rock rubble, and very slow bottom to top flow of water. The bucket will be completely dark, so no algae to compete with the little sponges, and they can proliferate to their valve's content in there, and make my water all sparkly.
So step 1. Get a bucket and a 3/4" uniseal. Measure the height of the sump, and the highest place on the bucket I can place the uniseal. Build a little wooden box to raise the bucket enough to have the drain at the right height. Easy.

Step 2. Drill a hole for a uniseal. Drilling holes in plastic is a bit of a pain really. So rather than doing the hole-saw nightmare, I decided, lets try a unibit for a uniseal! Turns out unibits are these magical devices that are PERFECT for drilling holes in plastic. It made this perfect, beautiful hole. No marring, no catching, dead perfect edges, drilled through like butter. I will always use one of these from now on.
Ok, that part was easy. Now the plan is to pump water through a fitting in the lid of the bucket, down to the bottom. So all I need to do is run a tube from the lid down to the bottom. Except, the bucket will be full of rocks, and sponges, and other fun stuff. If I ever want to take the lid off, I won't be able to get the tube back in.
Solution, build a little pipe that creates a channel for the tube! I got a 4-way PVC fitting, and drilled a hole the diameter of 1/2" PVC right through the top of it. I then assembled the fitting with some short pieces of pipe, and little elbows to stand it up off the bottom of the bucket. Now I have a little sleeve for my tubing to fit into, making it super easy to remvoe the lid.
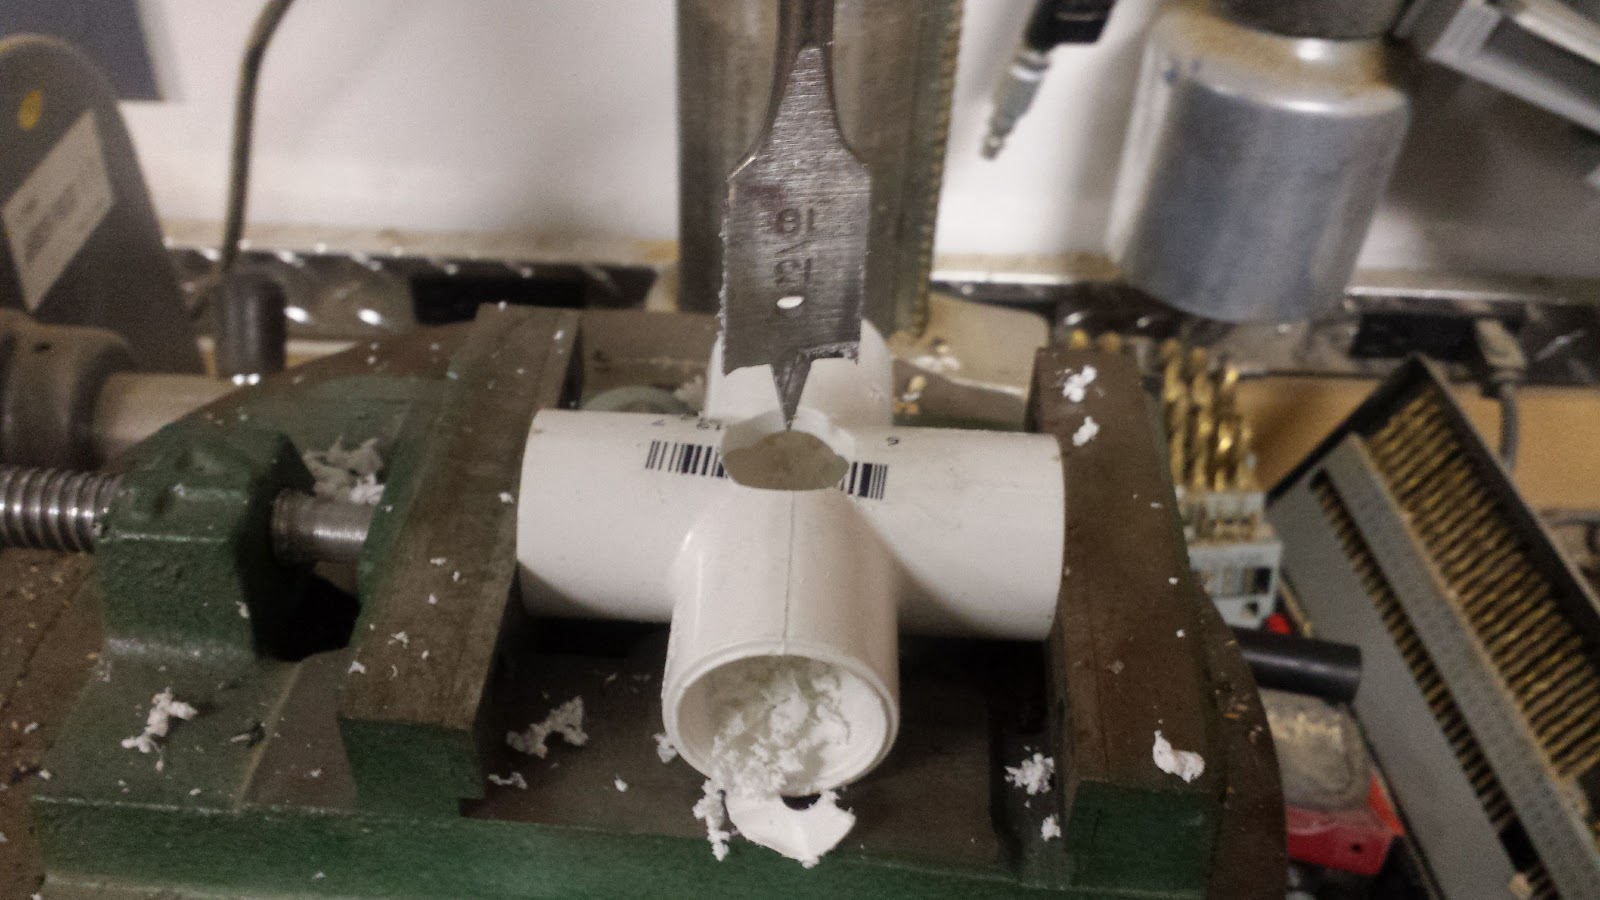

Quick test, and oops, the whole thing floats. Because the pipe is sealed, and the air can't get out from the little elbows. Easy fix, drill a hole in the 4-way to let the air out.

Now I need to make a little shelf for the rock to sit on. I get a piece of eggcrate, and slice it up, put a hole in the middle, and perfect. A nice little rock shelf. Test fit the whole thing, and everything is wonderful.

Next the lid. Drill a hole (with a unibit!) in the middle of the lid, and put on a 1/2" bulkhead. Top of the lid gets an R/O fitting, bottom gets a random fitting I had that happens to be the same diameter as some tubing I have lying about. Insert a length of tubing, and we have a lid.


Now all that was left, was to run some 3/4" pipe out the uniseal, and back into the sump, and then hook up water from the manifold into the top, and give it a test run. For the test run, I put some tape on the side of the bucket, and ran a stopwatch as the bucket filled. I marked the tape as it filled at 1 minute intervals. Lets see how it did:

3.5 cm per minute. I feel like this is pretty close to perfect. Not slow enough to be anaerobic, not fast enough to blast the sponges.
 I filled the bucket with some rocks I had been cycling in my QT tank for a month or so, and a few small rubble rocks from the display tank that had some sponges growing on them. I figure in a few months these will spread, and eventually I'll have a bucket full of sponges and filter feeders. Hooked everything up, checked for leaks, and poof. Done!
I checked on the bucket this morning, and noticed that the light over the fuge was shining onto it, and it was getting a little too much light. I'll probably end up wrapping it in some thick cloth, just to keep the light out. Seems like a simple enough solution.
I solved alot of water related problems today, so I'm pretty happy. Now that I know the water in the tank is safe, and the nitrates are down, it means I can start stocking and turning the lights on. That means the next step is to re-aquascape the tank, and finish filling it with rock. I'm going to just use dead rock for the rest of the tank, which I have been slowly collecting. The last shipment should arrive monday. Now I utterly suck at aquascaping. Not my thing. But the wife seems interested in it, and she is more artistic than me, so the plan is for her to draw up some ideas today, and some time next week, we will give it a go. Once that is done, I can start turning the main lights on, and get the ugly phase going, and throw some CUC in there!

I'm so close to having real life in there I can almost touch it. Excited about moving rocks around, I shimmy off to bed...

Epic Aquaculture
The artist formerly known as SawCJack00
View Badges
Partner Member 2024
Excellence Award
Reef Tank 365
Gold Sponsor
Reef Of The Month
Photo of the Month
AZ FRAG Member
My Tank Thread
Great build thread! Very entertaining and informative. I'd love to come over sometime and see it in person. I may even bring a few tank warming frags once you're ready for some SPS as that is my thing.
OP
OP
- Joined
- Nov 10, 2018
- Messages
- 772
- Reaction score
- 1,045
I'd love to have you, once it's something other than a big box full of water and sand. (Well, there are probably about 5,000 Gammarus sp. and 2k bristleworms in there, but..)
Right now the big goal/timeline, is that I need to get the rest of the rocks in, and let it re-stabilize. Then I need to toss a bowl full of peppermint shrimp in there to get a few aipstasia under control.
Right now the big goal/timeline, is that I need to get the rest of the rocks in, and let it re-stabilize. Then I need to toss a bowl full of peppermint shrimp in there to get a few aipstasia under control.
OP
OP
- Joined
- Nov 10, 2018
- Messages
- 772
- Reaction score
- 1,045
Day 14, Not as planned..

Full tank shot to start it off..
As you can see, this is not a tank full of new aquascape, as was planned for today. The wife was sick, and attempting to solo the rockwork wasn't realistic, so, it will be put off until next weekend.
I wasn't to be completely undone however.. I decided to fix some problems today.
First problem. I wanted to unplug something to test it the other day, just one of the pumps. I walked up to the EB832, and realized, I had no idea which plug was the pump. I had to trace the stupid cable! This is absolutely no good. In an emergency, with water rushing everywhere, I do not have time to trace cables.
https://www.amazon.com/gp/product/B07FD4V234/ref=ppx_yo_dt_b_asin_title_o04__o00_s00?ie=UTF8&psc=1

Problem solved. Cable tags. For every cable. The problem became even more obvious, as I basically had to trace every single cable just to figure out what was what. I'm actually still at it, as I have about 10-15 more cables to label. But it's getting there...

So we come to the second problem. It's actually a variety of problems, all with what I hope is one solution..
This means that the right side had to have the durso tuned to draw more water than the left side. I feel that the left side just isn't getting the same flow. Additionally, a ton of water is just bypassing the fuge. The right side now gets less water movement, and all kinds of knock-on problems have surfaced.
Solution? Tap into the crossfeed pipe, and draw from there for the COR15! As astute readers will remember, to solve my sump imbalance issues, I installed a tube from one sump to the other, to allow water to flow across in case of a single pump shutdown. All I needed to do, was cut that tube, and hook the COR15 to both ends of the tube, and then badda bing, it draws from both sumps equally!
So a manifold was built.


Now those of you who are astute viewers might notice.. I forgot to put the COR fitting on that pipe before I glued the tube into the flange. Yes, I had to cut it off and re-do it.
So the idea of this manifold is simple. Cut the tube that connects the sumps in half, connect each half to the T section. Then the pipe feeds down into the COR. I used a large pipe here at the T, just so there wouldn't be any bizzare flow artifacts in that section.
The only annoying thing, is that I glued the valve on upside down, so, I couldn't plumb it quite how I wanted to. Argh.
So, with much pain and grumbling, this whole mess was installed, and the pump relocated...


After fixing 3-4 leaks, it seems to be working as desired. I've tested shutting the pump off a few times now, and it reacts correctly, and re-starts easily. So far the flow seems much more even, and I feel like the left side is really moving more water.
It also let me re-adjust the dursos, and now I'm getting actual flow from the drain into the fuge area. Chaeto growth here I come.

This whole mess took about 4 hours, not counting the 3 x 2 hour dry times for PVC cement screwups.. While I was at it, I also threw back on a flourescent fixture I used to have mounted under the sump, which was used to light the sump up when working down there. I should have done that months ago. So much nicer to be able to see what I'm doing..
Staring wistfully at the rocks waiting to go into the tank, I climb into bed..

Full tank shot to start it off..
As you can see, this is not a tank full of new aquascape, as was planned for today. The wife was sick, and attempting to solo the rockwork wasn't realistic, so, it will be put off until next weekend.
I wasn't to be completely undone however.. I decided to fix some problems today.
First problem. I wanted to unplug something to test it the other day, just one of the pumps. I walked up to the EB832, and realized, I had no idea which plug was the pump. I had to trace the stupid cable! This is absolutely no good. In an emergency, with water rushing everywhere, I do not have time to trace cables.
https://www.amazon.com/gp/product/B07FD4V234/ref=ppx_yo_dt_b_asin_title_o04__o00_s00?ie=UTF8&psc=1

Problem solved. Cable tags. For every cable. The problem became even more obvious, as I basically had to trace every single cable just to figure out what was what. I'm actually still at it, as I have about 10-15 more cables to label. But it's getting there...

So we come to the second problem. It's actually a variety of problems, all with what I hope is one solution..
- On the left sump (the Elite), the water flow through the refugium is pretty lame, and so is the growth over there.
- Every time I dose vinegar (13ml) to the left side, the pH probe has a spaz.
- The heaters are having trouble keeping the temperature stable.
- The two sumps aren't staying at the same level.
This means that the right side had to have the durso tuned to draw more water than the left side. I feel that the left side just isn't getting the same flow. Additionally, a ton of water is just bypassing the fuge. The right side now gets less water movement, and all kinds of knock-on problems have surfaced.
Solution? Tap into the crossfeed pipe, and draw from there for the COR15! As astute readers will remember, to solve my sump imbalance issues, I installed a tube from one sump to the other, to allow water to flow across in case of a single pump shutdown. All I needed to do, was cut that tube, and hook the COR15 to both ends of the tube, and then badda bing, it draws from both sumps equally!
So a manifold was built.


Now those of you who are astute viewers might notice.. I forgot to put the COR fitting on that pipe before I glued the tube into the flange. Yes, I had to cut it off and re-do it.
So the idea of this manifold is simple. Cut the tube that connects the sumps in half, connect each half to the T section. Then the pipe feeds down into the COR. I used a large pipe here at the T, just so there wouldn't be any bizzare flow artifacts in that section.
The only annoying thing, is that I glued the valve on upside down, so, I couldn't plumb it quite how I wanted to. Argh.
So, with much pain and grumbling, this whole mess was installed, and the pump relocated...


After fixing 3-4 leaks, it seems to be working as desired. I've tested shutting the pump off a few times now, and it reacts correctly, and re-starts easily. So far the flow seems much more even, and I feel like the left side is really moving more water.
It also let me re-adjust the dursos, and now I'm getting actual flow from the drain into the fuge area. Chaeto growth here I come.

This whole mess took about 4 hours, not counting the 3 x 2 hour dry times for PVC cement screwups.. While I was at it, I also threw back on a flourescent fixture I used to have mounted under the sump, which was used to light the sump up when working down there. I should have done that months ago. So much nicer to be able to see what I'm doing..
Staring wistfully at the rocks waiting to go into the tank, I climb into bed..

OP
OP
- Joined
- Nov 10, 2018
- Messages
- 772
- Reaction score
- 1,045
Minor update.
I really hate how Neptune decided to use some crazy british thread pattern on the COR's that is incompatible with everything in the universe. And that is coming from the mouth of a Neptune fanboy...
So of course the COR leaked. Next morning I had a little puddle next to the pump, so it was a slow leak. The pond liner did it's job though. Pump leaked, liner contained it, *nothing* was damaged, no lasting impact, just lost maybe .5 gallons of water to my various difficulties, and had to wash some towels.
So my configuration was the output shaft was connected to the big union that comes with the COR. This is a kinda questionable design here, because they have a nice gasket fitting on the top of the output, but the union is so big that it won't mate with the O-ring if you use it. Maybe I was supposed to plumb it differently, but I can never find any standard fitting that fits it.
What I learned:
- Union attached to COR leaks. Even screwed all the way on.
- Wrap output thread in 2 layers of white plumbers tape, then attach union, leaks.
- Add 3 more layers of the gray pro stuff, leak stops. Didn't need to be screwed all the way on.
OP
OP
- Joined
- Nov 10, 2018
- Messages
- 772
- Reaction score
- 1,045
Day 15, The tank that took 7 years to aquascape..
So I finally got a good weekend, with all the ducks in the proper order, and was able to rescape (or finish scaping) the tank. Now many many moons ago, when I first started all this, I was purchasing monster boulders one at a time direct from Fiji. The idea at the time was, put one in, let it cycle up, then do another, and keep this up until a mains breaks and floods the house.. err.. I mean it's finished?
So some detours happened along the way, and I wasn't keeping up with the purchases fast enough, and I ended up with half a tank full of rock. Which you have seen in all the "lovely" full tank shots, where you can see about 5 feet of bare sandbed. Exiting stuff that.
Of course, because I'm super creative when it comes to fancy rockwork, my plan was "a big wall of rocks". So to assist with this wall, I built a PVC frame that goes all the way to the bottom of the tank, so the rocks could sit up on it off the bottom a bit. This gives the fish a permanent cave to hide in, and keeps the deep recesses from turning anoxic. One of the main returns curves down there a bit, just to give some flow in there (very gentle), just to keep the water moving about. I figure the sponges will love it too.
So along my new plan of "just get it done, don't spend 6 more years buying 1 rock every 3 months", I went online and got 240lbs of dry rock.
Now the old me would freak out right now and say dry rock is worthless, only Fiji or Pukani for me. But that stuff is hard to get now. And I refuse to use Atlantic rock, because I don't want to deal with the hitchikers. So dead it is.
I got three boxes from Amazon prime, as I mentioned in a previous post. Then I decided to get 3 more boxes from ArcReef. I'm super happy with the Amazon Prime stuff. Cheap, good rock, nice sizes, good stuff that. The ArcReef stuff.. eeeehh..
So here is my thoughts on the ArcReef rock, and it's mildly whiny.
Either way.. Here is 260ish lbs of rock. Can you tell them apart? Hint, the big ones were from Prime.

So because as previously stated, my aquascaping theory is "chuck them in", I asked my wife to design an aquascape. We watched a bunch of videos together, threw some ideas around, and then watched a particularly good set of videos with various shapes of tanks, and ideas. One of them was a corner tank, and the concept he called "Sleeping dragon".

So we took this idea, because in essence what I really have is two corner tanks connected together (because there is no side-view), and made a huge dragon. On the left side of the tank, we have the head, and on the right side, a small tail.

Now.. this was no easy project. It took a day and a half. Some of those boulders I originally purchased were in the range of 90-100 lbs each. There were at least 6 that were 80+, and about 10 more that were in the 40 range. Moving them around was a nightmare. And oh the sandstorms we caused. It would get so bad that we couldn't see what we were doing.
In the end, the smaller rocks weren't all that bad, as the big monsters filled in the majority of the space, and then the smaller ones just fit in perfectly to make various shapes, and fill in gaps all over the place. We also made a small island on one side, just because there is so much space in the tank. I feel like this structure uses alot more of the available footprint of the sand, and it's now far more stunning to look at. Overall, I'm super happy with this.


And to put a kick on the end, I have turned on the main lights finally. I have them set at 15% of full power, and will run like that for probably a week.

In other news, the GFO completely destroyed the phosphate in the tank. So much so that I'm now shutting it off, because it's caused the chaeto to die back. I still have a little bit of Nitrate, but that's all easy to deal with. Hopefully things will balance out once the ugly phase begins....
Turning the lights on has also shown up some dark spots in the tank. So I need to figure out a few spots or similar to fill those in. I might just go with some cheap black boxes around the corners to fill in the dead spots, as I don't think I need a ton of light. I'm also slightly concerned about the amount of white light.. I might swap the COB's for blues.. not sure.. we will see.
Oh, and since you made it to the end. Here is the timelapse of us doing the aquascape!
Dreaming of a future shipment of peppermint shrimp.. I crawl into bed, exhausted...
So I finally got a good weekend, with all the ducks in the proper order, and was able to rescape (or finish scaping) the tank. Now many many moons ago, when I first started all this, I was purchasing monster boulders one at a time direct from Fiji. The idea at the time was, put one in, let it cycle up, then do another, and keep this up until a mains breaks and floods the house.. err.. I mean it's finished?
So some detours happened along the way, and I wasn't keeping up with the purchases fast enough, and I ended up with half a tank full of rock. Which you have seen in all the "lovely" full tank shots, where you can see about 5 feet of bare sandbed. Exiting stuff that.
Of course, because I'm super creative when it comes to fancy rockwork, my plan was "a big wall of rocks". So to assist with this wall, I built a PVC frame that goes all the way to the bottom of the tank, so the rocks could sit up on it off the bottom a bit. This gives the fish a permanent cave to hide in, and keeps the deep recesses from turning anoxic. One of the main returns curves down there a bit, just to give some flow in there (very gentle), just to keep the water moving about. I figure the sponges will love it too.
So along my new plan of "just get it done, don't spend 6 more years buying 1 rock every 3 months", I went online and got 240lbs of dry rock.
Now the old me would freak out right now and say dry rock is worthless, only Fiji or Pukani for me. But that stuff is hard to get now. And I refuse to use Atlantic rock, because I don't want to deal with the hitchikers. So dead it is.
I got three boxes from Amazon prime, as I mentioned in a previous post. Then I decided to get 3 more boxes from ArcReef. I'm super happy with the Amazon Prime stuff. Cheap, good rock, nice sizes, good stuff that. The ArcReef stuff.. eeeehh..
So here is my thoughts on the ArcReef rock, and it's mildly whiny.
- It is 100% the same rock as the stuff that cost 1/3rd as much off Prime. After I rinsed all the different rock off, I had a really hard time telling it apart.
- They shipped 51 lbs instead of 45 per box. So that was nice.
- I picked ArcReef because they say on the Amazon page that you can request specific sizes. So of course I say I want 20-45lb boulders. (Which the page specifically says they will do.
- I ordered 3 boxes. The first one arrived, and they required signature for delivery. They needed an actual signature for a 45lb box of dead rock. Completely absurd. So of course I had to sign the little paper and wait for re-delivery.
- I get the delivery, and it's only 1 box. There is a note saying the other two were shipped 1 day later.
- The rocks were kinda small. Just a bunch of 8" rocks. The Prime stuff was all 12" or better. They obviously ignored my note.
- 1 week later, no rocks. Fedex says they don't even have the boxes yet.
- So I send them a note on Amazon. "Hey, my rocks didn't actually ship. Also, I wanted boulders, which you said you would provide, please be sure the next 2 boxes are boulders"
- Next two boxes show up, signature required of course...
- Just a bunch of 8" rocks again, with a "we're sorry we forgot to ship them, oops"
Either way.. Here is 260ish lbs of rock. Can you tell them apart? Hint, the big ones were from Prime.

So because as previously stated, my aquascaping theory is "chuck them in", I asked my wife to design an aquascape. We watched a bunch of videos together, threw some ideas around, and then watched a particularly good set of videos with various shapes of tanks, and ideas. One of them was a corner tank, and the concept he called "Sleeping dragon".

So we took this idea, because in essence what I really have is two corner tanks connected together (because there is no side-view), and made a huge dragon. On the left side of the tank, we have the head, and on the right side, a small tail.

Now.. this was no easy project. It took a day and a half. Some of those boulders I originally purchased were in the range of 90-100 lbs each. There were at least 6 that were 80+, and about 10 more that were in the 40 range. Moving them around was a nightmare. And oh the sandstorms we caused. It would get so bad that we couldn't see what we were doing.
In the end, the smaller rocks weren't all that bad, as the big monsters filled in the majority of the space, and then the smaller ones just fit in perfectly to make various shapes, and fill in gaps all over the place. We also made a small island on one side, just because there is so much space in the tank. I feel like this structure uses alot more of the available footprint of the sand, and it's now far more stunning to look at. Overall, I'm super happy with this.

And to put a kick on the end, I have turned on the main lights finally. I have them set at 15% of full power, and will run like that for probably a week.

In other news, the GFO completely destroyed the phosphate in the tank. So much so that I'm now shutting it off, because it's caused the chaeto to die back. I still have a little bit of Nitrate, but that's all easy to deal with. Hopefully things will balance out once the ugly phase begins....
Turning the lights on has also shown up some dark spots in the tank. So I need to figure out a few spots or similar to fill those in. I might just go with some cheap black boxes around the corners to fill in the dead spots, as I don't think I need a ton of light. I'm also slightly concerned about the amount of white light.. I might swap the COB's for blues.. not sure.. we will see.
Oh, and since you made it to the end. Here is the timelapse of us doing the aquascape!
Dreaming of a future shipment of peppermint shrimp.. I crawl into bed, exhausted...
OP
OP
- Joined
- Nov 10, 2018
- Messages
- 772
- Reaction score
- 1,045
Day 16, Let there be life?
So lots of little things left to do on the tank at this point, as I slowly ramp it up into full operation. Lights are currently on at 16% (of a max around 65). So now I want to get a few things running on there, and try to button it all up.
So let's start with the easy stuff. Since my calcium was low, but my dKH was correct, I decided to just mix up a gallon of CaCl and dose that into the tank over the next few weeks. Rigged up a simple bottle for that to pump out of, and hooked it into the doser. That should fix the base calcium levels.
Second, I hooked the Kalk stirrer up. Went with an Avast K2. I really like Reef Octopus stuff, but I've heard lots of bad things about the motor units on those. The Avast one, they advertise that you can run that stir motor 24/7, as opposed to periodically, so, ehh.. Went with that one. Hopefully it was the right choice.
Normally on a big tank like this, the thing to do would be to hook it to the ATO. As a plan, this is super problematic for me. First off, the ATO is a Neptune ATK. This device has an RO feed that goes to a safety float switch. This way if your ATO turns on, but your water level is high, it does nothing, because the float keeps the water off, despite the PMUP running. You simply cannot connect a kalk device to this. If ever the pump turned on, and the float was closed, it would overflow the stirrer.
Second issue is, my tank doesn't have the calcium demand just yet for an ATO dose. There are two ways to run a kalk reactor when you don't need it's full power:
1) Mix the reactor to full strength, and then attach a dosing pump to the inlet, and dose it as needed.
2) Hook it to an ATO, and adjust the kalk concentration as needed.
The second one there, sounds like a complete nightmare. Until the coralline kicks off on the new rockwork, I have roughly zero calcium needs right now, and the dKH is rock stable, so, I kind of don't need any kalk dosing yet. So currently, it's just filled with RO/DI water and nothing else. But I hooked up the dosing system.
As you might recall, I built a simple doser out of a Kamoer 24v pump connected directly to an Apex 24v outlet. I connected this doser to the RO/DI reservoir, and then into the Kalk stirrer. The output of the stirrer goes to one of the sumps. The doser puts out a known quantity of 83ml/min. So I have a simple OSC statement in the Apex that runs it once a day right now. As my needs change, I will up it to a few times per day with math. This will slowly cause the Neptune ATK to run less often, and at a certain point, I'll have to stop, because I'll hit the evap point. But during the early stages of the tank, this makes things easier.
However, placing the kalk output into the left sump, raises another problem that has been driving me insane anyhow. Currently the vinegar doses into that sump, and a few inches away is the pH, ORP, and Salinity probes. 4 times a day, the vinegar dumps in, and the probes all freak out for a few seconds, alarms fire off, and it makes me crazy. Know what will make that even better? Dumping 12.0 pH water in there a few times a day.
So the probes all have to move. 3d printer to the rescue.

This little bracket didn't come out perfectly, but it did come out. Printed from eSun PETG. It will hold the 4 main neptune probes, and the little clip on the bottom will hold a temp probe from one of those little suction cup thermometers, (I keep on as an emergency sanity check). Now I can relocate the probes to one of the drain towers on the tank.

And instantly, all my weird accuracy problems have disappeared! No more sump bubbles screwing up the Salinity probe. No more vinegar screwing up the pH probe. The only strange effect was, when I moved it up there, the salinity moved down like 5 points, and has remained there. No idea why. It's super stable now, just, reading 27. Oh Neptune.. your silly conductivity probe..
So in the realm of calcium, I returned to an older project. I have a Reef Octopus CR140D calcium reactor. I mentioned this awhile back, and that I had lost the O-rings for it, and the pump was dead, so I ordered one from CoralVue. That showed up. Time to get the body assembled.

So this is what the pump swap kit looks like. I have to say, CoralVue hit this one out of the park. Amazing. Makes me want to buy more stuff from them.
It comes with the new pump, which basically is the totally wrong physical shape from the one this reactor shipped with. But they give you this pile of pipe fittings, and detailed instructions. The fittings kit, has a bit of extra space on the fittings, so you put the new pump into place, and then carefully measure and cut down the supplied tubes, and everything then fits this new pump. You toss the old input setup entirely. It came with every imaginable part I would need to do the swap. All I had to do was carefully cut and measure the bits, and it went together like a dream.
Before:

After:

You would seriously never know this wasn't stock!
I also had the O-ring problem to deal with, and as I mentioned, I purchased a bunch off the O-Ring store (amazing..) and had them sitting around. Turns out, this one fit perfectly:

3.5 x 103mm. Dead on, super happy. They even put some saltwater taffy in with the shipping bag. For what was basically a $10 order. Amazing service.
Now a quick caveat and warning. As I plumbed this up, I was trying to make sure that everything lined up perfectly. This involved gluing the tubes together while the whole assembly was on the reactor. My mistake, was leaving it to dry like this. It turns out that PVC cement causes acrylic to craze. So there is a little bit of ugly now at the bottom of my reactor. Reader beware. Luckily, I pressure tested the whole assembly overnight, and there were no issues, it's only minor surface ick. Oh well. We learn things.
But all of this brings me to the actual title of my post. I wanted to add life to the tank. This was, well...
So I ordered 5 peppermint shrimp, 5 trochus, and 5 ceriths from the Algae Barn. Went with 3-day because they have the arrive alive guarantee. The Phoenix post office however, was bound and determined to screw that up. The box floated around in Phoenix for 3 days before getting to my door.
The trochus were all super sad. One was unresponsive, the other 4 would barely move. One shrimp was in 2 pieces, and 2 were dead. The ceriths were all happy. Oh well, nothing to be done, it all goes in.
Shrimp went in, immediately disappeared into the rocks never to be seen again. The trochus were all placed on a rock. Overnight, 2 of them moved away, and the other three didn't. Checked in the morning, shells were empty. My clean up crew found the dead ones, and literally stripped the shells empty overnight. Effective!
So long story short. In theory I have 2 tiny peppermint shrimp, somewhere, and 2 trochus, and then 5 ceriths. My wife of course, said "what were you thinking, you should have bought like 25 of each, do you know the size of this tank?" The problem is, no. I really don't. I cannot wrap my brain around the size of this tank still.
Normally, one would buy just a few of these things, and slowly scale up. You don't want a ton of snails that wipe the algae out and then starve back. But I was totally off scale here. 1 trochus has managed to barely handle 1 rock in 1 week. That means I need like.. 25 just to pass go. I probably need more like 50 at this point. That's an insane number to me. I would never put 25-50 snails in a tank where I just turned the lights on.
I'm way off here. I need to hit the store and buy real quantities of life. The numbers just boggle me, and I can't keep up with it mentally.

If we look at that picture.. there are 30+ rocks there. There was probably 1.5 - 2 times that much rock already in the tank. So lets say, 75 rocks, on the low side.
My 120 has, 6 rocks. My brain says, 800/120 == 6. So that means I take the numbers from the 120, and scale up by 6. Right? No. Scaled up, the rocks would be like 36, not 75. I need to be operating in the range of 12-15 TIMES what I do/did to the 120.
I am way off. The 120 would start with like, 2-3 trochus and ramp up. I should have gotten 25-40. I should have gotten like 15 peppermint shrimp, maybe 25. It's insanity to me.
Utterly boggled by numbers, I slip off to bed...

Awesome read.
I tend to ramp up on CUC as well but your baseline is way more than mine fully populated.
I tend to ramp up on CUC as well but your baseline is way more than mine fully populated.
OP
OP
- Joined
- Nov 10, 2018
- Messages
- 772
- Reaction score
- 1,045
Yeah, the numbers hurt my brain. It keeps happening over and over, but I never figure it out. I mean, sand for my 120 was 4 bags? This was what, 3/4 of a pallet, so like, 45 bags? That is not 6x. Huh.. it's more like 12x again. Interesting.. Maybe thats it. I need to think "what is reasonable for the 120 at this state?" and then multiply by 12-15 and just shut down the part of my brain that screams "no, you are going too far, too fast"
Even when it comes to fish I just can't be reasonable. My stocking plan list is like.. 12-15 fish. My brain keeps screaming that I'm pushing the boundary, but I keep looking at it going "I can't even see the boundary from here".
5 Ceriths. What was I thinking? In a week they've barely touched the little island on the front..
Oh, FTS from last night at 21:30, showing the lights in dusk mode, almost turned down...
 - Scaled (46%).png")
Right now I have the moonlights set to come on at 30% power whenever the "sun" is up. (That would be the deep blue) The Sun fades right to left (from the front) to simulate sunrise/sunset. So this is what the last gasp looks like.. At 9:30, we are probably at:
10% 7% 4% 0%
On the 4 mains.
I'm still working on ideas for the lights. I feel the tank needs a little more blue. The white is fantastic, love it, and at full power, it blows me away. The PAR is good, even in the bad spots, at full power, the measured readings are where I need them. But the color needs a little more blue.
I tried the chinese strip lights, and angling them back, but it just didn't have the power I needed. I think my current plan is this:
1) 2 48" Orphek 120 strip lights, probably in UV, mounted on the front wall, pointed diagonally towards the back rocks.
2) 6-8 20W Chinese Flood lights in Royal Blue, mounted on a bar right over the back of the tank, probably 2" off the acrylic.
I got one of the 20w floods, and gave it a quick test. I was pretty impressed actually. With the main lights at full, directly underneath the flood, I was getting an additional 40 PAR from it, and it gave a nice coloration to the back.

Even when it comes to fish I just can't be reasonable. My stocking plan list is like.. 12-15 fish. My brain keeps screaming that I'm pushing the boundary, but I keep looking at it going "I can't even see the boundary from here".
5 Ceriths. What was I thinking? In a week they've barely touched the little island on the front..
Oh, FTS from last night at 21:30, showing the lights in dusk mode, almost turned down...
Right now I have the moonlights set to come on at 30% power whenever the "sun" is up. (That would be the deep blue) The Sun fades right to left (from the front) to simulate sunrise/sunset. So this is what the last gasp looks like.. At 9:30, we are probably at:
10% 7% 4% 0%
On the 4 mains.
I'm still working on ideas for the lights. I feel the tank needs a little more blue. The white is fantastic, love it, and at full power, it blows me away. The PAR is good, even in the bad spots, at full power, the measured readings are where I need them. But the color needs a little more blue.
I tried the chinese strip lights, and angling them back, but it just didn't have the power I needed. I think my current plan is this:
1) 2 48" Orphek 120 strip lights, probably in UV, mounted on the front wall, pointed diagonally towards the back rocks.
2) 6-8 20W Chinese Flood lights in Royal Blue, mounted on a bar right over the back of the tank, probably 2" off the acrylic.
I got one of the 20w floods, and gave it a quick test. I was pretty impressed actually. With the main lights at full, directly underneath the flood, I was getting an additional 40 PAR from it, and it gave a nice coloration to the back.
Similar threads
- Replies
- 138
- Views
- 4,557
- Replies
- 9
- Views
- 108
- Replies
- 0
- Views
- 136
- Replies
- 57
- Views
- 2,994
- Replies
- 6
- Views
- 327


