Trouble shooting Neptune ATK

ZipAdeeZoa

Valuable Member
View Badges
Joined
Dec 18, 2018
Messages
1,004
Reaction score
1,637
Location
Nova Scotia
Rating - 0%
0   0   0
Hello everyone

I setup my first tank with an apex junior about a month ago and got the ATK to go with it and although it took some time for me to figure out how to update the module I managed to get it done and hooked it up as the instructions stated.

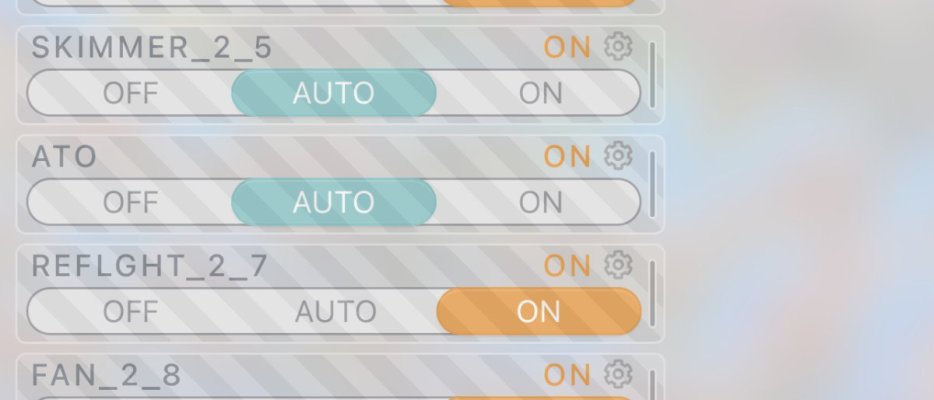
I used the preset configuration for the atk and called it a day but the water dropped below both sensors and it didn't kick in. I'm not very tech fluent and while trying to make sure it was purposed as the atk I made a second atk assigned to the same outlet... I removed the tile from my dashboard and continued.

I turned on the pmump on fusion and nothing happened so I went to switch tiles thinking I had swapped out the wrong one but once I saw the other one I decided to leave both of them on the dash and try toggling them on and off at the same time which worked. after to continuing to toggle them both back and forth I realized that the one I removed was no longer doing anything and put the tile back assuming I had solved the problem but now that I'm saying it out loud I'm realizing how that doesn't make any sense.

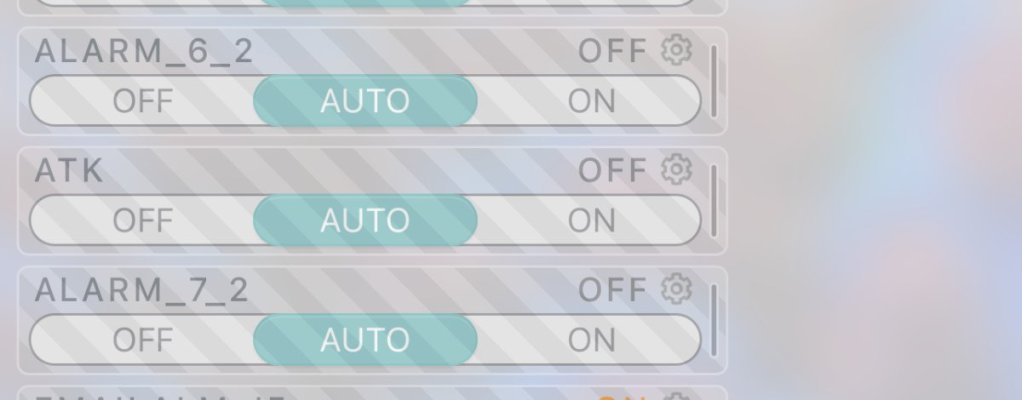
As is the Pmump will come on when I toggle it on but even if the water is well below both sensors and its on auto nothing happens. I've also been getting an alarm from the ATK since I first hooked it up about once an hour irregardless of where the water is in relation to the sensors.

I'm starting to think I've messed something up badly enough that I should probably just reset everything and try starting from scratch so that it either works or so that I don't muddy the waters by trying to fix it on my own...

I'm trying to Upload photos of the lines of code and the alarm notifications but now the files I'm air dropping have changed and I can no longer upload photos like I did last week. I'm starting to think technology and I are incompatible.

Does anybody have any idea's as to whats happening and how to fix it?
 

RamsReef

Valuable Member
View Badges
Joined
Aug 18, 2016
Messages
1,754
Reaction score
1,493
Rating - 0%
0   0   0
Not until you post your code.

The ATK is pretty straight forward,

Sensor 1 and Sensor 2, Sensor 1 is the low one, Sensor 2 is the higher one.
24 volt plugged in
Pmup plugged in.


I would do that and disconnect it from the apex, just run it stand alone.

Does it work?

After you verify it works like that then go into apex.

If you are that lost that you can not post code or the like, you might want to find a local reefer who can help you.

Most people work for beers or a frag.

Ram
 

Steve1310

Active Member
View Badges
Joined
Jun 17, 2016
Messages
309
Reaction score
443
Location
Chesapeake
Rating - 0%
0   0   0
Make sure the one and two sensors are plugged all the way in ! U can plug them in and it will nap in but it will still be less the a quarter inch from being plugged in ! I had a problem with mine like that ! I even looked at it and it looked plugged in but pushed hard on it and it clicked ! Maybe that is it !
 

vhuang168

Active Member
View Badges
Joined
Apr 17, 2015
Messages
212
Reaction score
135
Location
San Jose, CA
Rating - 0%
0   0   0
1st - how did you make a second ATK assigned to the same outlet!?! I do not understand what you did here.

2nd - did you run the ATK task?

if you cannot post a picture of the code, write it out.
 
OP
OP
ZipAdeeZoa

ZipAdeeZoa

Valuable Member
View Badges
Joined
Dec 18, 2018
Messages
1,004
Reaction score
1,637
Location
Nova Scotia
Rating - 0%
0   0   0
Thanks for the replies!

I was about to go try running it in stand alone but before I could I saw what Steve said and checked.... Both optical sensors where about a quater inch from being plugged in. That would explain the alarms:rolleyes: I toggled it back to auto after doing a manual fill so we'll see how that goes!

I did run the ATK task when I hooked it up originally and I'm sure I tried to redo the same process once I got the error messages, checked over everything made sure everything was plugged in (not enough it seems) but I ended up making a second one instead. Hopefully this solves the issue but in case it doesn't I forgot I could just copy paste the code, It felt like all my tech was turning against me the other day and amidst that frustration I totally forgot about copy/paste. I'm always impressed by how much my mother struggles with technology, seems the apple didn't fall to far from the tree;Hilarious

Heres the code for the one I'm running:

Fallback OFF
Set OFF
If Sw1 OPEN Then ON
If Sw2 CLOSED Then OFF
Defer 001:00 Then ON

Heres the code from the now inactive tile which I'm pretty sure is the code the ATK function gives you, If I try and check I'll end up with a third one. I should note that even when I remove the other tile from the dash the PMUMP will not come on with this function even when toggled to the ON position. Asides form that the code above just makes more sense to me.

Fallback OFF
Set OFF
If Swx2_1 OPEN Then ON
If Swx2_2 CLOSED Then OFF
When On > 005:00 Then OFF
Defer 000:10 Then ON
Defer 000:04 Then OFF
Min Time 060:00 Then OFF
 

Ultra Aquatics

Well-Known Member
View Badges
Joined
Apr 13, 2012
Messages
796
Reaction score
853
Location
New York
Rating - 100%
1   0   0
Might sound silly, but make sure you have the AC adapter plugged into the FMM.

If its not plugged in the FMM will still light up and sensors still activate, but the PMUP will never turn on.
 
OP
OP
ZipAdeeZoa

ZipAdeeZoa

Valuable Member
View Badges
Joined
Dec 18, 2018
Messages
1,004
Reaction score
1,637
Location
Nova Scotia
Rating - 0%
0   0   0
Pictures would help

"I uploaded photos to my build thread just fine a few weeks ago doing the exact same thing but since then I updated my phone and now instead of a Jpeg I get HEIC appearing where there was JPG. I swear if I need some "Apple Photo Format adapter" I'm just going to open angry birds and toss it in the tank for hermit crab to entertain himself..."

I wrote the above and then realized I should be able to export whatever it is to Jpeg since I can do raw to Jpeg the same way... If we need photos I can now provide them:confused:
 
OP
OP
ZipAdeeZoa

ZipAdeeZoa

Valuable Member
View Badges
Joined
Dec 18, 2018
Messages
1,004
Reaction score
1,637
Location
Nova Scotia
Rating - 0%
0   0   0
Might sound silly, but make sure you have the AC adapter plugged into the FMM.

If its not plugged in the FMM will still light up and sensors still activate, but the PMUP will never turn on.

The PMUP is getting power though because it kicks in when I toggle the ATO tile on my dash to ON but if I switch tiles it won't kick in when I do the same thing. I figure that if one comes on the other should when I swap them but then again I'm fairly confident its not suppose to have two ATO functions at any given time even when ones not on the Dash.
 

vhuang168

Active Member
View Badges
Joined
Apr 17, 2015
Messages
212
Reaction score
135
Location
San Jose, CA
Rating - 0%
0   0   0
The code from the 1st set is incorrect. Your optical sensors are not SW1 and SW2.

The code from the 2nd set is probably the correct one.

Which outlet is the 1st code set in?

Which outlet is the 2nd code set in?

Where is the power supply to the FMM plugged into? If to the EB832, which outlet?
 

RamsReef

Valuable Member
View Badges
Joined
Aug 18, 2016
Messages
1,754
Reaction score
1,493
Rating - 0%
0   0   0
I have no idea how you have two different tiles for one 24volt outlet?!?!

I would stick with apex original code, it prevents your pmup from running longer than 5 minutes, and also makes it so it checks your water level every hour.

Your code could potentially cause the pmup to cycle every minute.
 
OP
OP
ZipAdeeZoa

ZipAdeeZoa

Valuable Member
View Badges
Joined
Dec 18, 2018
Messages
1,004
Reaction score
1,637
Location
Nova Scotia
Rating - 0%
0   0   0
I have no idea how you have two different tiles for one 24volt outlet?!?!

I would stick with apex original code, it prevents your pmup from running longer than 5 minutes, and also makes it so it checks your water level every hour.

Your code could potentially cause the pmup to cycle every minute.
Actually I think only one is Assigned to oulet #1, Also I thought the "min" meant how long it would run for but your saying it means it has to wait at least an hour before it runs again?

The code from the 1st set is incorrect. Your optical sensors are not SW1 and SW2.

The code from the 2nd set is probably the correct one.

Which outlet is the 1st code set in?

Which outlet is the 2nd code set in?

Where is the power supply to the FMM plugged into? If to the EB832, which outlet?
I have the Apex Junior So I believe its an EB4, the power supply is plugged into Outlet #1. The shorter codes device shows as base_Out1 and longer codes device shows 2_1, Does this mean only the shorter code that I shouldn't be using is assigned to an outlet and the other is just in limbo? that would explain why only the one tile powers it on. Is there away to assign the longer code to the #1 outlet?

I'm starting to feel rather ridiculous for missing all these things but I'm very glad I asked
 

vhuang168

Active Member
View Badges
Joined
Apr 17, 2015
Messages
212
Reaction score
135
Location
San Jose, CA
Rating - 0%
0   0   0
Base_Out1 where the power supply is plugged into, should be set as an Always ON outlet. You do not turn the power to the FMM on/off. It should be supplying power to the FMM at all times.

2_1 is the outlet on the FMM itself, that is where the PMUP is plugged into and that is where you want to control the PMUP from.

Make the change to base_out1 and put that on Auto.

Fill the water until it touches/covers the bottom sensor.

Put LinkA_2_1 to Auto.
 
OP
OP
ZipAdeeZoa

ZipAdeeZoa

Valuable Member
View Badges
Joined
Dec 18, 2018
Messages
1,004
Reaction score
1,637
Location
Nova Scotia
Rating - 0%
0   0   0
Base_Out1 where the power supply is plugged into, should be set as an Always ON outlet. You do not turn the power to the FMM on/off. It should be supplying power to the FMM at all times.

2_1 is the outlet on the FMM itself, that is where the PMUP is plugged into and that is where you want to control the PMUP from.

Make the change to base_out1 and put that on Auto.

Fill the water until it touches/covers the bottom sensor.

Put LinkA_2_1 to Auto.

So just to be 100% sure I don't mess this up- I switch the codes via copy paste, turn on the PMUP until the bottom sensor is covered and then put them both on auto?
 

vhuang168

Active Member
View Badges
Joined
Apr 17, 2015
Messages
212
Reaction score
135
Location
San Jose, CA
Rating - 0%
0   0   0
You do not need to copy paste anything.

Base_l1 needs to be set as an Always ON outlet. In control type, change from advanced to always. Select ON then update.

LinkA_2_1 should already have the programming below.
Fallback OFF
Set OFF
If Swx2_1 OPEN Then ON
If Swx2_2 CLOSED Then OFF
When On > 005:00 Then OFF
Defer 000:10 Then ON
Defer 000:04 Then OFF
Min Time 060:00 Then OFF

Just leave that there.

Manually fill the water until it touches/covers the bottom sensor and move LinkA_2_1 to Auto.
 
OP
OP
ZipAdeeZoa

ZipAdeeZoa

Valuable Member
View Badges
Joined
Dec 18, 2018
Messages
1,004
Reaction score
1,637
Location
Nova Scotia
Rating - 0%
0   0   0
You do not need to copy paste anything.

Base_l1 needs to be set as an Always ON outlet. In control type, change from advanced to always. Select ON then update.

LinkA_2_1 should already have the programming below.
Fallback OFF
Set OFF
If Swx2_1 OPEN Then ON
If Swx2_2 CLOSED Then OFF
When On > 005:00 Then OFF
Defer 000:10 Then ON
Defer 000:04 Then OFF
Min Time 060:00 Then OFF

Just leave that there.

Manually fill the water until it touches/covers the bottom sensor and move LinkA_2_1 to Auto.
Thanks! I wanted to make sure it was working for a little bit before I got to excited but its working now, Thanks everyone!
 

Mcdy

Community Member
View Badges
Joined
Aug 10, 2019
Messages
91
Reaction score
42
Location
Independence
Rating - 0%
0   0   0
Ok,...I am not seeing the 24v link for the fmm and the pmup. I see the e832 24v ports but not the FMM module 24v port. Also,...I have checked the tiles and still not seeing the port. Any ideas??
 

vhuang168

Active Member
View Badges
Joined
Apr 17, 2015
Messages
212
Reaction score
135
Location
San Jose, CA
Rating - 0%
0   0   0
It is labeled ACC.


Screen Shot 2019-08-15 at 9.04.22 AM.png
 

Arisbel

Active Member
View Badges
Joined
Jun 29, 2019
Messages
128
Reaction score
100
Rating - 0%
0   0   0
I have the same issue and I didn’t comprehend a single thing said in this thread. I have 2 just like he put. Wish I knew what to do… to be honest, I need my hand held on this becuase I did not understand a thing y’all said
 

Attachments

  • FDDE2E36-108D-4FDD-A8A7-7D16C029007C.jpeg
    FDDE2E36-108D-4FDD-A8A7-7D16C029007C.jpeg
    57.5 KB · Views: 23
  • 72C38B21-8F7F-400D-9C3E-382C7CD79270.jpeg
    72C38B21-8F7F-400D-9C3E-382C7CD79270.jpeg
    51.9 KB · Views: 23

High pressure shells: Do you look for signs of stress in the invertebrates in your reef tank?

  • I regularly look for signs of invertebrate stress in my reef tank.

    Votes: 36 31.3%
  • I occasionally look for signs of invertebrate stress in my reef tank.

    Votes: 28 24.3%
  • I rarely look for signs of invertebrate stress in my reef tank.

    Votes: 21 18.3%
  • I never look for signs of invertebrate stress in my reef tank.

    Votes: 30 26.1%
  • Other.

    Votes: 0 0.0%
Back
Top