12ft of 3” solid maple wasn’t cheap. Don’t let me screw this up. How would you attach? Silicone & clamps/ Plz advise

Navigation
Install the app
How to install the app on iOS
Follow along with the video below to see how to install our site as a web app on your home screen.
Note: This feature may not be available in some browsers.
More options
You are using an out of date browser. It may not display this or other websites correctly.
You should upgrade or use an alternative browser.
You should upgrade or use an alternative browser.
Wood frame for plastic rimmed tank
- Thread starter Doctorgori
- Start date
- Tagged users None
- Joined
- Jun 10, 2019
- Messages
- 565
- Reaction score
- 1,035
you could use 2.5" self tapping screws... that should hold them on good and tight.....
Just kidding, I personally would use silicone and clamp it on, let it cure for a day or two before taking the clamps off. I would recommend roughing up the black plastic trim a little with some coarse sandpaper before just for a little added piece of mind...
Just kidding, I personally would use silicone and clamp it on, let it cure for a day or two before taking the clamps off. I would recommend roughing up the black plastic trim a little with some coarse sandpaper before just for a little added piece of mind...
- Joined
- Feb 15, 2019
- Messages
- 2,444
- Reaction score
- 3,357
3m double sided tape.
I imagine if I ever
Ha ha , I actually stopped reading
I was thinking silicone but wondered if I ever had to remove it, it could be a pain ...silicone: option #2
you could use 2.5" self tapping screws... that should hold them on good and tight.....
Just kidding, I personally would use silicone and clamp it on, let it cure for a day or two before taking the clamps off. I would recommend roughing up the black plastic trim a little with some coarse sandpaper before just for a little added piece of mind...
Ha ha , I actually stopped reading
I was thinking silicone but wondered if I ever had to remove it, it could be a pain ...silicone: option #2
Option #1, if I can find it and the indicated strength is enough...edit: waterproof? water tolerant, et3m double sided tape.
Are you decent at woodworking? You could miter and assemble the pieces off the tank and install over the top like a crown. To me this would be the best and most seamless look and would allow for easy removal.
Are you decent at woodworking? You could miter and assemble the pieces off the tank and install over the top like a crown. To me this would be the best and most seamless look and would allow for easy removal.
I’m “OK” with wood working, and I mean just “OK”. .... I make mistakes and just did; I’m using solids to edge my plywood board, so I joined them using a Kreg rig instead of dowel rods. Now I gotta disassemble and re-do.
Sorry for the cry-ramble ...anyway, I was thinking of just that. Even running off about 2 sawblabes worth on the inside to give the frame a resting lip. Chickened out on the tricky math for a tight fit.
roger to the miter edge; done. I’m gonna pre-drill holes for 1.5” finish nails + Gorilla glue. Just cop’d corner clamps
Thats exactly what I would do. Run the pieces through the table saw with a dato or even regular blade, miter, then attach them together with some small finish nails and some wood glue. Couple of dabs of silicone in the corner or some double sided tape to keep it from being loose.I’m “OK” with wood working, and I mean just “OK”. .... I make mistakes and just did; I’m using solids to edge my plywood board, so I joined them using a Kreg rig instead of dowel rods. Now I gotta disassemble and re-do.
Sorry for the cry-ramble ...anyway, I was thinking of just that. Even running off about 2 sawblabes worth on the inside to give the frame a resting lip. Chickened out on the tricky math for a tight fit.
roger to the miter edge; done. I’m gonna pre-drill holes for 1.5” finish nails + Gorilla glue. Just cop’d corner clamps
I’d opt for silicone. With 3m tape there will be a crack, easy for water to drip between.
Thats exactly what I would do. Run the pieces through the table saw with a dato or even regular blade, miter, then attach them together with some small finish nails and some wood glue. Couple of dabs of silicone in the corner or some double sided tape to keep it from being loose.
I’d opt for silicone. With 3m tape there will be a crack, easy for water to drip between.
Silicone then .... I need to route the edges, should I
-assemble the frame 1st, clamp down, then run maybe 1/4 - 1/8 round to soften that milled edge?
-Route each side then assemble
I definitely want a clean retro-modern look; vacillating over routing those edges or sanding them
if you are looking for a retro modern look I would use a 1/4" round over bit, and then sand afterwards. I have made lots of mid century modern or danish contemporary inspired furniture and the router was used a lot. I am sure it would still look good if you just broke the edges by hand, but it won't have as much of a "look".Silicone then .... I need to route the edges, should I
-assemble the frame 1st, clamp down, then run maybe 1/4 - 1/8 round to soften that milled edge?
-Route each side then assemble
I definitely want a clean retro-modern look; vacillating over routing those edges or sanding them
When doing projects like this, I like to run the router before assembly. If you have a router table, then it's quick work running the pieces. Having a piece like this assembled first, may make routing take a bit longer.
jsker
Reefing is all about the adventure
View Badges
Staff member
Super Moderator
Partner Member 2024
Excellence Award
Reef Tank 365
Article Contributor
Hospitality Award
Ocala Reef Club Member
R2R Secret Santa 2023
My Tank Thread
I would also suggest to use stainless brad nails and titebond green outdoor glue.I’d opt for silicone. With 3m tape there will be a crack, easy for water to drip between.
Appreciate that, will do exactly as instructed. I’ll post picif you are looking for a retro modern look I would use a 1/4" round over bit, and then sand afterwards. I have made lots of mid century modern or danish contemporary inspired furniture and the router was used a lot. I am sure it would still look good if you just broke the edges by hand, but it won't have as much of a "look".
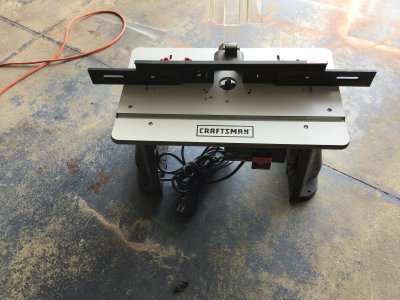
I have a cheesy Craftsman whose fence I don’t trustWhen doing projects like this, I like to run the router before assembly. If you have a router table, then it's quick work running the pieces. Having a piece like this assembled first, may make routing take a bit longer.

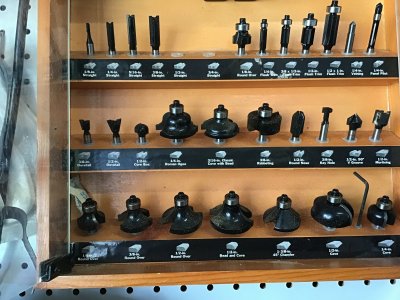
...its been a while, and i know how dumb this sounds, but which bit? ;Bored

- Joined
- Feb 15, 2019
- Messages
- 2,444
- Reaction score
- 3,357
Double up on that. He could use the tape and then apply a bead of silicone on top to fully waterproof.I’d opt for silicone. With 3m tape there will be a crack, easy for water to drip between.
Similar threads
- Replies
- 24
- Views
- 754


