Navigation
Install the app
How to install the app on iOS
Follow along with the video below to see how to install our site as a web app on your home screen.
Note: This feature may not be available in some browsers.
More options
You are using an out of date browser. It may not display this or other websites correctly.
You should upgrade or use an alternative browser.
You should upgrade or use an alternative browser.
The Illuminata Conspiracy, a rimless build
- Build Thread
- Thread starter Akwarius
- Start date
- Tagged users None


OP
OP
Lessons Learned
Some random motivating factors and mistakes that I've learned from my previous setup:
1. The importance of a tidy sump and organized equipment.
2. Your frag tank should be specifically designed for the particular coral on growout.
3. Reactors should be accessible and installed in such a way to facilitate regular maintenance.
4. Cryptic zones of live rock can be beneficial, but only if they dont become nutrient traps.
5. If you are forgetting what corals you own, you might have too many frags!
6. Large brittlestars are of little use to a reef tank.
7. A large, poorly maintained reef tank is hard to ignore.
8. Phosphates that are elevated for a period of time will come to haunt you later by leeching out of live rock.
9. A diamond goby will escape regardless of the tank cover!
10. If you skimp on plumbing, then you will probably hate it for the life of the tank.
11. A reef tank should compliment your home interior, be something that you are proud to show off, and (in my case) be child-safe.
12. Equipment without a failsafe will eventually exercise Murphy's law.
13. Saltwater is an excellent conductor of electricity.")
Some random motivating factors and mistakes that I've learned from my previous setup:
1. The importance of a tidy sump and organized equipment.
2. Your frag tank should be specifically designed for the particular coral on growout.
3. Reactors should be accessible and installed in such a way to facilitate regular maintenance.
4. Cryptic zones of live rock can be beneficial, but only if they dont become nutrient traps.
5. If you are forgetting what corals you own, you might have too many frags!
6. Large brittlestars are of little use to a reef tank.
7. A large, poorly maintained reef tank is hard to ignore.
8. Phosphates that are elevated for a period of time will come to haunt you later by leeching out of live rock.
9. A diamond goby will escape regardless of the tank cover!
10. If you skimp on plumbing, then you will probably hate it for the life of the tank.
11. A reef tank should compliment your home interior, be something that you are proud to show off, and (in my case) be child-safe.
12. Equipment without a failsafe will eventually exercise Murphy's law.
13. Saltwater is an excellent conductor of electricity.
Last edited:

OP
OP
Dry rock build
Here's a quick DIY of my dry rock build. Waterfall foam is, in my opinion, the best way to secure rock. The only caveat is that the rock must be dry in order for it to adhere and cure properly. Once set, the foam is very strong and flexible, takes coralline growth well, and not terribly unattractive. I start with an armature of unglued 3/4" pvc and an eggcrate base. The challenge will be to disguise the hard angles and lines of this initial armature.
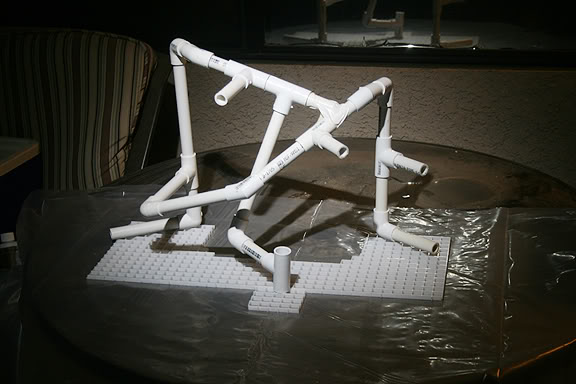
Here's a quick DIY of my dry rock build. Waterfall foam is, in my opinion, the best way to secure rock. The only caveat is that the rock must be dry in order for it to adhere and cure properly. Once set, the foam is very strong and flexible, takes coralline growth well, and not terribly unattractive. I start with an armature of unglued 3/4" pvc and an eggcrate base. The challenge will be to disguise the hard angles and lines of this initial armature.
OP
OP
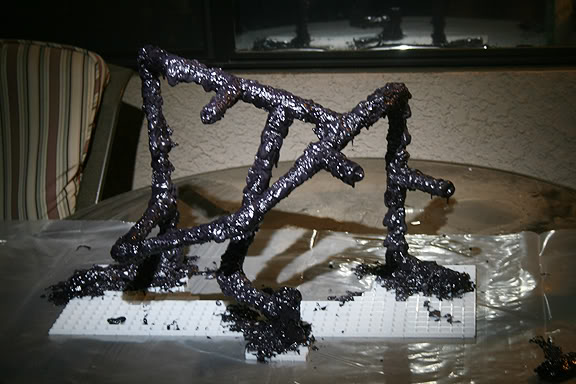
The first coat of waterfall foam is essentially just to cover the pipe and secure the fittings. I spray modest amounts of the foam and spread it periodically with a foam brush. The idea is not to allow the foam to "puff" up at this point. Unexpanded foam will be stronger and provide a better attachment for the dry rock.
OP
OP
The next step is the most difficult because of the time constraints of the curing foam. I layout the dry rock (brs shelf and eco) and fracture some pieces in order to better fit the composition. The BRS shelf rock is amazing, the largest of which ended up being about as large as my 21" flat screen computer monitor. The rock has not been cooked, though I am confident that this rock is fairly clean considering the lack of odor and visible detritus. I will also be using a large amount of seed rock from my previous setup, just not in the main aquascape.
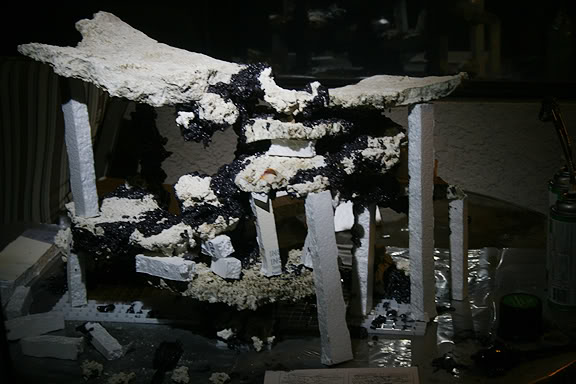
As you can see the scape has become a mess of supports and scaffolds. These styrofoam pieces will remove easily with a knife or flame when the waterfall foam has cured. I want to really take advantage of the process and make dramatic overhangs and shelves. The best way I can describe how these rocks are attached to the armature is that I am using the foam as a "glue". I spray it on both surfaces and then attach, support the rock, and then spread or remove foam with a brush as necessary. Some of the larger rocks will require several coats. I cannot stress enough that the foam should not simply be allowed to expand. It needs to be worked into a denser consistency for strength.
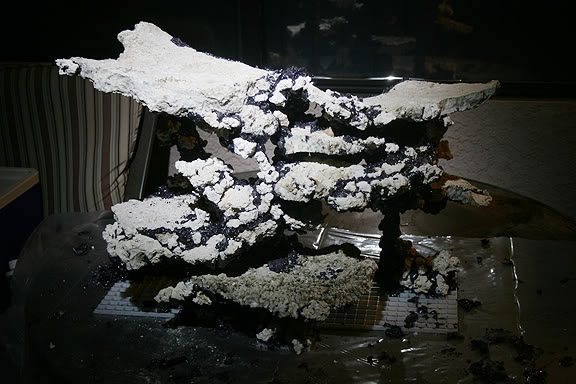
Here's the finished product fully cured. Pretty close to how I imagined it, though I had to think on the fly and make some compromises to insure stability of the rock. I'm very happy with the shelves- this will allow plenty of space for zoanthid and chalice frag disks.
As you can see the scape has become a mess of supports and scaffolds. These styrofoam pieces will remove easily with a knife or flame when the waterfall foam has cured. I want to really take advantage of the process and make dramatic overhangs and shelves. The best way I can describe how these rocks are attached to the armature is that I am using the foam as a "glue". I spray it on both surfaces and then attach, support the rock, and then spread or remove foam with a brush as necessary. Some of the larger rocks will require several coats. I cannot stress enough that the foam should not simply be allowed to expand. It needs to be worked into a denser consistency for strength.
Here's the finished product fully cured. Pretty close to how I imagined it, though I had to think on the fly and make some compromises to insure stability of the rock. I'm very happy with the shelves- this will allow plenty of space for zoanthid and chalice frag disks.

OP
OP
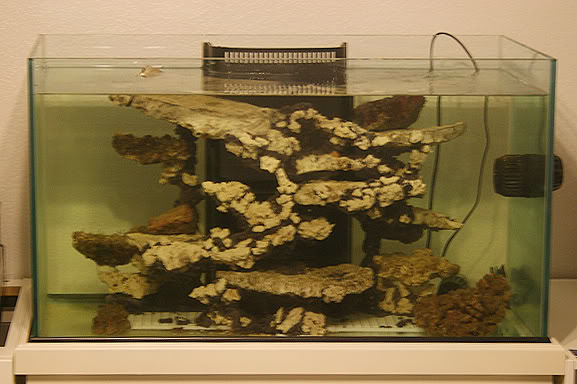
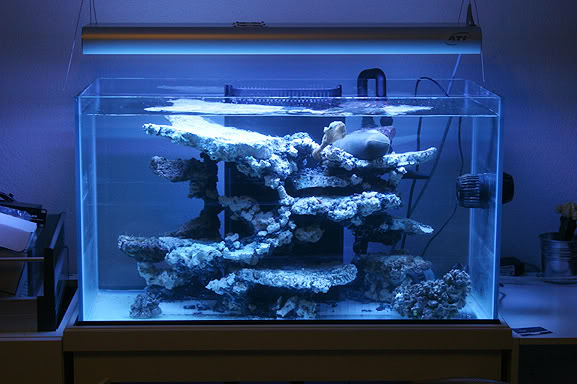
Here's a shot of the rock curing in-tank. As you can see, the idea was to disguise/integrate the prominent center overflow into the aquascape.
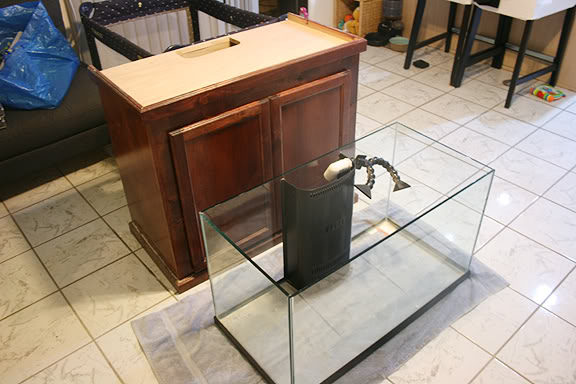
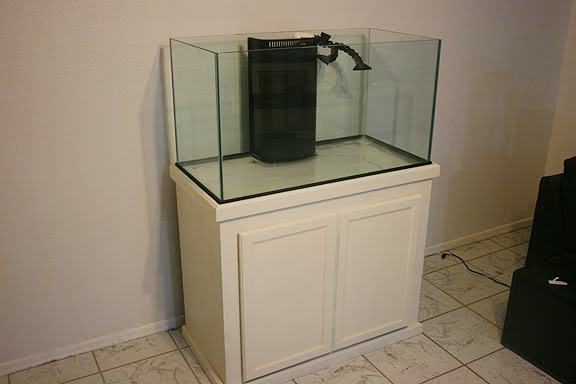
Full setup without sump. Now off to work on plumbing...
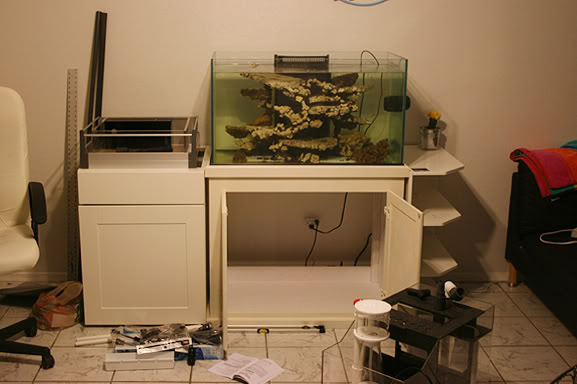
The adjacent cabinet will house an eight-gallon frag tank plumbed into the main system. I want to have it entirely concealed and on a drawer-pull.
Full setup without sump. Now off to work on plumbing...
The adjacent cabinet will house an eight-gallon frag tank plumbed into the main system. I want to have it entirely concealed and on a drawer-pull.
OP
OP
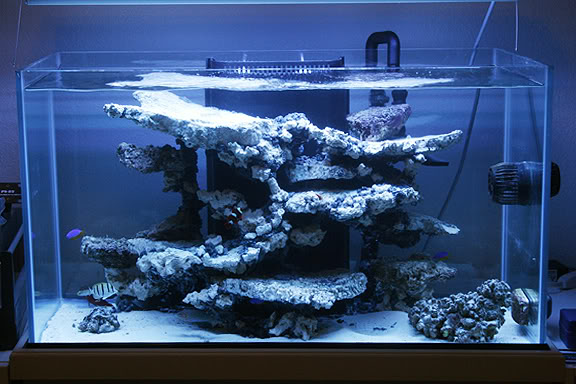
Fish added!
Another week and nitrites are almost undetectable. I added damsels for a couple of days and decided to add the rest of my fish. Would not have rush this, but I really wanted to fully tear down my existing tank. The plumbing is finally finished. I spent a lot of time working on the best layout, and it's a huge improvement over my previous attempts. Unfortunately, I discovered that the pre-drilled holes only accomodated 3/4" drains, so I went with two of them and slung the return over the top. The return is a SRO waterblaster HY-3000W, which will feed the reactors and frag tank as well.
 W HY-3000W
Another week and nitrites are almost undetectable. I added damsels for a couple of days and decided to add the rest of my fish. Would not have rush this, but I really wanted to fully tear down my existing tank. The plumbing is finally finished. I spent a lot of time working on the best layout, and it's a huge improvement over my previous attempts. Unfortunately, I discovered that the pre-drilled holes only accomodated 3/4" drains, so I went with two of them and slung the return over the top. The return is a SRO waterblaster HY-3000W, which will feed the reactors and frag tank as well.

OP
OP
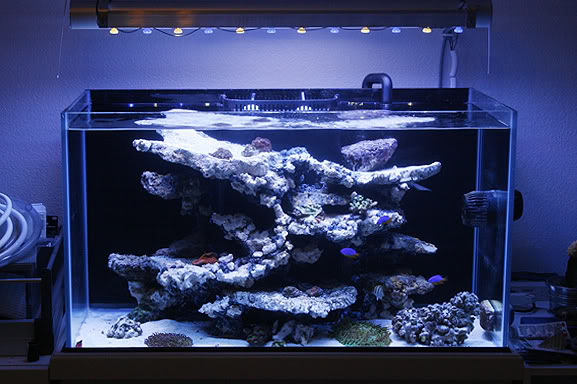
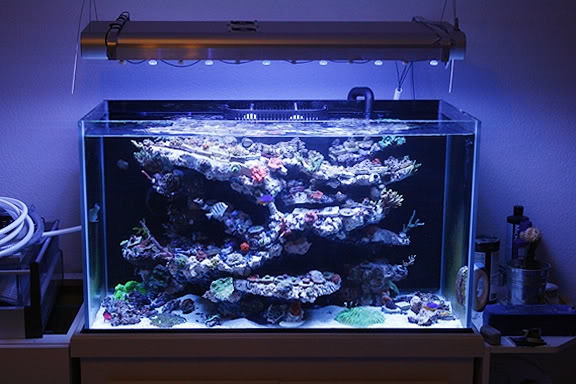
LED's installed!
Finally got around to installing the LED's. Two diy 36" strips with 12 CW XPG's and 12 RB XPE's. An aluminum armature connects the heatsinks to the ATI. Bright and beautiful!
You'll also notice that I decided to paint the back panel black. This helps to further disguise the overflow.
Finally got around to installing the LED's. Two diy 36" strips with 12 CW XPG's and 12 RB XPE's. An aluminum armature connects the heatsinks to the ATI. Bright and beautiful!
You'll also notice that I decided to paint the back panel black. This helps to further disguise the overflow.
OP
OP
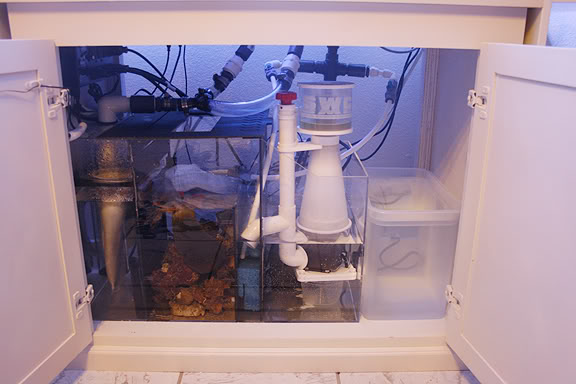
What'sump?
Current sump shot.
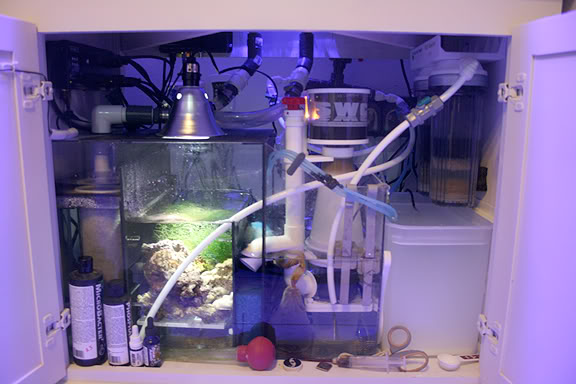
It's compact, but a huge improvement over what I've set up in the past. Everything is accessible and serves a purpose. Refugium completed with chaeto and extra live rock elevated on an eggcrate platform. The fuge has a vortech! BRS dual reactor, ATO unit, and three part doser installed. The skimmer is already kicking butt!
Current sump shot.
It's compact, but a huge improvement over what I've set up in the past. Everything is accessible and serves a purpose. Refugium completed with chaeto and extra live rock elevated on an eggcrate platform. The fuge has a vortech! BRS dual reactor, ATO unit, and three part doser installed. The skimmer is already kicking butt!


Travis,
Looks great man! I love the aquascape! you did an excellent job putting that together it really looks good man! That's one HOT looking system! :bigsmile:
Looks great man! I love the aquascape! you did an excellent job putting that together it really looks good man! That's one HOT looking system! :bigsmile:
With the scaping it looks much larger than it actually is... This is awesome!

OP
OP
Thanks Kev! I really tried to think this one through.Travis,
Looks great man! I love the aquascape! you did an excellent job putting that together it really looks good man! That's one HOT looking system! :bigsmile:
Thanks! Im accustomed to a more minimal look, but with this scape I wanted plenty of space for zoas and chalice.With the scaping it looks much larger than it actually is... This is awesome!
Thank you! This diy method opens up a lot of possibilites.Thats really nice! I really like the way you built the rock work!
Thanks!looking great!
Thank you!Nicely Done!
Similar threads
- Replies
- 2
- Views
- 75
- Replies
- 838
- Views
- 12,794

New Posts
-
 Inkbird app interval can't be less than .3?
- Latest: Townes_Van_Camp
-

-

-

-


