JeffLED

Community Member
View Badges
Joined
Feb 23, 2020
Messages
55
Reaction score
28
Rating - 0%
0   0   0
Welcome to my build thread. If pictures are worth 1000 words, then I plan on saving myself some typing with some photos.
I have a few "strategies" or "philosophies" that I have always stuck with in reef keeping:
  1. Over-do equipment
  2. Under-do stock list
  3. Stock inhabitants that can adapt to conditions - avoid trying to adapt conditions to accommodate inhabitants
  4. Limit anything that requires supplemental support (spot feeding of filter feeders, testing and dosing of non-standard trace elements, etc.)
  5. Prefer livestock that has a unique lifestyle (think clown & 'nem, Pistol shrimp & Goby)
Here are some of the details of the aquarium:
  1. 165 Gallon Seamless Bowfront from Aquavim
  2. The aquarium is drilled for an overflow and return, but I have converted the system in a Herbie system by adding a return line around the back of the aquarium, and using both drilled lines for overflows to the sump.
  3. Apex EL Reef controller
  4. Tunze ATO with redundant reservoir
Without further adieu, here is the current set-up/plan.
Steps completed:
I had a 75 gallon in my old house. I have moved the stock from the 75 into the new aquarium. The 75 is currently serving as the QT tank.

Aqua.png


This setup has been great thus far. Best part of all has been the spotfree car wash I have setup in my garage. It is basically an ATO reservoir with a standard float valve. I turn a knob and 5 gallons of spot free water (0TDS) drains into the reservoir with a freshwater pump attached.

Here is an image of the aquarium:
IMG_3293.jpg

I want to point out my "favorite" hack/DIY feature is definitely the stand lights. I have always powered LED stand lights from the Apex EL 24V power supply. They would turn on when I opened the left door. I found myself wanting the lights to go on when either door was opened, so it was just a quick little DIY hack.

IMG_3291.jpg
IMG_3290.jpg
IMG_3287.jpg

I spliced the cable to run to two different IR switches that are wired in parallel. After the IR switches, I have used two 12V LED strips that are wired in series. When either door is opened on my stand, both lights will come on. When both doors are closed in the stand, both lights go off.
IMG_3288.jpg

This is what it all looks like when the lighting is on.

My next priorities are stocking the tank with inhabitants. I welcome any comments or suggestions, and thanks for taking a look at my build. ATO.jpg
 

Bleigh

The best bad influence
View Badges
Joined
Jan 15, 2019
Messages
9,075
Reaction score
22,375
Location
Charlotte, NC
Rating - 0%
0   0   0
Wow! This is so detailed and well thought out! I feel like you just gave us the recipe for the secret sauce! Can’t wait to see the amazing things you do with it!
 

revhtree

Owner Administrator
View Badges
Joined
May 8, 2006
Messages
47,709
Reaction score
86,643
Rating - 100%
1   0   0
Great build thread!
 

Ron Reefman

Lets Go Snorkeling!
View Badges
Joined
Aug 12, 2012
Messages
9,281
Reaction score
20,866
Location
SW Florida
Rating - 0%
0   0   0
Great artwork, or whatever we should call the computer design images.

You look to be off to a strong start!
 
OP
OP
JeffLED

JeffLED

Community Member
View Badges
Joined
Feb 23, 2020
Messages
55
Reaction score
28
Rating - 0%
0   0   0
Great artwork, or whatever we should call the computer design images.

You look to be off to a strong start!
Hi Ron, thanks for the feedback. You can call them whatever you want but I personally just call it the greatest computer program of all time - MS Paint!
 
OP
OP
JeffLED

JeffLED

Community Member
View Badges
Joined
Feb 23, 2020
Messages
55
Reaction score
28
Rating - 0%
0   0   0
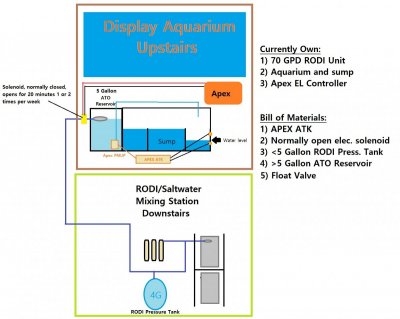
I am back and pleading to all for some assistance. I have a thought on a way to make my water change program much easier, I just want to run the design past Reef2Reef for thumbs up approvals. I currently run a sort of Herbie system with a fine gate valve on the main line (I like quiet).
I have a saltwater mixing station in my basement with the typical 32 gallon Brute Trashcans. I use a pump to move saltwater upstairs to the display tank at the rate of ROUGHLY 1 gallon/minute. The pump has a float switch, so when the brute is close to empty, it will shut itself off. The problem I have is needing to watch water levels because once I drain too much out, I will not have any new water mixed as replacement. Here is my "design" so I would never need to monitor actual water volumes in/out.

Basics of the design:
  1. Add a "T" above the fine gate vale
  2. Add a second gate valve to the "T"
  3. Add quick connect (or hose) just past the second gate valve.
Here are the steps for a water change.
  1. Turn off main return pump and allow display tank water to level out (should be inline with top of main return line)
  2. Close fine gate valve
  3. Open new gate valve
  4. Run coiled hose in stand outside, into sink, toilet, etc.
  5. Add hose from saltwater mixing station to display tank, allow pump to run until it turns off
  6. Once complete, reverse steps, but I would know that I have exchanged the perfect amount of water.
The thought is that for every gallon that enters the display, an equal amount of water would drain through the main drain line, leading to a near perfect 1:1 exchange of water. I have not seen this design elsewhere, maybe someone has. Does this sound like a prudent design?

Waterchange.png
 
OP
OP
JeffLED

JeffLED

Community Member
View Badges
Joined
Feb 23, 2020
Messages
55
Reaction score
28
Rating - 0%
0   0   0
Ready for the worst update on a tank build ever?!?
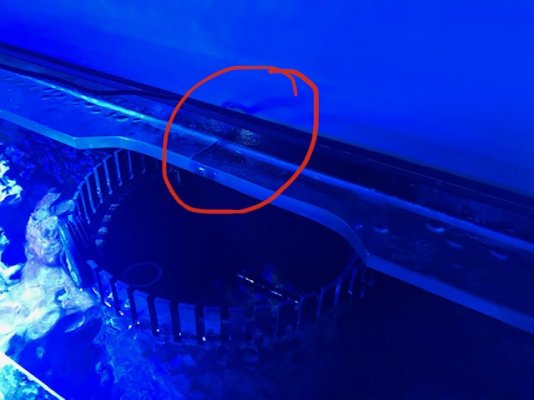
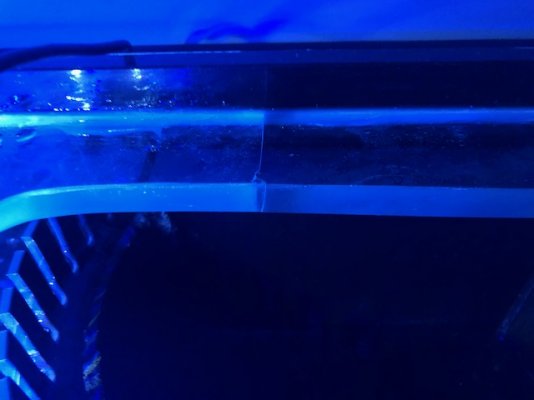
I was feeding the fish the other day and noticed an unusual line in the eurobrace on my aquarium. Upon further inspection, I noticed it is fully cracked! Uh oh. I quickly contacted the manufacturer, Aquavim. It took a few days, but here was their reply:

"Our specialist says it's best to replace it, as it is risky to have a glass tank without the euro-bracing. You can do this by emptying the aquarium first (as currently the water is applying pressure to all sides of the tank), and then finding a piece of glass that is the same size, and gluing this with silicone glue underneath the piece that has the crack, so that they are glued together and you get double reinforcement. Pls note, it is very important that the tank is COMPLETELY empty without water before you do this.

Please update us on the process and contact us if you have any questions."


Euro crack.jpeg Eurocrack2.jpeg
 

nickng

Active Member
View Badges
Joined
Apr 20, 2023
Messages
257
Reaction score
227
Location
Boston
Rating - 0%
0   0   0
Ready for the worst update on a tank build ever?!?
I was feeding the fish the other day and noticed an unusual line in the eurobrace on my aquarium. Upon further inspection, I noticed it is fully cracked! Uh oh. I quickly contacted the manufacturer, Aquavim. It took a few days, but here was their reply:

"Our specialist says it's best to replace it, as it is risky to have a glass tank without the euro-bracing. You can do this by emptying the aquarium first (as currently the water is applying pressure to all sides of the tank), and then finding a piece of glass that is the same size, and gluing this with silicone glue underneath the piece that has the crack, so that they are glued together and you get double reinforcement. Pls note, it is very important that the tank is COMPLETELY empty without water before you do this.

Please update us on the process and contact us if you have any questions."


Euro crack.jpeg Eurocrack2.jpeg
Hi, I know this is an older thread. However I really like the seamless bow front look and am thinking of the 70 or 100 gallon versions. So I am curious if the issue has been fixed or did you get rid of the tank.
 
OP
OP
JeffLED

JeffLED

Community Member
View Badges
Joined
Feb 23, 2020
Messages
55
Reaction score
28
Rating - 0%
0   0   0
Still have it. Let me know if you have specific questions. This was my first aquarium with curved glass of any type. Two things I never realized before it was already in my house:
1) Keeping the bowfront glass clean is way different than flat panels of glass (less efficient). Just picture the interaction of the magnetic pad or scraper you intend to use. Especially if you have a DSB and are one of the people who likes to scrape "sub sand surface". I actually use a magfloat for most cleaning, and recently purchased a Tunze Care Magnet+ to actually scrape areas where coralline began to grow. Either needs to be vertical or horizontal to keep the cleaning surfaced in contact with the glass.
2) There can be a slight fishbowl effect for certain parts of the aquarium from certain angles. This does not bother me at all but in the wrong location it may not be optimal tank. It is most noticeable when viewing 45degrees off of the center view. If you always had to look into the aquarium from the two bends where the glass is "most curved", it might not be the best option.
 

nickng

Active Member
View Badges
Joined
Apr 20, 2023
Messages
257
Reaction score
227
Location
Boston
Rating - 0%
0   0   0
Still have it. Let me know if you have specific questions. This was my first aquarium with curved glass of any type. Two things I never realized before it was already in my house:
1) Keeping the bowfront glass clean is way different than flat panels of glass (less efficient). Just picture the interaction of the magnetic pad or scraper you intend to use. Especially if you have a DSB and are one of the people who likes to scrape "sub sand surface". I actually use a magfloat for most cleaning, and recently purchased a Tunze Care Magnet+ to actually scrape areas where coralline began to grow. Either needs to be vertical or horizontal to keep the cleaning surfaced in contact with the glass.
2) There can be a slight fishbowl effect for certain parts of the aquarium from certain angles. This does not bother me at all but in the wrong location it may not be optimal tank. It is most noticeable when viewing 45degrees off of the center view. If you always had to look into the aquarium from the two bends where the glass is "most curved", it might not be the best option.
thanks, good to know the tank is ok after the fix.
By the way how thick is the glass used on the tank?
I actually have a 32 biocube with the back panel removed to gain 5 inches more tank width and drilled for a sump. There are scrapers made for curved glass and I find that I don’t need to worry about scraping the silicone edge. I took a look at the aqua vim site and saw a seamless curved glass with a flat front panel.
 
OP
OP
JeffLED

JeffLED

Community Member
View Badges
Joined
Feb 23, 2020
Messages
55
Reaction score
28
Rating - 0%
0   0   0
thanks, good to know the tank is ok after the fix.
By the way how thick is the glass used on the tank?
I actually have a 32 biocube with the back panel removed to gain 5 inches more tank width and drilled for a sump. There are scrapers made for curved glass and I find that I don’t need to worry about scraping the silicone edge. I took a look at the aqua vim site and saw a seamless curved glass with a flat front panel.
I previously owned a 29 biocube. I actually forget about this when I said I hadn't owned an aquarium with curved glass. Cleaning the new display bowfront is quite different than cleaning the little biocube.

I think glass is 3/4" ish but I do not have this committed to memory. You can prob find these specs on Aquavim website.
Any other specific questions?
 

nickng

Active Member
View Badges
Joined
Apr 20, 2023
Messages
257
Reaction score
227
Location
Boston
Rating - 0%
0   0   0
I previously owned a 29 biocube. I actually forget about this when I said I hadn't owned an aquarium with curved glass. Cleaning the new display bowfront is quite different than cleaning the little biocube.

I think glass is 3/4" ish but I do not have this committed to memory. You can prob find these specs on Aquavim website.
Any other specific questions?
Thanks for sharing. I just sent an email to aqua vim about their 80 gallon bow front and the 120 gallon Panaromic flat front designs.
Other than the crack, how’s the build quality of the tank? Also does the cabinet have adjustable supports that can be adjusted to level out the tank? And how solid is the cabinet ie solid wood?
 
OP
OP
JeffLED

JeffLED

Community Member
View Badges
Joined
Feb 23, 2020
Messages
55
Reaction score
28
Rating - 0%
0   0   0
Thanks for sharing. I just sent an email to aqua vim about their 80 gallon bow front and the 120 gallon Panaromic flat front designs.
Other than the crack, how’s the build quality of the tank? Also does the cabinet have adjustable supports that can be adjusted to level out the tank? And how solid is the cabinet ie solid wood?
Build quality of stand is very solid. I purchased the stand "unfinished" and had a friend who builds furniture add an epoxy based stain that matched particular trim in my house. He specifically chose a finish that would be resistant to saltwater/salt creep/etc. The cabinet was subsequently shimmed for level.

I also had another small problem, and the company was responsive to my concerns. The stands and aquariums are manufactured at the same time (together) to ensure proper fit/etc. The fact I had the stand finished would have made it difficult for them to just provide a new aquarium for the existing stand - they each have unique variances (as it was told to me). They are a Chinese company, and I think everything is made in mainland china and then large quantities are shipped to their New York location.

My tank is the 160, so there likely are manufacturing differences. I have no idea about their other sizes.
 

More than just hot air: Is there a Pufferfish in your aquarium?

  • There is currently a pufferfish in my aquarium.

    Votes: 30 17.2%
  • There is not currently a pufferfish in my aquarium, but I have kept one in the past.

    Votes: 29 16.7%
  • There has never been a pufferfish in my aquarium, but I plan to keep one in the future.

    Votes: 32 18.4%
  • I have no plans to keep a pufferfish in my aquarium.

    Votes: 75 43.1%
  • Other.

    Votes: 8 4.6%
Back
Top